SimonD
-
Posts
1941 -
Joined
-
Last visited
-
Days Won
10
Everything posted by SimonD
-
Best construction method to avoid mould growth
SimonD replied to goatcarrot's topic in General Construction Issues
I think you may be referring to timber frame panel systems rather than sips. These panel systems can be open or closed, filled with different types of insulation, including pumped cellulose or woodfibre, sometimes done in the factory, sometimes completed onsite. With your allergies and sensitivity to mould, thus wanting to avoid excess moisture, I'd recommend you have a look at woodfibre breathable systems as the fabric of the building due to its moisture buffering capabilities. However, seeing your original post and that you have difficult access, stick frame may be the option, unless you can fit something like a spider crane in there? -
That depends on the company supplying the cladding. Some companies can machine you up a bespoke profile. I used CedarDirect for my cladding and they did that for me. Here's a link to their main profiles page: https://www.cedardirect.co.uk/profiles/
-
Zinc angled standing seam.
SimonD replied to Makeitstop's topic in House Extensions & Conservatories
My bad! I meant the sliding door! But as it's all doing your nut, I won't try to explain any more! ? -
condensation in cold roof in passive house
SimonD replied to kaye's topic in Roofing, Tiling & Slating
Mirroring what others have said, this is most likely entirely normal. It could just be down to a recent rapid drop in ambient temperature together will moist air within a new building. Keep an eye on it but you'll no doubt see it disappear soon. -
Warranty providing BC - bad idea?
SimonD replied to MelodyCool's topic in New House & Structural Warranties
I tried to use the LABC warranty but they wouldn't have me! ? As I understand it LABC warranty are underwritten by some other insurer and they will only cover builds that use products that are specifically approved under the LABC warranty scheme. Because a product has a LABC registered detail, or even BBA, doesn't mean it's covered under the warranty scheme. To get a quote you'll have to supply all materials used for the structure, including insulation system and they assess them as part of your application. This is okay for a bog standard build. I was turned down because I'm using woodfibre insulation even though the supplier had BBA certification. They were also very bureaucratic and interviewed me at length about my self-build background etc. I went with Protek. They were far easier to deal with and gave me a decent price for the whole thing. -
Zinc angled standing seam.
SimonD replied to Makeitstop's topic in House Extensions & Conservatories
So membrane about 50 quid plus VAT and clips maybe £75, the rest is then labour. I've been told that the going rate for installers on a day rate is between 180 - 220 depending on experience. Now, many of the smaller outfits will need to either hire or borrow a tray former (as to buy they typically start at about £10k even for a compact version) as well as a folding and cutting machine (again a few k to buy). They will also have to bring a second person to help with tray forming, but I'd expect that would only be a couple of days max with your design. Was this mentioned or covered in the discussion/quote? When I hired the equipment and tools myself for a couple of weeks it cost about £1200 and if this is included in the quote, it could make more sense. They might get the materials from somewhere that forms and folds the sheet but then that service plus transport can work out more than getting in the machinery. It's a bit of chicken and egg. Just a bit of speculation about why the cost might be coming in at it is. Another thought may be that you could modifiy your design to make it ever so slightly easier for the installer. I noticed that on the drawings you posted the window would require a couple of trays to be cut out vertically. If you could line up the edges of the windows to run in line with the seams of the cladding it would save some time to clip it into the reveals - but then you also want to ensure the seams are symmetrical with the corner of the building and masonry. Again just an idea that may help things along. I'm not entirely convinced the reveals are such as issue.... -
As @ProDave says, get it in as part of the intial enabling works so it's ready. There's nothing more frustrating that needing some power and having to sort out and run a generator. Our utility company provided the specs on the temporary electrics setup which basically came down to a large peice of marine plywood on fence posts with two boxes attached, one for the meter and the other for a consumer unit. The two are linked with long tails. My electrician then asked what I wanted in terms of supply and just wired up a few different sockets inside the box on separate rings, a couple of outdoor sockets as well as a ring to the garage. With sockets the choice is yours really, oh, and try and get as many sockets as you can!
-
Zinc angled standing seam.
SimonD replied to Makeitstop's topic in House Extensions & Conservatories
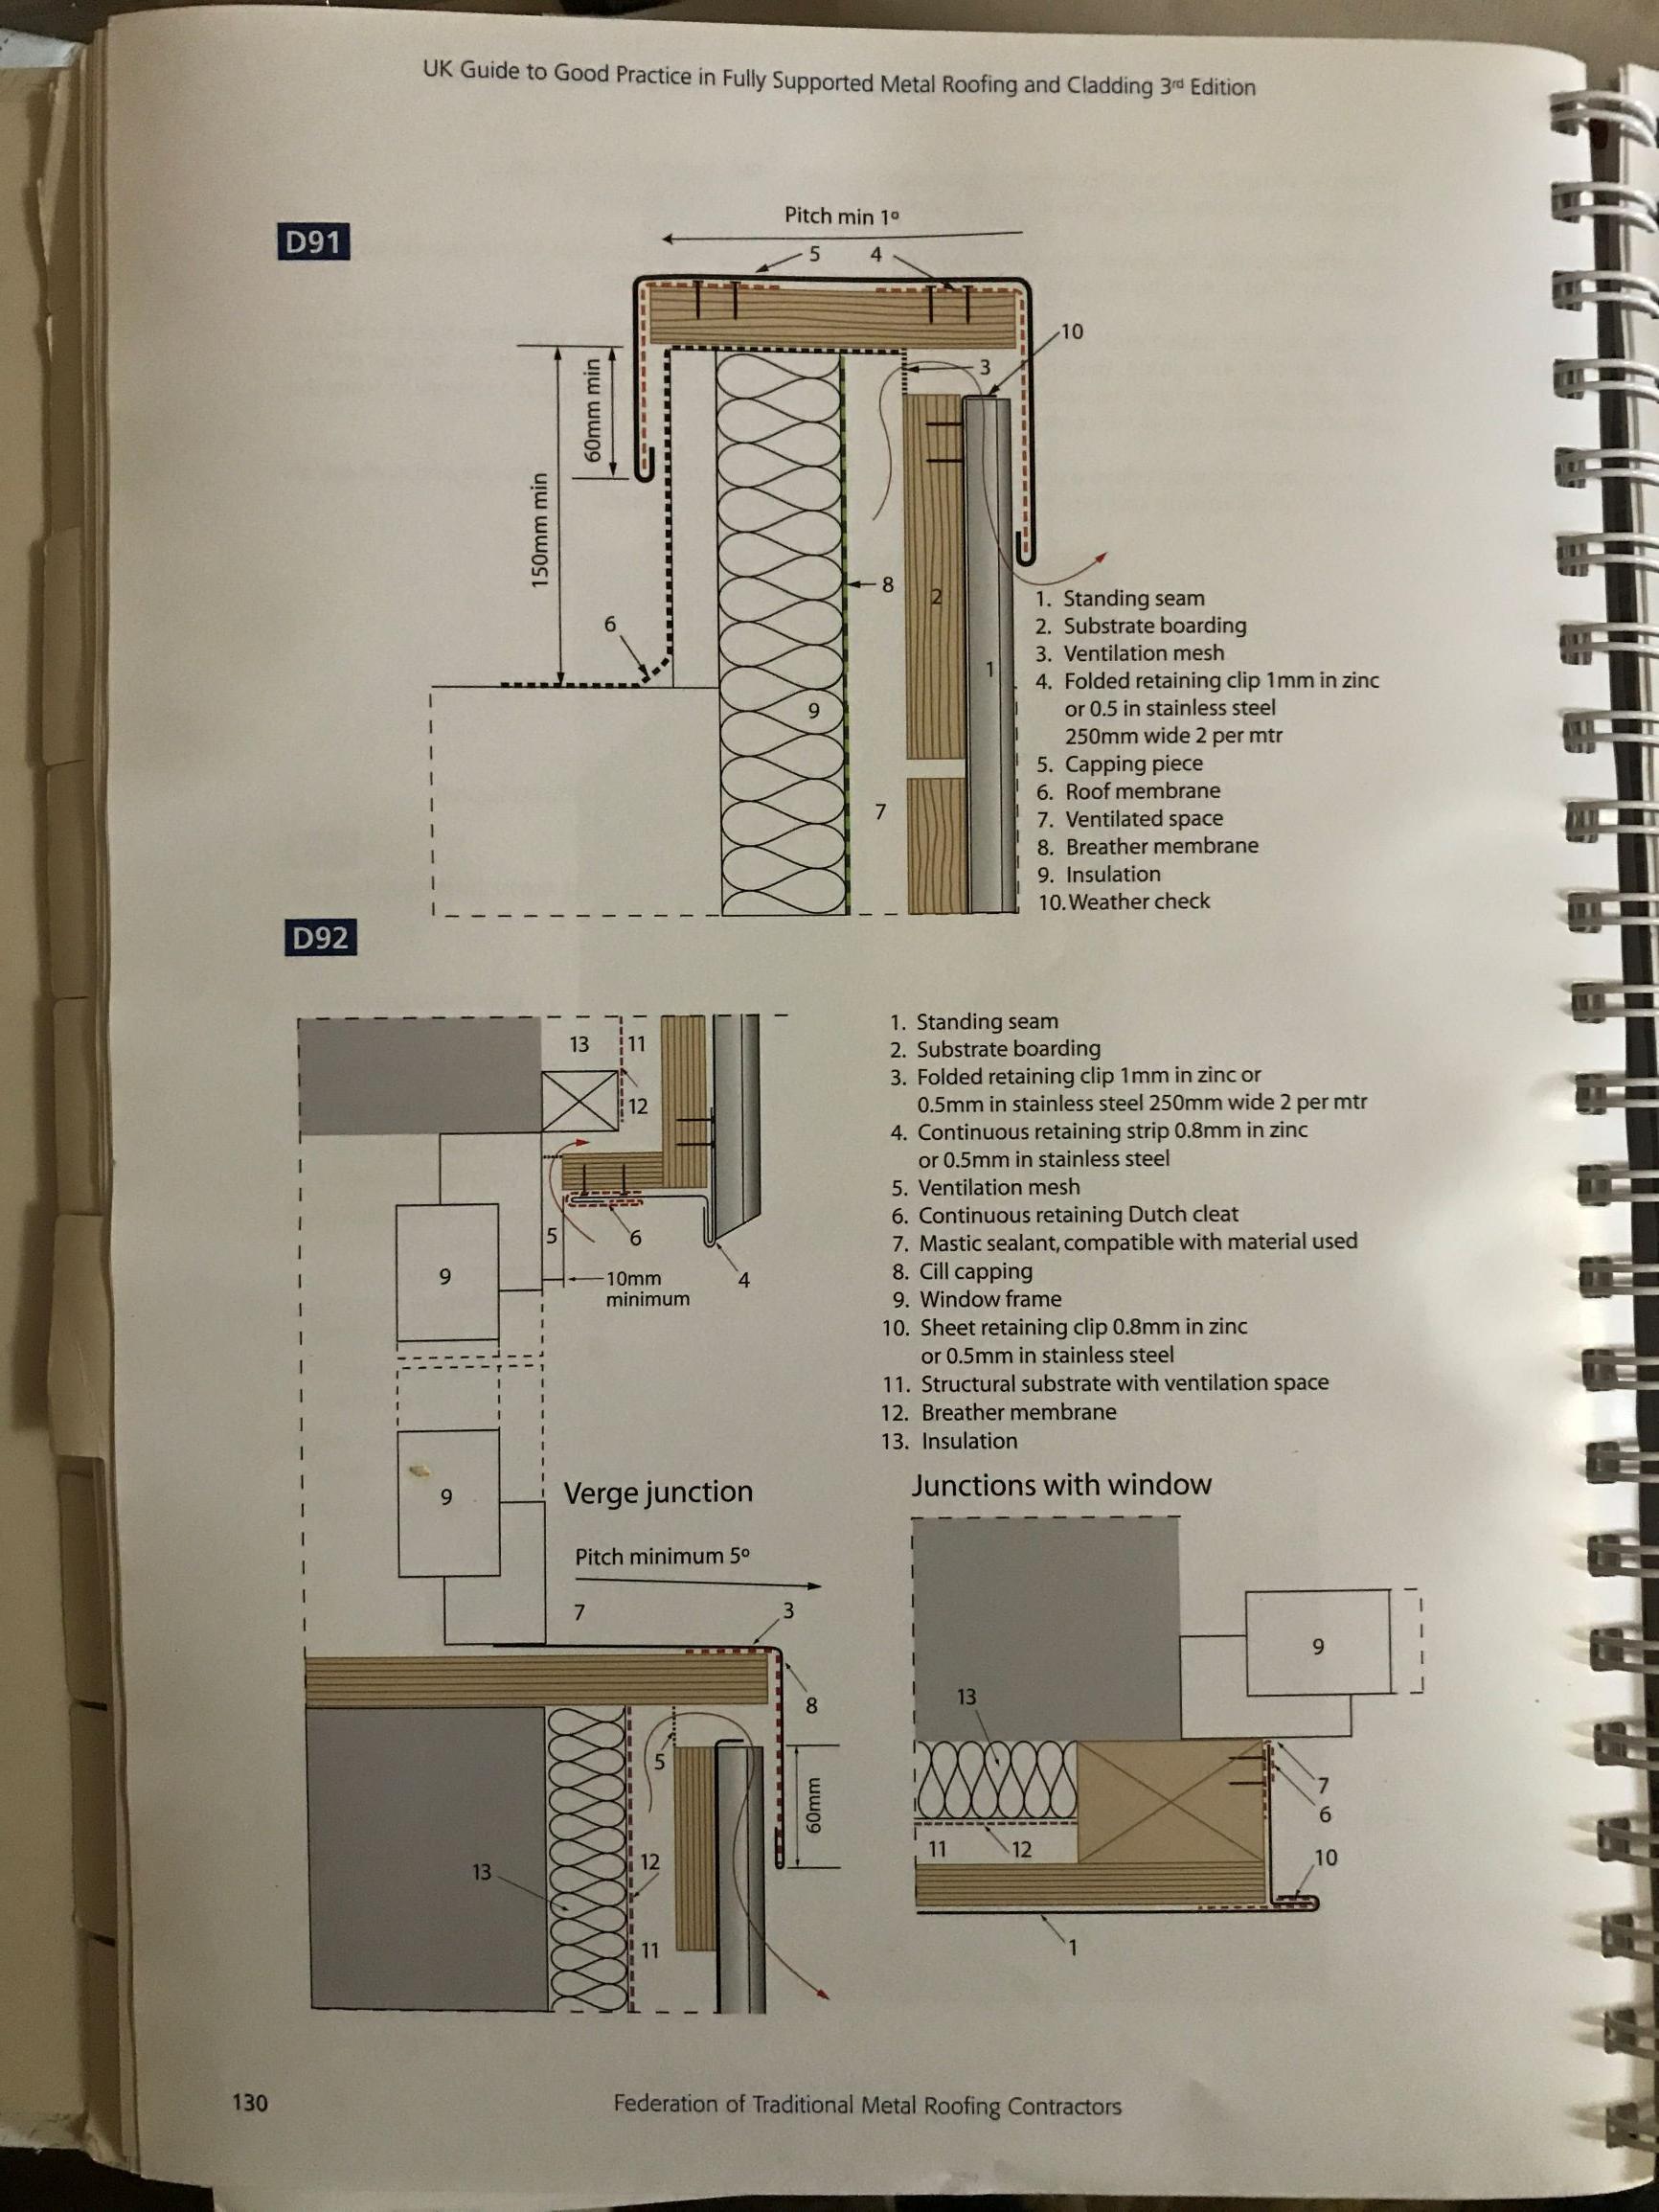
Here is the photo of the detailing for info. As a comparison re price, last year I got a quote for zinc material only which worked out at about £35/m2 plus VAT for the standing seams and up to about £45/m2 for flashings. This was all cut and formed. Interesting to see the installers markup on here but it is skilled work.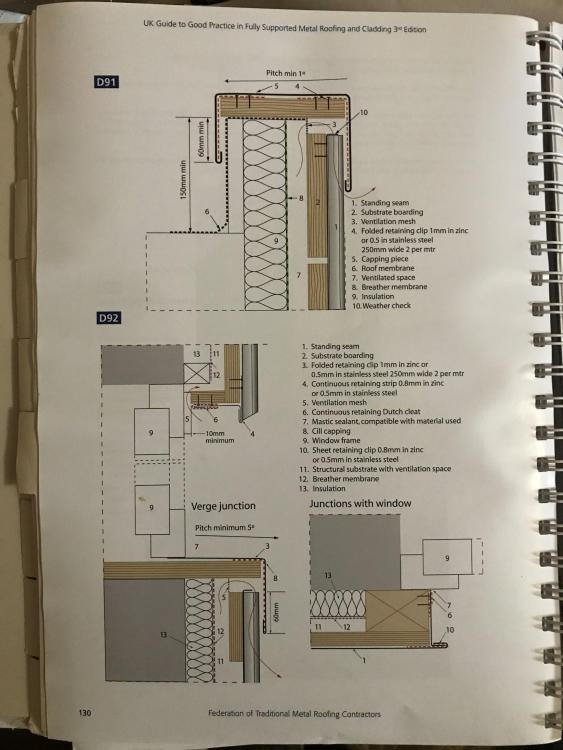
-
Self build insurance vs JCT Joint name insurance
SimonD replied to aims's topic in Self Build Insurance
Before I decided to take on our build myself, I spoke to contractors and looked at the insurance side of it all because several builders simply stated that they were fully insured and this turned out to be employer and public liability insurance, not all risks. I was also considering a JCT contract. Now, when I looked at the insurance side of this type of contract it became clear that the insurance specificied by the contract may in fact be quite limited in its scope and therefore opens up multiple risks that may not be apparent at the outset. I believe that a lot of people are falsely believing they're fully covered because the terms and their meanings are quite confusing. I think you need to go through the prospective cover in each instance to understand what is covered and what is not and then seek to make up any shortfall, or not if you don't think the risk is sufficient to do so. One item not listed so far is both owned and hired-in plant and insurance - many hire companies will not hire you plant unless you can first show relevant cover ( short term/ad hoc this cover can be very expensive - some hire companies may simply add 12% or so to the hire costs) and may not be included in an all risks policy. On mine it is an optional extra. All in all it's a minefield that unfortunately does require a good few hours of reading very boring policy documents and understanding the various risks you're exposed to during your building project. What has your architect as project administrator shared in terms of experience and input re this? -
Ensuring vaulted ceiling won't get hidden condensation
SimonD replied to Jilly's topic in Ventilation
From looking at your image from the inside of the roof it looks like the steel does sit inside the thermal envelope as the joists filled with pir rest on a ridge beam that rests on the steel. Re the vents - do you have the detail drawings produced by your architect/technician for the roof? Even before your change from sheepswool to pir insulation and bitumen felt, there would have been a 50mm ventilation gap specified for the structure?- 35 replies
-
- 2
-

-

-
- vaulted ceiling
- ventilation
- (and 2 more)
-
Nice one, thanks. Okay, the 6m limit will means some careful positioning of the manifold, no wonder it's recommended they're installed as close to the centre of the house as possible.
-
Zinc angled standing seam.
SimonD replied to Makeitstop's topic in House Extensions & Conservatories
I found the drawing you uploaded to this thread now - I obviously didn't read it all carefully enough first time time round! Hope you have some joy finding someone. Re material requirements. From my experience, it's not the trays that are too difficult or time consuming, it's making up the flashings and depending on the girth required for the flashings it can considerable increase the total amount of material required because the flashings are typically cut from a 600mm width coil. I'll scan and upload recommended detailing for parapet, cladding and window reveals to illustrate later on. -
Zinc angled standing seam.
SimonD replied to Makeitstop's topic in House Extensions & Conservatories
Ah, yes I've now found them thanks. Doesn't look too complex at all. -
Zinc angled standing seam.
SimonD replied to Makeitstop's topic in House Extensions & Conservatories
That's exactly what happened with ours and I ended updoing it myself. Do you have any drawings for what you're looking to clad? I'm curious as to how complicated your proposed cladding can be ? -
Self build insurance vs JCT Joint name insurance
SimonD replied to aims's topic in Self Build Insurance
This is such a confusing topic. I did a course that covered this kind of stuff and I left with reams of paper and my head spinning! It's often assumed that insurance is employer, public and legal expenses, but you also have to ensure that there is insurance in place should an accident happen that destroys or damages the partially built building being constructed (until you have building control completion) and to cover things like material or tool theft. A contractors all risks insurance should cover rebuild costs if something happens before the new building is completed - or you need to explicitly understand and agree this with any contractor you employ - and theft,for example. I don't think this needs to be in joint names as you pay this premium when employing a main contractor, unless you agree otherwise with the contactor. Likewise, if the main contractor is managing the site and all works, including employing all trades, then the main contractor should be taking out and paying for the employer and public insurances as part of its normal business. This is partly why the main contractor route can be expensive, you're handing it all over to them! If I was doing any piling work using a contactor for this, I would also be looking for them to show they've got cover for non-negligence as rectification should fall to them, not you as they're providing the service, which you're paying for. The last thing you want is to try and prove negligence in order to make a claim to cover rectification. Now, if you start employing trades to come on site, the situation becomes more complicated. You then need at least employer. and public liability cover, and possibly even all risks insurance because you are becoming the employer and partial contractor and if then something happens to the building that requires remedial or rebuild, who, you or your contractor becomes liable? In this case I do wonder whether you might need tocover yourself for all risks, but I don't know. It probably depends on the extent of work you are employig trades to do and at what point of the build. With respect to JCT, I think there are several options with respect to insurance. For new build, either the contractor or employer take out insurance. In respect of renovation or extension the situation is slightly different because, I think, this comes down to an explicit agreement between contractor and client. But this may have been updated more recently than I looked at the JCT stuff. I'm not an expert on this and because it isn't entirely straightforward, I'd seriously recommend you get some specialist advice on this. -
Brilliant, thanks for the heads up on the actual product. Looks like such as simple way to make up a bespoke manifold. Thanks @Big Jimbo for this. That sounds like the ideal solution for my layout so I hope you don't mind if I steal it! To work on each room one by one is exactly how I'd envisaged doing mine. It would also allow me to first fix all the pipe from the manifold, install all my ground floor insulation and subfloor knowing there aren't any underfloor joints within the system and then commision each one room by room - it'll make life a lot easier. I know everything is not always about price, but looking at the prices of the complete manifolds, they do cost a tidy sum. DIY manifold with TRVs does seem like a very sensible way to go and I have to admit I hadn't thought about that until now. Great stuff. ?
-
Nobody with any experience to willing to share on this?
-
+ 1 to @Roger440's suggestion re Ty Mawr (lime.org.uk), but I'd suggest you go one further and pick up the phone to talk to them. However, one word of advice about Ty Mawr is that whilst they all know their conservation stuff, they will present you with multiple options, sometimes too many. This is a really good thing in one way as they don't dictate a solution convenient to them and it gives you the freedom to choose the best solution for you! But you need to know what you want first and have a good basis for making a decision. Either way, talk to them with pen and paper in hand and make notes! ? + 1 to @Gus Potter's heads up about ventilation. If you're retrofitting insulation to an older property you must build into the designs a ventilation strategy. Don't leave this to the end as an afterthought. As for insulation, there are various options available to you in terms of buildup but you need to look at the system as a whole rather than each component in isolation. For example, only looking at insulation material and forgetting about the whole wall from internal finish to external render. This essentially means using the same or similar materials that work together and in the same way. As was suggested above this means that you'd undo all your good work by adding a layer of plastic paint to your plasterboard after spending vast amounts of money installing sheeps wool or wood fibre insulation (plasterboard in and of itself does function okay in terms of moisture buffering within this kind of wall system but not if it's backed with plastic insulation). Other options are available however where you could use wood wool board or lath & limeplaster (and as @Jilly suggests Clay plaster) but this all depends on how far you want to go with it, and your budget. @J Beware there's lots of talk nowadays about breathability, but this is actually a bit of a meaningless term within the building industry. Within this you normally find discussion about vapour permeability and hygroscopicity, and then related airtightness. It's worth spending an evening or so doing some research about these terms and how they work within a building over a good glass of wine, if you're so inclined. Hygroscopicity is probably the most misunderstood term in terms of how it works and its value, but it relates to both the ability for a building material to buffer excess moisture produced within the building and then release that back into the atmosphere over time as well as a system's ability to pass moisture through the whole building fabric to equalise relative humidity levels with the outside. Research has shown that a well built hygroscopic building fabric can reduce relative humidity within the house by 10-25%. So important not just for the health of the building fabric (where the focus of this is most directed) but also for indoor air quality and comfort. ☺️
-
Rotting Windows/Rain onto door
SimonD replied to jackcowdrey's topic in General Self Build & DIY Discussion
Hello, welcome to the forum. Are your windows oak or other hardwood? Lovely structure by the way. Do you mean something like this? g It's certainly worth considering as an option, one question being whether you have sufficient roof tile overhang? Alternatively, you could look at adding a matching timber profile sill to the top of the windows and doors that protrudes just beyond the masonry to deflect water and rain away from the top of the window? -
Can I lean on the experiences you guys have learnt
SimonD replied to Sally's topic in Building Regulations
Hello Sally, Welcome and congrats on getting planning permission. I'd suggest that your next step is to develop the planning drawings into construction drawing essentially so that you (and any builder) knows what and how you're going to build it. You will most likely need a structural engineer to draw up a structural scheme as part of this. Best thing to do is talk to your architecture friend and ask if they know or could recommend anybody to do the detailed designs for you. HTH -
Ensuring vaulted ceiling won't get hidden condensation
SimonD replied to Jilly's topic in Ventilation
This is common with PIR and other light weight insulations and is probably more down to it's lack of thermal mass and decrement delay rather than it's thickness.- 35 replies
-
- 2
-
-
- vaulted ceiling
- ventilation
- (and 2 more)
-
Ensuring vaulted ceiling won't get hidden condensation
SimonD replied to Jilly's topic in Ventilation
I think that according to some bat experts, this new kind of membrane is unproven/insufficiently tested in the field hence why the bitumen is still recommended.- 35 replies
-
- 1
-
-
- vaulted ceiling
- ventilation
- (and 2 more)
-
Ensuring vaulted ceiling won't get hidden condensation
SimonD replied to Jilly's topic in Ventilation
Yes, chimney effect with vents at the eaves and vents and the ridge. With low pitched roofs it is sometimes okay to use vents on both of the eaves and rely on pressure differences across the house to create to necessary air flow. In this instance you need to ensure continuous flow so need a 50mm gap at the ridge. Here's a good illustration:- 35 replies
-
- 3
-
-
- vaulted ceiling
- ventilation
- (and 2 more)
-
Ensuring vaulted ceiling won't get hidden condensation
SimonD replied to Jilly's topic in Ventilation
Does this 50mm air gap have eaves ventilators? If so, is there a continuous gap to provide flow across the whole roof? From the photo, I'm suspect the ridge beam prevents this? In that case you do need to add ventilators. In the photo it looks like the steel beam is inside the insulated envelope? I wonder whether your only other option would have been to look at using woodfibre insulation but that would have requires a re-design of the roof buildup (as this system typically uses an external insulation sarking board). However, I don't know how this stuff works with bats. I think your easiest option is to ensure that the 50mm ventilation gap between your pir and the F1 membrane has sufficient cross-flow and then focus on breathability around the rest of the house.- 35 replies
-
- 1
-
-
- vaulted ceiling
- ventilation
- (and 2 more)
-
Couldn't agree more. I first had a 3m timber post marked up that referenced DPC and first floor level and when the steel frame was erected I transferred the levels that. When I lost line of sight, I made up a long 25m water level clamped to the relevant height I need to work at. As for taking on brick and blockwork without prior experience, I did exactly that. I can attest to the aches and pains, tiredness, misery, and messiness. I did it, but have to say I hated pretty much every moment of it. That was mostly because I had to repair and add height to existing building. Using reclaimed clay bricks in the middle of summer add to the challenge as they soak up the moisture in the mortar like there's no tomorrow, so that didn't help. Concrete blocks I found easier because they don't soak up the moisture in the mortar in the same way. After about 6 months of grind, I started to enjoy building walls and don't find it a problem any more, and the end product doesn't look too shabby any more. When you start off, you just need to do your research, be patient, take your time, and constantly measure and re-measure your work as you go along. Mixing mortar correctly I found to be more like mixing dough for bread making - it's science with art. Minor mistakes can be worked around and adjusted for as you build. For example, if you get the mortar bed thickness slightly wrong you can adjust for it over the next few courses. I've lost the link to it but there was a series of videos I watched a few years ago on Youtube by an old timer who helped me to relax about the idea of taking this on without previous experience. I found it really useful to buy a couple of books on the subject because those books explained, for example, the different mortar classes (and thus mixes), where and why they're used so it helped me to decifer the SE's specifications of M6, M4 or M12 mortar and how to mix them.