
Adsibob
-
Posts
3608 -
Joined
-
Last visited
-
Days Won
10
Everything posted by Adsibob
-
I’m considering some large format porcelain tiles to lay externally. We have a cement slab outside, but it needs to be built up by about 90mm before we lay the porcelain tiles. What build up should I use: flow screed? sand and cement screed? something else? ditra matting? Do I need to make sure the build up is dry/cured before the porcelain goes down or does it not matter for external purposes?
-
no idea. It was poured almost 6 months ago and we've not had any problems. I think they taped up the seams between the boards before the pour. Can't remember.
-
Do you remember those clever little adaptors that could convert most fittings into a G9 capsule bulb and then gave a choice of covers? Well I can still find the adaptors (e.g. here) but alas all the covers seem to be discontinued and out of stock, unless one goes for a coloured one. I'm after a frosted or opal one if anyone knows where I could get one, like this:
-
mine are also Knightsbridge screwless. So i really don't know what is going on.
-
The insulation is foil faced. It is designed to have pipes laid on to it.
-
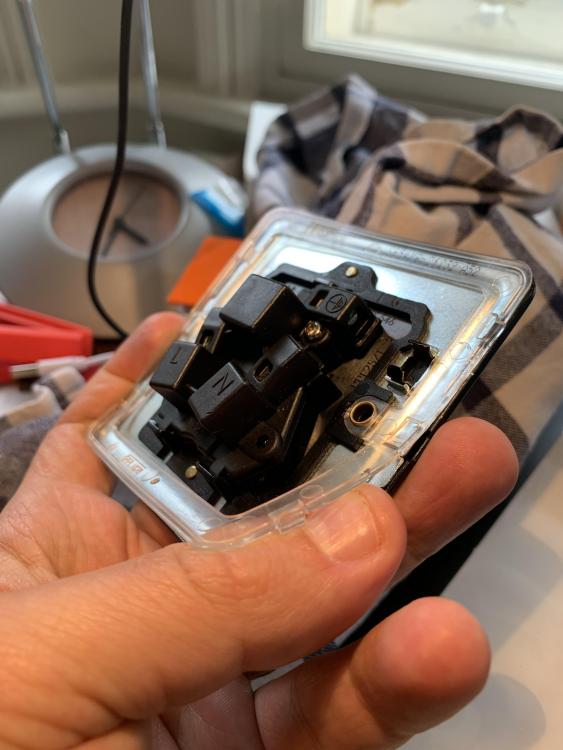
I’m Not sure about this. Here is a photo, with my thumb lifting up the plastic “washer” in question. It d doesn’t come off completely, because it is attached centrally at either side to the plate.
-
Yes, there is a 5% retention for the whole project (which is fairly significant) and also he hasn’t invoiced me for the work he has to do over the next few weeks.
-
FD30 doors do have a nice hefty feel to them, and with three hinges they work really well. You should be able to find oak FD30 doors, they look like solid oak, but in fact are engineered with something else on the inside. This is actually far preferable to solid oak, as solid oak will warp. So just look for oak FD30s in the style you want. Todd Doors has a nice range.
-
So just thought I’d update everyone: it’s still not finished and we still haven’t moved in. To compound matters my builder has left the country and promised he will continue to manage his guys remotely. Who knows how that will pan out. We have a few crunch points coming up over the next couple of weeks, but apart from snagging, we should be done by the end of the month. I fear there is a LOT of snagging. How long should snagging for a brand new 5 bed house take?
-
that's impressive!
-
Something similar happened on my build. UK Power Networks fixed it for free. I would call UKPN and not really tell them to much other than there is a live mains which has been exposed/punctured, it's dangerous, etc. They should come out pretty sharpish and fix it.
-
Ended up going with Knightsbridge sockets for a number of rooms, and very disappointed with the finish. Turns out there is a plastic piece which the plate needs to clip onto that is visible all around the plate and doesn't match the finish of the plate at all, because instead of being the same colour as the plate is an opaque plastic, which shows all away around the edge of the plate. It looks really bad. I'm thinking I might have to apply decorator's caulk all the way around each socket to conceal this plastic, but I fear that will make it look just as bad. @BMcN I think you also got Knightsbridge sockets. Did you have the same problem?
-

Farrow and Ball paint: is it that much better?
Adsibob replied to ToughButterCup's topic in Decorating
I agree F and B looks much better and cannot be imitated. I’m just very disappointed that on this occasion we had such bad colour consistency between two batches of the same colour and finish, bought from the same F and B shop only weeks apart. Madness. Here is a picture showing the difference between the door and the architrave. Both the same estate emulsion colour and same estate eggshell finish, but from different tins/batches.
-
@Selfbuildnewbie this is better, but the en-suite for bedroom 2 is tiny. You could make it 40cm longer by taking away some space from that rather large cupboard. Unless that cupboard is for a UVC. Where is your UVC going? Architects often forget about the importance of locating these somewhere central to all HW outlets. And depending on what size UVC you will be going for, you might need your SE to chime in on its location as well, otherwise you might find out too late that you don’t have the support for it.
-
I agree. @CharlieKLP’s windows look much better
-
How did you connect your stove pipe to air supply?
Adsibob replied to Adsibob's topic in Stoves, Fires & Fireplaces
Thanks. We need to sort this out before we install the stove and stove base, because once the stove goes in there won’t be any way to access (or see) the air supply pipe. It is all hidden behind a concrete plinth e we have built to support a steel tabletop which in turn supports the stove. Hence we need a fit and forget solution. -
Farrow and Ball paint: is it that much better?
Adsibob replied to ToughButterCup's topic in Decorating
I beg to differ. I’ve spent over £2k on F and B paints to do my whole house. Had an absolute nightmare with batch consistency of one of their eggshells. Likely to lead to litigation is so bad. F and B accept there is a problem, yet have only offered me a “free” can of paint, even though whole room will need to be repainted. -
How to achieve sound proofing/noise insulation in the house
Adsibob replied to Indy's topic in General Construction Issues
-
How to achieve sound proofing/noise insulation in the house
Adsibob replied to Indy's topic in General Construction Issues
Plus 1. Also worth insisting on D4 expanding glue and floor tite screws for fixing your chipboard flooring down. Metal studs, if staggered, can also isolate the side of a wall from each other. -
We have a soil pipe under our screed bringing in fresh air from outside. Next week we need to connect it to our new Stove. The Stove inlet is 80mm diameter and needs an 80mm diameter steel duct. But our soil pipe is 110mm diameter. It’s been suggested to me that the 80mm steel pipe should just be fed into the soil pipe and the gap between the two should be closed up with duct tape. I guess duct tape is designed for ducts, but the issue I have is that once the stove goes in, it will be impossible to access this connection, because it sits under the stove and that area will be sealed up. Will duct tape keep the connection sealed for 20 years? Surely eventually it unsticks?
-
50 years? Anyone going through the blood, sweat and tears of building a house surely wants it to last for generations, not decades!
-
Screed deflection and microcement curing time
Adsibob replied to Adsibob's topic in Floor Structures
Microcement installation started on 22nd March and was finished by 25th/26th. I think all the microcement itself was finished on 25th, the 26th was just sealant. But we've not been able to follow the guidance to keep the room above 18C. We have kept it uncovered with no traffic on it for first 48h and only light traffic since. I won't turn heating on for another couple of weeks, but my doubt remains whether I should postpone the installation of the stove. The plinths of concrete which support the steel tabletop which support the stove, are also covered in microcement, installed at same time as floor. -
Screed deflection and microcement curing time
Adsibob replied to Adsibob's topic in Floor Structures
This is helpful thanks. Our build up of the floor in question is: 3.5mm of microcement 0.5mm mesh specified by microcement company 70-80mm of sand and cement screed containing UFH pipes 100mm tacker insulation DPM sand blinding 150mm of concrete slab containing a A142 mesh to BS4483 machine compacted hardcore London clay I take comfort from the fact that due to various delays, the concrete slab was laid a year before the microcement and the screed was laid about midway through that year, so hopefully everything has been done in a fairly gradual manner, with the only mistake being that we turned on the heating only 10 weeks after the screed was poured, whereas it probably would have been best to wait to 13 or 14 week point. So given the stove and steel table top is not that heavy (150kg in total and supported on three sides by concrete plinths that were cast a few months ago), I think the conclusion is to proceed with the steel tabletop and stove installation next week, but to delay switching on the heating till a week or so after that. Is that right? -
MVHR unit sourcing
Adsibob replied to KM A4's topic in Mechanical Ventilation with Heat Recovery (MVHR)
Yes, unless the supplier has an export agent in the UK and is selling the product as a UK product, you will have to pay the Boris-is-a-liar customs charge AND VAT AND an admin fee for the privilege of having a delivery company - not chosen by you - administer this ridiculous affront on free trade for you. Moreover, it will be tricky to work out how much the customs charge actually is before you are hit with it, because HmRC guidance notes on these things are fairly complex. I would bank on 6%, and hope it is fractionally less. Vote Brexit! -
Yep: