
JohnMo
-
Posts
12897 -
Joined
-
Last visited
-
Days Won
190
Everything posted by JohnMo
-
None, just a heat pump, don't be too greedy with flow temps. My WC curve for cooling is 14 at 30 and 14.5 at 20. Compressor restart hysterisis is 4.9 and shut-off is 2.8. Been cool and not much solar gain for the last few days ASHP compressor hasn't started at all. Any condensation you make is a result of the internal temperature and humidity, keep the temperature steady you shouldn't have issues, if you let the temperature swing about with timers etc you will be chasing your tail to keep condensation in check.
-
My pipes run outside to summer house so are insulated. But not insulated within the summer house. The UFH manifold isn't insulated either. Neither seem to get wet, possibly due my short run times The target flow temp is 14.5. but the way it's all setup the flow temp can go down to 11.7. But the heat pump compressor rarely runs more than 40 mins (mostly 12 mins) before shut off and then just circulates cool water. Once the return temp hits 19.4 the cycle starts again.
-
For the pipes just make sure they are barrier pipes, so you don't get air entering the system over time. I am just using Hep2O. The fan coils will have a condensate collection point and a connector to run to drain. I decided running a drain away was too much work, so thought I would suck it and see and if I needed, I could put a small container underneath to catch drips. Which so far I haven't needed to do.
-
Not us that needs to be happy, it your house🙂
-
Although I said I had no pumps that was related to heating. I do have one these, they have a timer and thermostat. Runs in the morning and in the evening. https://renewableproductswarehouse.store/products/lowara-secondary-return-pump-ecocirc-pro-15-1-110-ru I got mine from eBay for £125.
-
Wouldn't you do this. To get the levels where you want them? Doing mine again I would miss out the GSE flashing and do lead instead
-

Fancoil plan P (yes, there’s been lots of iterations….)
JohnMo replied to G and J's topic in Ventilation
I'm not at the stage of needing to actually find a UK supplier, but Daikin advertise I found the following two important parameters you need to be able to adjust: Fan starting temperature for cooling and heating. This is the water flow temperature being detected by the fan coil to give a permission for the fan to start. Not all units have these as adjustable, so worth checking. My default settings were 15 degs for cooling and 32 for heating. These were reset to 18 and 21. I found some cheaper units were factory set to 35 for heating only. Also check the flow output at different flow temperatures, once you get to UFH flow temp the output of fan coils drops. My unit can do 6.5kW a delta 50, at delta 10 it's closer to 1kW. -
Fancoil plan P (yes, there’s been lots of iterations….)
JohnMo replied to G and J's topic in Ventilation
Look at Cool Energy web site -
Fancoil plan P (yes, there’s been lots of iterations….)
JohnMo replied to G and J's topic in Ventilation
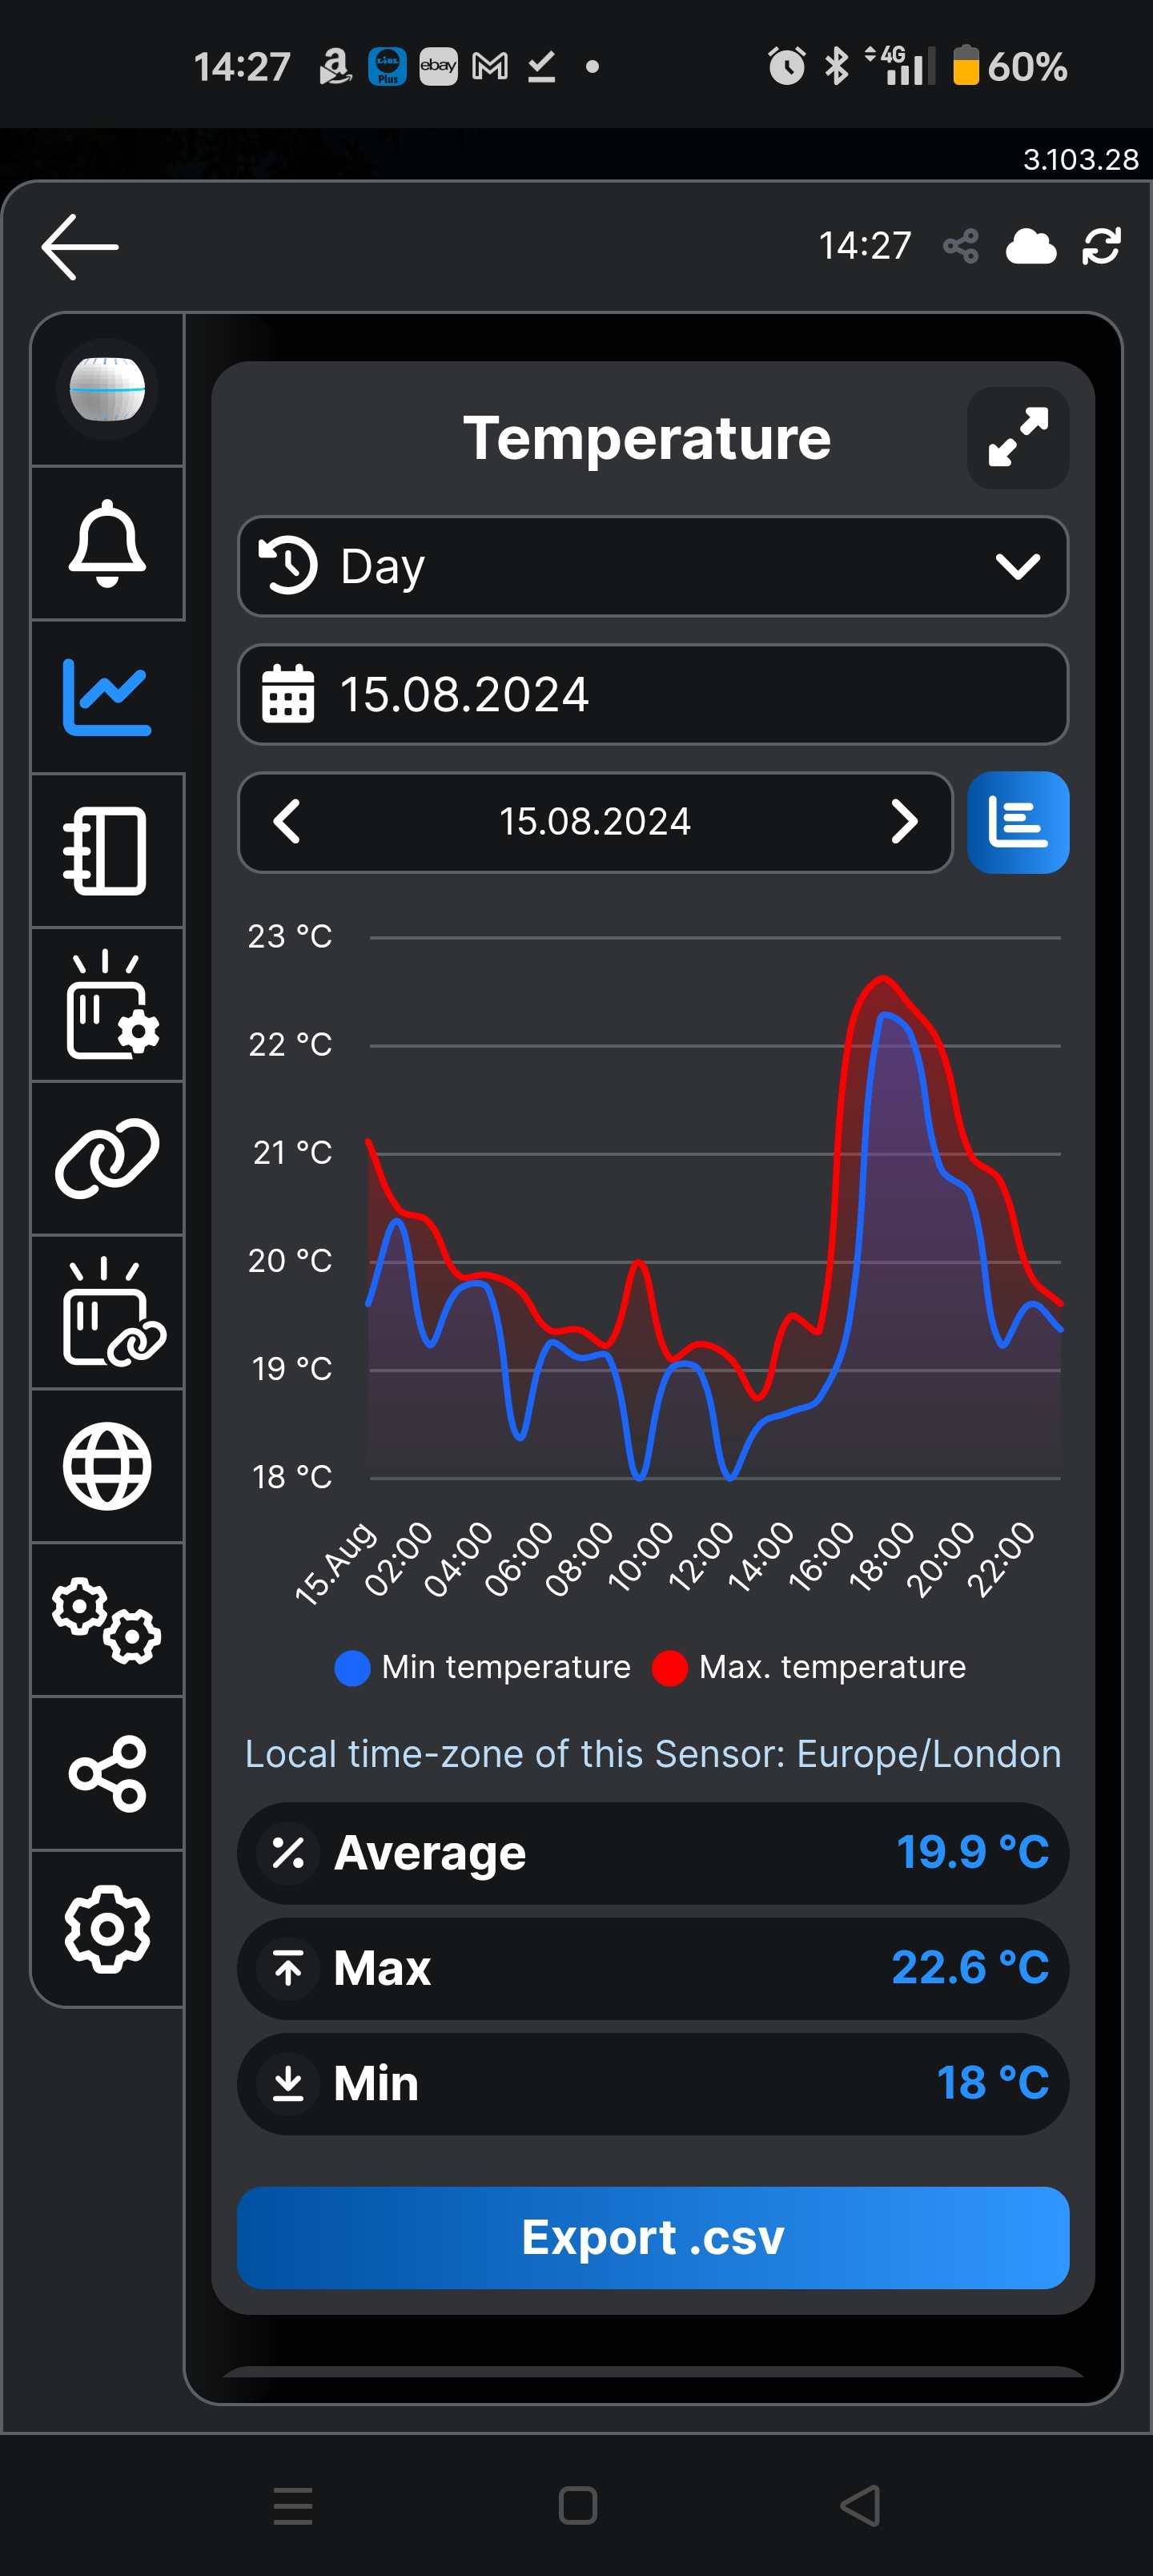
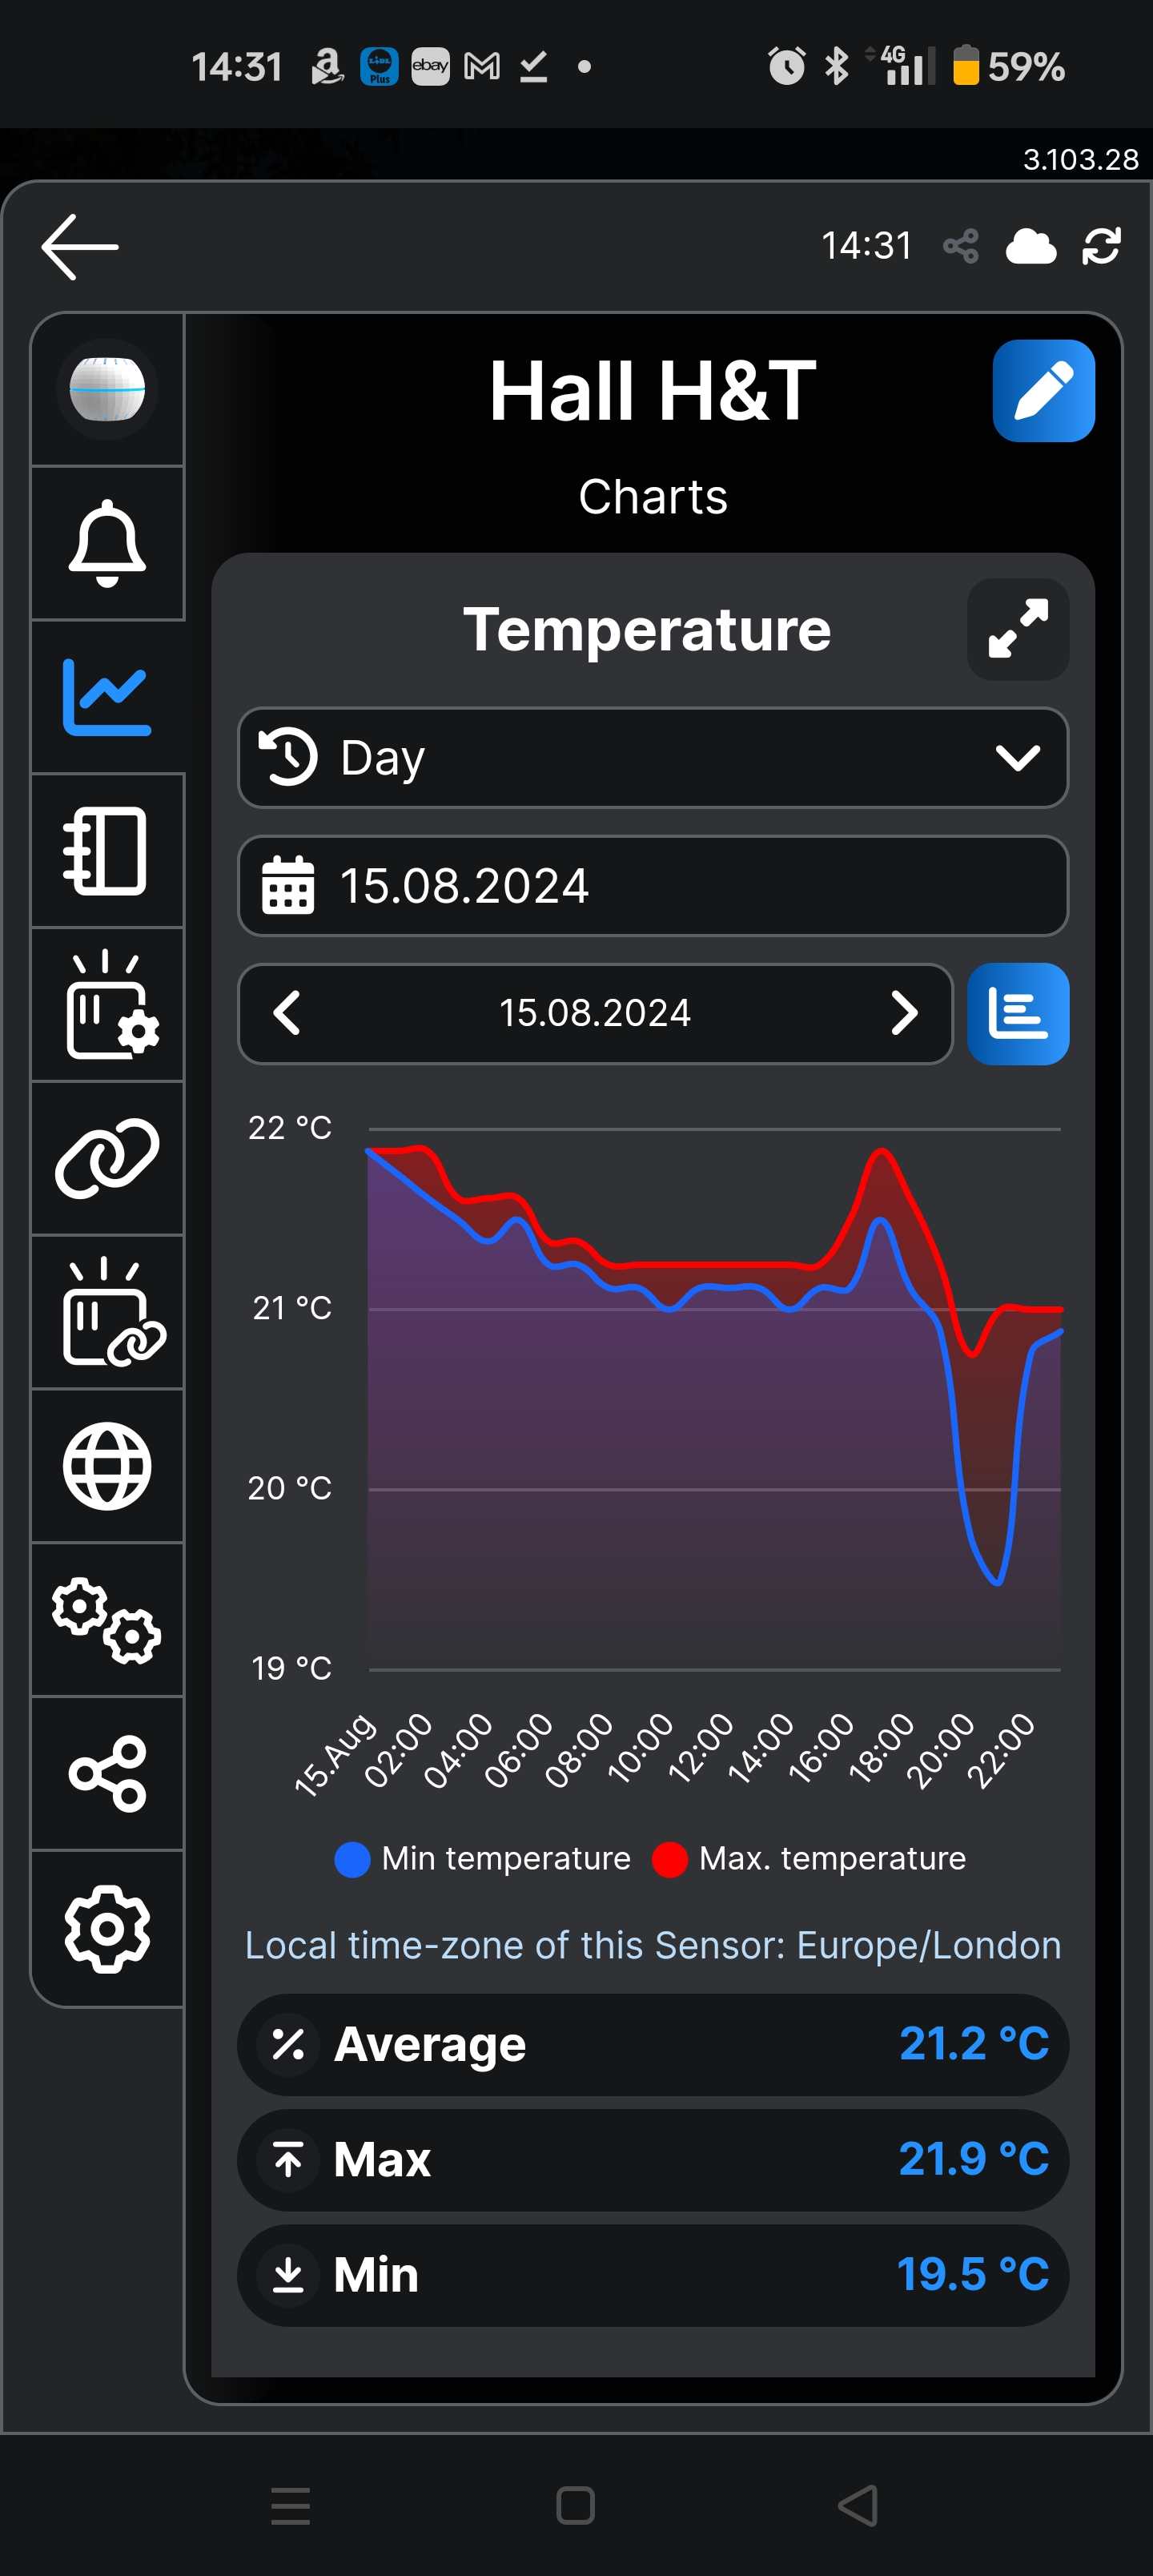
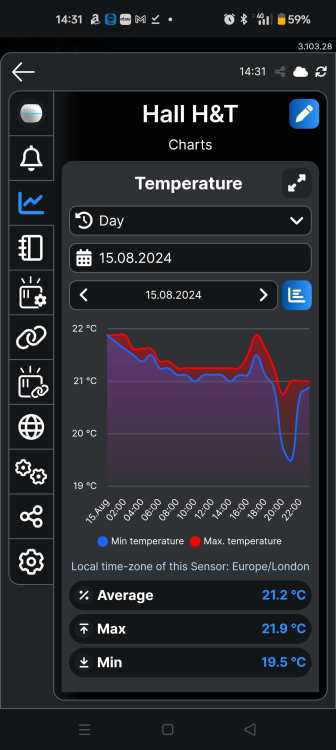
Get the flow temperature correct you can leave the heat pump to manage cycling based on demand. You can set a very simple WC for cooling. Mine is 14.5 at 30 OAT and 15 at 20. The heat pump senses return temp and starts compressor based on need. Sun comes out return temp rises heat pump compressor starts. That's all @Dave Jones is using and says his bedroom remains well cool. This our summer house, you can clearly see when the sun came out with a steep rise in temp and equally quick drop in temp. For comparison the house (temperature sensor in hall) house is just UFH cooling. The real spike in the living room is much bigger, but the cooling effect similar.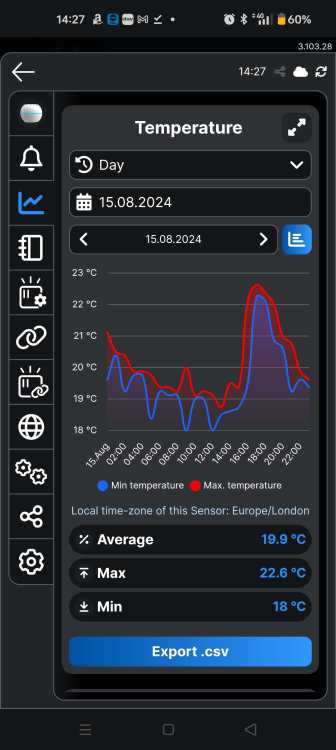
-
Yes but a ground bearing slab. With block and beam I would have some insulation below the pipes and plenty above. Assume the space will be vented below B&B, so if cold outside the space below would be similar.
-
Fancoil plan P (yes, there’s been lots of iterations….)
JohnMo replied to G and J's topic in Ventilation
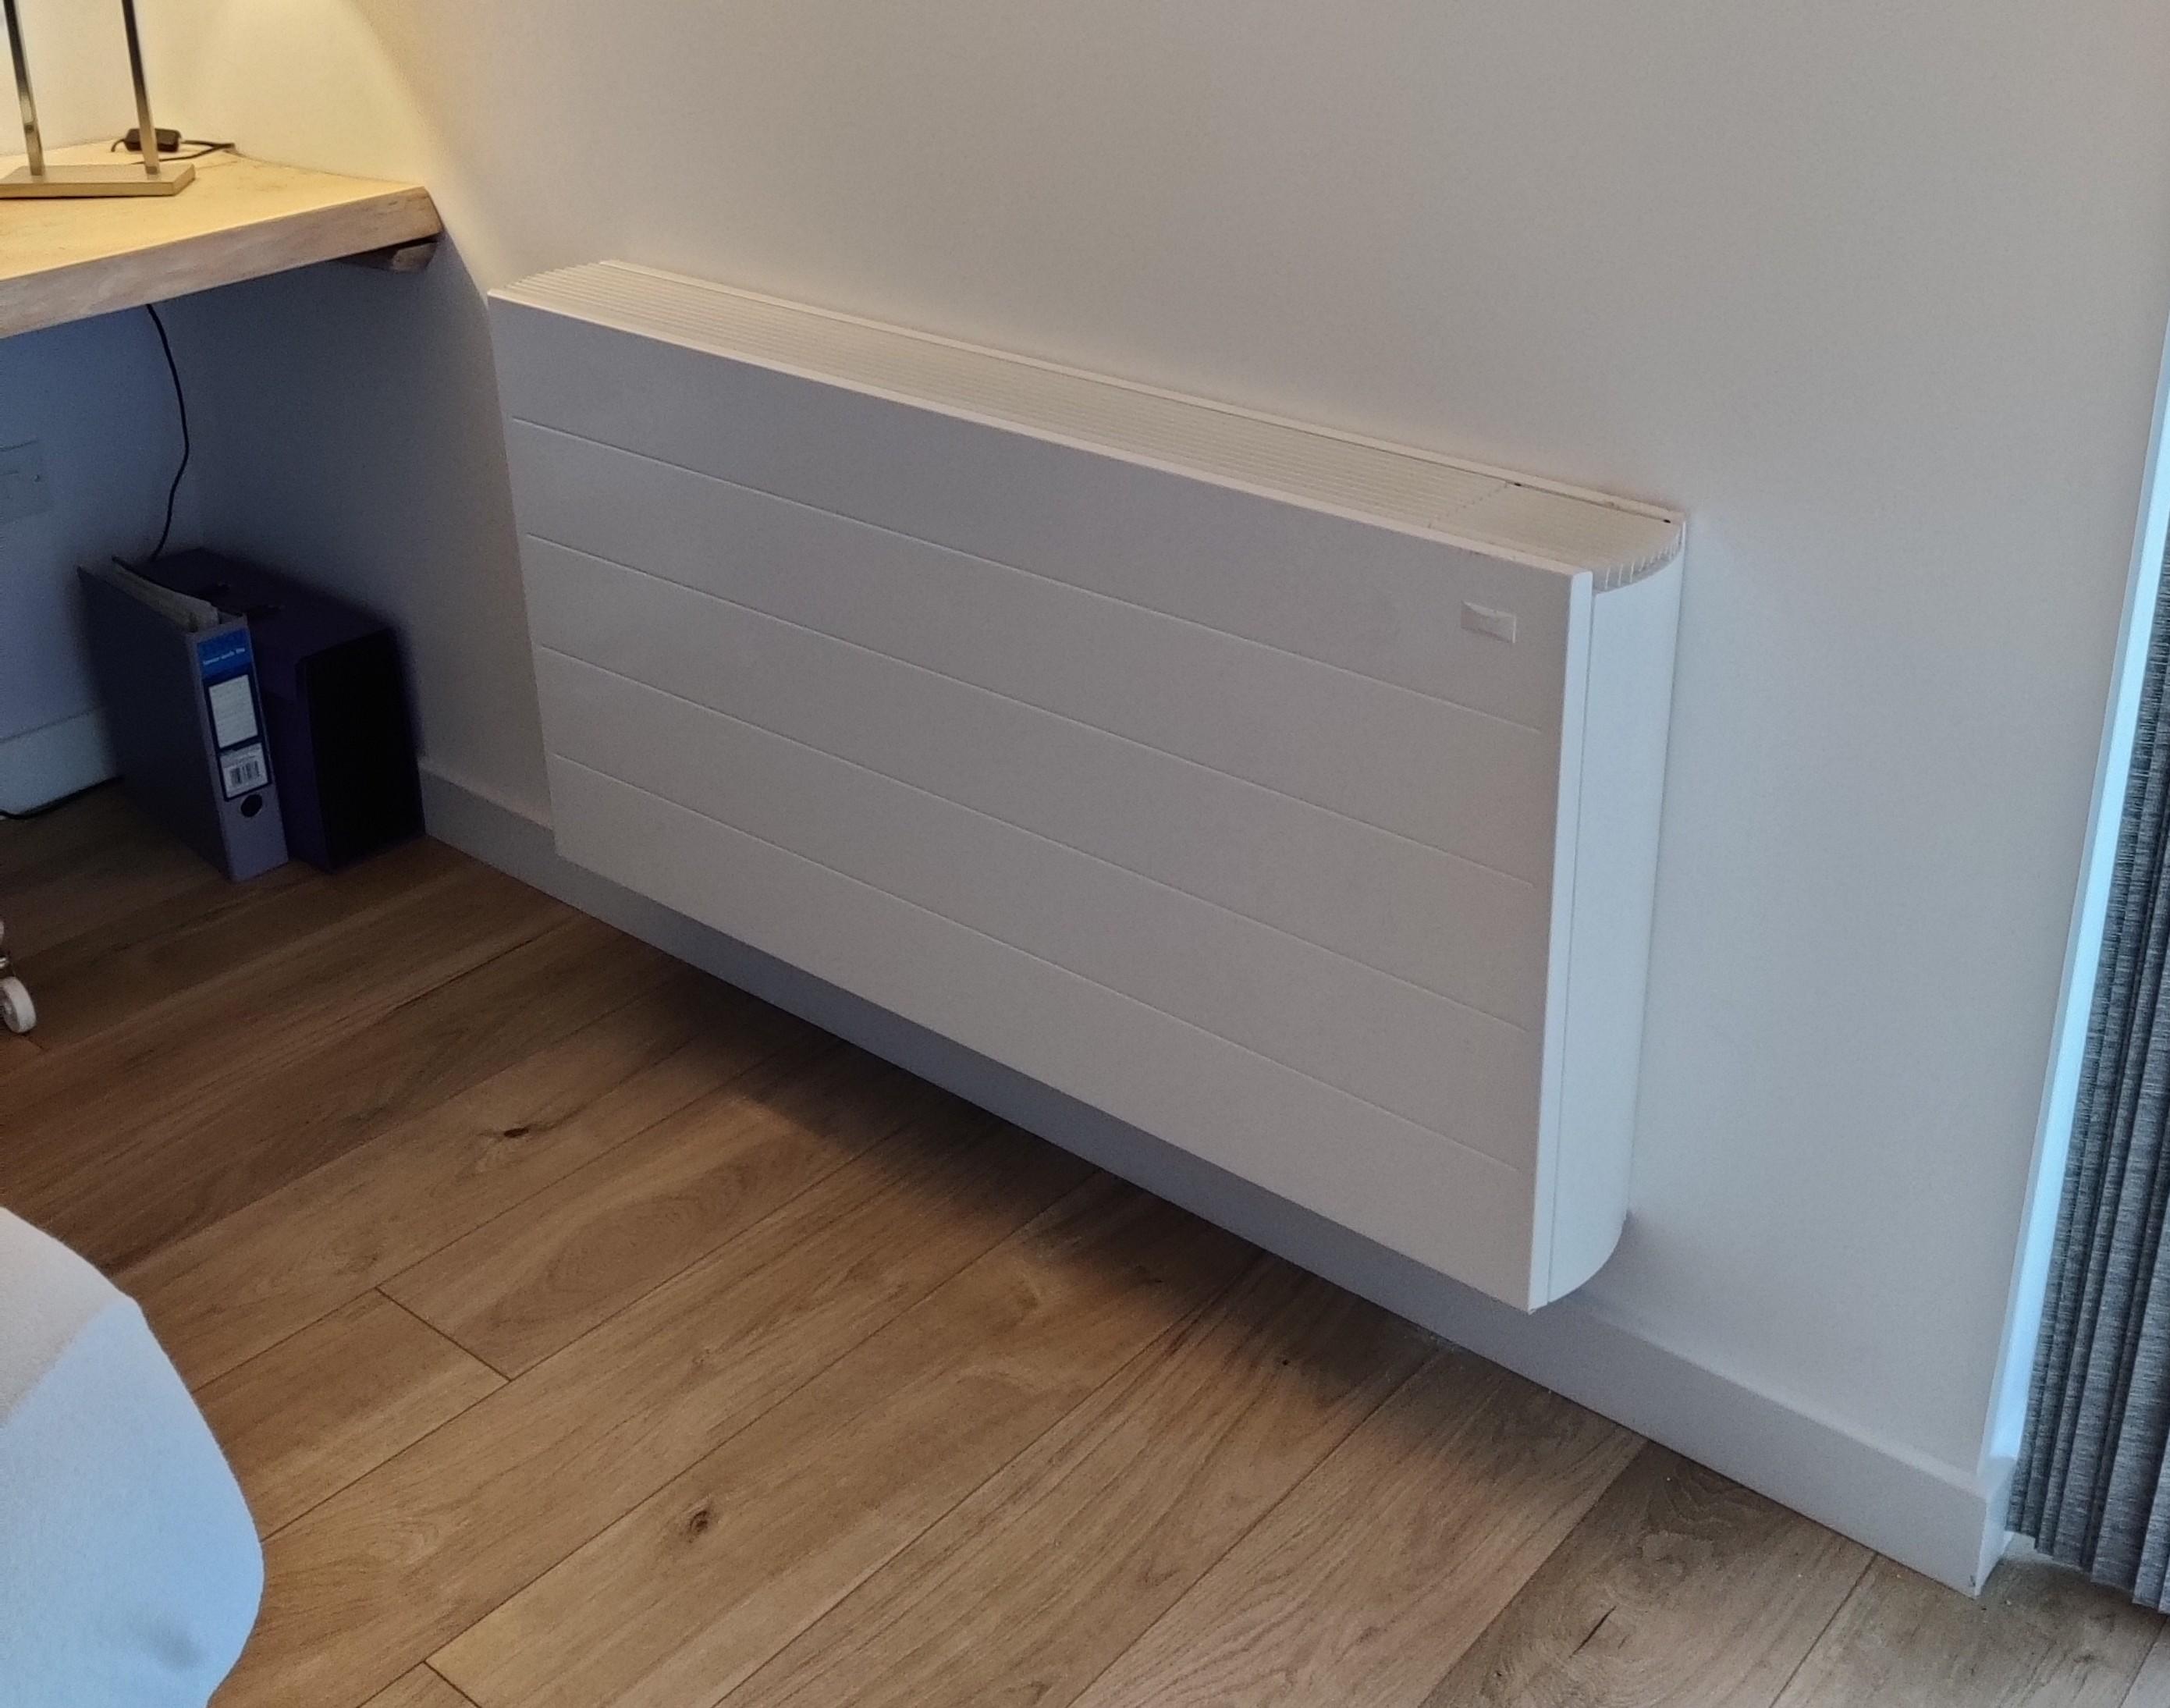
Our Myson in the summer house. Big one and 4 pipe K2 heat exchanges piped in series, so I can run the same flow temps as UFH
-
Fancoil plan P (yes, there’s been lots of iterations….)
JohnMo replied to G and J's topic in Ventilation
I would do a simple wall mount one. Panasonic, Cool Energy or Myson are good ones. Condensation drain, yes if flowing 5 Deg water. But if the water is going through the UFH also a flow temp of 14ish would be better to keep away from condensation issues in the floor. If you don't involve the floor in the flow path you will need a 50 plus litre buffer also to stop short cycling. Our summer house fan coil has been running for the last 6 weeks, pipes not insulated and no condensate drain, zero drips. Just run the pipes from your UFH manifold as a separate loop. -
The same conclusion I came to. Basically letting it run as fast as it wants in cooling mode and heat pump seems happy. UFH seems very quiet, advantage of no pumps in the house.
-
Does my heating system need a powerflush?
JohnMo replied to Question's topic in Central Heating (Radiators)
Doesn't remove corrosion, not does a power flush. But VDI prevents corrosion as far as it's possible by elimination of the properties that allow it to happen i.e. bug growth (reduced mineral content), oxygen and reduced electrical conductivity of the water. -
Many have tried, but never heard anyone say it works as expected. Don't waste you time trying or your money - flow rates are too low to work. As I said deliberately MVHR is for ventilation. But you can do some heating with it max heat rate based on passivhaus flow rates at 10W/m2. But is way from efficient with a heat pump as the flow temps need to high. Keep ventilation and heat/cooling as separate things. You can buy combined units but if one thing goes wrong, the whole lot stops working. Keep it all simple.
-
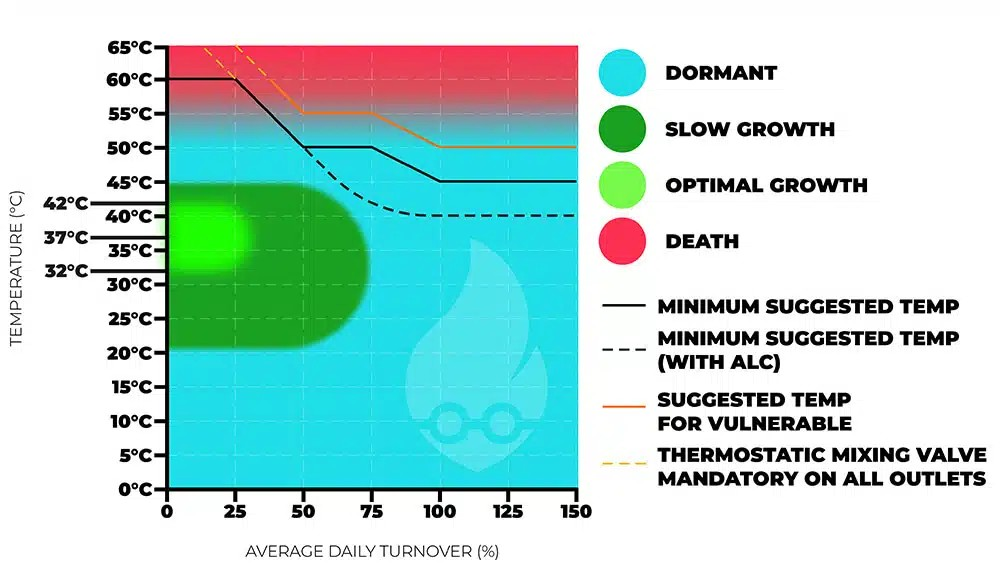
All our cold pipes run below the insulation in the floor (200mmm PIR). They are in flexible conduit cast into our concrete subfloor. Keep well away from UFH as you will have a breeding ground for bugs in the warm space. Also who wants warm 'cold' water. Legionella growth chart - UFH temps are the correct temperature for slow and optimal growth dependent on flow temperature.
-
Does my heating system need a powerflush?
JohnMo replied to Question's topic in Central Heating (Radiators)
Mine was way worse than that - it was brown. What are trying to achieve? I didn't power flush, but it took me a few days to get to VDI 2035 spec (read up on it). So I could run without additional chemicals in the water. A power flush will have it all done very quickly. -
Yes those are the rules, go to HMRC website its all in there. I had the same conversation and was pointed towards HMRC and thet agreed.
-
Slight amendment, if you think you will need cooling in bedrooms install fan coils.
-
We started gas and quickly moved to ASHP. Really wouldn't bother going down the grant route for the ASHP you will just be ripped off with a unit way to big. ASHP like it all kept really simple, this also reduces costs, so no need for thermostats, mixers or pumps, buffers or volumisers, do it all from the ashp circulation pump. So UFH on ground floor and in bathrooms only is a good choice. Keep it to single zone, run 24/7 in weather compensation mode is best way to run in a new build. Make provision for panel heaters in bedrooms. Electric towel rad in bathroom. I would definitely look at Panasonic, easy to install and set up. You need to know your heat loss before progressing. So you need to understand your airtightness and ventilation strategy first. MVHR is for ventilation, if your house isn't going to airtight (better than 3) it's not a good choice, demand activation MEV would be better. Advice, go airtight, really well insulated, MVHR and ASHP. You may not be building a Passivhaus but read up on them, nearly everything is sensible and can be applied to any house. I would steer clear of companies that want to design something and you hand over loads of money for kit you don't really need. Once you get your head around MVHR it's pretty easy to design yourself. Same with the heating system, download LoopCad and design the loops yourself.
-
No Ours was 10% on acceptance of quote. Balance on satisfaction of completion. No way would I part with the money and leave them with zero benefit to fix anything - if they mess up. You also need to Make sure they are using airtight foam around the window aperture before covering it all up. If you say that's extra, walk away, because you stand no chance of getting good install.
-
Tally your preventable mistakes :)
JohnMo replied to puntloos's topic in New House & Structural Warranties
You need to break down what MVHR does Extracts from wet rooms, so all the wet rooms temperatures will be averaged out by the time they get to the HE. But you are only extracting 1/3 to 1/2 the whole house volume each hour. So not much Supply air will pass through the exchanger and basically be within a deg or so if the outgoing air. Again you are only supplying the same volume as you extract each hour. So again not much. You bypass the HE if the outside world is cooler than inside the house, when inside is hotter than outside but at summer temperatures outside (not winter), but you are still changing the air in the house once every few hours. HE bypassing is stop making things worse not really fixing them. Open a couple of windows and you can do several air changes an hour with a cross flow. MVHR is just ventilation don't treat it as anything else. A floor several degrees cooler than the air can suck a lot of heat away. The other day the heat pump was pulling 7kW out the floor for about 1.5 hrs over a 2 hour period, just because the sun was out, it was about 20 outside. But this is really a topic for a different thread. -
Possibly a loss leader, they win some loose some, but ultimately they want you buying their electric, they may also be able to lease a car to you?
-
Tally your preventable mistakes :)
JohnMo replied to puntloos's topic in New House & Structural Warranties
Yep have MVHR, I also thought MVHR means equal room temps and moving heat about, it doesn't work like that, it's just ventilation. But when the sun's shining it gets hot, MVHR is rubbish at moving heat. Also have UFH in cooling mode, but to get rid of heat quickly opening windows is best. UFH cooling, really just helps bring down the temps quicker than it would otherwise be and tempers the extremes. Our bedroom window is open most of the summer. -
Tally your preventable mistakes :)
JohnMo replied to puntloos's topic in New House & Structural Warranties
Mine issues related to heating a low energy house and early issues I had with excessive gas consumption. Basically way to many thermostats trying to control everything to tightly causes major short cycling. Took awhile to sort. But plumber would have done the same and charged a fortune to install and would have never rectified. Bathrooms really need electric UFH and water UFH House stops needing heat way sooner than the bathrooms do. Would install better bigger opening windows in the spare bedrooms.