


Brickie
-
Posts
634 -
Joined
-
Last visited
Everything posted by Brickie
-
One option would be to build with standard mortar but rake out during construction,then hit the pointing in one go at the end. The extra cost of the white cement would be dramatically reduced this way. You could even be using the build as samples for variations in mortar mixing. The pointing could then be tackled when the build is water tight with yourself as the labourer to ensure absolute consistency of colour.
-
…& my suggestions at work to have engineering bricks to 150mm above g/l is ignored every time
-
Telescopic vents with Block and beam floor
Brickie replied to Lincolnshire Ian's topic in Ventilation
600mm x 100mm x 65mm concrete lintols are stocked specifically for this scenario. -
More concerned about the damp proofing & skim downstairs tbh…
-
When appointing a bricky,I would ask to see examples of previous work in your chosen bond. ive seen some horror shows from even experienced trowels. Maybe talk to your architect about making any piers between windows work Flemish bond sizes-2.5 bricks long (552mm) is the smallest you can do in perfect bond & then it jumps to 4 bricks (890mm).
-
Wall ties question- slanted or level, does it matter
Brickie replied to ab12's topic in Bricklaying, Blockwork & Mortar
Gently being the keyword. 20mm inside to out exceeds ‘gently’ in my book. -
Only issue there is having to notch the insulation around them & then tape over once the tie is in place. Alternatively,you could just insulate the whole thing & fix full length abbey channels through the insulation.
-
This product solves every problem you mentioned. Not cheap but probably the best solution,other than doing EPS beads. Just to add,you’ll need to impress upon the Brickies the need to actually bed these in,rather than poking them in afterwards.

-
I would suggest doing a LOT of research into the Damp proofing industry in general before committing to anything. without knowing a single thing about your case,I will say that I’m 90% certain you do not have rising damp. EDIT-please have a look at Peter Ward’s videos on YT.
-
I’m not so sure-a straight crack through 5-6 courses of blue staffs? What were the temperatures during the cavity fill? (Including overnight) Edit-just had a closer look at the photos-that first bed joint above the blues looks either frost damaged or they’ve used a s**load of Washing up liquid as a plasticiser.
-
Below DPC level detail advice needed for new build.
Brickie replied to ruggers's topic in Foundations
Ignore the lintol shown-typical installation is more like this. A cavity tray is usually installed around the perimeter at around 150mm above ground level,this is a pretty standard detail now.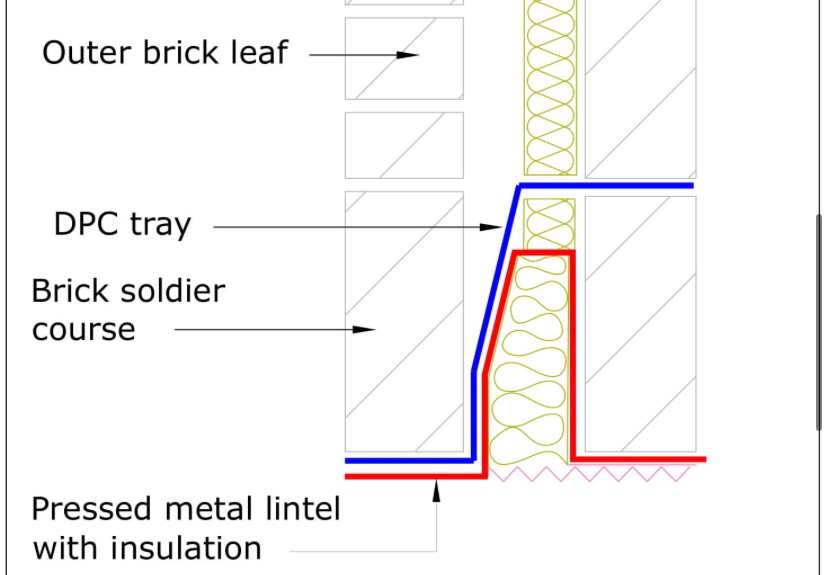
-
Below DPC level detail advice needed for new build.
Brickie replied to ruggers's topic in Foundations
A cavity tray isn’t really installed as per the drawing-it would come out across the top of a PIR sheet & then down to the outer leaf. Some people chamfer that sheet below to ensure a fall away from the inner leaf,which isn’t great thermally but probably preferable to any moisture finding itself trapped on a minute rise in the DPC tray. All the more reason why I don’t believe PIR is a suitable insulation material for masonry builds. -
Is there a steel ridge beam?
-
I’d suggest a 1:1:6 mix is about right for aerated. In summer months,I ideally like to wet the top of the course below before bedding out,to kill the initial suction grab much the same way as old school plasterers would.
-
Fitting a padstone to support an already fitted RSJ
Brickie replied to DIYDan1981's topic in RSJs, Lintels & Steelwork
That cabling & the timber either side are going to give you a headache. How come the builder’s not installing the pad stone? -
My understanding is that bonding shouldn’t be used on an exterior wall but @nod is the person to ask.
-
Is it not hanging tiles on the bays?
-
Possibly you’re thinking of Tuck Pointed brickwork-a fairly common practice at one time to give the illusion of very accurate,thin jointed work.
-
+1 Treat the movement joint as you would a door or window reveal with the ties in to the frame @225 vertical spacing both sides of the mj.
-
I have a mate who carries out basement digs on this basis at times,and I believe the percentage is tiered as an incentive to keep costs down (I.e. 15% to £150,000 dropping to 10% thereafter,just as an example.) At first glance it might not seem like much of a carrot but bear in mind that if he ‘milks’ the job & breaks the threshold then,come the end of the job,he’s still tying up all the annoying loose ends,but earning a far smaller commission for his trouble.
-
You should be fine to remove the infill beneath the arch. Going forward,the chimney stack will need ventilating with an air brick,top & bottom.
-
+1 to that.
-
New Build: Windows Sequence vs Brickwork
Brickie replied to mike2016's topic in Bricklaying, Blockwork & Mortar
Make sure you get absolutely spot on dimensions from the window company. Not done a TF myself for years but we used to have to leave a gap top & bottom around the frames to allow for differential settlement between the TF & masonry-worth checking what’s required now as the bricklayer will need that info too. -
I was taught that the mix should get weaker from first to second coat or it’ll pull- @nod?
-
Creating a smile in the mind - with bricks.
Brickie replied to ToughButterCup's topic in Brick & Block
I’d think you’d want a decent scaled drawing. Might not be the thing to attempt early on.


