MortarThePoint
-
Posts
2168 -
Joined
-
Last visited
Everything posted by MortarThePoint
-
I can't find any guidance that says the sill has to be wider than the opening. The closest I can get is NHBC guidance 6.11.7 to do with Render: We will have some rendered parts on the upstairs.I think the thing being avoided is water going off the side of the sill rather than flowing to the front. By implication, this suggests the sills don't have to be wider than the window reveal.

-
Thank you for the link and image. Interesting cavity closure, but the important detail shown is the DPC. Do you think a DPC is a must or as can we trust the staggered joints to be waterproof enough?
-
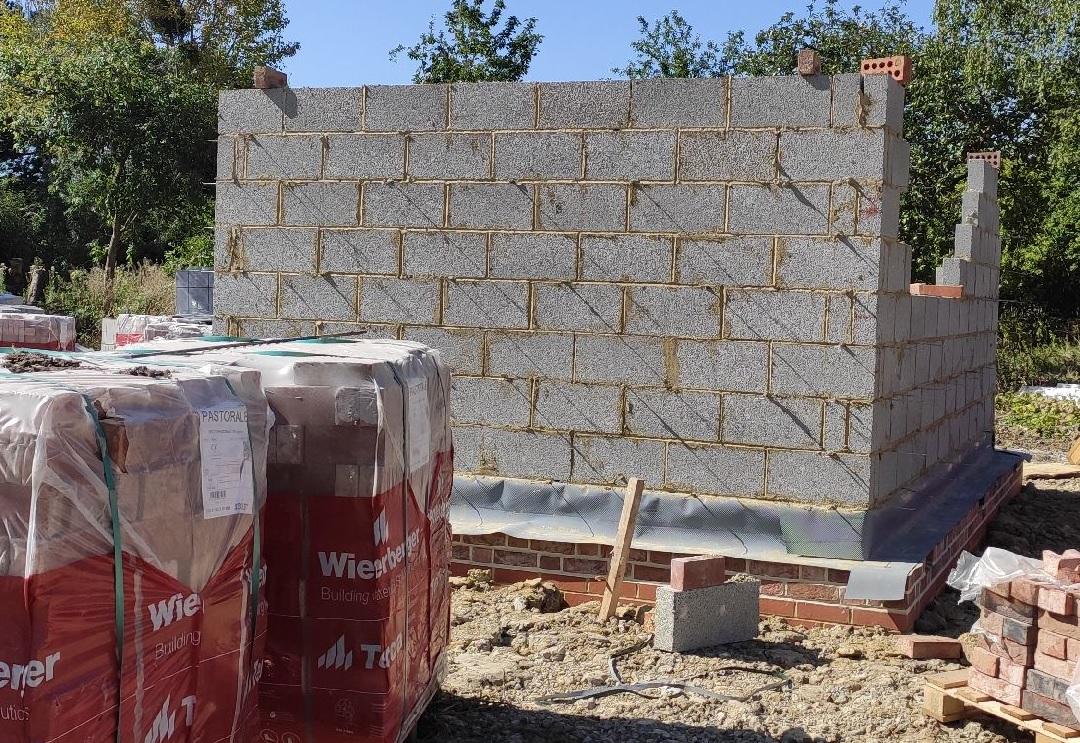
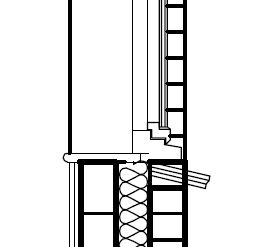
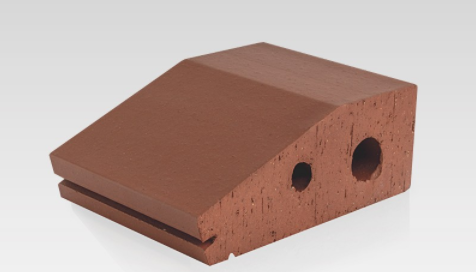
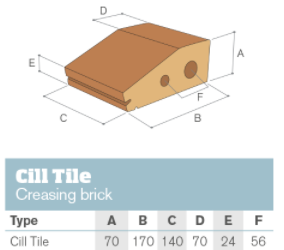
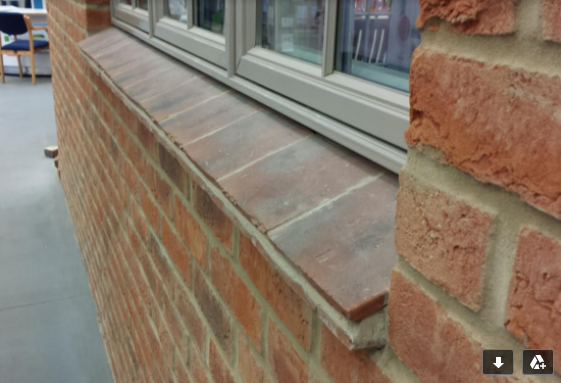
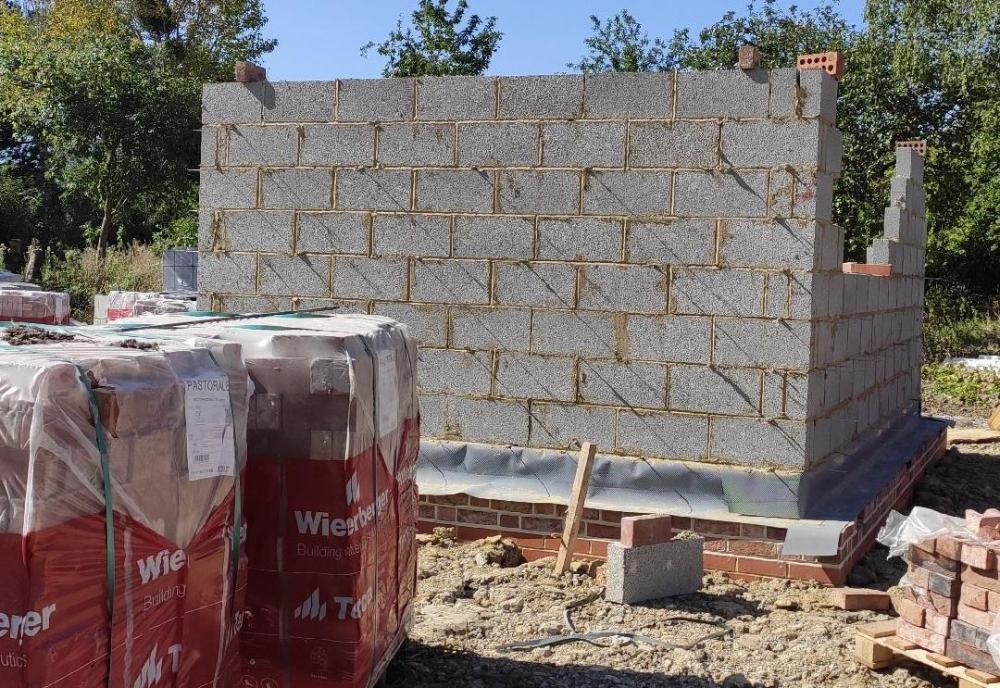
The build is coming at pace so I'm definitely in avalanche mode now. We liked the sills on the example house at the NSBRC (photo below) so have decided to go that way. The closest thing we have to a detail from the Architect on this is shown in a cross-section (extract below). Does anyone have a better detail for a creasing tile sill? I am presuming (danger) that the tiles just sit on the brickwork and there is no damp feature or anything beneath. Thinking about it the low angle mortar joints will get a lot of rain on, so is there supposed to be DPC underneath? I've come across the 'cill tile creasing brick' below which I think looks like a good option. The brickie warned that creasing tiles always get smashed on site once fitted so these could help reduce that as well as being easier to fit. Has anyone used these? The last thought is that I didn't specify that the sill will end at the edge of the brickwork reveal rather than being slightly wider, so the brickie has made the sill ~45mm wider than the reveal. I think I prefer how the photo below looks, but does anyone have a concern either way.
-
I think you're right, market forces make his position pretty solid. Personally, I think he should only be charging for 2 days as it took him 4 days to do something that without the additional work would have taken him 2 days. My biggest issue is with his temper around being asked about it. As long as he's open about it and we agree things up front I know what's coming. Some times you have to play the long game and grin and bear it to get where you want to be. I wish I was better able to judge his work to know if it's all worth it though.
-
Full house! Good advice, I'd rather clear the air and work to a revised fixed price than have a painful journey
-
Works out as about 80m or so as some internal walls. Every block was cut and I understand and agree with his approach of sorting the issue straight away. It took him 4 days to set out all of the first course of blockwork including the cutting.
-
Unfortunately that's hard for me to gauge as it's my first time doing this. I deal with plenty of difficult to get along with people in my day job, with varying degrees of success ? But going straight to nuclear when questioned on something isn't cool!
-
I'm fine with additional work being additional cost. He has to make a living and that's completely reasonable. He may have undercooked the fixed price, but he should come to me and say that and we can have a grown up conversation about it. I did ask him how confident he was of the price at quote time as he was lower than some others. Even so, I'd be open to him saying he needs to up the cost because it's more involved than he expected. That would be less painful than him trying to recoup additional cost through over inflating any additional work that does crop up. It's still early days. They haven't reached first lift yet so there's still a long road ahead.
-
Well this may not be a surprise to some as I am getting used to this game, but I'm having some trouble with the brickie. It probably isn't for the reasons people might think though. The floor slabs installed by others were out of level, so the brickie said he'd need to cut blocks down to size to cope with the variation. Every block around the first course of the walls has had to be trimmed as a result and he said this would take 2-3 days on 'day rate' to cover the extra time (job is otherwise fixed price). I've just received the invoice and there are four issues: He's invoiced for 5 days, when the task was completed across 4 days (he wasn't here on the Monday). Pointing out, he said he keeps a book and is sure. He's charging extra for the full time taken to setout, cut and lay the first course rather than just the extra time that was taken due to the cutting (i.e. 2 days). He says that's just how day rate works, even if you're doing something else that you'd need to have done on the fix price work as well. We agreed rates before he started on the project, turns out he gave me the wrong rates and different ones now apply. On my discussing this in an open way, he's said he doesn't need the grief and threatened to take his tools and leave site. I find the last of those issues hardest to accept and feels like bullying. Any one of the first three reasons would be enough to warrant the conversation and I approached the conversation gently rather than confronting him aggressively about it. I'm now left wondering if I should tell him to pack up and head off as I don't want to be bullied through the process. I realise extra work costs extra money and I've no beef with that. We are at a natural break point and it would be easier to stop here and engage someone else than in a few days time. Is this par for the course, or a sign of bad things to come?
-
So did Scheidel prepare a design for your chimney? I'm getting a design prepared by Dunbrik, but I'd like one for the Isokern system by Scheidel as well.
-
That's a cool system and solves the air supply nicely
-
Sounds like people prefer the ceramic approach. Is there a specific reason to not like the corrugated metal approach? I know it needs replacing, but that would be after ~30 years. It's a lot easier to install if I understand correctly.
-
Lovely stone. A proper chimney may be beyond the scope of things at this stage so a flue liner is likely the only option. I suspect that means we have to have a log burning stove.
-
Definitely want to avoid that!
-
It would be for a log burner
-
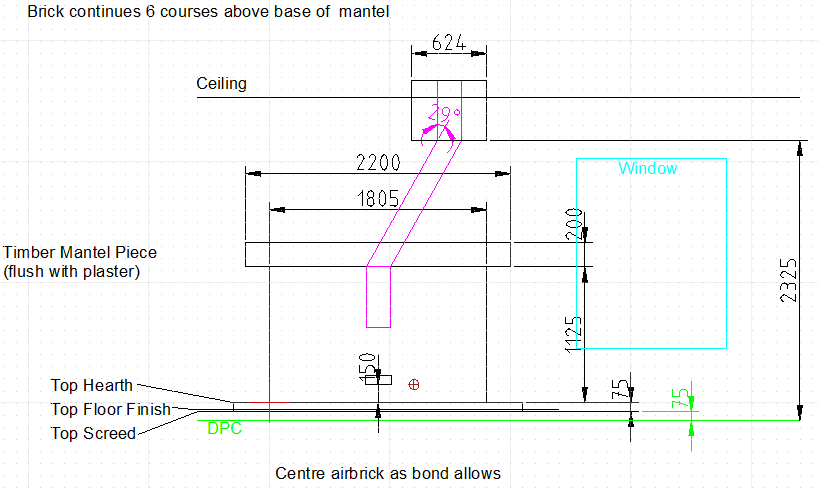
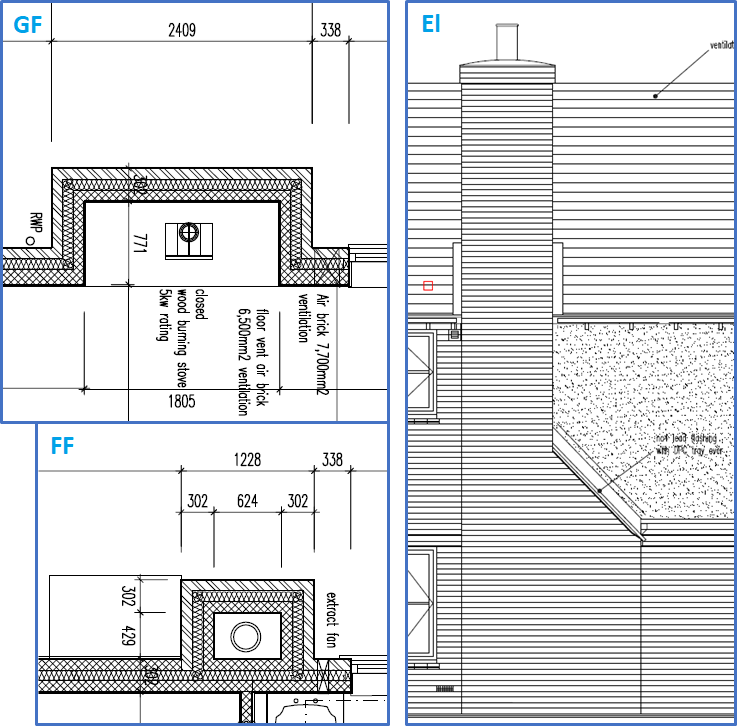
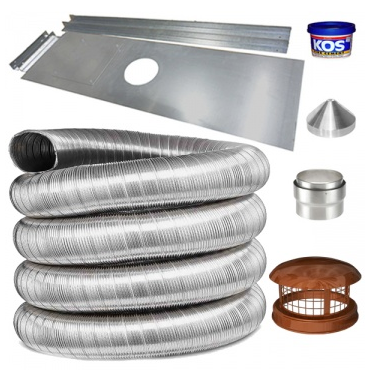
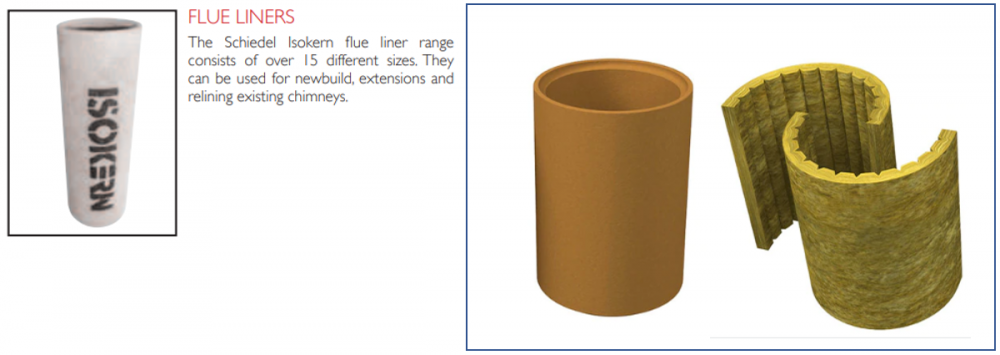
The chimney has started going up which is some of the first above DPC brickwork so nice to see. It's thrown open a whole host of questions though, one of which is how to line the chimney (plans at the bottom). I see two main options: Ceramic (inc Pumice) flue liner: Tubular sections that are stacked on top of a concrete (?) base plate and sealed together. You surround the sections with either granular or fibre insulation. Very much built in to the chimney and needs to be done as the chimney goes up. I expect this would cost around £900 for 200mm x 7m. Here's a video that shows the concept: https://youtu.be/VVRhrdjoFbw Corrugated metal flue liner tube: available in 316 (15 years) or better 904 (30 years) grade stainless steel this costs about £340 for 200mm x 7m. I think these are double wall to warm up faster and I guess would just hang down the chimney from the top? It's certainly the cheapest choice, but also seems like the choice that is easiest to go back on and change to another approach at a later if wanted and doesn't need to be built in as the chimney goes up as far as I can see. We had planned to use a stove as I was under the impression that open fires were no longer allowed, but various suppliers are suggesting they are. If you had an open fire, I think you then need a gather that sits above the fire basket and would then attach to the flue liner, though I am uninformed there so if anyone has done this please share some knowledge. What approach did you choose?
-
Sounds like a plan. I'll also try to keep them on their toes but don't enjoy having to push people for their best work.
-
I asked my BCO and he said he'd prefer 1.6m max. I spoke to the brickies and they were concerned that the scaffolders wouldn't want to do their internal birdcage that low. I checked with the scaffolders and they said that was fine. All the rest will be stopping at 7 courses which I am happy about and the brickies are happy too as they won't have to visit each section twice before the first internal scaffold lift, they'll just be doing more off the internal scaffold (~1.6m to ~2.7m). To avoid snots in the cavity, the brickies are planning to have a timber at the top of cavity resting on the ties (to pull out vertically) and one at the bottom of cavity they can pull out sideways. I'm sure we are going to have words at some point about keeping the cavity clean, but hopefully it won't be too bad.
-
Yes that would help, but doesn't protect the ties from snots unfortunately.
-
I worded my initial post poorly. The brickies are planning to do all the inner leaf blockwork to 9 courses high. They then plan to do the outer leaf brickwork.
-
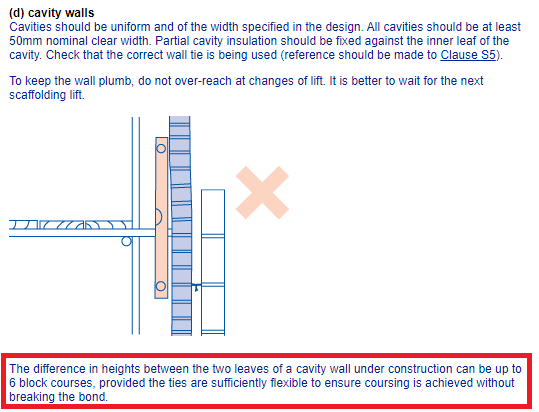
I've been pretty relaxed about it, but then spooked myself that perhaps I should have thought about it a bit more. I saw the NHBC guidance below that says not more than 6 block courses and they are going up to 9.
-
Interesting. I'd expect that any design would need to be tailored to the plot somewhat and various additional fees would push up the planning application cost. Depends how much of a struggle planning might be in terms of whether you'd need a complex design and access statement etc.
-
Sometimes what's difficult as a first time selfbuilder is when things differ from how you thought things would progress and being unsure if that's OK. I had expected inner and outer leaves to rise at the same time, but the brickies are planning to do all the inner leaf blockwork first and then the outer leaf brickwork. Is there anything wrong with this approach? I had expected the inner leaf to lag the outer leaf to help them keep the cavity clear, but as long as they manage to keep the cavity clean is there any other worry in the approach they are taking?
-
I might be missing something here. The gas membrane is at DPC level of the outer leaf and I am forming the DPC using the cavity tray that is on the surface of the membrane.
-
There is a company that makes some insulation for use with cavity trays: https://www.jackon-insulation.co.uk/products/detail/jackodur-cavity-tray-insulation/ I wouldn't be able to get these in time. I wondered about using polystyrene coving and pinning the cavity tray to the face of the inner leaf as then there would only be the curve as it makes a single transition from vertical to horizontal. Then I saw the coving is hollow so wouldn't help much. I'll have to make sure the cavity tray is installed loose enough for the blown beads to push it down onto the face of the inner leaf without applying a tension to the cavity tray and risking dislodging it. With a bit of care, it should be possible to have a radius of curvature of about 25mm or less at both the top and the bottom of the vertical portion of the cavity tray (as shown on the right side of my sketch) and so the missing amount of insulation will be small (about 10% over a height of 25mm). If the DPC material can actually be convinced to fold then it will be a lot less. 450mm is a standard width for DPC but that is a bit tight to make this out of. 102mm outer leaf, 100mm cavity, and 225mm up inner leaf leaves only 23mm stuck in to the inner leaf blockwork bed. Is that enough? If tight and crossing at an angle making maximum cold bridge, it would have about 100mm available for the inner leaf bed. I think I'll get my scissors out and trim down a load of 600mm wide DPC to 500mm.