


MortarThePoint
-
Posts
2168 -
Joined
-
Last visited
Everything posted by MortarThePoint
-
I know you can use either wafer head screws or a stud crimper to joint metal frame together, but wondered what people actually tend to use. I like the idea of the crimper not leaving heads that stick out and the plasterboard has to go over. What do the pros use? @Conor looks like your MF contractor used some wafer screws, but did they use them through out or also use a crimper?
-
It's to keep the option of opening that area up and having it more open plan. There is a steel there so no need for a load bearing partition.
-
Do you mean the bit of wall circled in red. I may remove this from the design.
-
I might have some so that's a good thought.
-
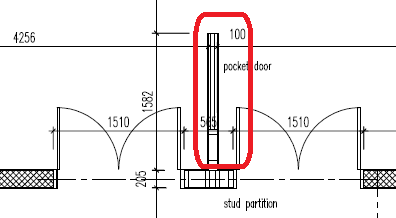
I need to construct a shot section (565mm) of stud partition between two sets of doors. The blockwork either side of these doors is 190mm, thick, so I need to use substantial studs. I suppose I could use two lots of 90mm MF c-studs right next to each other. The wall circled in red below has a pocket door in it and I'm thinking of not having this wall altogether. That means the pillar sits isolated, so needs to be quite strong hard to resist the forces from the doors. The sole plate will be glued down and the header above the doors will go across to the blockwork. Which do you prefer the sound of: 2layers of 90mm c-studs 1 layer of 146mm c-studs with extra sheet of plasterboard each side. 7x2 timber
-
Large 2 part window installation
MortarThePoint replied to MortarThePoint's topic in Windows & Glazing
Great, I have a bag of ones similar to those as well. https://www.amazon.co.uk/gp/product/B07NWMCDVP/ That type is often described as glazing packers and used between the glazing unit and the sash frame, but should be good under the cill too. -
Large 2 part window installation
MortarThePoint replied to MortarThePoint's topic in Windows & Glazing
Thanks. Just standard frame packers like pictured below? I'm so used to beds of mortar under wallplates that it always feels like a nice way of spreading the load https://www.amazon.co.uk/Draper-44006-Plastic-Packers-Pieces/dp/B001233ZJC/
-
Large 2 part window installation
MortarThePoint replied to MortarThePoint's topic in Windows & Glazing
I found the information below in another one of their documents. This looks good for installing in sections. Any idea what the material I have circled in red is? It's not something the windows have come with and I presume it is something slightly compliant to avoid pressure concentrations.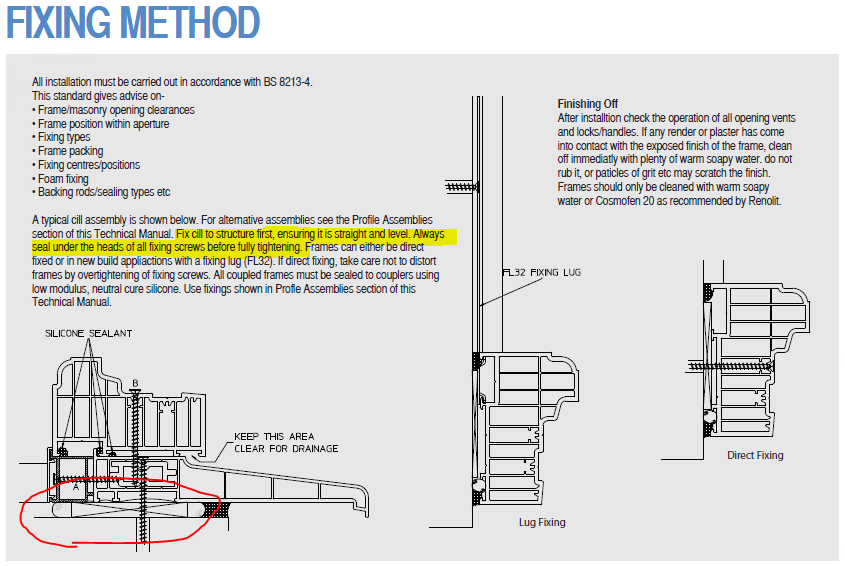
-
Large 2 part window installation
MortarThePoint replied to MortarThePoint's topic in Windows & Glazing
Thanks. It's on the first floor above a void unfortunately. We'll make a small scaffold for it, but may need to enlist some more hands unless we can work out installing in sections. -
Large 2 part window installation
MortarThePoint replied to MortarThePoint's topic in Windows & Glazing
As far as I understand it they even have hinges, but I may have got the wrong end of the stick -
Large 2 part window installation
MortarThePoint replied to MortarThePoint's topic in Windows & Glazing
With the Residence 9 flush casement system dummy sashes are actually normal sashes without handles and there is apparently a trick to opening them. -
Large 2 part window installation
MortarThePoint replied to MortarThePoint's topic in Windows & Glazing
Thanks Craig. I think the glass may be bonded in so could be an issue removing the glass. If I remove the sashes I'd be worried keeping it all just so (e.g. super square) so the sashes can go back in OK -
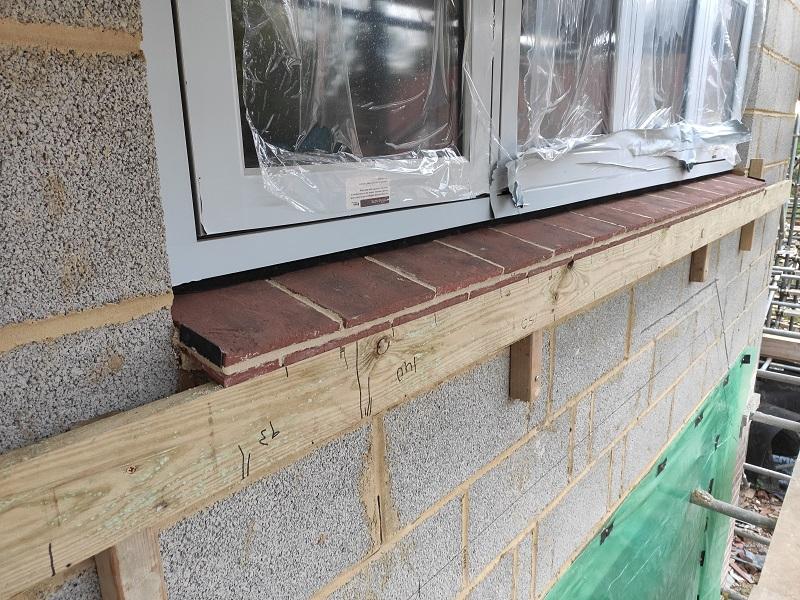
Most places I am using tile cills, but not in a couple of pleases. One of those is a 3.3m width by 1.3m high window that is made up of two frames coupled together, but a single cill running underneath. I'm wondering how to install this. This is heavy 100mm PVCu frames (Residence 9) with glass already in. Normal practice is to stick the cill to the frame prior to installation, but I'm not sure that makes sense. Possible approaches: Couple the two frames together and stick the cill on prior to installation of the whole lot. Heavy and hard to handle Attach one window frame to the cill and fit like that, then stick the second window frame to the cill during its installation Somehow install just the cill (drill and screw?) and then install the two window frames afterwards, sticking them to the cill Any tips gratefully received. I don't think the first option is practical given the weight and that it's just two of us installing the windows with their glass already in.
-
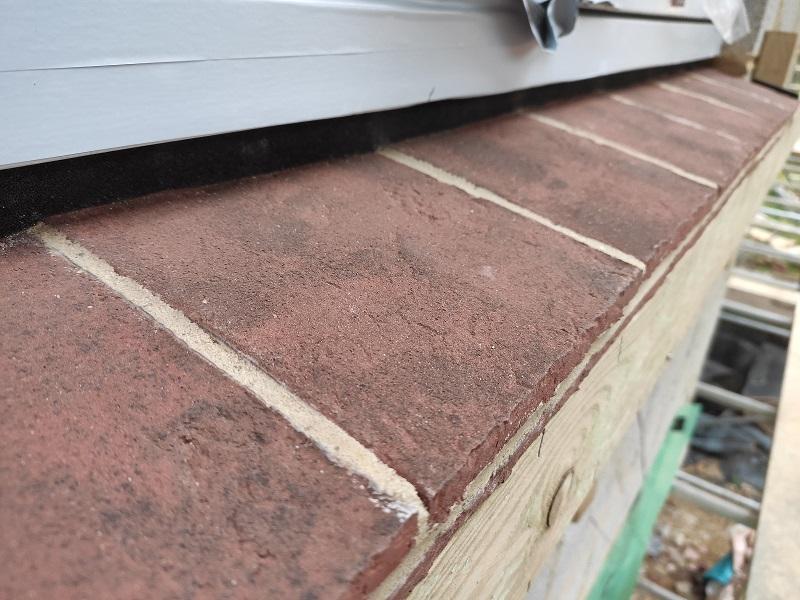
Well I'm no expert, but I am improving. Here's my fourth cill. My first three were in a group done together and smudged a bit unfortunately. Should have waited longer with those before jointing up.
-
That page only covers the ridge abutment and stepped flashings though.
-
Ouch! I presume you are more keen on chasing in lead at an angle if it is to be under render. If so do you have a spec for the thickness of the lead strip? 100mm?
-
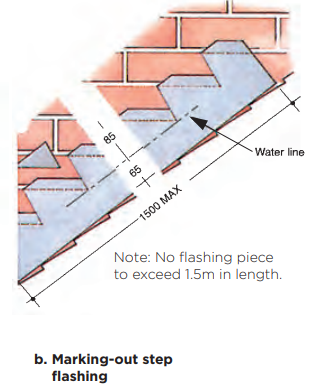
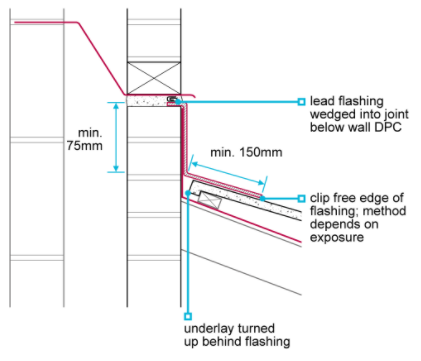
NHBC shows a stepped Flashing going as close as 65mm minimum to the tile line. The first link below shows older NHBC guidance which said 85mm minimum but that seems to now be 65mm. This is all for stepped flashing. I can't find anything for chased in at an angle but some logic (dangerous) dictates: Could be 85mm (or 65mm) measured across the flashing (e.g. 110mm tucked in ~25mm) Could be 150mm measured vertically which on a 45 degree wall is 106mm across the flashing Normally wouldn't be so fussed and they've used 150mm lead chased in (now). Above the bay window on the front of the house I want it tighter and fancy 100mm across the lead. Does anyone have a copy of the LSTA Complete Guide and able to see if they specify something for straight chased flashings? I know NHBC aren't building regs, but I haven't seen a building reg related to this and the warranty providers must meet or exceed regs (surely). I think a lot of roofers just have 150mm minimum in their head as that works pretty much everywhere. It's 75mm minimum lead upstand at a horizontal pitched roof abutment. https://nhbccampaigns.co.uk/landingpages/techzone/previous_versions/2011/Part6/section1/default.htm https://nhbc-standards.co.uk/7-roofs/7-2-pitched-roofs/7-2-20-weathering-details/ https://www.associatedlead.co.uk/wp-content/uploads/2018/06/Guide-to-Rolled-Lead.pdf


-
I've come back here after however many months and it's time for the roofers to tuck in their lead. Still think yours looks very nice. Looks like the vertical height of the flashing is about 130mm so at 45 degrees was it a 100mm strip of lead tucked in around 10mm? [90mm/COS(45) = 127mm] Or have you tucked it in much further ~50mm?
-
Nice idea, that hadn't occurred to us
-
It will be for occasional use. You have to walk past the intended back door to reach these doors.
-
No full size snooker table for me a Pot Black chipboard special though in my case a Pot White
-
Bay windows for complete beginners
MortarThePoint replied to MortarThePoint's topic in Windows & Glazing
Is there a rule of thumb as to how the side windows should open? They can either be hinged on the house side of the bay elevation (option B) or on the other side (option A). Option A: hinged on side away from house, opening gap nearest house, you see the outside of the window sash when looking at the front of the house with the windows open Option B: hinged on side closest to house, opening gap away from house, you see the inside of the window sash when looking at the front of the house with the windows open I can see you'd get more ventilation with option B. There must be a way this is normally done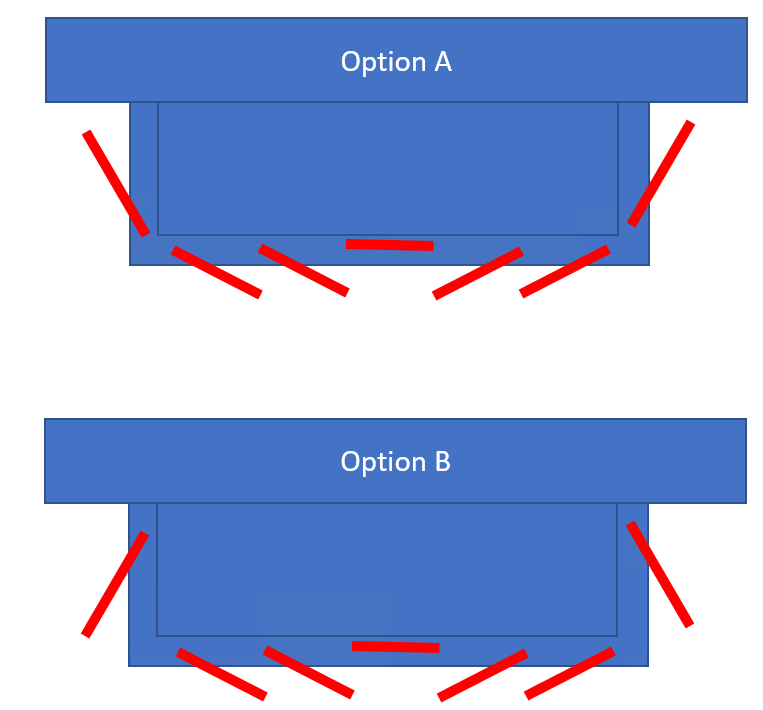
-
I've wondered about that. One of the French doors is in the kitchen and there is a normal pedestrian back door at the other end of the kitchen so that's the access. I can't see why we would open these unless it's a sunny day and we want both open anyway. You never really know how you use somewhere until you've lived there though. Carrying furniture about is a consideration though as the total opening will be around 1200mm. Should that be wide enough for must things?
-
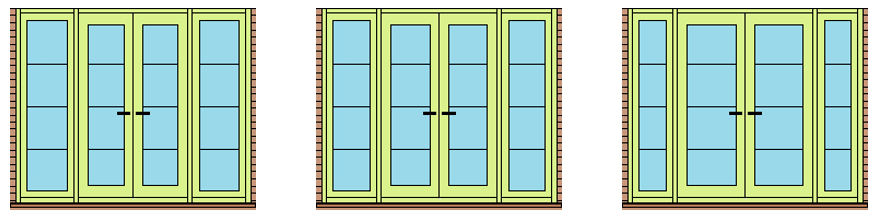
Perhaps less popular these days than bifolds, but we are planning on French doors with side lights. All our windows run on multiples of ~600mm lights (e.g. 1800mm triple light) and have astragals. The doors reveals are 2400mm wide. There are various decisions to be made enroute and I thought I'd share the thoughts: widths: below is an image that shows the three options considered. Large doors do look good in isolation from the windows and has good utility (being able to pass in and out of a single door) but doesn't look so in keeping with the rest of the windows. Equal sash widths ties in well with the windows, but the glass in the door looks pretty narrow. We thought Equal glass width was the best compromise as it doesn't look too mismatched with the windows and looks more natural in itself than equal sashes. It makes the door sashes around 600mm which is narrow if opening one. threshold: We've gone PVCu and you can either have that as the threshold or aluminium. Both would have the top of the threshold 20-25mm higher than the floor finish. We thought black aluminium would wear better. vertical alignment: We thought we could focus on aligning bottom of sash or bottom of glass (Only option at top is to align tops of sashes*). The side lights have PVCu frames at their bottom. Alignment with the doors is easy if the doors have a PVCu threshold and you want the bottom of door and window sashes level. Using the aluminium threshold, you need to mount the threshold ~25mm higher than the bottom of window frame to have their sash bottoms level. We plan to do this and use a 25mm hard wood packer on top of the hard wood cill we are going to use. That will then need to be dressed with a colour matched trim [* you could use the thicker door sash profiles for the side light bottom and top, but we weren't so keen on that] astragals: equally divide the door glass or the window glass. We preferred the latter (as drawn below). Width options: All total 2.4m x 2.1m. left to right equal sash width, equal glazing width and large doors (1500mm for pair). Which choices would you have made?
-
Bay windows for complete beginners
MortarThePoint replied to MortarThePoint's topic in Windows & Glazing
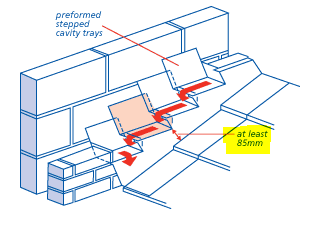
You can't have a flat roof section with render below ? And that is how it should be done ….! So you would always have a stepped cavity tray even in a blockwork elevation. Would you use coursing blocks to avoid making the flashing steps very high (which would use excessive amounts of lead and cause issues of the render spanning too far across the lead)?


