


MortarThePoint
-
Posts
2294 -
Joined
-
Last visited
Everything posted by MortarThePoint
-
One better, I'll be using RCBOs which is effectively an RCD for each circuit. I wanted something to highlight that capping / conduit is nothing to do with protecting cables beyond he plastering stage.
-
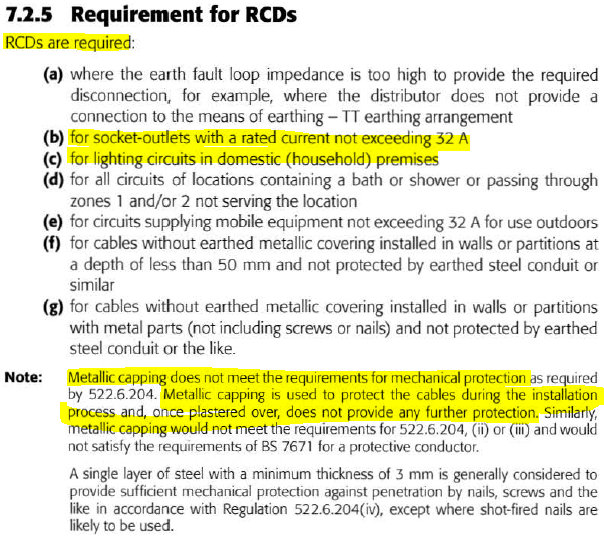
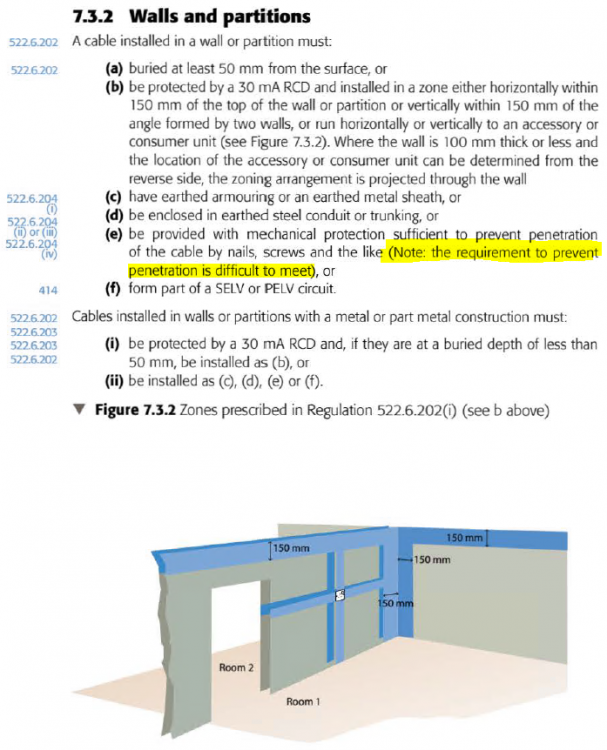
Some relevant extracts from the Onsite Guide: ------ This is poorly written as everything I have seen suggests its (a) or (b) or (c) or (d) or (e) or (f) but there is no or at the end of (b) here.
-
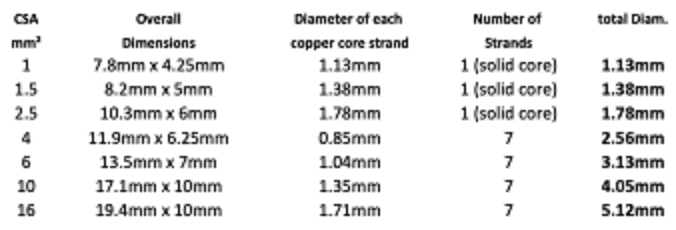
There's been lots of planning and not much doing what with a pick up in day job demand. I'm starting to doubt the benefit of using conduit/capping at all for sockets. If chased into the wall, e.g. with a 15mm x 10mm chase. With a 10mm chase depth it would be an amazingly cack-handed plasterer who managed to damage a cable. Oval conduit is pretty cheap (£0.35/m) so it's not so much of a cost decision. As @PeterW say's, complete rewiring is likely far down the line, and how many modifications would actually be made easier by conduit. Adding a new socket might be midway between two existing sockets and so benefit from the conduit. I think I am already leaning towards an excessive number of sockets (four 2-gangs per bedroom) so it feels unlikely I'd want more. Maybe using conduit in selected rooms that are more likely to need changes, like the living room. Oval conduit in some ways feels a bit like insurance against making some mistakes. Conduit for wired data connections is a no brainer on the other hand.
-
Valid, I wanted to qualify that it wasn't a problem. >£100/yr is possibly decadent for what it is, <£20/yr feels OK.
-
Narrower pipe definitely helps so probably takes it to a trivial cost. Volume of pipe to basin, v = pi * 10 * (0.0088/2)^2 = 0.6l --> mass of water m_w = 0.6kg So about a third of the water volume, so all energy costs go down by 3. 365 * (4 * 4) * ((2.5p/3 + 0.3p/3) - (1.2p/3 + 0.18p/3)) = £28/yr without ASHP 365 * (4 * 4) * ((2.5p/3 + 0.3p/3) - (1.2p/3 + 0.18p/3)) = £22/yr without ASHP and just priming Haven't included the pump power in any of this, but likely small if shuts off after only enough time to prime the pipes. The 300s is 5mins average occupancy and was naively used for the duration of hot water circulation. It was a guess, but Model 1b doesn't account for much anyway after the correction prompted by JohnMo's comment. willbish's comment pretty much eliminates it and, if set up correctly, potentially the whole difference.
-
If you were to harvest grey water for toilet flush, then an alternative simpler and potentially more energy efficient approach would be to have a valve near the basin to 'waste' that opens when presence detected and closes when hot water detected (or after set time). The water wouldn't be totally wasted and there's no need for a return pipe.
-
A rather hacked solution which wastes about the same amount of energy is to fill the cistern from the hot water supply. Problem is it probably wouldn't fill before you reached the basin.?
-
Thanks JohnMo! I was surprised by the numbers that came out, so hoped someone would shoot a hole. I have assumed a 5C temperature loss, but that may be too much. Thinking again, the water is only in the pipe for 2*1.77l / 12l/min = 18 seconds. An online calculator [1] suggests 8W/m based on 55C/25C/15mm pipe/15mm insulation which would make for 20m * 8W/m = 160W which is 4% of the previous figure so more like it. 8W/m from 0.177l/m for 18seconds works out as a dT of (8*18)/(4200*0.117) = 0.2C. So my guess was WAY out. That makes the model 1b contribution much smaller: Model 1b: flow and return circulated for 5 minutes (=300s) each time loo occupied Energy wasted, E2 = dT * q * t_occupied * c_w = 0.2C * 0.2kg/s * 300s * 4.2kJ/kgC = 50kJ = 0.014kWhr --> cost 0.3p (0.005kWhr & 0.1p if ASHP) [equivalent to 160W for the 5mins] No water wasted before hot water starts coming through Checking Model 1a: dT/dt = 0.2C / 18s = 0.67C/min. That means it would take about an hour to get back to 25C as it's not linear. That seems OK for model 1a. So Model 1b doesn't account for much and it's the difference between 2.5p and 1.2p per loo usage of Model 1a and Model 0 that counts. That makes the annual difference: 365 * (4 * 4) * ((2.5p + 0.3p) - (1.2p + 0.18p)) = £83/yr (£21/yr if ASHP) Much more palatable. [1] https://cheguide.com/heat_loss_insulation.html
-
I've always been happy to wash hands with cold water (using the cold tap), but that's probably frowned on in the post Covid 20 seconds world. As our house is laid out, we only have one basin at a significant distance. I had wondered about having a thermostated redring style water heater to heat the first bit coming through.
-
It's half as wasteful as having flow and return cooling down.
-
It would be less wasteful to have a sensor that shuts off the circulation when hot water is detected in the return pipe back at the tank. That would limit the damage to Model 1a, so around 200kWhr/year (elec).
-
It's nice to have hot water straightaway when you turn a hot tap on. To achieve this, I think some have a flow and return to the basin in question and hot water is circulated to it when the bathroom light is turned on or a PIR is tripped. Isn't this hugely wasteful? Approximate calculation: Water circulation flow rate, q = 12l/min = 0.2l/s (guess) Hot water temperature, T_w = 55C Room temperature, T_r = 25 Drop in water temperature flow vs return, dT = 5C (guess, insulated but still) Pipe ID, d = 15mm Pipe length to basin, L = 10m Volume of pipe to basin, v = pi * 10 * (0.015/2)^2 = 1.77l --> mass of water m_w = 1.77kg Model 0: system with only a flow. Water heated up and then allowed to cool down before next use some hours later Energy wasted, E1 = (T_w - T_r) * m_w * c_w = (55C - 25C) * 1.77kg * 4.2kJ/kgC = 223kJ = 0.06kWhr --> cost 1.2p. Potentially 1.77l of water wasted before hot water starts coming through, cost 0.18p. Model 1a: flow and return water heated up and then allowed to cool down before next use some hours later Energy wasted, E1 = (T_w - T_r) * (2 * m_w) * c_w = (55C - 25C) * (2 * 1.77kg) * 4.2kJ/kgC = 446kJ = 0.12kWhr --> cost 2.5p (0.04kWhr & 0.8p if ASHP) No water wasted before hot water starts coming through Model 1b: flow and return circulated for 5 minutes (=300s) each time loo occupied Energy wasted, E2 = dT * q * t_occupied * c_w = 5C * 0.2kg/s * 300s * 4.2kJ/kgC = 1260kJ = 0.35kWhr --> cost 7p (0.12kWhr & 2.3p if ASHP) [equivalent to 4.2kW for the 5mins] No water wasted before hot water starts coming through With a hot flow and return system it would be approximately the sum of 1a and 1b, so about 10p for each time the loo is used. It would be less wasteful (of energy and money, but not water) to automatically run the hot tap until it is warm each time, ready for instant hot water. But that would be seen as an awful waste. Why isn't a flow and return system seen as the same. Annual cost based on loos used 4 times a day by 4 people: 365 * (4 * 4) * (0.12kWhr + 0.35kWhr) = 2,745kWhr (900kWhr) 365 * (4 * 4) * 10p = £584/yr (£200/yr if ASHP) Wouldn't be a waste in winter as it would heat the house, but that may be only half of the year. So best case you're still looking at wasting about 500kwhr and £100 per year. Have I misunderstood how these systems work?
-
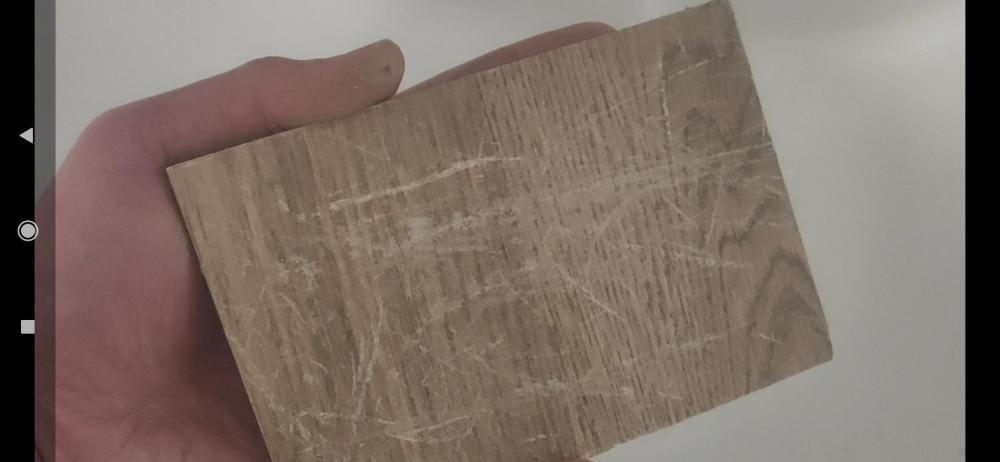
Just bought my tiles way ahead of when I'll be ready for them (still first fixing). They were a lot cheaper than I expected, but we preferred their look to the other options and the wife is happy. I subjected the sample to some abuse slapping it onto and pressing/rubbing it on a large heap of granite Type-1 MOT. Wiped with a damp cloth and then looked fine, I was impressed. You can see slight scratches remaining in the glancing light, but the wood grain effect helps hide it. Can't think of anything else to do with them as chiselling with the screwdriver did nothing. First picture after scratching, 2nd after washing and wiping, 3rd with glancing light.


-
@pocster How did it turn out once you got some tiles on? I was wondering how much height this adds? Tile adhesive applied with a 10mm square tiling trowel will leave a layer of around 3-4mm depth normally wouldn't it? Do you then simply add the thickness of the decoupling mat? Is it normal to glue the decoupling mat down? I thought people used something similar to tile adhesive. What glue did you use?
-
Wow, that must look interesting! I presume that's one panel of many switches. I'm not expecting anything that busy.
-
Rewiring includes us concluding we want an additional socket etc somewhere. I know that it's not required by regulations, but wondered more about people's experiences and preferences
-
I plan to chase it in and the chase depth looks to only need about 12mm. Can check with BCO that he'd OK. I don't have any hollow blocks. Most will need to be vertical due to the layout. I have a chaser and will see how the dust extraction works.
-
Thanks, why is that? Personal preference, standard practice or regs?
-
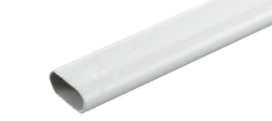
We've a lot of blockwork walls which are to be wet plastered. This means we'll have lots of cables chased into the blockwork and then plastered over. As I understand it, there are two main reasons to using capping: Protection: to protect the wires from the plaster's trowel, won't protect against screws or nails Rewiring: you have a chance of pulling/pushing wires through and so don't need to disturb the plaster if rewiring. The alternative is to just chase and clip the wires to get plastered over. Chasing limits 1/3 width of blocks if vertical, 1/6 if horizontal. So for 100mm blocks that's 32mm and 16mm respectively. I'm inclined to use the oval conduit pictured below chased into the blockwork. The main benefit is the rewiring one as I see it, because chased wires should be protected enough against the plasterer. I'm doing the wiring myself so can take the time to include the conduit. I'd like it in 3m lengths (2.7m ceilings, 2m works well for 2.4m ceilings), but Screwfix don't carry that, though this page says it is made. The datasheet says it's 1 cm deep, but drawings of other brands suggest 11mm external, 9mm internal. I have read wires outside conduit dissipate heat better which makes sense. What did others do and how realistic is to to rewire through these? Falcon is another option and this supplier looks well priced: https://www.superlecdirect.com/p-oval20-falcon-20mm-pvc-oval-conduit/ TLC unbranded and expensive: Dimensions: External: 22.5mm x 11mm Internal: 20.0mm x 9.17mm : https://www.tlc-direct.co.uk/Products/MTOV20.html Dimensions: External: 29mm x 11mm Internal: 25.0mm x 9.90mm : https://www.tlc-direct.co.uk/Products/MTOV25.html
-
What goes under the door sill?
MortarThePoint replied to MortarThePoint's topic in General Construction Issues
What level is the ground outside? It looks like your DPM is about 4 brick courses under floor level, so is the ground level with the top of your foundation? -
What goes under the door sill?
MortarThePoint replied to MortarThePoint's topic in General Construction Issues
I was just thinking about perimeter insulation and it's about 10mm thick with maybe 0.03W/mK so if 75mm high the PSI is 0.03*0.075/0.010=0.225W/mK. Doesn't normally have outside temperature on the other side but I have seen drawings with it between screed and concrete door step which are both good thermal conductors so step would be near outside temp. 7mm slate detail is 1.6*0.007/0.070=0.16W/mK. I think I'll only be able to achieve 35mm 'thickness' with slightly thinner slate so more like 0.25W/mK. These figures are indicative of the elements only rather than the build up which is far more complicated to work out. -
What goes under the door sill?
MortarThePoint replied to MortarThePoint's topic in General Construction Issues
Interesting, they look good. This whole area is a bit under detailed. -
What goes under the door sill?
MortarThePoint replied to MortarThePoint's topic in General Construction Issues
k=1.6W/mK with an average dT=13C, an area of A=0.005*2.4=0.012m2 and a 'thickness' of around t=0.070m makes for a heat flow of k*A*dT / t = 3.6W. COP of 300% makes that 1.2W of electricity so pretty small (about 1kWh/month so <£1/yr based on 6months heating). -
Mortar is fantastic stuff for filling load bearing gaps but is tricky when the gap is very thin and is a nuisance to mix when you only need a small amount. One great property of it is it is relatively easy to rework if things go wrong. I've got some thin gaps (3mm) I want to fill with something with the be benefits of mortar. It would ideally be gun-able straight from a tube. There are loads of grip fill adhesives, but I don't want it to grip much or adhere much like mortar doesn't to DPM. Is tile adhesive the right choice, or is there something better? I'm laying some Hardie Backer across the cavity on top of a gas membrane so don't want to get in a situation where I cock it up and it's not reworkable. Door cill then sits on outer leaf covering end of Hardie Backer and will screed over the rest. Cold bridge kept low as 12mm Hardie Backer is L=0.19.
-
Gap between render beads and lintel
MortarThePoint replied to MortarThePoint's topic in Plastering & Rendering
The lintel doesn't quite come to the face of the blockwork and then the render bead is pressed into the render basecoat. The gap is about 8mm.


