MortarThePoint
-
Posts
2294 -
Joined
-
Last visited
Everything posted by MortarThePoint
-
Pitched Roof Counter Battens For Insulation
MortarThePoint replied to MortarThePoint's topic in Heat Insulation
Forgot to do the division: dU = 4.167 * (0.025m *0.002m) * 60W/mk / 0.171m = 0.073W/m2K I've checked with Arthur Hough and there AH120 (aka GL6) is 0.8mm thick. BG suggest 600mm x 600mm centres (see extract below), reducing the number per square meter to 2.78/m2. That reduces the thermal bridging to dU = 2.78 * (0.025m *0.0008m) * 60W/mk / 0.171m = 0.020W/m2K. That first number seems so large (e.g. changing 0.15 to 0.22) that it can't be right. I guess it is treating it as a bridge all the way through to cold which isn't really fair. To do it properly needs FEA. Alternative model would be to consider GL6 in series with a block of wood to cold. the length of the block of wood would be the thickness of insulation remaining past the end of the connector, so 80mm in my case. What area to make the block of wood? 27x27 : r_wood = 0.080 / 0.12*0.027*0.027 = 914, r_gl6 = 143, r_total = 1067 --> dU = 2.78 / 1067 = 0.003 47x50 : r_wood = 0.080 / 0.12*0.047*0.050 = 284, r_gl6 = 143, r_total = 427 --> dU = 2.78 / 427 = 0.007 47x81 : r_wood = 0.080 / 0.12*0.047*0.081 = 175, r_gl6 = 143, r_total = 318 --> dU = 2.78 / 318 = 0.009 Feels reasonable to assume that the affect of using GL6 connectors vs some magic non-conductive ones is dU = 0.005 - 0.010, I'm happy to work with 0.005. Removing 50mm wide by insulation_thickness_below_rafters timber battens improves the U-value by dU = 0.004 so the GL6s cancel that out and it comes down purely to cost and ease of installation. Also putting it into context, it's all equivalent to a difference of about 7mm of Mineral Wool! I was uneasy that my pitched section's U-value was rounding up to 0.15 rather than down to 0.14. A single 1m2 window cancels out 120m2 of that difference! -
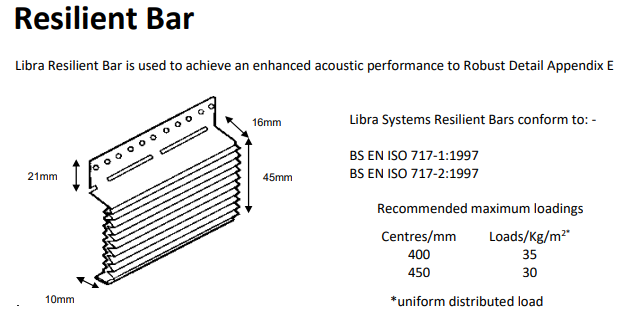
You can use Resilient Bar on ceilings and on walls so it stands to reason (?) you can use them under the rafters of a pitched roof. I'm tossing up between the following three options, all to allow 75mm of below rafter Mineral Wool insulation: 50x47 timber batten on 25mm standoff blocks [£1.20/m] 50x25 timber battens on 50mm stand off blocks (strong enough to take my weight on a single one spanning 600mm) [£0.80/m) Resilient Bar on 63mm standoff blocks (no way strong enough for me to stand on) [£1.50/m for comparison as at 400mm c/c unlike timber at 600mm c/c] The Resilient Bar has the benefit of near eliminating the batten thermal bridge as the insulation behind it would be the full 75mm except where the blocks are which improves U-value by about 0.004. One thing I can't decide if it's a good thing or a bad thing is that Resilient Bar won't couple the plasterboard to the trusses as solidly as timber battens would. The bad side of that could be a sloped wall with a bit of give, though I haven't heard of people complaining about walls with Resilient Bar being flimsy, but maybe that's because of the sound isolation meaning I can't hear their cries. The good side is that it could protect the plasterboard from minor movements of the trusses as they age. Could that help avoid cracking. Obviously the Resilient Bar would be good for sound isolation, but that's not needed here. Has anyone used Resilient Bar under rafters or have any thoughts on this?
-
Pitched Roof Counter Battens For Insulation
MortarThePoint replied to MortarThePoint's topic in Heat Insulation
I saw some videos of a larger renovation in France in which they used the GL6 connectors. Well I've given myself a bit of a shock working out the thermal bridge of one of these GL6 connectors. Steel has a lambda value of around 60 W/mK whereas pine has a value of round 0.18W/mk. That's a factor of 333. If these are at 400mm c/c x 600mm c/c that works out as 4.167/m2. If the average equivalent width is 25mm (reduced from 27mm by the holes) and the thickness is 2mm (guessing, will check) then the loss per m2 would be 4.167 * (0.025m *0.002m) * 60W/mk / 0.171m = 0.0125W/m2K which is a pretty large addition to the U-value. that assumes the metal extends all the way through the insulation, which it wouldn't. The SAP calculation looks great as it ignores this thermal bridging, but the reality is more complicated.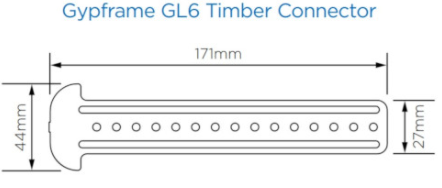
-
Crazy Rafter Roll insulation cost
MortarThePoint replied to MortarThePoint's topic in Heat Insulation
I wasn't suggesting you'd get better than 220mm of equivalent thickness of something of order 0.040. The 'overfill' was to make it stay put, but to be clear I'm not suggesting anyone actual does it. -
Partitions: Timbers studs Vs Metal C studs
MortarThePoint replied to MortarThePoint's topic in General Construction Issues
Amazing to think of the weight supported by studs. If doubling up on something like SoundBloc, Each stud is supporting about 80kg of weight (1.3kN/m). Check you Structural Engineer's allowance for partition weight as sometimes it's only 1kN/m. -
Crazy Rafter Roll insulation cost
MortarThePoint replied to MortarThePoint's topic in Heat Insulation
Loft roll isn't self supporting so would just collapse down over time whereas the more expensive ones do self support. That said I have often thought it would be easy to anchor Loft Roll in place and stop it sagging and so save a bunch. But as is often the case with such ideas, it's not going to be used as per the manufacturer's guidance and so BCO won't be happy nor the Warranty provider. If filling rafters (ie no air gap) another approach that might work and be much cheaper than the correct product would be to squeeze something like 2no. 150mm into the 220mm rafter. The compression might be enough to hold it in place. I spoke to a merchant years ago and he said some builders staple Loft Roll to rafters. They may have quoted competing against builders using the right stuff. I would be interested if anyone has done something like this. -
Crazy Rafter Roll insulation cost
MortarThePoint replied to MortarThePoint's topic in Heat Insulation
@sean1933 It might be worth taking a look at OmniFit Slab 35 as it may be slightly cheaper than the FrameTherm 35. -
Partitions: Timbers studs Vs Metal C studs
MortarThePoint replied to MortarThePoint's topic in General Construction Issues
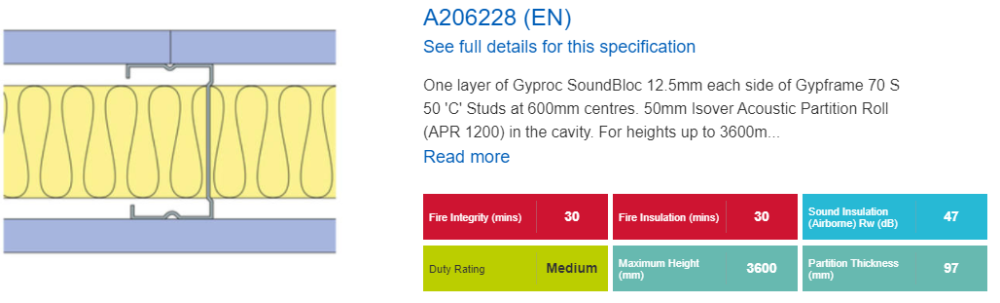
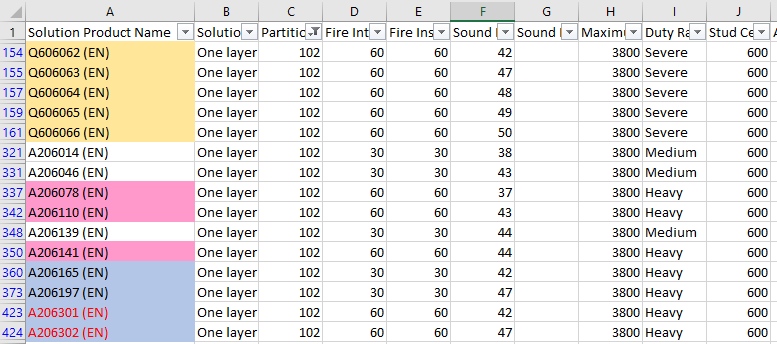
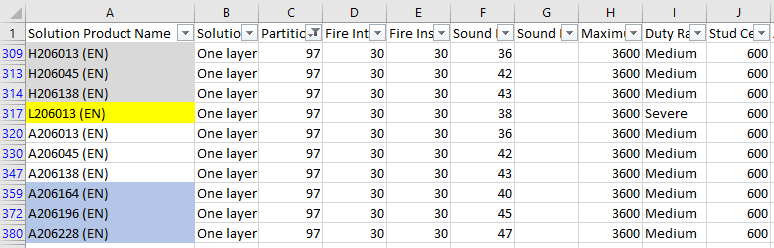
I wanted to check the effect of varying Acoustic Roll thickness on sound and the headline is adding just 25mm is 5dB better than having none, but adding 50mm is a further 1.5dB better. It may be cheaper to upgrade the plasterboard than double the thickness of the Acoustic Roll (SoundBloc+25mm is better than WallBoard+50mm). The Gory details: Maddeningly, BG have changed their product selector website and it's near useless. Previously I remember you could select which studs and plasterboard you'd use but now its got all the detail codes instead of the stud type. It says "To see all Specifications that use a particular Product, please go to the Product page and look for the ‘Show me all specifications that use this product’ option." but if you select a specific stud type results include other types! Sadly the madness doesn't end when you download the CSV. Although the table includes stud type etc, the columns are messed up so the data can be in the wrong columns 😞 How hard can it be! I added a column that concats all the columns after the abutment one (as many use C studs for abutments but other studs mainly) checked if the concat contains the stud name I want and then filter. {EDIT: easier to use find on column B} Below is some extracts. The colours are Duraline orange, WallBoard white, Fireline pink, SoundBloc blue (red text if SoundBloc F), TileBacker grey, and Habito yellow. Multiple lines as different insulation options, the first of each group is no insulation. The first 5 are the 15mm Duraline with the following insulation (APR 1200 unless says): none (42dB), 25mm Isover Acoustic Partition Roll (APR 1200) (47dB), 50mm Isover Acoustic Partition Roll (APR 1200) (48dB), 80mm Isover Modular Roll (49dB), 75mm Isover Acoustic Slab (50dB) Other sheet types that have less options follow that order though (double check). 102mm Partitions with 70 S 50 C-studs: 97mm Partitions with 70 S 50 C-studs: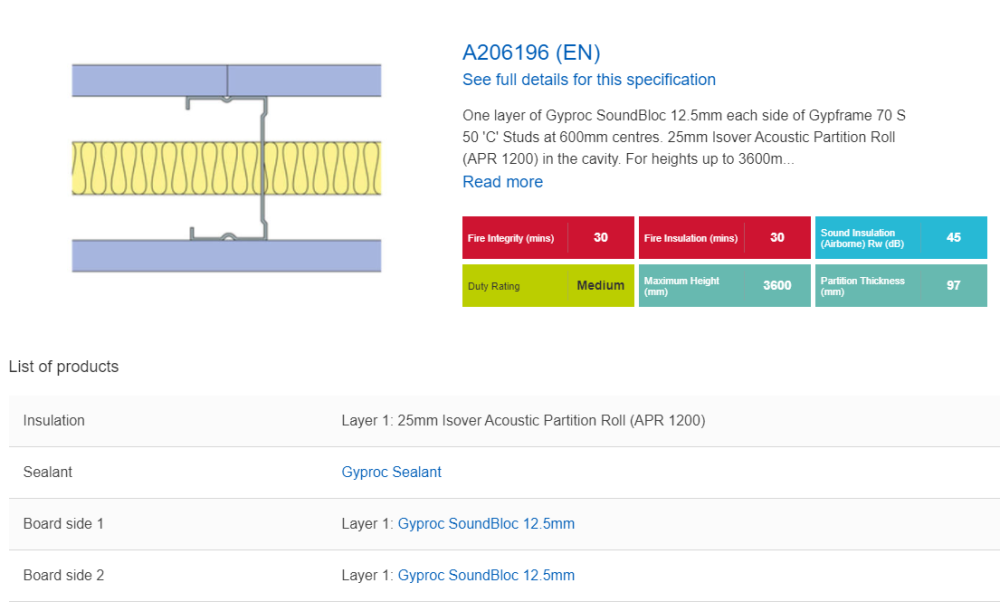
-
Crazy Rafter Roll insulation cost
MortarThePoint replied to MortarThePoint's topic in Heat Insulation
These are good prices for the current environment. What supplier(s) are they from? -
Good advice, it's what we would have done months ago if it wasn't for Covid
-
If only 🙂 She'd be more interested in the bedroom than the kitchen though
-
Thank you for checking, very kind
-
Typically, how long are appliance cables for non-fitted appliances? Most importantly drier and washer? A bit of a 'how long is a piece of string question' I know but allows me to establish zones.
-
The architect has shown about 5m of extractor ducting to where it then exits the house. Two questions: Is there no maximum ducting length between hood and final exit? I have a soil pipe to get behind, can I use the rectangular ducting with it's longer edge vertical, rather than horizontal as shown below?
-
Is it normal to plaster the whole wall behind kitchen cabinets (including base cabinets) or is it usually left as bare blockwork?
-
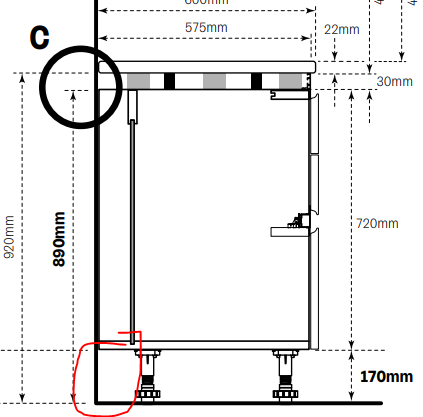
Howdens have a pretty generous service void behind (some with 72mm) so routing pipes etc should be easy there. Some others have little or no service void (Ikea have none). I might plan to have the electrics go down in the permitted zone in the corner of the room and then go along in the red circled area then popping up in chases where needed. That can all be done when the kitchen is finalised (scoff) and about to be installed.
-
Every time I discuss the kitchen with my wife she has a different idea. I asked her to do a design, which she did but it still doesn't seem to have finalised things in her mind. The main difficulty for me is how to manage the services (water and electric). Water is easier as I presume it can get routed through when the units layout is finalised (?). The walls are blockwork so the pipes would need to be wall mounted. Is there normally a gap behind units for this? I'm clearly not an experience kitchen fitter. There are no water connections downstream of the kitchen, so it doesn't affect anything else. The electrics are more complicated as they get chased into the wall. We are tiling the whole floor (inc. under units) and is it normal to plaster behind kitchen units? Either way, as there needs to be plastered wall above the units, any cable drops need to be finalised before plastering. Under counter sockets are pretty easy, but the countertop ones are more difficult. since they need to be the correct distances from things like the sink and cooker. I don't know what tiles we'll be using for the kitchen splashback so hard to get the height of the sockets spot on for that. Any tips?
-
Where to put the electricity meter
MortarThePoint replied to MortarThePoint's topic in Consumer Units, RCDs, MCBOs
The 43m limit is a real nuisance and wish I'd know it before. I've measured on site more accurately and it works out to be very close to 40m to go along the back of the house and round the end of it. That comes right up against the 43m limit allowing 3m for the pole. I'm wondering about drilling a hole into the sub floor void to route the cable under the end of the house and save about 6m of length. It will be tough to get the height just right and also to feed it through. Any advice? I've shown this adapted route in solid purple below. Would have been easy to have built a 6m length of soil pipe in when the foundation blockwork was being done but that ship has sailed. The ground under the void is 675mm below DPC, so 525mm below ground level. I'll check, but think 450mm would be deep enough below the patio, so 500mm below ground level would be fine. I'd be OK with location C if I can have an internal meter, so I might try my luck there.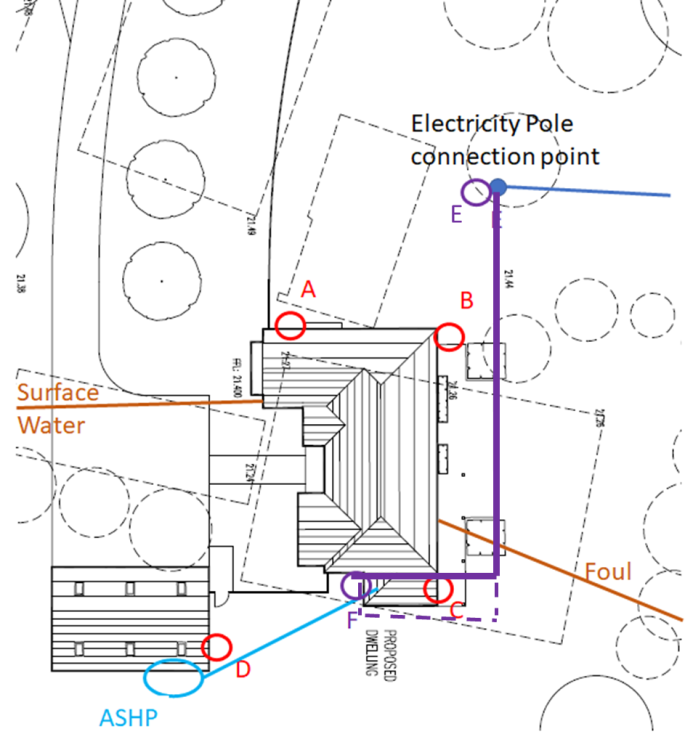
-
Crazy Rafter Roll insulation cost
MortarThePoint replied to MortarThePoint's topic in Heat Insulation
Wish I had ordered last year when I started this thread, but space on site... -
Crazy Rafter Roll insulation cost
MortarThePoint replied to MortarThePoint's topic in Heat Insulation
Be careful here as when I looked at partitions it seemed like the whle Rockwool thing being good for sound was a myth: -
Where to put the electricity meter
MortarThePoint replied to MortarThePoint's topic in Consumer Units, RCDs, MCBOs
This looks like it's going to get a bit tricky unfortunately. I decided on Plan F on the front of the house, but that's about 45m from the pole. I didn't check that with UKPN at the time D'Oh 🙄 UKPN say they have a Small Connections limit of 43m (inc. 3m for pole), so I'm too far and need t go yo the Projects Team, gulp / cha-ching! The price would be £2100 for a 3-phase connection by the Small Connections team plus £17/m for cable, so quite envious of @Redoctober's connection all for £900. Heaven knows what the Project Team cost will look like. [NB: the 3-phase side of it was only adding ~£300]. The about 45m is routing along the back of the house and then around the Utility and putting the meter box in the least impactful position and close to the CU. Not going round the Utility (Plan C) would make it around 36m but we'd walk past it every day. Kind have wish I had gone @ProDave 's route in 2019 when I had a 3-phase connection removed for demolition. One question I had on that was voltage drop. Having a log run of SWA on the customer side of the meter means the customer pays for the voltage drop doesn't it? That could put the bill up by up to 5% couldn't it (thinking main load will be ASHP). -
Socket Heights (English Regs)
MortarThePoint replied to MortarThePoint's topic in Regulations, Training & Qualifications
I appreciate the benefit of higher sockets and that was why I asked my BCO if I could have a mix. All bedrooms are having 4 double outlets and feels like the two more discretely positioned ones could be high (e.g. by the beds) and the other two, which are in the open, lower down. A teenager probably uses sockets 10 to 100 times as many times as an OAP. Sadly my dad's given up playing Scalextric. -
Socket Heights (English Regs)
MortarThePoint replied to MortarThePoint's topic in Regulations, Training & Qualifications
Very interesting. Do you have a reference for that? I asked my BCO if I could have some lower and he thought all had to be high, but that wasn't considering non-general use. -
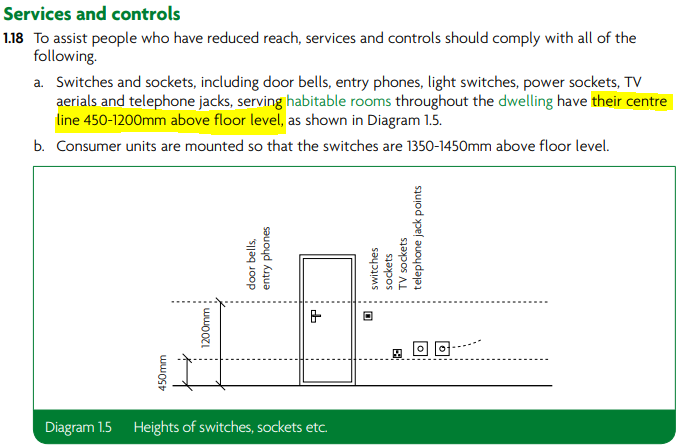
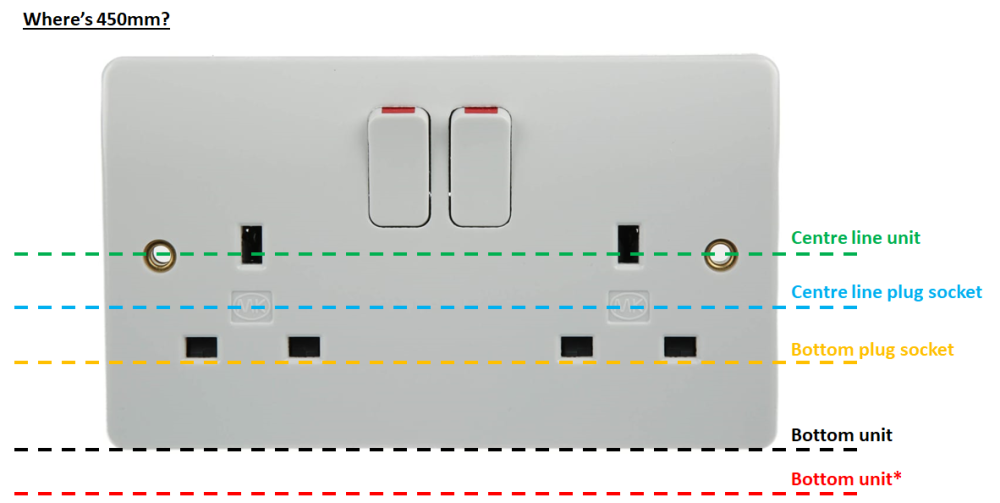
The regulations vary across the UK, so this is relevant to the English Regs (Part M). Most commentary I can see on the English regs potentially seem to make a subtle mistake. Where do you measure the 450mm to? Clause 1.18 of Part M says "their centre line". But then it references a slightly unrealistic drawing. Both copied below. Whether you applaud the regulations intent aside, it needs to be understood as many want to put the sockets as low as 'allowed'. I would read 1.18 to mean the Green line below, or perhaps the Blue at a stretch though that's going to vary by socket manufacturer. I see lots or commentary referencing the Black line or perhaps even the Red line where people have added a little extra for carpet thickness etc. Where have people gone with this in their own builds? Personally, I've always lived in older heights and would prefer the sockets lower upstairs in bedrooms (NB: logically the NI regs don't mandate a height here as in most dwellings there is no wheelchair access to the first floor, but that's irrelevant in England).
-
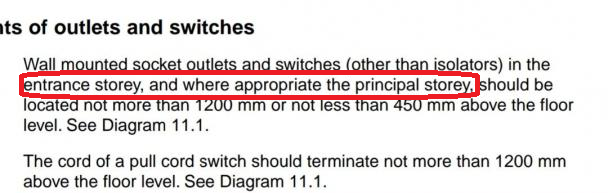
Interesting that NI building regulations limit the requirement to the entrance and principal storey, i.e. the ground floor in most cases. Not so for the English Regs which apply to all habitable rooms so include first floor bedrooms.