


MortarThePoint
-
Posts
2198 -
Joined
-
Last visited
Everything posted by MortarThePoint
-
Partitions: Timbers studs Vs Metal C studs
MortarThePoint replied to MortarThePoint's topic in General Construction Issues
With a timber wall, you're looking at starting around STC32 and going into the 40s at best without using resilient bar (aka resilient channel) or doubling up on timbers. Timber highlights from IR761: Page 26: 406 c/c, 90mm timber studs, double layers of 13mm plasterboard, mid density insulation STC 38 Page 178: 610 c/c, 90mm timber studs, 16mm plasterboard, lower density insulation, resilient bar one side 406c/c STC 50 Page 218: 406c/c, 90mm timber studs, double layers of 13mm plasterboard, lower density insulation, resilient bar one side 610c/c STC 57 Page 350: Double timber wall, 610c/c, double layers of 16mm plasterboard, lower density insulation STC 69. Good below 125Hz (e.g. 26.7 @ 50Hz) Some MF highlights (copied from previous post): Page 89: 610 c/c, 90 steel studs, 16mm plasterboard lower density insulation STC 50. Page 93: 610 c/c, 65 steel studs, 13mm plasterboard (double on one side) lower density insulation STC 51. Page 120: 610 c/c, 90 steel studs, 16mm plasterboard (+13mm on one side) lower density insulation STC 55. Page 124: 610 c/c, 65 steel studs. two layers of 13mm plasterboard each side, lower density insulation STC 55. Page 245: 406 c/c, 90 steel studs, two layers of 13mm plasterboard each side, low/medium density insulation, resilient bar one side 610c/c STC 60. Page 350: Double timber wall, 610c/c, double layers of 16mm plasterboard, lower density insulation STC 69. Good below 125Hz (e.g. 26.7 @ 50Hz) So looks like you get about the same result using 90mm timber studs with single sided Resilient Channel as you do using 65mm metal studs. Mapping to the UK that would be 95mm timber and 70mm MF. The timber option is about 40mm thicker and currently more expensive. 70mm MF is around £1/m of material whereas 4x2 is above £2/m of material and would need the resilient bar on top of that. -
Partitions: Timbers studs Vs Metal C studs
MortarThePoint replied to MortarThePoint's topic in General Construction Issues
Internal. I have two kids and like the sound of mechanical clocks and a good read ? -
Partitions: Timbers studs Vs Metal C studs
MortarThePoint replied to MortarThePoint's topic in General Construction Issues
My comment was made a bit quickly. Pointless to go nuts with the soundproofing if the door isn't specifically sound proof. Even then, the door is likely to be the weak spot in any wall above 44dB which is a single skin each side (denser board type) insulated wall of C-studs. -
Partitions: Timbers studs Vs Metal C studs
MortarThePoint replied to MortarThePoint's topic in General Construction Issues
Important to remember that any wall with a door in is pointless to soundproof ? link -
Partitions: Timbers studs Vs Metal C studs
MortarThePoint replied to MortarThePoint's topic in General Construction Issues
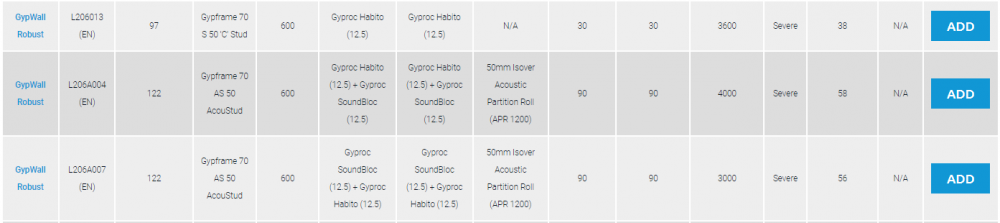
I've been getting my head around Partition duty and I think I'll be happy as long as it is Severe duty in certain places. BG Habito is expensive (£20) and only available to me in Pallet quantities (38 @ 2.7m). It's good stuff though and the BG System Selector says a sheet of Habito either side of a 70 S 50 C-Stud is Severe duty rating with Sound Insulation of 38dB. That's with no insulation and they don't give a value with insulation. However, I can deduce from page C04.S02.P04 of the White Book that adding 25mm of acoustic insulation adds 6dB, so would make that combination 44dB. Given the incremental cost, I think I'll go with the Acoustud and SoundBloc upgrades which give Severe duty and 58dB sound insulation, the same as insulation + 2x SoundBloc each side. That gives me some combinations that all have 58dB: Habito + Soundbloc both sides £65/lm Habito + SoundBloc one side, 2x SoundBloc the other side £57/lm 2x SoundBloc both sides £49/lm In less sound and duty sensitive locations, I can go single skin with 50dB: Habito both sides £47/lm Habito one side, SoundBloc the other side £39/lm SoundBloc both sides £31/lm Future proofing with Habito is going to cost me a fair bit, but not as much as if I was to put Plywood or OSB in at their current prices. I may end up with some Habito sheets left over though. I can do this as I don't have many metres of partition to address. For reference, a 40dB 70 S 50 wall (with insulation) would be around about £18/lm I think. On this, SoundBloc each side adds about £8/lm and the Acoustud adds about £5/lm. I don't have any fire requirements above 30 minutes.


-
The MF looks great. I've never seen it in the flesh so it's great to see. I see they have included the deflection heads by using the deeper track which is good. Crazy how much more expensive the deeper track is than the standard track. (about 3x).
-
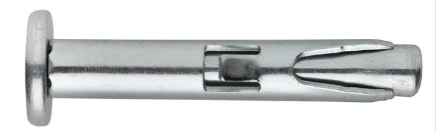
Cool, thanks. Looks tidy and good large service openings in the studs. The Tradeline studs look to have pretty small service openings. Are they standard 92mm C-studs? Hammer in similar to these: https://www.builderdepot.co.uk/spit-udz-6mm-x-35mm-fire-resistant-hammer-in-fixing-pack-of-100
-
@Conor to understand your install a bit more I was hoping you don't mind me asking the following Do you know what fixing they have used to attach the GL2 brackets to the underside of HCF? If not, a close up photo would be cool. Did they put up the MF for partitions first? They haven't used GL8 perimeter along the ICF which I guess is to do with the ICF. Do you know their plan at the edges? What plasterboard are you going to use under this? Thanks
-
Architect has included enough details. He's specified 150mm void with Casoline MF. I don't want or need such a large void.
-
Partitions: Timbers studs Vs Metal C studs
MortarThePoint replied to MortarThePoint's topic in General Construction Issues
I'm tempted to go for MF I-studs rather than C-studs but they are about 3x the price without supported pricing. In terms of feeling solid, Does anyone know how 70mm I-stud compare to 92mm C-stud? Having a 6y.o. who already likes slamming doors doesn't bode well for the years to come if I don't have solid feeling partitions. -
Partitions: Timbers studs Vs Metal C studs
MortarThePoint replied to MortarThePoint's topic in General Construction Issues
This one includes Resilient Channel -
Sorry you did say that. Found an installation video. The brackets look to be GL2 and the channel is GL1 (sections can be joined by GL3) and a perimeter of GL8 (also used for pattresses). GL1 brackets seem to normally go in at 600mm x 1200mm centres. GL3 joins sections of GL1 as required. In parts (Speed Pro not BG): GL1: 1.67m/m2, £1.14/m, £1.90/m2 https://www.builderdepot.co.uk/metal-lining-channel-3600mm-gl1 GL2: 1.4/m2, 12p each, 16p/m2 https://www.builderdepot.co.uk/195mm-gypframe-gypliner-brackets-gl2-box-of-100 GL3: 0.3/m, 0.5/m2, 12p each, 6p/m2 https://www.builderdepot.co.uk/gypframe-gypliner-channel-connectors-gl3-box-of-50 GL8: £0.83/m https://www.builderdepot.co.uk/metal-track-3000mm-gl8 An arbitrary 4m*4m room would cost 16m2*(£1.90/m2 + £0.16/m2 + £0.06/m2) + 16m*(£0.83/m) = £47.2 or about £3/m2 plus screws. BG may be more expensive as likely a better brand (?). 47x50 timber at 600mm c/c would be £2.75/m2 so GypLyner does compare well with the timber cost. Perhaps not so favourably historically, but based on where timber prices are now... Whilst the timber feels easier to install to a flat level surface, under the hollow core camber the ease of adjusting the metal frame looks very attractive.
-
Sounds neat, easier than chasing blockwork!
-
Looks great, what system is that? Do you have a link to the brackets?
-
Architect included a 150mm MF void, but seems pointless (no ducting). MF needs at least 100mm I think. To get it flat I was planning to pack each mounting as @Mr Punter suggests. To mount the timber to the underside of the HCF I was planning on something like these masonry screws at 400mm c/c.
-
Basic architect 'construction drawings'
-
Opinions seem a bit divided over 12.5mm plasterboard on 600mm c/c: https://www.plasterersforum.com/threads/600mm-centres.61316/ Seems a bit perverse to go for 15mm plasterboard @600mm c/c to save timber cost, but may end up the better choice. 600mm saves 33% over 400mm 480mm saves 17% over 400mm but is not a standard spacing so a bit weird
-
600mm centres would be great. I thought 12.5mm needed 400mm c/c, perhaps that's 9.5mm plasterboard then.
-
Just finished phoning around for prices and the timber for the void would cost: 50mm void (47x50) £4.13/m2 (£1.65/m) 38mm void (38x50) £3.23/m2 (£1.29/m) 25mm void (25x38) £2.01/m2 (£0.81/m) In more normal times all of those prices would probably be halved. Painful to pay more than 4x2 prices for 2x2.
-
I had considered not having a ceiling void under our hollowcore (see below) but think I do need it really, but plan to keep it to a relative minimum. That raises the question of what the minimum is. Is there a reg that needs to be followed? There are lots of downlighters that support shallow voids (e.g. https://www.downlightsdirect.co.uk/shallow-downlights.html?depth_range=1-50), so I don't think lights will set the minimum void size. I have seen people mention downlighters that are only around 20mm. Any wiring needs a minimal gap. An insulated 15mm water pipe ends up 13+15+13=41mm (22mm --> 48mm) so that suggests a 50mm ceiling void. Not needed, but waste pipes are "40mm" typically, but at solvent well joints mean it would need 50mm plus any fall. I don't need any of this though. Seems like the water pipes are the driving factor. I could take a long route to avoid having the water pipes in the ceiling void. Would it be bold to have a 25mm ceiling void? I was thinking 50mm was best, but with timber prices having gone nuts, I expect 2x2 to be double the 90p/m I paid in December and it needs a fair length as I expect to install at 400mm c/c. I could have a larger void (50mm) in the rooms that the water pipes would need to pass through and a smaller void (25mm) in the other rooms.
-
Wow, that was close. It came down to having less than two rails to spare and I feel I put it in everywhere it was needed. I also worked out that you can ream the Nu-Heat 14mm clip rails out to 16mm using a 16mm forstener bit. Thanks for the suggestions, but looks like I'm good and the screeders are now doing their thing. Pressure test was started last night at >9pm.
-
Amazon have sticky back for Wednesday and Screwfix is 24-48 hour unfortunately. The JG-Speedfit is 15mm. Ambiente may be an option. But time isn't on my side to head to the other side of Hatfield. Fingers crossed.
-
I urgently need a small quantity of clip track. I thought I had over ordered but think I have come up half a dozen short. If anyone has some left over from their install near South Cambridge it would be awesome if I could buy it off them. I've been using the Wunda clip track, but as long as it is for 16mm pipe and self adhesive it should be OK. It can't have barbs on he back for sticking into insulation. Thanks
-
So the edge foam was outside the constructional hearth area? I have a inglenook so think anything inside that counts as the constructional hearth area
-
I'm trying to make it one. The other WBS can have 12mm but one unsure so want constructional hearth


