Thorfun
-
Posts
4889 -
Joined
-
Last visited
-
Days Won
36
Everything posted by Thorfun
-
took a look and didn't fancy any of those cheap cordless staplers. so, me being me, I ordered this https://www.amazon.co.uk/dp/B07FHLGWZY?psc=1&smid=A3P5ROKL5A1OLE&ref_=chk_typ_imgToDp for delivery tomorrow. should do the trick! 🙂
-
we have a hammer tacker and that was great for external membrane on the timber frame. but this is for stapling AVCL which needs to be a bit more accurate that slamming a hammer tacker in the general vicinity of where you want a staple! don't need to do 1000s in a day as this job will (hopefully) be finished soon. but at the moment she has to wait for me to do stapling whereas if I buy a stapler she can use then she can do the work herself!
-
perfect. thank you. I just happen to have some of that lying around. 🙂
-
I have an old-ish staple gun that I find ok to use but the wife finds it too hard to use. the trigger requires quite a bit of force. without wanting to buy a load of different staplers to try can anyone recommend a good stapler that has an easy-action 'trigger'?
-
Need help with airtightness detailing for room above garage
Thorfun replied to Thorfun's topic in Ventilation
further reading on the Protect VC Ultra in this document it shows the membrane fitted either way round but with the foil surface facing the airspace. so foil facing the airspace in between the joists is ok. it also says: so, that to me sounds like fitting the membrane to the posi-joists and then insulating on the garage side is actually the correct thing to do! unless I'm completely misreading the information I think my 'yellow-line' plan is correct. anyone got any reason to disagree with that? -
a general question to all and, even though I'm tagging @craig as the resident expert on all things windows, any and all opinions welcome as always. as our build has progressed our sliding doors have had dirt/dust/crud build up on the rails/tracks. once cleaned off is there a product we can use to get the lovely smooth action we had when newly installed?
-
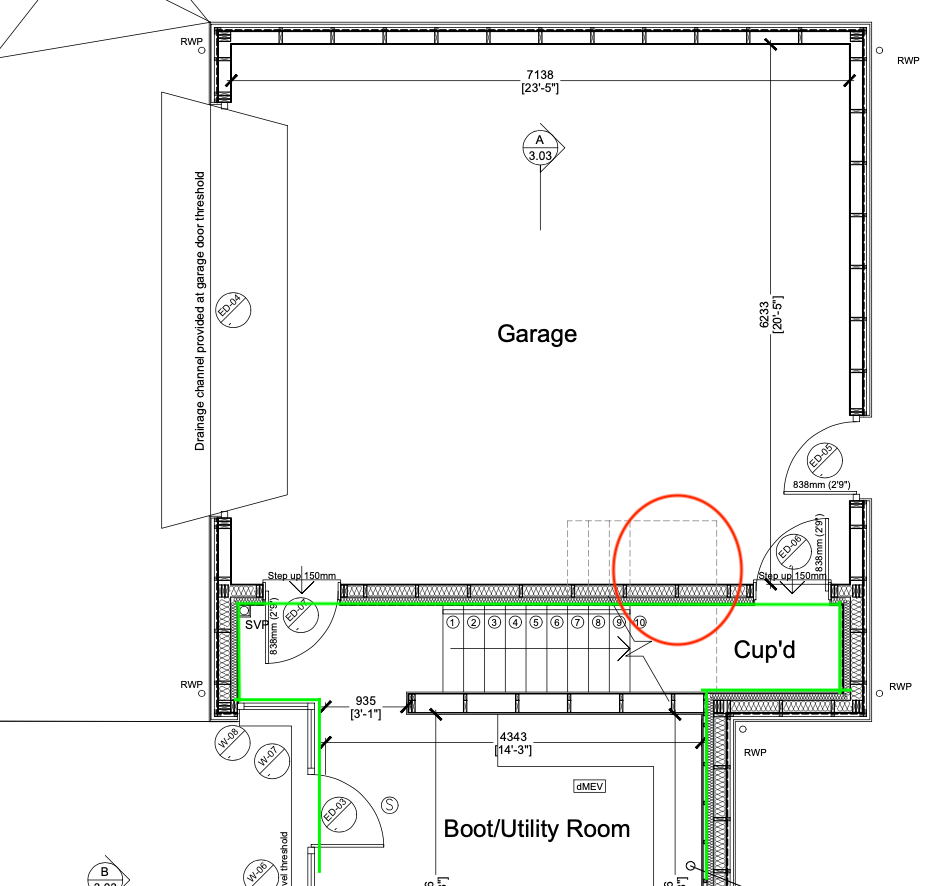
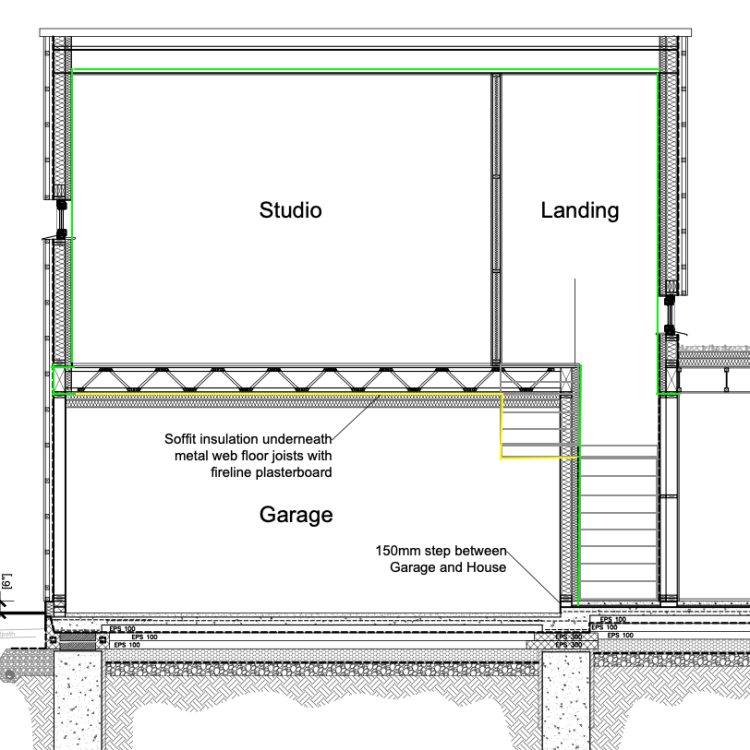
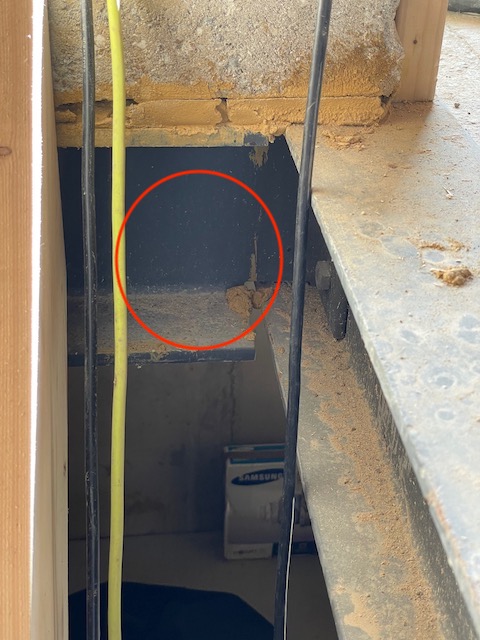
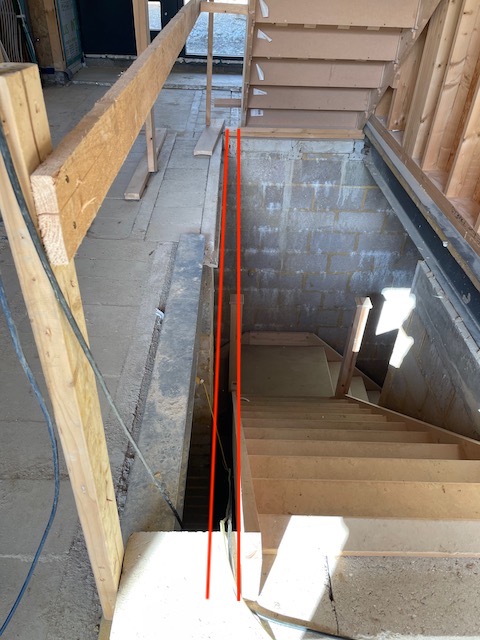
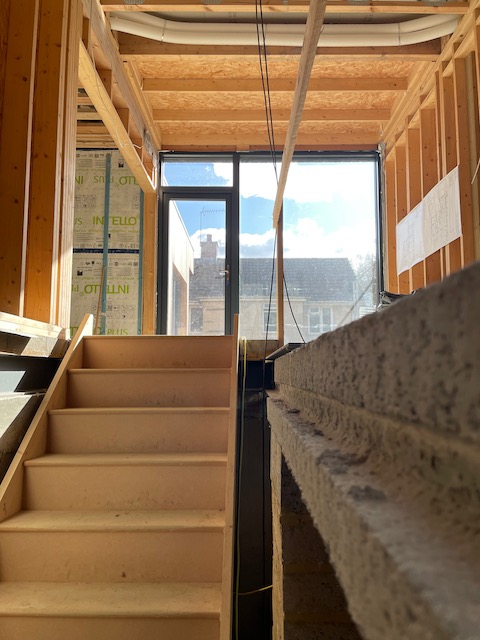
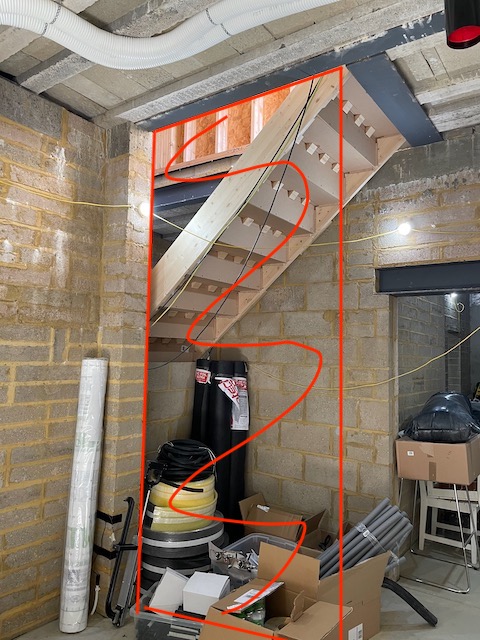
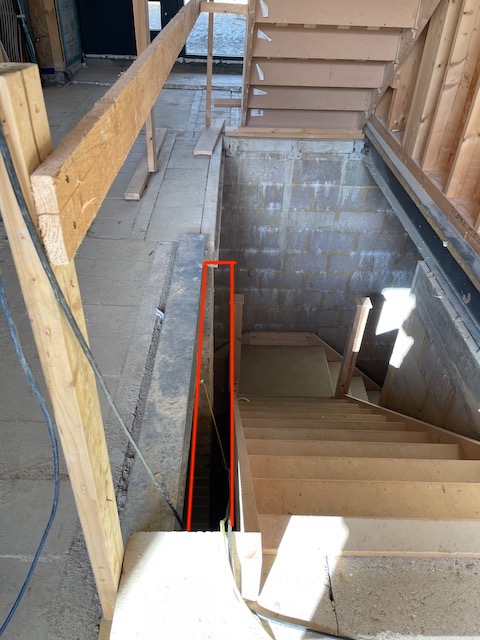
afternoon all. today I started to look at the detailing for the airtightness for the room above our attached garage (I will simply refer to that as the 'studio' for ease of typing) and it's proving difficult to see the wood from the trees. if I knew now when I started this project I would've got the architect to completely change what he designed for the space as it's really hard to maintain airtightness in that space. some details.... the garage is, obviously, outside the airtight layer, but the stairs going up to the studio start in the house but then have a half-landing that is part way in to the garage. here's a couple of drawings to illustrate. in the drawings the green line is the current airtight membrane but the stairs pierce that layer where the landing goes in to the garage (the red circle in the first image). so, I was thinking of putting some AVCL underneath the joists of the garage ceiling and on the garage side of the stairs and landing to join the existing green layer. that way any heat that travels through the stairs will get trapped underneath them and not leak in to the garage. is this ok to put the barrier on the underside of the joists with the insulation on the garage side? in the rest of the house I'm using Intello Plus but I was thinking of using some Protect VC Foil Ultra that I have lying around to save buying more Intello Plus. I presume it's ok to mix and match AVCL? and is there a 'right way round' for the Protect VC Ultra? i.e. does it matter which way the silver side is facing with regards to vapour transfer? I guess that if the silver side is facing upwards away from the insulation and in to the joist void then any heat in there will be reflected back up through the floor to the room? and, one final question, if I put the membrane in the yellow location is it a problem to put some Rockwool between the joists (thinking 100mm) on that side of the VCL to reduce noise transfer? sorry for all the questions. it's probably a bit of a silly question but I want to get this done so I can, hopefully, get an airtightness test completed in a month or so and then I can start boarding! as always, happy to take some in-situ photos if anything doesn't make sense.

-
From the start of planning to site electric
Thorfun commented on Susie's blog entry in The Old Cow Shed
brilliant! best of luck with it all -
they offer the service but they charge handsomely for it. if you do it the way @Kelvin has and we did and how many others have on here by project managing after the TF company gets you to a watertight stage then you can save substantial amounts of money. but it can often take a lot longer and can be a lot of work managing it all. everyone has to take their own journey but for us doing it this way meant we could build a bigger house. to pay a turnkey or main contractor would've meant a much smaller house for the same amount of money.
-
Fair enough but also sounds like a not so easy job up a ladder or platform. Not saying £600 is the right price but probably in the ballpark for a ball-ache!
-
How to support a (block and beam) beam at one end
Thorfun replied to Thorfun's topic in Floor Structures
I'll give them a go! thanks. if it all fails miserably then I'll borrow the Spitfire off my mate and revert to explosives to get the job done. 😉 -
I thought Velux blinds were supremely DIY-able?
-
apart from the whole environmental and sustainability angle of course
-
How to support a (block and beam) beam at one end
Thorfun replied to Thorfun's topic in Floor Structures
my corrosion question was about shot fired nails. I'm a bit confused by the Tek screws though. I presume you guys means something like these? if so, I know they say self-drilling but surely there's no way that is going through a structural steel without drilling a hole first? even though it says no drilling first required? now that's my kind of testing. -
How to support a (block and beam) beam at one end
Thorfun replied to Thorfun's topic in Floor Structures
yes but the stairs are temporary and the final stairs will be wider to fill the gap. the wall below in the basement will be built up to be level with the existing beam so it ends up being vertical all along. so the new wall will support some of the beam. as such, I'm now not worried at all. 🙂 I just need to build the wall, fill in between the steel and the wall and then shutter it for when the screed goes down so that doesn't pour down the stairwell! (I hope that makes sense) -
How to support a (block and beam) beam at one end
Thorfun replied to Thorfun's topic in Floor Structures
corroding even internally? -
How to support a (block and beam) beam at one end
Thorfun replied to Thorfun's topic in Floor Structures
yeah. that's what i've done before for fixing to steels. shot fired timber through the steel and then build out from that timber with more timber. figured i could do the same here now. -
How to support a (block and beam) beam at one end
Thorfun replied to Thorfun's topic in Floor Structures
so, an apology is required from me for this for being a d**k! I got a laser out and lined it up with where I needed to bring the hallway in to and it appears I've already done the work on the end where the beam is and simply forgot about it! for some reason I still thought I had to bring that in a bit. I remember doing it now. I removed the blocks and moved the beam to the right (which is why it's overhanging the wall below slightly) and then infilled with new blocks. all done well over a year ago so I could be forgiven for forgetting as so much else has happened since. anyway, so I'm now down to having to build out from the steel to line up with the beam. what do you think? shot fire timber through the steel and build out with timber from there with it also sitting in the horizontal steel? then I'll build a timber wall below it to fill the gap from below and the staircase will eventually be made wider to fully fit the stairwell. -
How to support a (block and beam) beam at one end
Thorfun replied to Thorfun's topic in Floor Structures
not spoken to the beam manufacturers. it's worth a shout, thanks. interesting, hadn't really thought about using timber as there'll be screed going on top and figured a concrete beam would be stronger to take that weight than timber. I could build that wall in the basement in timber as well and make the verticals double/triple thick to take most of the weight of the timber joists as well. interesting and worth thinking about. I'll investigate joist hangers or wall plates. thanks for the tips. -
I need to figure out how to widen my hallway to fill in a bit of void down to the basement where the red lines are shown below. so the hallway need to come out by about 120mm. I discussed this with a friend and he suggested getting another beam to sit alongside the existing one (pretty much where the red lines are) which I thought was a good idea although I'd still need to fill in the gap between the steel and the new beam. one end of the beam could sit in an existing steel in this area circled red: which you can see if I look down the existing beam but the other end doesn't have any where to sit or be supported: my friend suggested a steel 'hanger' of some kind bolted/fitted to the existing beam but I didn't find anything like that on a Google search so guess it'd have to be bespoke? I will need to build a wall going down to the basement floor to stop sound coming up the stairs as shown below: so that could also help to support the beam as it goes in to the steel but that wall would only go to about here and half the beam would be unsupported. so, after all those pictures finally some questions: 1. how would be best to support the other end of the beam? 2. can anyone think of a better solution?
-
We should have installed air conditioning… now what?
Thorfun replied to Adsibob's topic in Other Heating Systems
no sorry. never used it in the end so can't comment on how dark it makes things look. maybe speak to an installer and ask if they can give you an existing installation to see and a reference to discuss that with. -
Thank you. We are so far. Just wish we were further along. But these things take time.
-
sounds like you've very firmly got your heads on right! it's great that you've considered lots of different options and the beauty of building your own house is that you can build what YOU want and not give a hoot about what anyone else says. 😉 I really look forward to following your journey if you're willing to share with us.
-
it's a shame that the main entrance is at the side of the house. I would've thought having a central atrium with the tree and staircase as a main wow feature as you walk in the front door (central-ish to the property) with rooms leading off it would be amazing. it would also mean you'd be able to remove the corridor feel upstairs to the bedrooms. you could treat the house as having 2 wings. one side of the house upstairs a large and luxurious master bedroom and then 2/3 bedrooms the other side of the house (personally I don't see the point of adding extra bedrooms just for the sake of it. if you're like us and never want to move again then the financial return of the extra bedroom will never be realised except for your dependents who inherit it. we're building a 400m2 house and only have 3 bedrooms as we only have 2 kids). then you should still have room upstairs for an upstairs living room. I also don't see the point of a laundry room upstairs and a large utility downstairs. why not put the laundry in the utility room? the above comment are with the caveat that I'm not a designer! we used an architect and let him let his creativity go wild within the confines of our brief. he came up with a few ideas of which we liked bits of each. he then amalgamated those bits into a design that we love. you're doing a great job but I wonder if with the size of the house your budget would stretch to using an architect or architectural designer then they might come up with something that you hadn't thought of? anyway, I'm not (or not wanting to) raining on your parade. as I said, the house looks lovely, I just feel that professionals are there for a reason as they do what we can't even though we think we can! during our build there are some things I've simply left to the professionals as I know it will be better than I can do as I know my limits.
-
my wife keeps one of these. basically a short sentence summing up each day. https://www.amazon.co.uk/One-Line-Day-Memories-Rainbow/dp/B09MYXS2Z6/ref=sr_1_3?keywords=line+a+day+diary+5+year&qid=1677941670&sprefix=a+line+a+day+di%2Caps%2C202&sr=8-3 might be manageable for a self builder to write a line of a quick summary at the end of each day rather than worrying about keeping a full diary as that could take up a lot of time.