Onoff
-
Posts
21126 -
Joined
-
Last visited
-
Days Won
206
Everything posted by Onoff
-
@Declan52 quoted sand wrongly, no biggie, we knew what he meant. You are using what's known as "all in one ballast". It's a mixture of aggregate up to 20mm in size and sand. What mix are you using, 4:1?
-
Have a read of this: 056-How-to-make-concrete.pdf
-
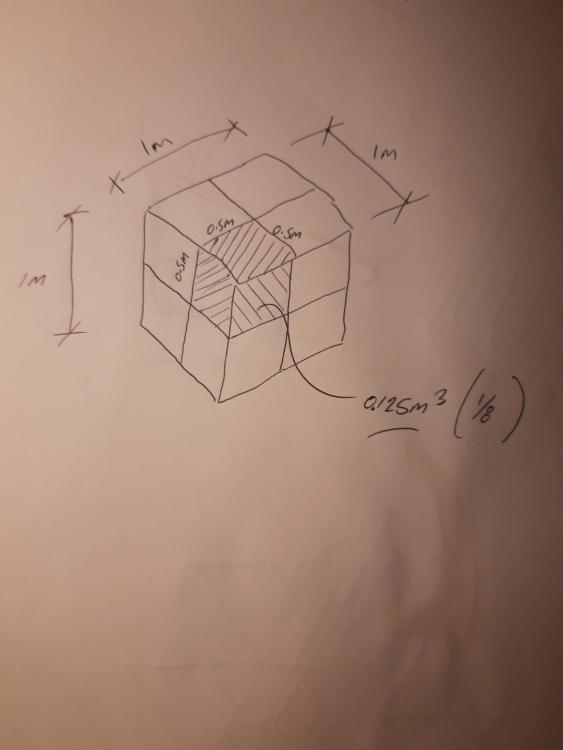
If you stacked 8 cubes each 500x500x500 they would make 1m3. So each one is 1/8 of a cubic metre or 0.125m3.
-
Sorry. My mistake, blinding headache here and waiting for pills to kick in! It's actually 0.14m3 for each plinth. So 0.28m3 for both.
-
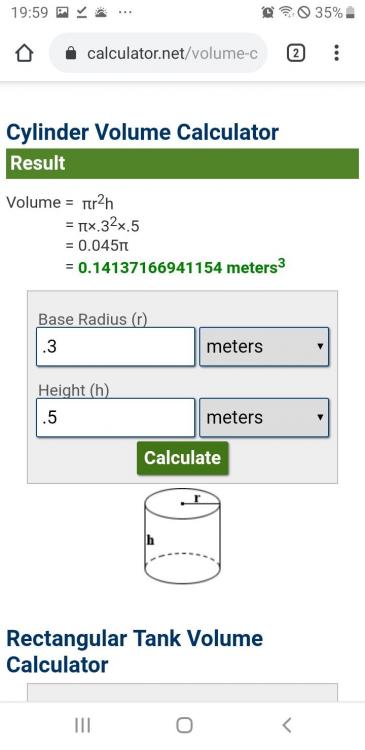
Do these up slope plinths are 2' or 600mm dia and 500mm high? Is that correct? That's pretty much bang on 0.25m3. So 0.5m3 concrete required to do both plinths. EDIT: ABOVE CALCS ARE WRONG!!!
-
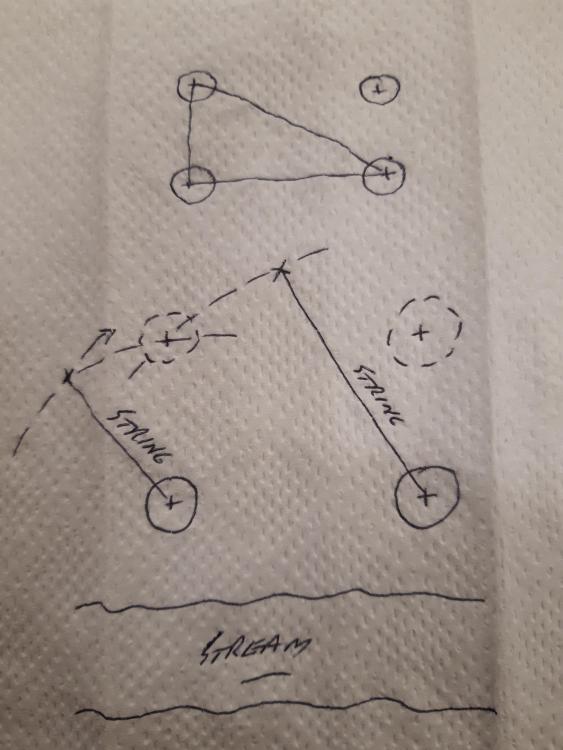
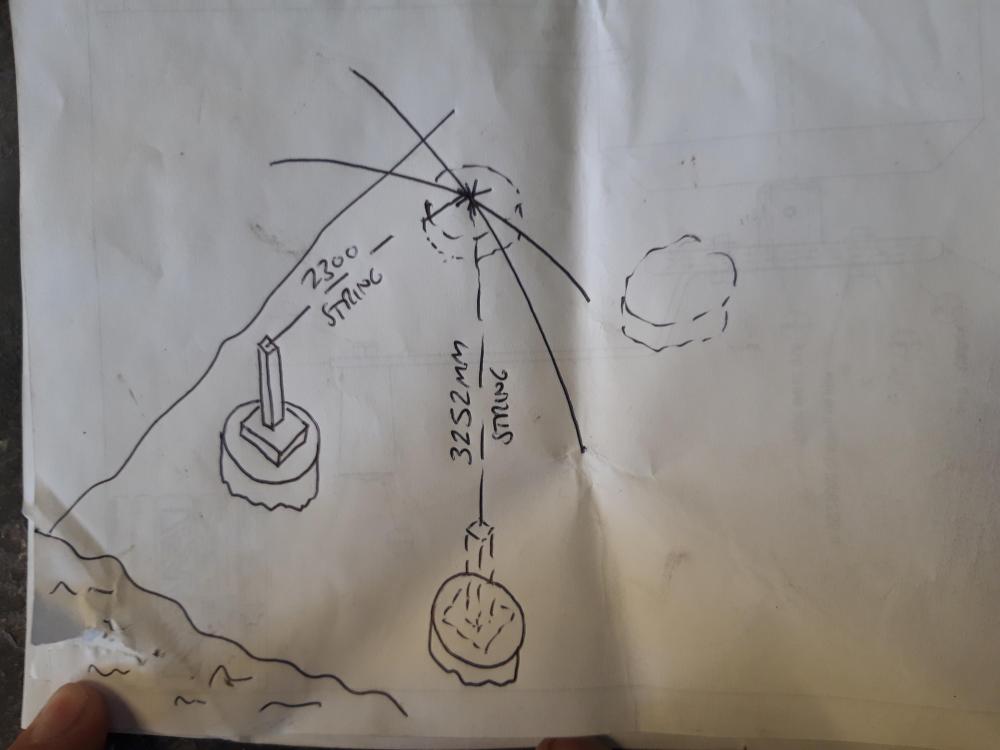
You have two existing plinths that are "down" the slope. You want to put two more plinths further up the slope. If I'm correct each side measures 2300mm. Standing down by the stream, looking up the slope: 1) From your existing left hand, lower plinth, strike an arc 2300mm. From your existing right hand, lower plinth strike an arc 3252mm. Where the two arcs meet is the centre of your left hand plinth further up the slope. 2) From your existing right hand, lower plinth, strike an arc 2300mm. From your left hand, lower, existing plinth strike an arc 3252mm. Where the two arcs meet is the centre of your right hand plinth further up the slope.
-
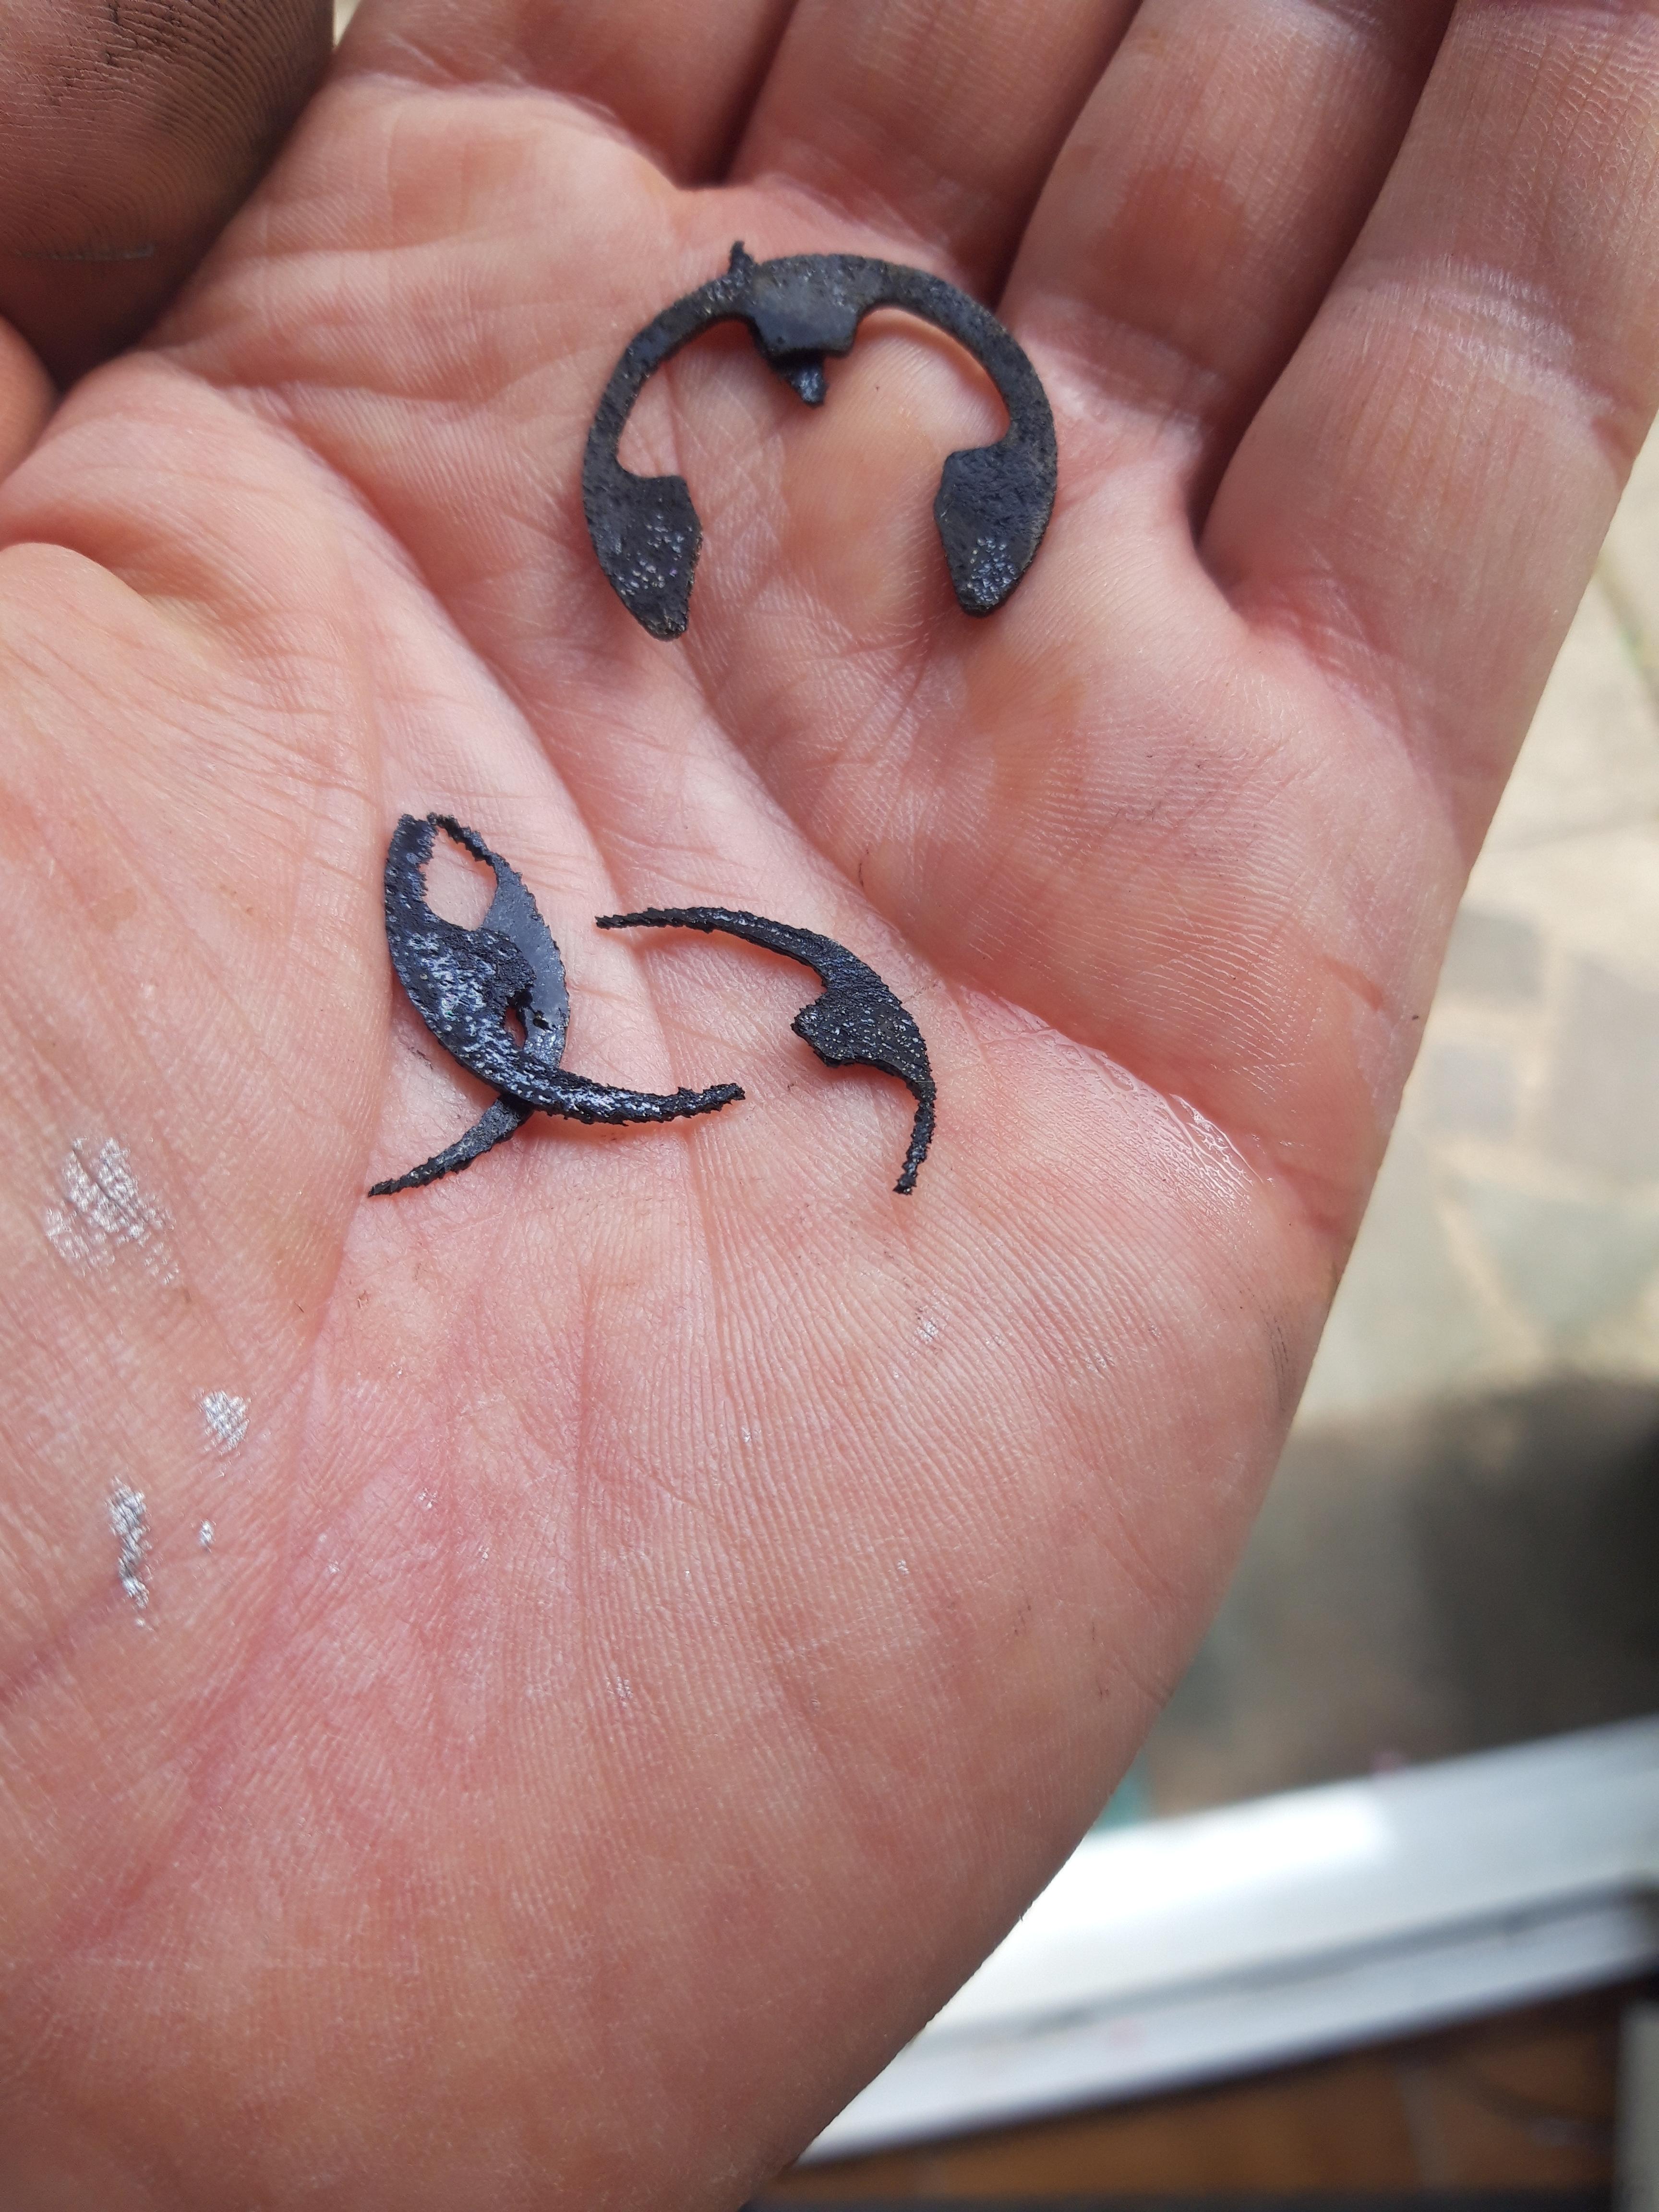
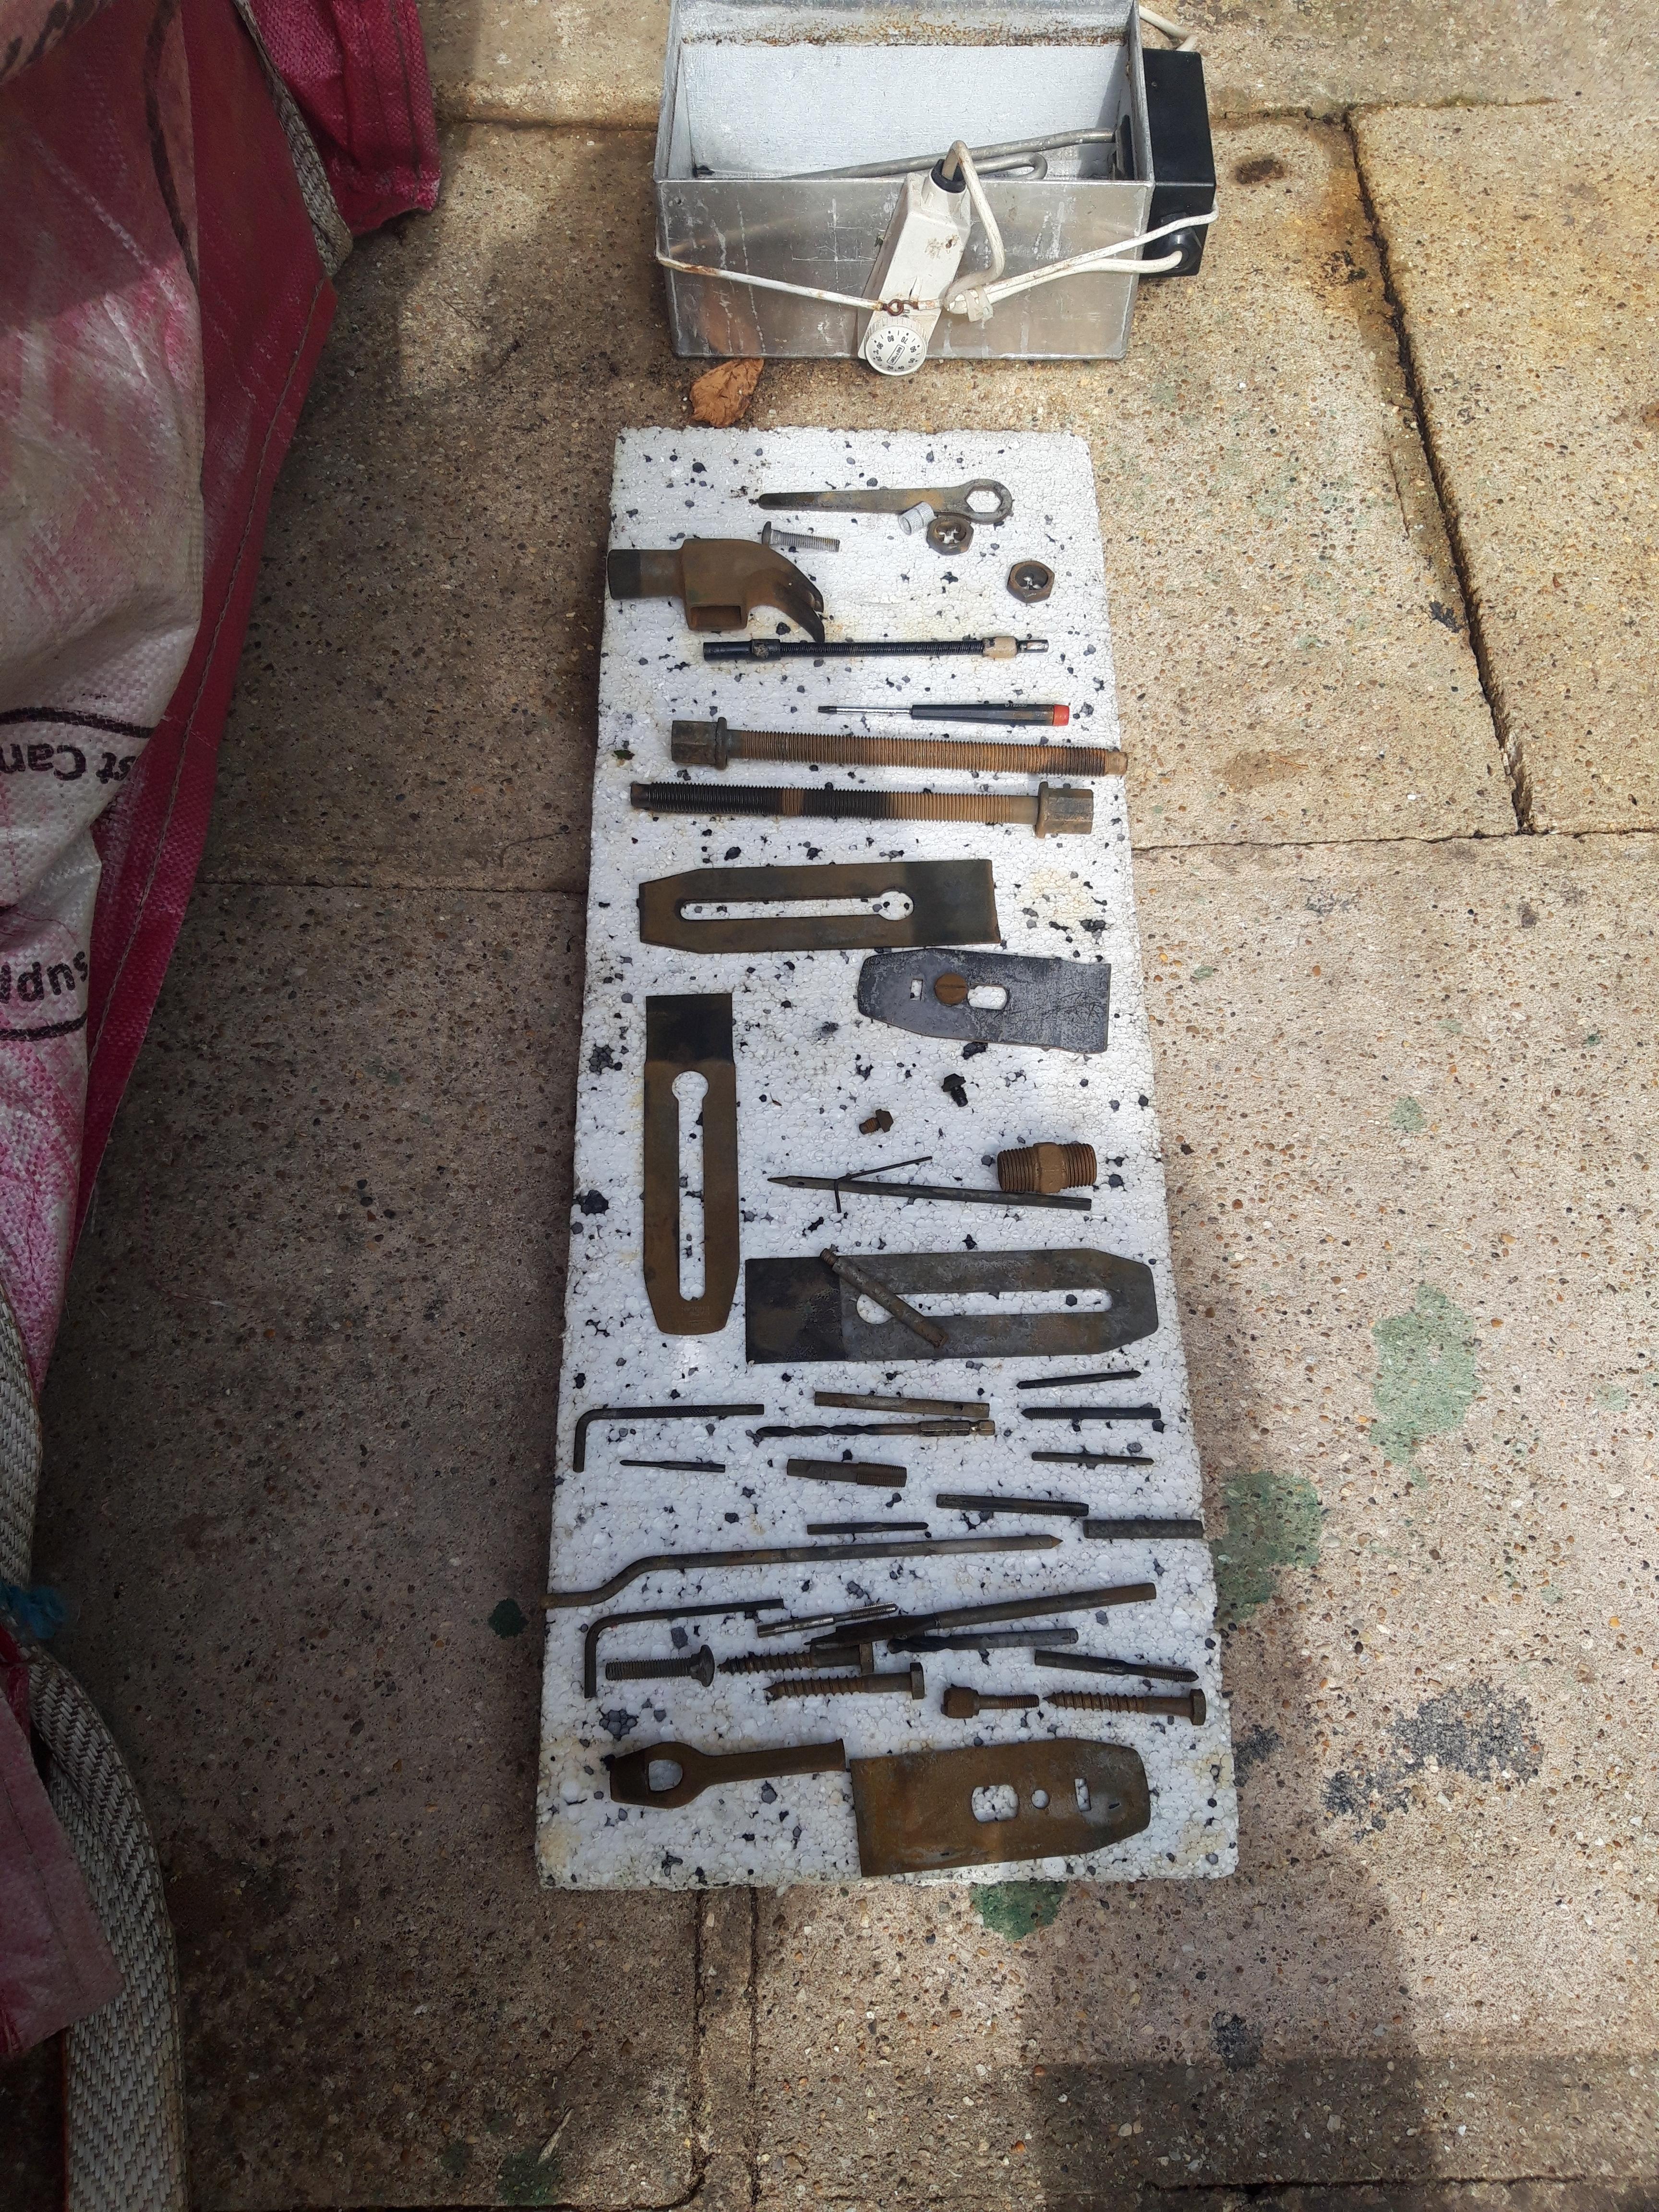
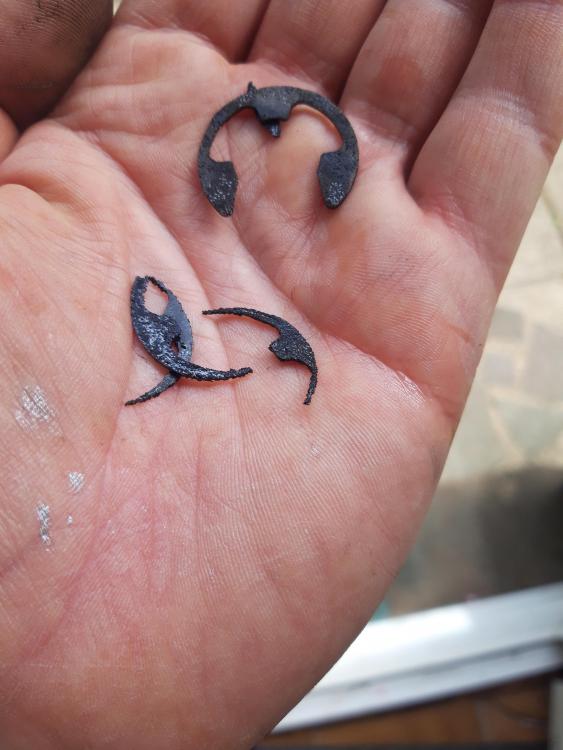
I don't think so! Sounds like hard work and overkill. Might have a black plastic waste somewhere here... One thing I'd noted is I left the parts in the small tank for over a week and some parts have corroded/ disintegrated! What was 4 circlips: The plane blades are interesting (and annoying). They've both thinned down and narrowed at what I guess is the high carbon content end:

-
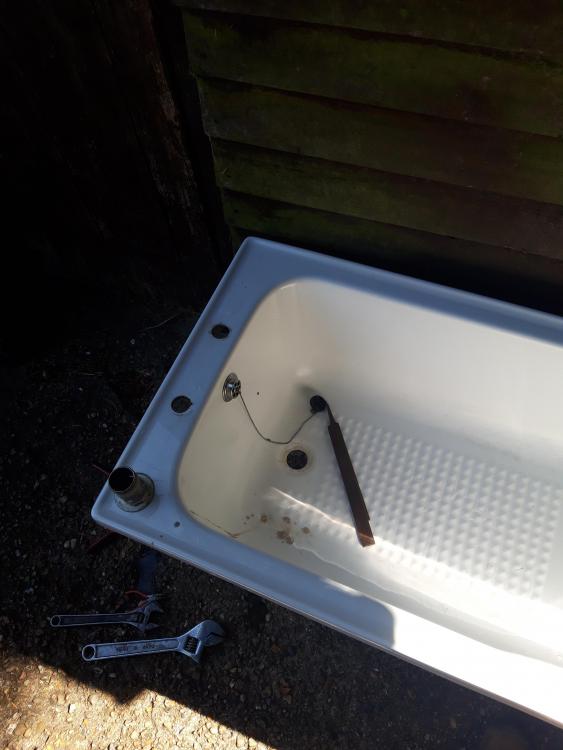
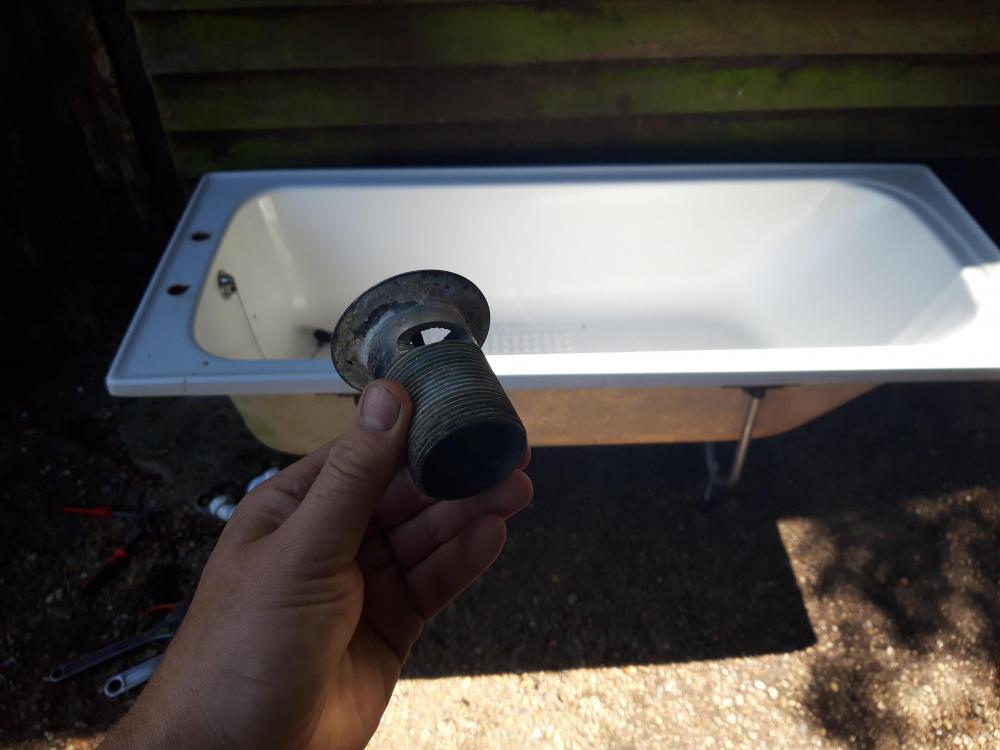
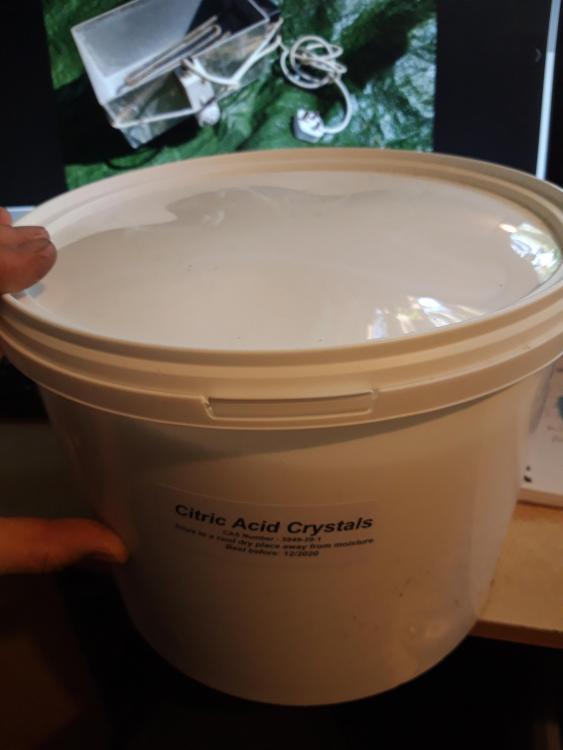
Need to blank the plug hold off for the big bath tank. Figuring though the citric acid might eat whatever alloy the waste is made of as it says it'll eat zinc, tin, lead and alloys thereof. How to blank it off?
-
Don't beat yourself up you could have been the bloke who ordered two! ? All I really wanted was a switched power take off for a vacuum, for my radial arm saw and I've just realised I could have done that with a 13A socket and one of the many 230V coil contactors I've sitting here! Doh!
-
Arsenal...North of the river then? I mean "Welcome aboard!" ?
-
MORE wrinkly I think you mean... Was using some 50% phosphoric acid at work today (for it's intended descaling purpose) and wondered how that would work in the heated tank?
-
10kg of citric acid just arrived. Bath time soon!
-
We've used this stuff before:

-
I used Polypipe panels, video: Then A142 mesh over the top: Then 100mm of concrete:
-

mains water - how to bring it in and up through slab
Onoff replied to MarkH's topic in General Plumbing
I just left a pub and half a pint still in the glass! Some American IPA I regretted ordering. Prescott Summer Season something...yuk! I think you only need insulate as far down as the "frost line" in my case. With an insulated, passive esque raft...not sure. -
mains water - how to bring it in and up through slab
Onoff replied to MarkH's topic in General Plumbing
As belt and braces I rolled some perforated galv sheet: ...and wrapped around the duct in the "vulnerable" space above the footings: (Pre Wiska Gel and before Jet Blue Plus fixed the leak). -
mains water - how to bring it in and up through slab
Onoff replied to MarkH's topic in General Plumbing
Had to drill through the existing footings when I renewed my mains water. What a bitch! There's a metre of pipe insulation down inside the duct and Wiska gel on top to hopefully fully seal the duct. -
1m tall bits of wood with a base plate nailed to the bottom. Sit it on the lower plinths. Weight down with bricks. Two bits of string, where the arcs meet...or one big of string and a knot at the intersection. Tie other ends around nail in centre of 1m high posts, pull tight, knot marks centre of up slope plinths. 2300x2300 square? Diagonal bit of string will be 3252mm.
-
No fear of drowning now either. You can get rid of the life belts on the wall.
-
When I do my 30m2, passive-esque garden room it'll incorporate details gleaned off of the various threads here with not an SE in sight. I might make reference to my mid 80s copy of Part A for the flat roof joist detail but that's about it. The walls will be in effect a timber frame detail similar to Zoot's extension but I'll work backwards from a decent U value. The floor will be up to 300mm eps with a 100mm slab and UFH. For the green roof again I'll just copy what others have done here.
-
Pure cotton I find or silk...
-
@zoothorn, you're flying by the seat of your pants here by not employing a structural engineer. However...a bit of half educated searching always helps. Check this out. You will have I think to sign up to Pinterest. General guidelines from the States about cantilevered decks. I'd just pick the nearest equivalent metric sized timber and maybe go one size up depth wise for good measure. Make sure the timber strength classes are the same too. I too am a master of winging it! https://pin.it/g4efp3374gryet Just don't blame anyone but yourself if it ends up as a raft! Edit: Got a feeling you're going to love Pinterest!
-
Tried the above in Google Translate but to no avail... ?
-
I'm not saying do it on the ones yet to do or that you should have done it on the ones already poured, just what I'm used to on commercial sites where I see columns and piles and actually have been involved in building machinery support plinths for 35 years... Re-bar cages serve to reinforce the column against crushing loads that may otherwise fracture/crumble the column. A DIY method of installing vertical bars made into a cage: https://www.instructables.com/id/Make-Rebar-Cages-On-site-For-Concrete-Piers/ Sometimes re-bar columns are spiral wound. Dropping a couple of random rods in vertically will undoubtedly help but it's not really "designed" as such. For what you're doing a good strong mix with a waterptoofer in should be fine and don't sweat the lack of reinforcing cage. Anyway yours is more of a pile or footing and to some extent you've the added "benefit" that they're in the ground so have lateral ground pressure acting against them. Tbh yours "look right" pretty much so carry on regardless! It's only a f**king shed! Looking forward to seeing you bring your woodwork skills to bear.
-
No.1 - Do something about those sticky out re-bars before you slip on the slope and impale yourself! Cut flush or jam a lump of timber over them with a hole drilled in a bit. Are said re-bars in the picture just bits of straight rod stuck in vertically? Ths concrete columns I see usually have a rolled mesh cage in them or flar plate/ vertical stud arrangement.