vivienz
-
Posts
1378 -
Joined
-
Days Won
15
Everything posted by vivienz
-
Ah, good spot, Jeremy. I shall consider further. I have the details of a place in Southampton that I will ring tomorrow. They do all things balustrade and of that nature.
-
You splendid fellow! That may well be arriving soon - thanks!
-
Welcome. We found our rural north Dorset plot on rightmove as a knock down and rebuild. Any thoughts on what sort of build you want?
-
I will add a photo later, but the door has exactly the same thing as the one in the photo. Without the letter box and the pooch.
-
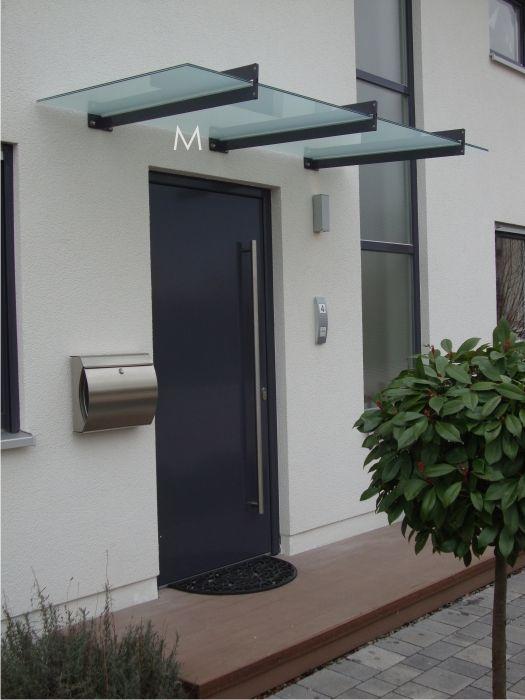
I think that may be overkill for a canopy over the front door. I have a 5m high brise soleil fixed to the front of the building next to the door and glass/steel balustrades around the balconies upstairs all with similar fixings and bracket sizes, and all of which remain firmly in place. Following this, if I have 3 well attached brackets carrying the glass through their middle, with what look like similar sized attachment plates and fixings, I think that will do the job adequately. I'm not sure that an SE could add much more to a canopy apart from cost and over-specifying. I've encountered really good SEs and ones that have added no value to the build but cost a fortune for what they offered, so I'm wary of employing them just for the sake of it.
-
The wind here is pretty fierce - we have no shelter at all between us and the southwesterlies that come in, which is why I like the look of the one with the glass retained by 3 brackets. It would look not dissimilar in style to the brise soleil we have fitted and then hasn't been a creak or groan out of that through all the bad weather, so I have some confidence in that type of design. Keeping it clean shouldn't be a problem, just a quick wipe down and maybe a coat of Rainex on it to stop stuff sticking as well (it used to work a treat on the shower screen at the old house where we had hard water!). As for a BMW showroom, no chance of that with a pair of Fiat pandas parked around the corner - a BMW wouldn't be seen dead around here!
-
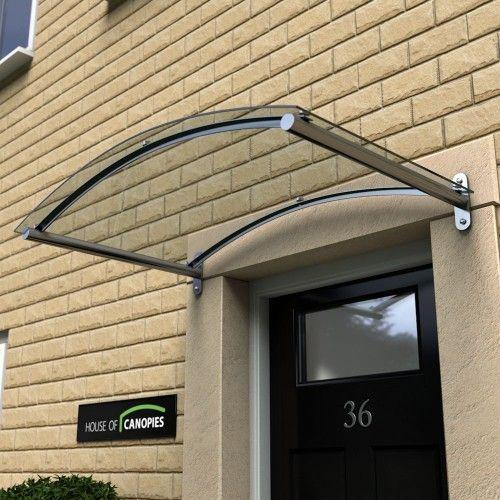
I've seen lots of examples with curved glass - would that help counteract the span at all, assuming the design would work for you? Like this one.
-
Structural Steelwork Support On Passive Slab
vivienz replied to davidc's topic in General Structural Issues
I've got steels in my building. They are across the long spans of the lounge/kitchen/dining area and the gable windows upstairs. -
Can I be brutally honest/my usual tactless self? Those fixings look an awful lot like the shower arms I have in my bathrooms. Okay in the bathrooms, but not over the front door. That's the problem with pinterest - it's responsible for the ceiling feature in my lounge, my wetroom and possibly a canopy. None of which are/will be cheap. Damn!
-
....and I've just called my window/door people. A compromised gasket is suspected, so someone will be out to have a look pdq. Love good customer service - my roof was fixed yesterday, too, barely 24 hours after I rang them about the slates blowing off in the storm.
-
Oooo! That's lovely! Okay, so I'm probably best contacting a fabricator. Will do and will report back. Thanks!
-
I think I still want a canopy, though.?
-
Hmm. Good point. I shall have a word with the door supplier and see what they have to say.
-
I've always known that our site is exposed to strong south-westerly conditions but the storms and seemingly constant rain since October have emphasised just how much, and water regularly gets driven under our front door on the south face of the building. I need to get some rain protection in place, at the very least a canopy and have seen my heart's desire on pinterest. Of course, it looks expensive. Can anyone give me some start points on where to source one of these? It looks sturdy enough to withstand the winds that come sweeping across. I don't think a polycarbonate one will look nice or be up to the job and I'm not confident of anything reliant on a couple of fixing points as it will need to be over 2m wide. Any pointers most welcome!
-
Clear vegetation from plot, DIY. Advice please!
vivienz replied to Dreadnaught's topic in General Self Build & DIY Discussion
If it weren't quite so far, I'd be happy to oblige! In truth, I wouldn't worry about saving anything. You will have to put it pots or a part of the site that won't be bothered by machinery/needed for materials/etc. Then you will need to keep it all fed and watered until it's ready to plant, which is when you find out that those carefully nurtured specimens don't fit the places you have for them. Purely on a time/cost basis, it's cheaper to buy new plants when you're ready. -
Clear vegetation from plot, DIY. Advice please!
vivienz replied to Dreadnaught's topic in General Self Build & DIY Discussion
There isn't anything particularly nasty in the photo, tbh. Shrubs, a few perennials and a few nettles. I can't see any bindweed either (rampant climber, strangles other plants, large white trumpet shaped flowers in late summer/autumn). Check if there's anything you want to save for re- planting later, take out the shrubs/small trees then get rid of those nettles. They will come through first and spread quickly. After that, a large covering of weed suppression fabric will save a great deal of time and effort until you know what you want to do with plant and machinery on site. Clearing a site by hand with minimal tools is back breaking work, even for a fit squash player! Different muscle groups, used in different ways. There won't be enough vegetation to absorb glyphosate or be burnt until a few months from now. The weed suppression fabric will stop it all from growing in the first place and you may be able to re-use it when you do your final landscaping. -
I need to pick a kitchen, recommendations welcome!
vivienz replied to Carrerahill's topic in Kitchen Units & Worktops
I have one, fitted last year, and I'm very pleased with it. A friend put one her place after a kitchen exrension late last year and was equally pleased. -
Looking at things from the end, how much weight would that third party opinion carry in a hearing? If it's more for your own confidence/comfort, the difficulty in getting another party in the same industry to speak out against one of their own could outweigh the benefit their statement offers - it is just an opinion, after all. Don't forget that in a civil case, evidence and submissions are judged on the basis of balance of probabilities, a far lower bar of proof than for a criminal case.
-
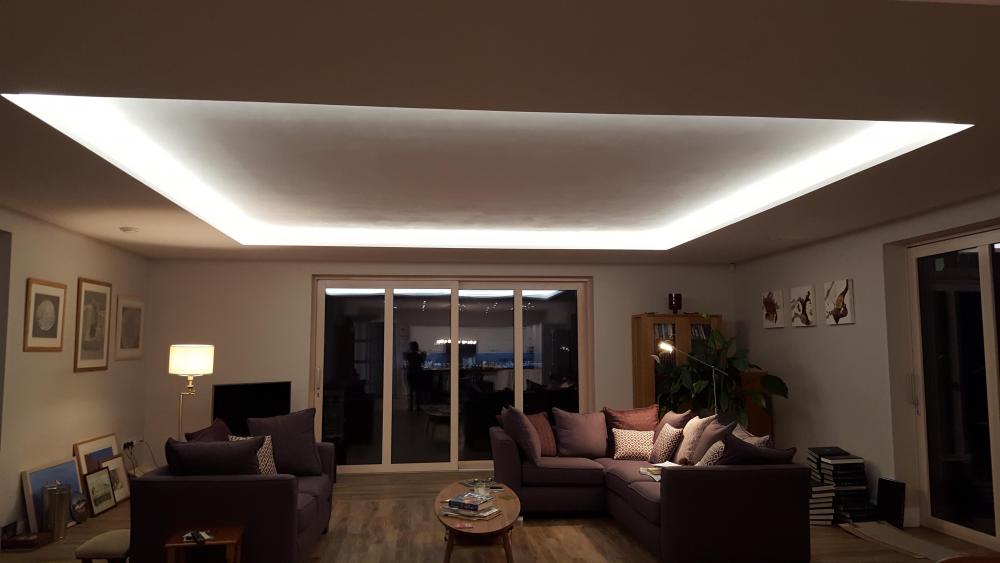
I would use this feature again, not that I plan to. The wash of light on the ceiling is effective and I think it's nicer than the coving lights that you can get, which I also considered.
-
@Adam2 I have two sets of LED strips up there - 1 light switch does one set (dipped headlights) and the other brings on the second (full beam). One set of lights is more than enough to read by - they are very effective. If we're watching tv, we just have table lamps on and I have an overhead LED reading lamp if I was to read whilst OH watches the box.
-
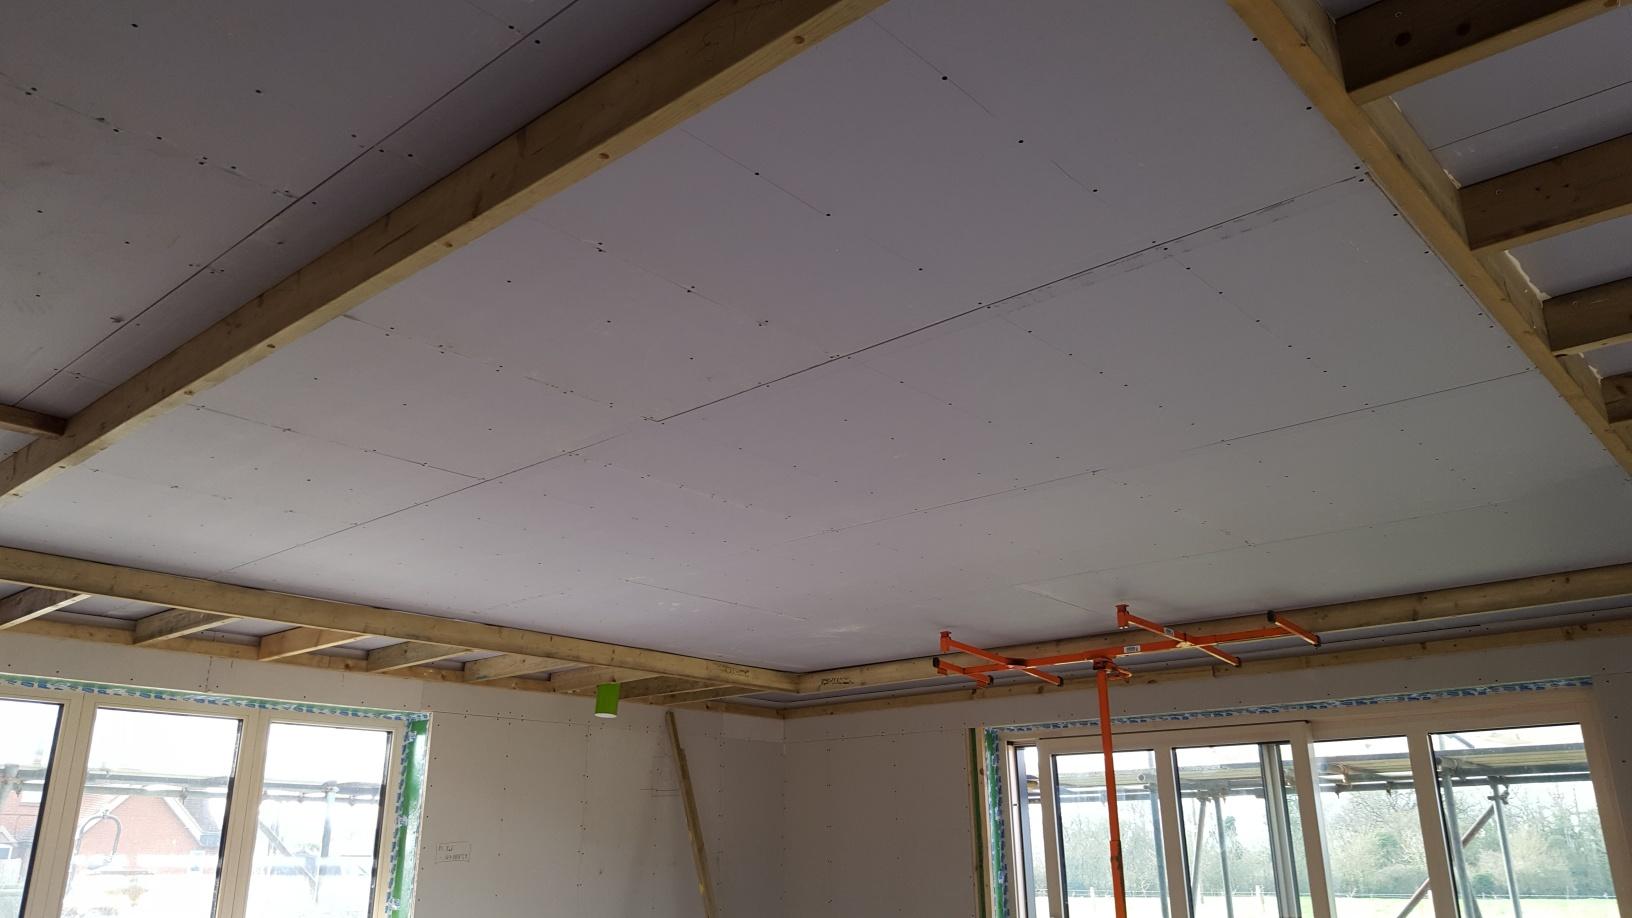
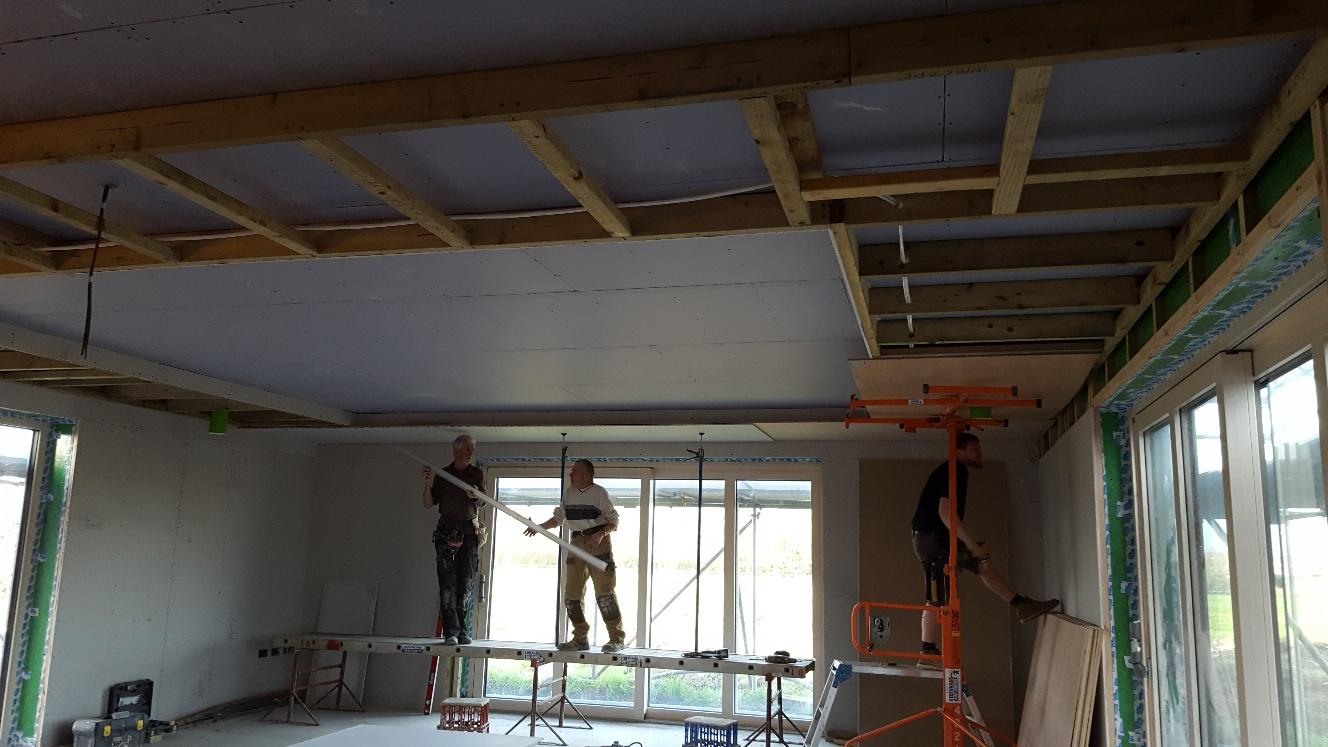
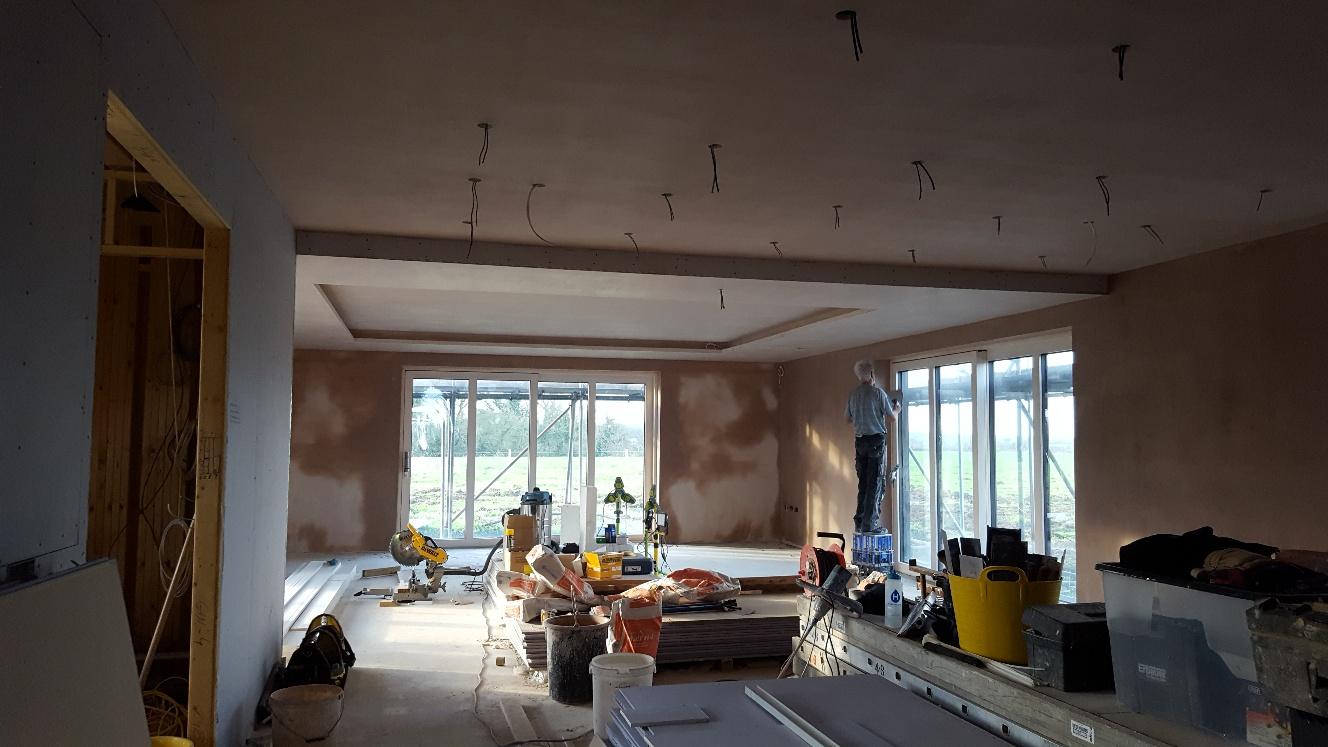
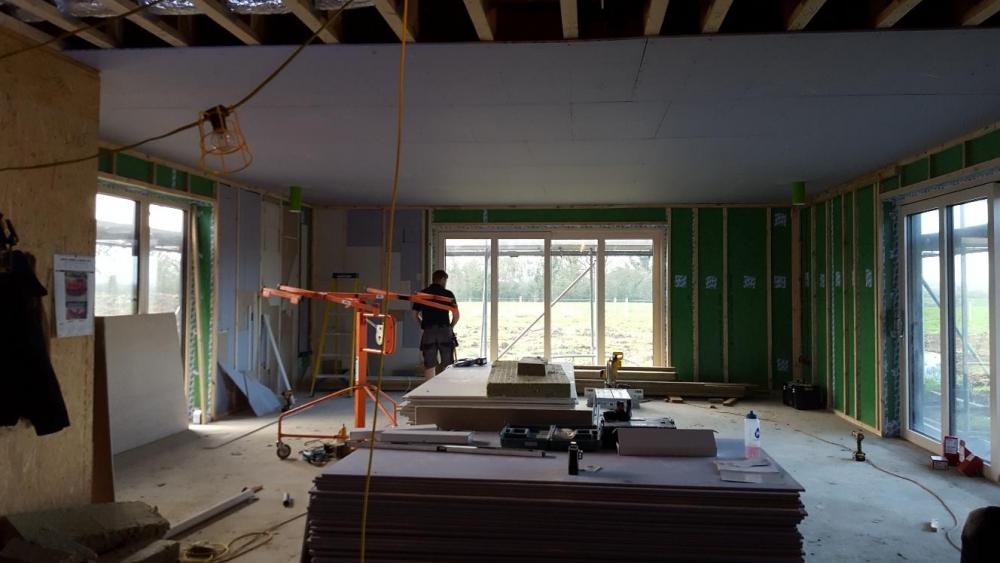
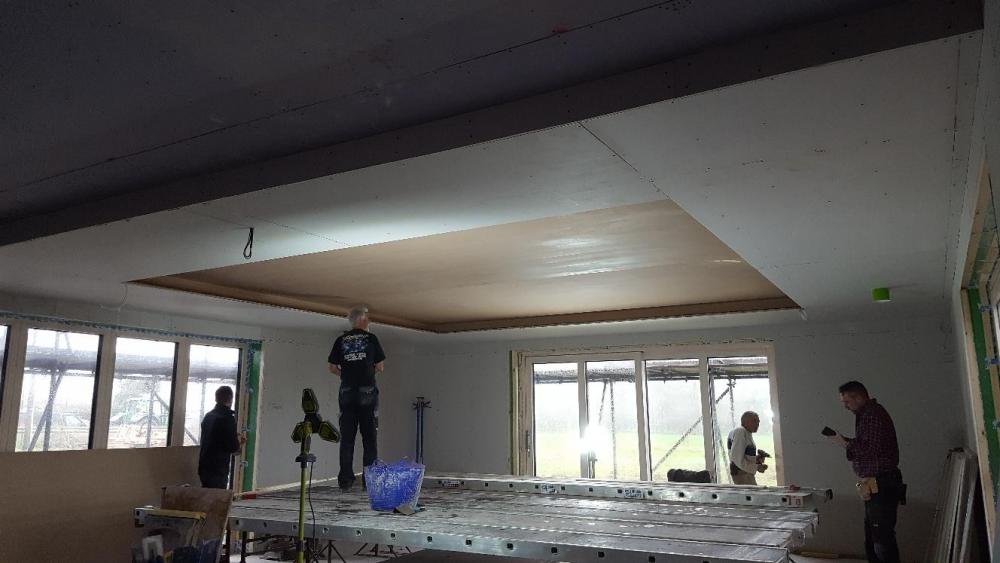
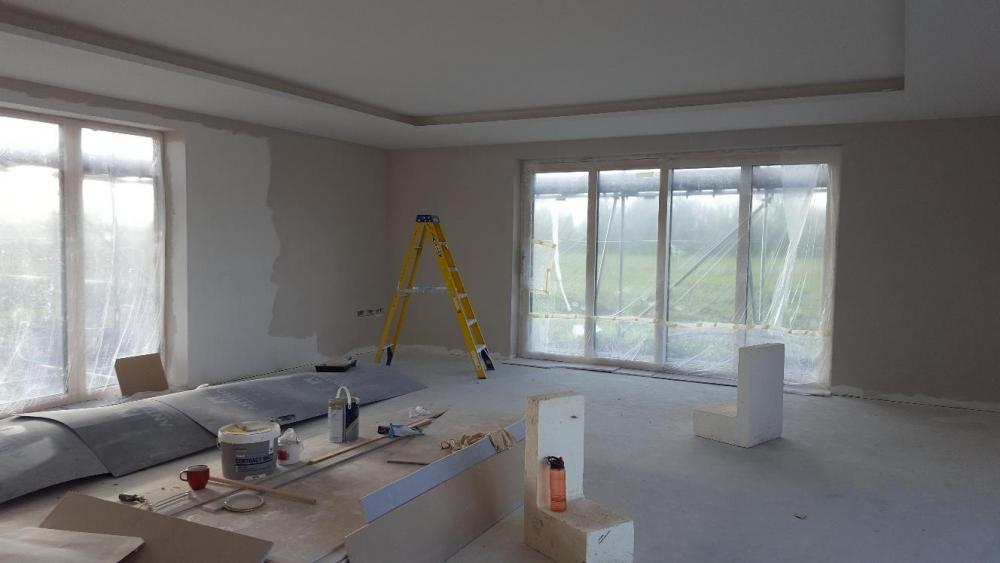
Sorry for the delay on the reply here, I've been transferring everything to a new PC in anctipation of the death of Windows XP and 7. Anyhow, I've found a few photos of the ceiling feature in the lounge area whilst under construction, so here they are. First off, the entire ceiling was dry lined with acoustic plasterboard. Heavy stuff, quite literally, and it took the PB lifter and plenty of strong arms to get it all up there. After the entire lounge/diner/kitchen ceiling was boarded, construction of the dropped border area was started. Note that the lighting electrical connections were all pulled through the boarding and in place throughout. There is a perimeter border, on the top of the walls, then the inner border at the appropriate depth. Noggins were put in all around to stabilise the whole thing and to make sure that the next lot of plasterboard had something to attach to. The green tube poking out at the bottom just left of centre is the MVHR inlet. There is another at the mirrored position on the right hand side, just out of shot. Next up was boarding the dropped section. This was done on the horizontal and then vertical pieces on the inner inset part. The horizontal was done in two stages - first up using ply, then the plasterboard was attached to this. Also, timber was put around the edge of the inner rim in the form of an upstand. This gives the impression of greater depth and more substance, as well as something to hide the LED lights behind. Once all the boarding was done, plastering was next. As seen in the photo, the inner section was done first. You can also see the right hand MVHR inlet now. It's worth making a comment on the staging boards, which I hired in for this job. They weren't cheap to hire, but it made the job of plastering so much easier and what it cost in hire was more than made up for by the quality of finish they were able to achieve and not having to waste time moving things around to get from one part to another. The whole of that lounge area ceiling was plastered in a day as a result. Here's the final plastered result, looking from the kitchen. The excess MVHR inlets was cut away immediately before plastering. Then, finally, here it is with the mist coat sprayed on.


-
The centre is the full height ceiling, 2700mm. The border around the edges is about 150mm depth.
-
It's nowhere near as pretty as a tesla powerwall, but I've had a battery system installed recently. My solar PV is a 5.4kWh system, 18 panels GCE mounts. All in with installation, £8k, back in 2018. The battery system is made up of 6 x 2.4kW Pylontech batteries @ £610 each and 2 AC controllers set up in parallel, £595 each. All prices ex VAT - I can reclaim this as part of the new build. Total cost, including install and bits and pieces, £5.6k. The whole thing has a changeover switch so, in the event of a power cut, I can isolate the system and still power the essential house systems and the battery controls are set up to always hold 50% charge so that they have some juice if the power does get cut off. So, £13.6k for the whole shebang.
-
FWIW, this is how ours looks now.
-
Could you do a cardboard mock up and stick it to your ceiling and get a feel for it?