sean1933
-
Posts
88 -
Joined
-
Last visited
Everything posted by sean1933
-
posi joist design problems - intersection with lintels...
sean1933 replied to sean1933's topic in General Structural Issues
Its 1200mm with joist span being 4m to spine wall, currently at 400c's. This problem also happens at 2 other locations seen below - one being a door opening 2250mm wide...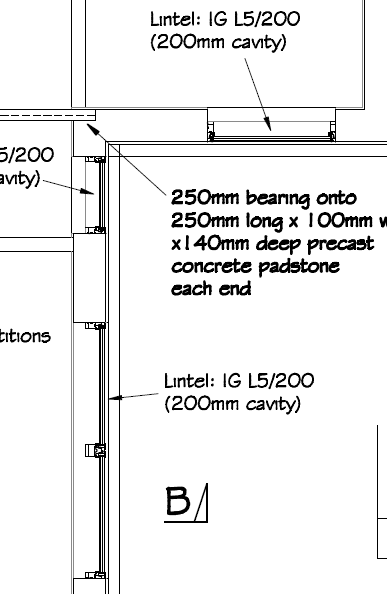
-
posi joist design problems - intersection with lintels...
sean1933 replied to sean1933's topic in General Structural Issues
joists and block infills would be located where the block is shown in the above diagram, with 1 further brick above to make up the 300mm spacing between floors. Hopefully the below helps:
-
posi joist design problems - intersection with lintels...
sean1933 replied to sean1933's topic in General Structural Issues
Hi Peter. Sorry I should have highlighted that the lintels in issue are not steels but the box standard cavity type lintels - birtley hdx 150 type (albeit 200 cavity). -
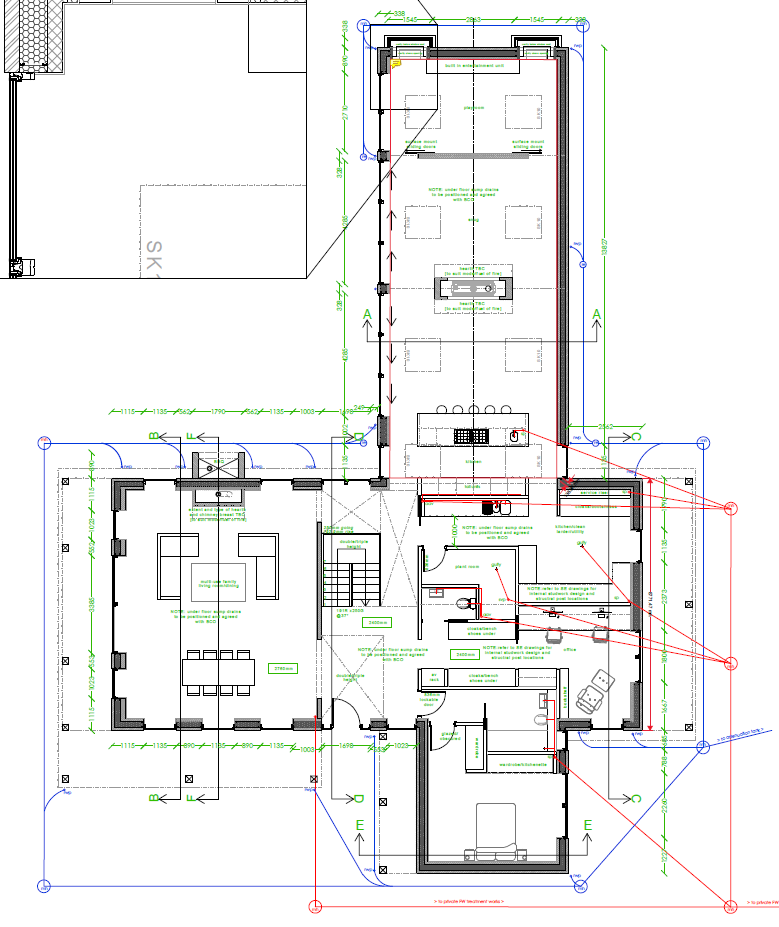
I am at the stage where we are ready to get the joists ordered and I've been struggling to deal with a few issues that have given me a headache. Our house is rather complicated with a lot of of glass including floor to ceiling windows on both floors. Construction is brick and block 200mm cavity. I initially wanted to go down the route of timber plates and resin bolts to help with air tightness but the structural engineer for various reasons wasn't keen. I have therefore resorted to a combination of built in, and top cord hung onto various steels (some without a timber plate). Obviously I want a flat floor and various steels being up to 4mm out of size caused a few headaches, but nothing a steel packer plate at the bearing ends wont fix. There is one problem however that I'm struggling to overcome and my head hurts, any solutions welcome! Joists (posi or easi joist) are 254mm Ceiling height being 2.4m. In a couple of areas of the house we have floor to ceiling windows both above and below the Birley HD190 cavity lintels - I believe this rules out hangers due to no downward load above. The frustration I have is that where the joists are built in they obviously go from bearing on a block, to bearing on the lintel (which is some 5mm thick + mortar bed = 10+mm)... thus meaning they are some 10mm out of level the joists next to them. Solutions I have considered: - Joists with trimmable ends. Wolf say this is length ways and the bottom bearer cannot be trimmed down more than 6mm - this mitigates a bit but doesn't fully fix the problem. - Pack out the bottom of every block bearing joist with packers - bit bodge like....and laborious. - Accept a slightly uneven floor and hope it isn't noticeable or if it is fix with a thin latex fibre screed - as above... - I did consider switching to top cord hung joists at these points (or maybe the entire floor) but comparing old technical documents from Wolf vs the newer version, this option isn't included so I can only assume it is discouraged. I have asked Wolf, but no reply yet. I seem to recall reading something similar on here but cannot find it for the life of me... Any solutions greatly requested!
-
Hi Peter - I am heavily leaning towards the isokern idea for the main logburner for longevity etc. The chimney is however large enough that a slender person could probably just about climb up inside to inspect any twin wall connections. From a labour etc perspective I considered Isokern DM is probably the way to go rather than Dunbrik as each side of the chimney is 700x800 internal so would need huge amount of vermiculite to insulate and I would therefore probably need to build another smaller stack inside the larger stack for stability (flues cant free stand I believe) and to encase the vermiculite - sounds labour intensive. Not to mention the added weight of an entire new internal stack that wasn't account for by the SE (thank you Architect....). Perhaps an alternative might be 200mm Dunbrik boxed in at 1 corner of the stack (so only 1 extra run of bricks and flue required), does this sound more sensible? the logburner specs a 150 flue so I assume going bigger isnt a problem? With regards to the larger BBQ chimney I calculated the size of flue required for an open fire as per building regs... as the opening is something like 1350x825mm, a 350 flue is broadly in the remit for what size is suggested for good draw. In reality I believe 400mm would be better but you cant get a liner in that size unless I go concrete at huge expense so I figured as its outside anyway it wouldnt be the end of the world if all the smoke didnt go up the flue. Or do you consider I'm going over the top? I am just trying to avoid what was a 'nice to have' BBQ idea not costing me the earth in liners!
-
I'm having a similar dilemma at the moment so am interested to learn which route you chose in the end? We have a slightly different and unique setup in that our stack is fully external and 1.8m wide with a BBQ/fire on the outside. The stack has therefore been split in 2 to serve both the BBQ/outdoor fire and internal woodburning stove. Builder started leading me down the path of a liner as its easier and faster to fit than clay blocks (as BBQ is occasional use) but now I'm questioning it having read this thread. My current plan is to use a 150mm twin wall flue inside one side of the stack (for logburner, having been sleeved through the cavity wall), and a 350-400mm steel liner on the other side to service the BBQ/fire. Any input greatly welcomed!
-
Out of interest what sort of thickness, and price were they Simon? Just looking at similar options at the moment for under our steel columns. Currently trying to talk to Armatherm and Farrat.
-
hyload or 'normal' (eg visqueen)... whats the difference?
sean1933 replied to sean1933's topic in Damp & DPCs
Thanks both. Engineer hasnt spec'd a DPC material. Would I be right in assuming Hyload would be a better choice? Ie am I assuming correctly that your inference is a switch from Hyload to cheaper visqueen could be an error, but switching to Hyload when already intended visqueen wouldnt be an issue as its a better product? -
Can anyone help answer this for me - google isnt helping and my old school builder said its a fad, no need to pay for hyload dpc. Not sure if it makes any difference but we have a jablite insulated beam and block floor system, and a reasonable number of high pointload walls due to lots of glass and not much actual structural walls. Below ground blockwork is 10n, a reasonable amount of the above is spec'd at 7n. Thanks in advance!
-
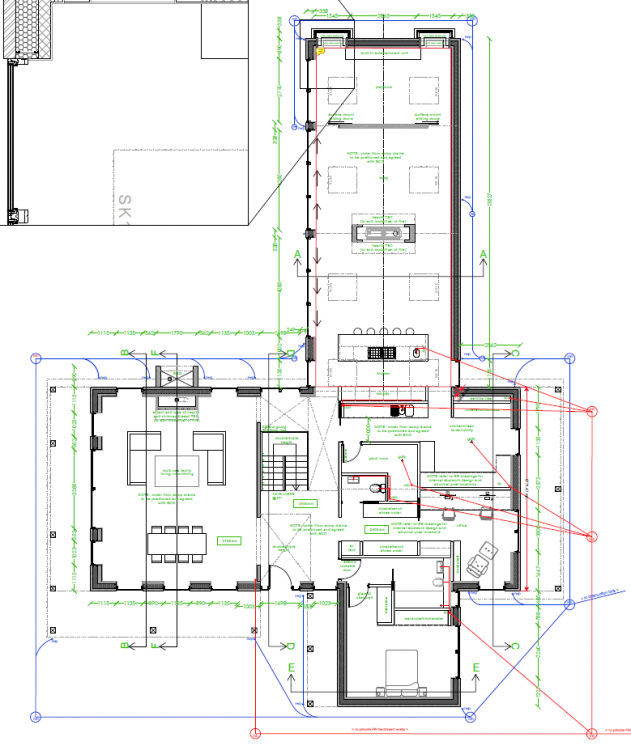
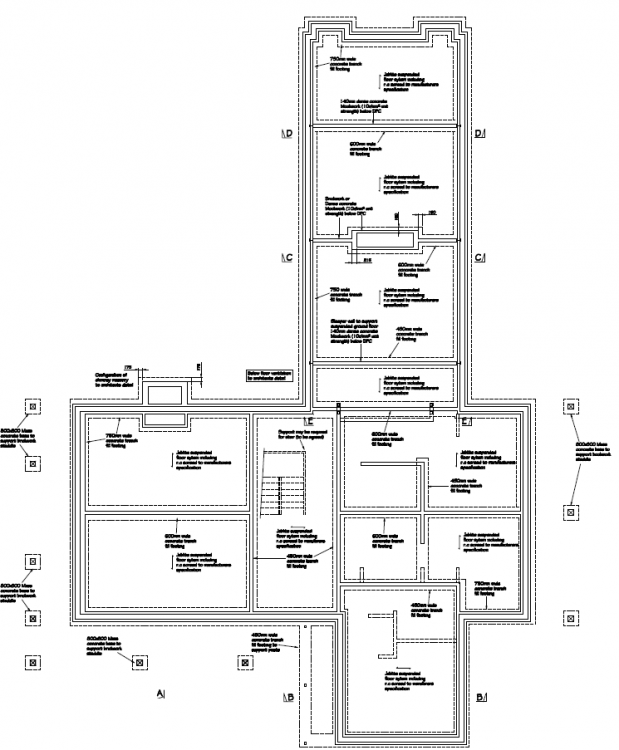
I'm just trying to work out spacing for air bricks as we have a complicated shape lots of level tresholds - my plan overall was cross ventilation left to right. Having dealt with the rear extension where we have level thresholds pretty much all the way along (dealt with via a sunken drained void hidden under the paving in line with NHBC guidance doc http://www.nhbc.co.uk/Builders/ProductsandServices/TechZone/NHBCStandards/TechnicalGuidanceDocuments/61/filedownload,65368,en.pdf ) I am now struggling to deal with the ventilation for the main house (ignoring front protrusion), although I am not sure if my understanding of the calculations as per BS5250 - It says you need the greater of 500mm2 of ventilated area per m2 of floor or 1500mm2 per m run of ventilated wall. My assumption is that this requirement is each from each side (ie air in, and out) , rather than total vents. My calcs being 139.5m2 floor space x 500m2 = 69,750mm2 / 6170 mm2 (each timlock vent) = 11.3 ie 12 vents each side. This clearly wouldnt look right on a wall thats 8.8m long as spacing would be c.3 bricks apart (not to mention the structural issues). Is this right? Assuming so, any solutions? Can I just get away with vents around the entire main building or do I need to consider double stacked vents (which I imagine wont look subtle and will take up most of the insulation space in the 200mm cavity so thermal bridge issues). Help!
-
Just about to fit my 11mm OSB sarking before Protect VP400 straight ontop. It's square edged - does it need a 3mm gap all the way around as I keep reading conflicting info ? thanks in advance!
-
OSB sarking & ventilation above breather membrane ?
sean1933 replied to sean1933's topic in Roofing, Tiling & Slating
Quick couple of Q's @ProDave if you dont mind. -Did you tape under the battens to seal any moisture risk from nail penetrations? Cant decide if this is overkill... -What size eave vent did you use on your main roof 10mm or 25mm? My reading now suggests if it is to be ventilated then a duo roof needs at least 25mm at eaves and 5mm at ridge, but I might be getting confused as sleep is somewhat of a luxury these days so brain is struggling! -11mm square edged OSB sarking - would you just nail it or is screwing necessary? And should it be gapped or tight? thanks in advance. -
OSB sarking & ventilation above breather membrane ?
sean1933 replied to sean1933's topic in Roofing, Tiling & Slating
thanks Dave - until I had a lead time issue I was going with 25mm wood fibre but jumped to OSB to save some time and money seeing as its only the garage. Will probably use wood fire on the house though. I think part of my question is around the eaves vents being a method of water escape, where as without them it has to fit though small gaps as will be resting on the tilt fillet or fascia board. It is a big roof (6m to ridge, 10.6m wide) so want to make sure it is done right. Do you think I should just stick the over eaves vents in like yours, a dry ridge system and be done with it? It's peanuts in terms of cost but I figured if not ventilating was more energy efficient and possible due to the roof buildup, then why bother ventilating... -
Hi all. I am just about to start boarding out our large garage/workshop roof (inc room in void above) with 11mm OSB sarking (Required for racking strength) and am struggling with a couple of details that I hope someone can help with. Our buildup is:: Natural slate Batten Counterbatten Protect VP400 LR membrane 11mm OSB 195mm rafters fullfill rafter roll 25mm celotex (might leave this off as it is only a garage after all!) VCL PB Firstly, as the OSB isnt T&G'd, does it need to be 3mm gapped on all 4 sides or should it be butted up? Do i need a watertight nail tape under the counterbattens or is this overkill in the real world? Ventilation... now this is where I am struggling. Accepting no need for any ventilation below sarking as fullfill - the Q I have is I keep reading about the arguments for and against ventilation above the sarking/membrane - suggestion being a lack of ventilation gives a warmer roof. My question is, is the counterbatten space and natural gaps created by natural slate enough for escape of any moisture, or do I need to ventilate at ridge and eaves? My setup is pretty much as @ProDave 's but he used an over eaves vent. These are the 2 conflicts: Diagram below for example doesnt show any over eaves ventilation, so only eaves vent is spaces between tiles... help! but @ProDave 's layout does:
-
Appreciate this is a bit of an old thread but I'm just about to submit papers to Ecology and need to get a solicitor onboard. Our purchase solicitor was expensive and slow, I wont be using them again. Does anyone have a recommendation for a good but wont cost the earth solicitor? Thanks in advance.
-
Great thanks. He is talking about the same loading that you were re pressure from the ground on the outside pushing block work into the cavity. We're currently building the garage using the same principles as the house. He was particularly worried about vehicles driving in and that extra load on external ground pushing against a hollow cavity (well, eps beads with ltd compressive strength) below.
-
Just going through this issue now and our SE is now saying (despite architects plans showing cavity below ground) that he's not happy with that and wants full fill concrete to ground level. I've compromised and agreed he's happy with a full fill sheet insulation as long as it has some compression strength to avoid inward collapse. He didnt give me a specific kpa number that I need so I am wondering if the normal white EPS70 will suffice... what did you use Peter? As our garage walls are now 2 blocks up (100mm cavity) I'm no considering doing what you did with a 70-90mm EPC and filling the outside gap with slurry cement. Did anyone else go for XPS over EPS? Seems to be harder to get hold of (wickes has EPS70 in stock) and much more expensive, and if so any recommendations on product/supplier? Thanks in advance
-
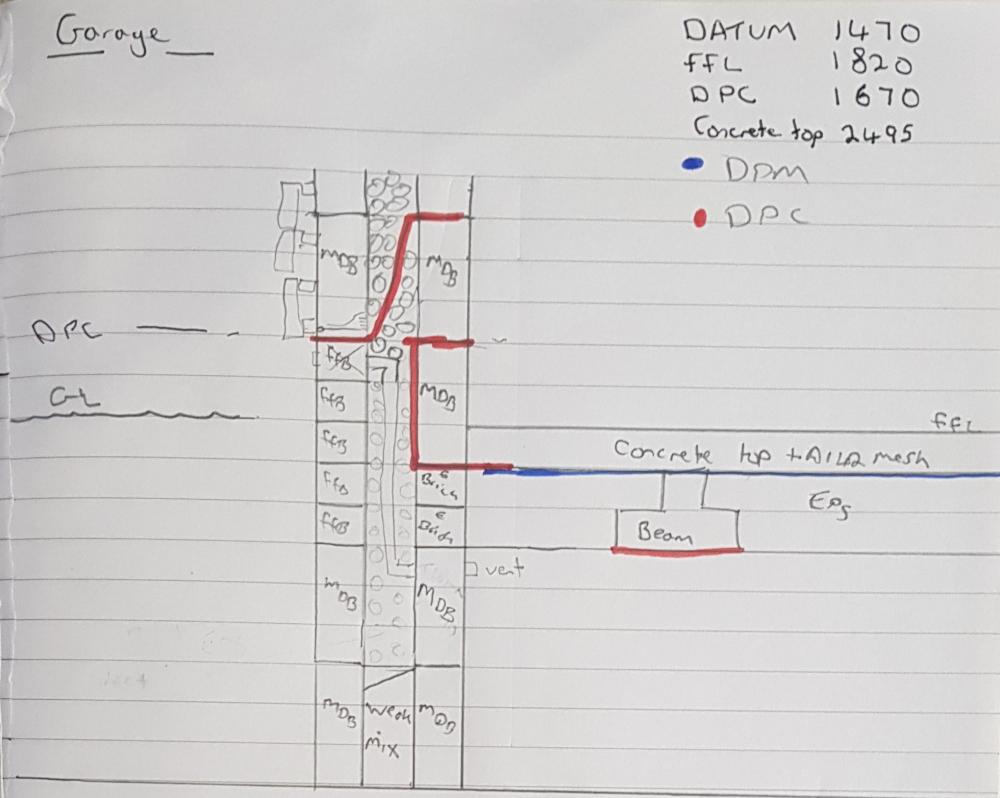
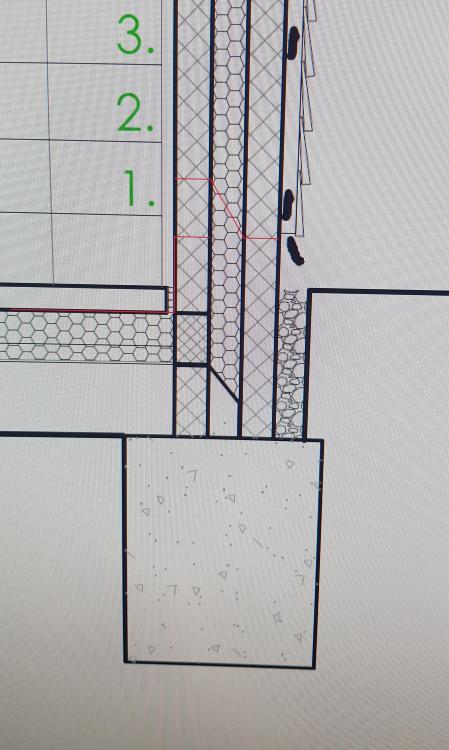
I haven't intentionally created 3 dpc levels but top is to form cav tray, middle is dpc and bottom is just lap under to avoid visible inside dpc as per architects detail... agree seems ott but cant think of anothet way of doing it without dropping dpc down 2 bricks which isnt ideal with our ground levels as its pretty flat all round.
-
Bricky starts on Monday and i showed him the below drawing today, to which he questioned the 2 level DPC potentially causing a slip line and suggesting Structural Engineers sometimes dont like it. Im sure I saw the same detail on here somewhere so interested in others views/alternative solutions. Original architects detail also shown below - reason i changed is because it would leave DPC visible internally as no screed buildup (jablite system with structural concrete top). Thanks in advance!
-
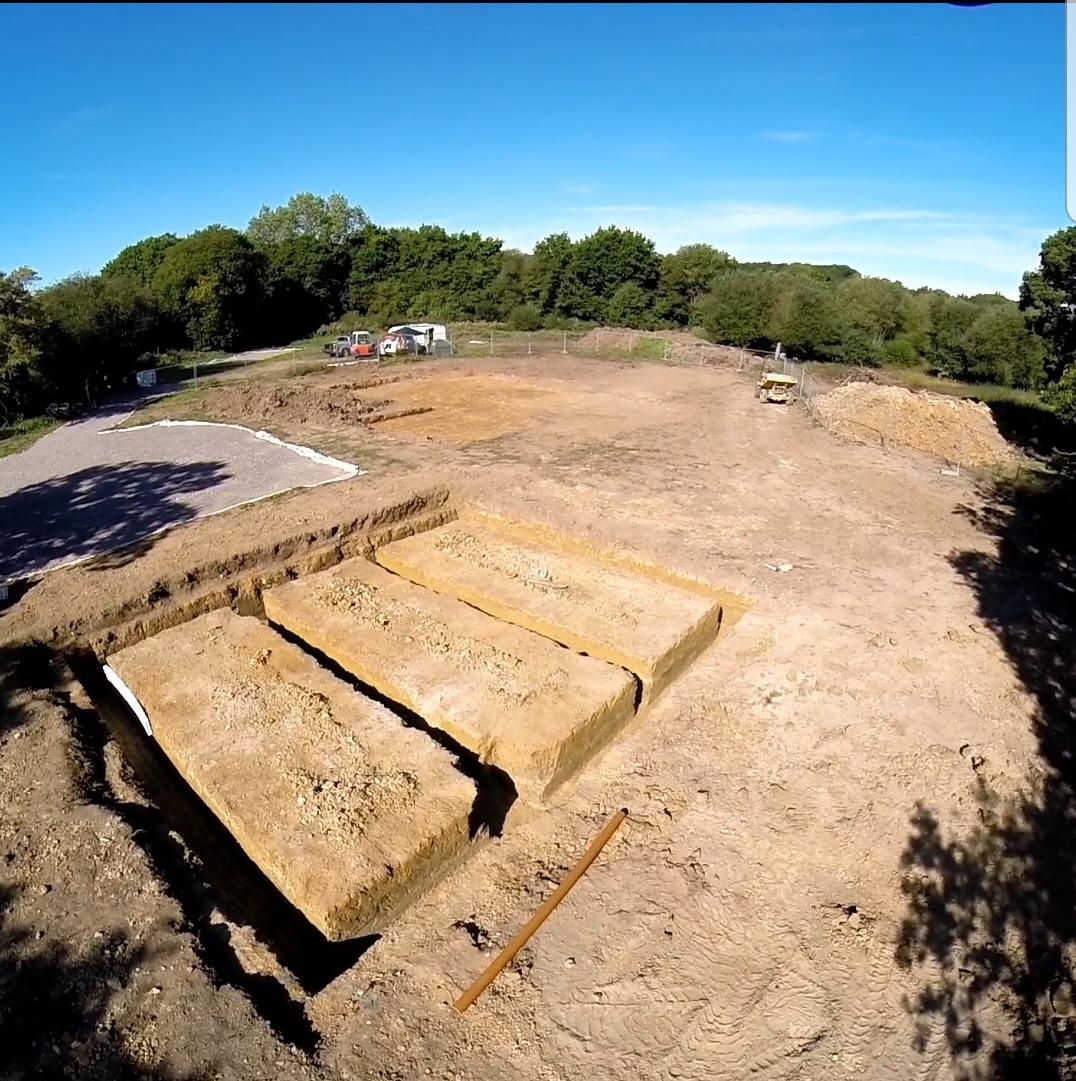
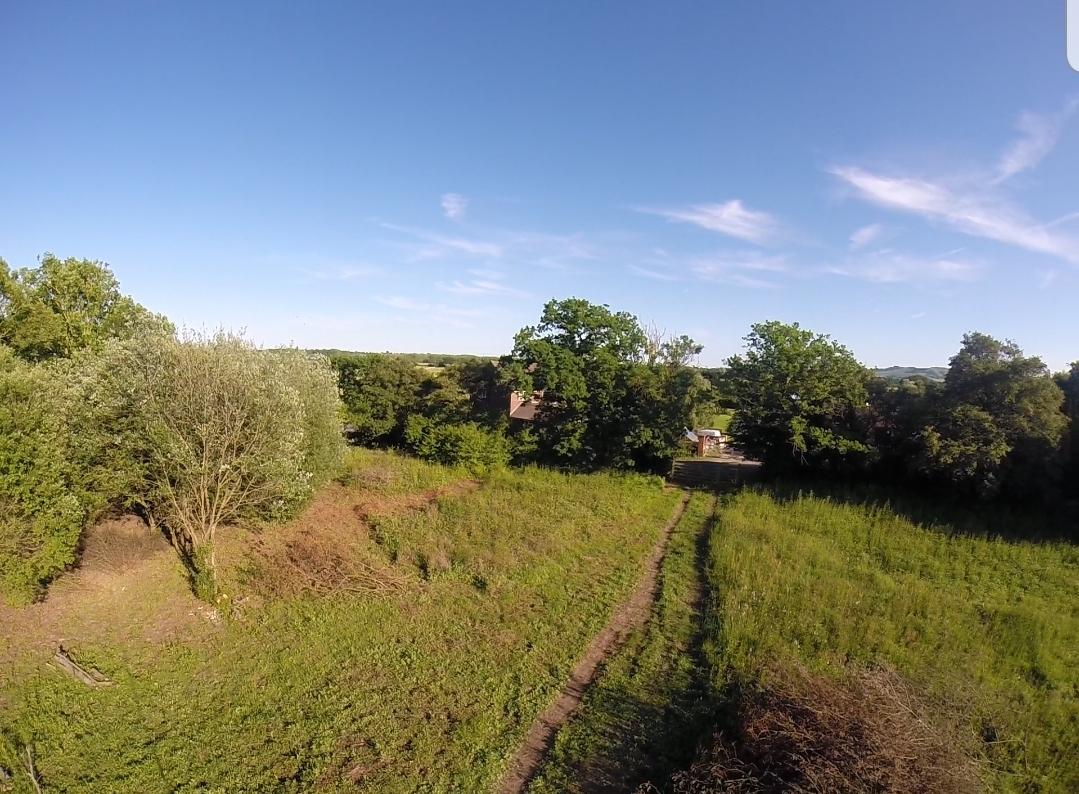
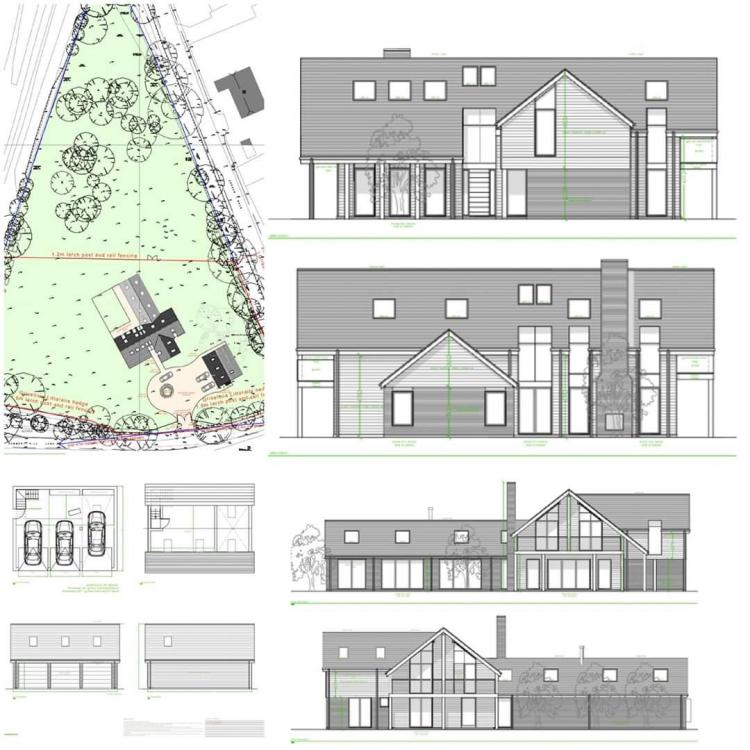
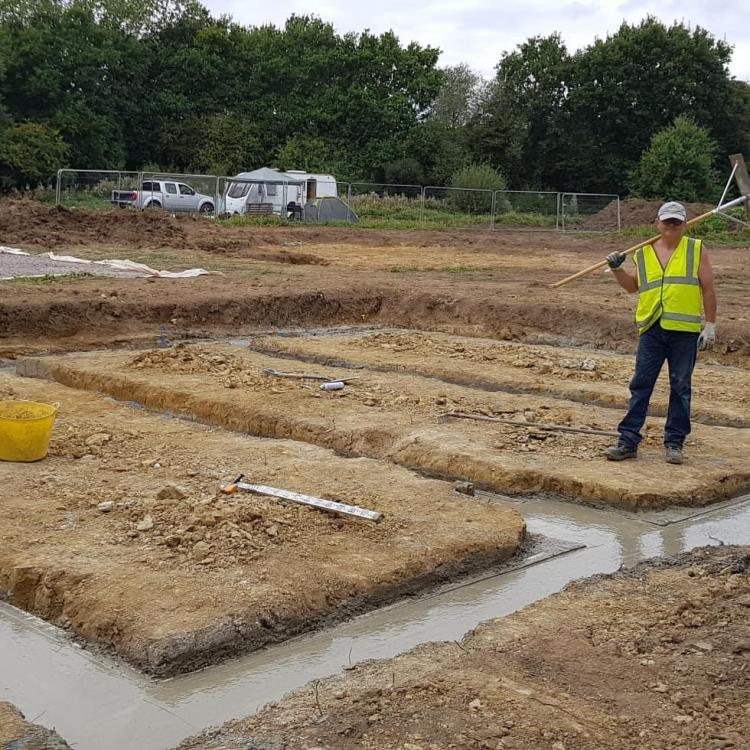
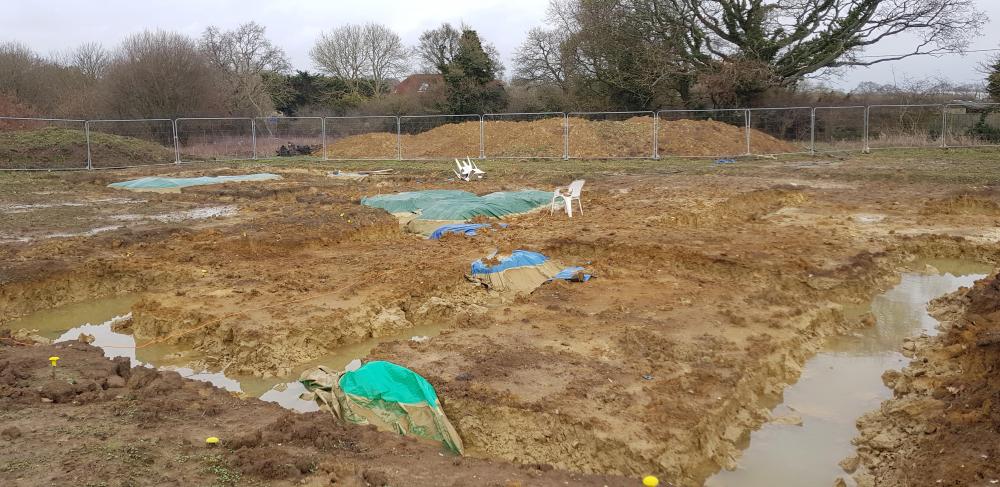
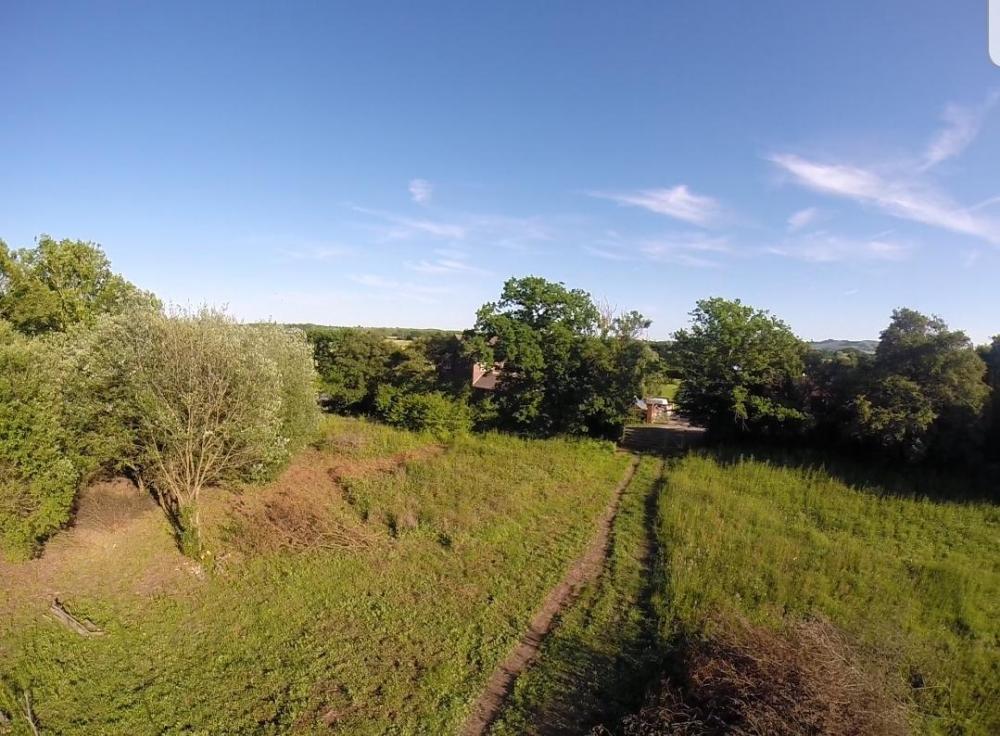
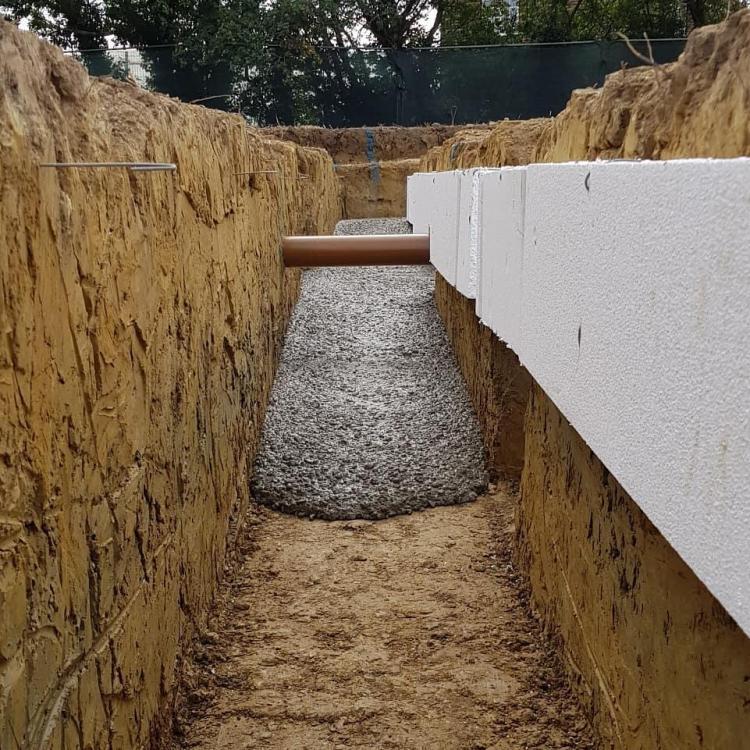
Hi all, I have been a member here for at least a year now and have found everyone so welcoming and helpful, I should have posted this many months ago so apologies for the slack! Sorry for the long post, and I'll also apologise now for any of my (expect many) stupid questions. So, 4 years ago my wife and then 1 year old daughter (my now 1yr old son was nothing but a future plan at that stage!) made the crazy decided to buy a 2.2acre greenfield site (very very overgrown and untouched for 30+ years - I have never seen brambles & blackthorn so thick!) without planning permission in a relatively rural area near Hailsham, East Sussex. Outside development area but with slight hints of positivity from our local planning office made us take the leap - land never comes up here and costs a fortune if permission in place. 3 architects and 2 approvals later (and a lot of near mental breakdowns!) and we finally achieved the design we wanted. In March last year we sold our house and following a brief period with the inlaws we are now all living on site in twin-static caravan - best decision we ever mad I must say. We're building a large 5 bedroom 'contemporary barn style' (ie lots of glass) house and large garage/workshop utilising brick & block construction with a 200mm cavity (filled with grey EPS beads) and jablite insulated beam & block floor system. The philosophy behind the build is a low-energy house using relatively standard building methods. Externals to be clad with a mix of fair faced brick a black wood cladding. I dont have any experience in the building trade other than being a keen DIY'er with an eye for detail - I hope to do as much as I can myself but know when to use professionals (brickwork being one prime example!). I do however have knowledgeable people around me (friends, google, and you lot!) and a retired builder (father in law) to draw from. Annoyingly due to delays with getting our B-regs plans signed off we couldn't start on the building structure until late summer, which has had horrendous repercussions! Most notably my father came over from the states in September for a week to help me dig and pour the foundations for both buildings, we got the dug & filled but the house is an entirely different story... rain hit 2 days before we were ready for concrete and we are now left with 150m of 1.2m trenches that are full have water and completely destroyed due to cave ins etc. As a result I've parked the house founds until spring but will be reverting shuttered trench-fill and blockwork. Not a problem as we've more than enough to be getting on with, bricky starts on the garage on the 24th! I've attached a couple of photos/plans but plan to track our journey via instagram (there is also a cool little aerial video), should any of you at all be interested feel free to follow me 'sean1933' Sean


-
Oversite for suspended concrete floor
sean1933 replied to cwr's topic in General Construction Issues
Hi Nod. I'm in a similar situation and our BCO has requested a concrete oversite below B&B with a slight fall to drain. Plan is to lay a DPM then slurry above. I was just wondering, what mix did you use, and how deep? Just trying to decide if I mix on site or order premix - 80m2 to do soon on the garage (house will come later!). I already have the fall created by the soil so was hoping for a 20-30mm cap will suffice. Thanks Sean -
Thanks both. The jablite B&B system is the beams + EPS infill system. Architect has specified cavity fill insulation to extent at least 150mm below the beam bottom to help with thermal bridging. He has no experience with blown beads (it was my choice as we're going wide cavity on the house - 200mm) but hasnt spec'd any alternative insulation below DPC.... building control didnt seem to have an issue signing the plans off so would assume they are happy but I will check the BBA cert just to be sure. Below the beams I have 2 blocks before reaching trench fill. To further help with thermal bridging I plan to use 1 course of thermalite Hi-strenth-10's (10.4n blocks spec'd below DPC) directly below the beam...so I figured using weak mix fill to the bottom of the thermalite would be fine.... any further thoughts on this setup?
-
Thanks Peter. Apologies I should have explained I'm going with a Jablite beam and block system rather than slab - with that in mind would you agree there isnt there isnt compressive issue to worry about? Re the cavity tray, any particular reason why they are used in this scenario? Aside from when there is an air brick to consider?
-
I appreciate this was a whilst ago but is there any particular reason why you cannot just use blown EPS beads below DPC? I'm just about to start my build and the architect has simply shown blown beads above and below the cavity tray. Furthermore...why is there a need for a cavity tray in the below example if a a normal outside fall is provided for the cavity fill mix (given EPS beads are permeable). I have to say I'm thoroughly confused as to why sometimes I see cavity trays at this level and other times I dont, just individual DPC's.
-
Not sure what the outcome for the op was, but as I wanted my garage floor insulated too, I have ended up going with the Jablite garage floor system. Insulation (EPS) replaces the blocks between beams then min 75mm structural concrete + A142 mesh above. Due to place my order this week as the bricky gets going in a few weeks ? https://www.jablite.co.uk/application/garage-floor-system/