


Bitpipe
-
Posts
4118 -
Joined
-
Last visited
-
Days Won
53
Everything posted by Bitpipe
-

Utter newbie questions about financing a self-build
Bitpipe replied to dakid's topic in Self Build Mortgages
We did similar, buying and living in a slightly clapped out 3 bed house on a 1/2 acre plot for almost 4 years before demolishing and rebuilding. We did tell the mge company (have neighbours who could have caused trouble, not worth the risk) so cleared the mge with our build fund and raised new funds with Ecology, who have been a delight to deal with. We did the caravan on site for the build, bit of a pain but our net accomodation costs for 18 months were £1200 so I make that £66 a month Invaluable too being on site during the build. -
Happy to help. I must have spent two plus years researching and designing our basement (it's actually how I stumbled across e-build, predecessor of this site). Unlike most other building decisions, a lot of the basement cost is dictated by your local circumstances - ground conditions, site, design and budget. When you know all of those factors you'll be able to accurately cost, until then it's guesswork and be warned that if you start work without absolutely certainty then you could face a steep increase in costs. By all means investigate possible build methods but until your SE and BC have signed off on your design, you'll not know for certain what you need. At one stage of our investigations, there was the potential for piling which would have killed the budget, luckily another round of GI allowed that to be eliminated as a possibility (I say luckily, the new GI survey cost anther £3.5k.....)
-
How to build a rainwater tank system from IBCs?
Bitpipe replied to Bitpipe's topic in Rainwater, Guttering & SuDS
Yes, just garden water - mostly to meet BR and LA conditions so don't want to over spend ! -
How to build a rainwater tank system from IBCs?
Bitpipe replied to Bitpipe's topic in Rainwater, Guttering & SuDS
Just imagine what you could cook up in @JSHarris garage with his collection of ex military submersible spare parts..- 50 replies
-
- 1
-

-
- rainwater
- harvesting
- (and 1 more)
-
How to build a rainwater tank system from IBCs?
Bitpipe replied to Bitpipe's topic in Rainwater, Guttering & SuDS
Did you used to be in the A-Team?- 50 replies
-
- 1
-

-
- rainwater
- harvesting
- (and 1 more)
-
How to build a rainwater tank system from IBCs?
Bitpipe replied to Bitpipe's topic in Rainwater, Guttering & SuDS
You make it sound so easy So the flanged connector is a two part thing, that wasn't obvious looking on ebay. Learning so much on this thread! -
How to build a rainwater tank system from IBCs?
Bitpipe replied to Bitpipe's topic in Rainwater, Guttering & SuDS
You're right - doesn't need to be submersible as it can just sit next to the tanks inline with the feed to the tap. -
How to build a rainwater tank system from IBCs?
Bitpipe replied to Bitpipe's topic in Rainwater, Guttering & SuDS
Peter, any disadvantage in using a 110mm connection into tank 1 with this http://www.ebay.co.uk/itm/IBC-Cover-filter-Rainwater-filter-Lid-DN-150-HT-DN-110-mit-Serviceoeffnung-/112298123220?hash=item1a257d5fd4:g:sIYAAOSw-0xYOsoY aside from getting the 110mm pipe to the right place? I've got quite a few bends lying about that I can probably use. Found the flanged outlet - do you solvent weld that to the IBC or just use a sealant? -
How to build a rainwater tank system from IBCs?
Bitpipe replied to Bitpipe's topic in Rainwater, Guttering & SuDS
Ah, I get it now. The soakaway is a 5m deep, 2m wide concrete ringed structure so not that worried about it having leaves etc. No real way to intercept the rainwater now until it hits that big orange pipe. Have put hedgehogs in the gutters to also minimise leaf build up. Right, I think I have a plan... need to start scouring eBay for cheap IBCs Any recommendations on a decent submersible pump? Thanks! -
I have a basement as part of our new build, it is 11.5m x 10.5m and constructed as an 'open box' i.e no lid. Passive timber frame house sits on top, basement is passive also (fancy way of saying it sits on a foundation of EPS and walls are clad in EPS, meeting the outer leaf and insulated section of the timber frame. Three large 10m steels span the ground floor, (one on a post) with a web of smaller steel joists taking point loads from above and web joists in-between. We could have had a solid walls in the basement but wanted flexibility in the layout. Some quick comments on your plan. In my experience. the cost of a basement is dependent on a number of features. Getting planning is by far the easiest bit 1) most fundamentally - ground conditions. Tricky conditions such as made ground, hard rock, chalk (solution features) high water table etc will drive up excavation costs and construction costs. We have chalk under gravel (Thames valley river bed) so needed a very substantial slab (300mm) with lots of reinforcement. The only way you are going to know what the required basement spec is, is to have proper ground investigation (cores to 4m and probes to 10m) at 2-3 points in your footprint. You then need to have a SE work out the required structure, concrete, steel etc. You may get an early view on what's likely under your feet by searching for nearby historical boreholes to get a feel, but you'll ultimately need to do your own investigation as conditions can rapidly vary. Water table will dictate your degree of waterproofing. For us, water table was low at 6m so we were able to use warrantied waterproof concrete on its own. Our friends built near the Thames and needed external tanking and wp concrete (they used the Glatthar system, good but not cheap). Some opt for the internal membrane, sump & pump. Principal here is that you build a leaky box, allow the water to safely collect in a sump and continuously pump out. Very common on retrofit basements in London. Budget £5k for the investigation. If your LA adds requirements for contamination surveys etc then expect to pay a bit more. SE will vary, we paid £5K but got quite a bit of additional work in there too (services design etc..). BC will then want to ensure you have means of escape and/or fire suppression so external stairs or a sprinkler system will need to be in the design. Will you have wet services down there? If so, you'll need to pump wet waste up to the main foul level. How are the internals being lit? We used UPVC windows and GRP light wells from MEA - they've been very effective and the concrete team only needed to leave the aperture (sufficiently reinforced obviously per SE design). Party wall is critical also, we were lucky in that we escaped any notification due to the 45o rule. We were within 6m of one neighbour and 8m of another. Have you done any of this investigation & design yet? Pretty impossible to cost the job without it in my opinion. 2) Design - a simple rectangular box is cheapest, thinner the raft & walls the cheaper (subject to SE spec). Penetrations will add cost as they complicate the formwork and require more prep before the pour. 3) Access - a very tight site can be expensive to excavate, muck away and to get steel and concrete onto. You need min 1m working space, with appropriately battered back walls around the basement. If your ground is very soft or loose, you may need to sheet pile (very expensive). Our excavation (not much bigger than yours) required 73 20t trucks to cart away the spoil. Machine was loading them directly so it only took 3 days - we were lucky to have good access so this was not too painful. We also pumped concrete for the slab and used shuttered runs for the walls (pump hire is expensive) direct from the mixer. 4) Build method. ICF is a fine choice, especially if you're using an external or internal waterproofing method. If you're reliant on just WP concrete then you need an excellent pour with no honeycombing and this is impossible to confirm with ICF so traditional formwork is a better option. You can DIY your waterproofing but it will not be warrantied. We used a SIKA system which had admix in the concrete and the water bar between day joins - the SIKA rep came to site to inspect the work before pours and the team photographed everything as they went. So we now have a 20 year guarantee on the integrity, upon which the building warranty is dependent. Cost for our 120m2 basement (including demo of the existing and services) was £120k in Berkshire - probably £90-100k purely for the basement itself if you strip out the other parts of the package. We used a reputable local groundwork who brings in a proved team that did the steel, formwork and pouring - goes without saying that it's pretty skilled work. Good value for money in my opinion given the extra space that we acquired. Basements do not need to be scary but there is a lot of prep that you need to do before you can really understand and mitigate the costs. Fair to say that Tony (of Tony's house) did his own basement DIY at a fraction of my cost (he is an experienced builder of 30+ years) and I went to see it - very nice it is too. Probably plenty more to share on our experience if you have more questions!
-
We specced a hot return (it's in 15mm vs the main hot circuit of 22mm). Instead of using a pipe stat and timer, which was the plumber's default option, the sparky wired it into the same circuit as the MVHR boost which is activated when the bathroom light comes on or by a PIR in each bathroom - runs for a good 10 mins after each has been deactivated. We don't have any sensor in the kitchen, however there is a MVHR boost close to hand so I just hit that and presto - hot water
-
Be advised that the fee is per submission so you need to cram as much in as you can. Inevitably you won't be able to discharge some until you're actually complete. Our determination took longer than 12 weeks so we ended up getting our fee back
-
How to build a rainwater tank system from IBCs?
Bitpipe replied to Bitpipe's topic in Rainwater, Guttering & SuDS
That's great Peter. So the filter you show above goes straight into the top of the IBC? Looks like it would need cleaned out pretty regularly, unless I'm missing something. The expensive one I highlighted above looked to be self cleaning to a degree as the debris would get flushed back into the soak-away pipe. Will look for a cheaper alternative. This looks like the right kind of MPDE T to join the four tanks together at the bottom (one T per pair of tanks and then join the Ts together, all on 32mm MPDE). Just need to think how how to assemble it all, wondering how to get the P trap in the first IBC. Where did you get your IBCs from originally? -
How to build a rainwater tank system from IBCs?
Bitpipe replied to Bitpipe's topic in Rainwater, Guttering & SuDS
Thanks all - I'm in Maidenhead, Berks. I have quite a bit of spare 32mm MPDE as you can see in the pic so can use that to make connections and can probably scrounge some 25mm also. Regarding incoming filters - that IBC firm offer two types of filter, vertical and horizontal (as this will be for garden use, I'm not going to get too fussy on the degree of the filtration). Might get away with the cheaper vertical one if I could get a tighter 90 bend on the incoming 110mm pipe, failing that, the more expensive horizontal one would work where the rain pipe comes in. Either way, will probably move the pipe closer to the wall to maximise space for the tanks. -
How to build a rainwater tank system from IBCs?
Bitpipe replied to Bitpipe's topic in Rainwater, Guttering & SuDS
They will live in this big concrete box so will be quite safe, they're not strong enough to be buried directly in the ground. I plan to have them in a 2x2 configuration. There's 1.5m between the floor and deck (which will stat just underneath the light well window) so some room to manouvre. The incoming rain pipe is just over 1m off the floor.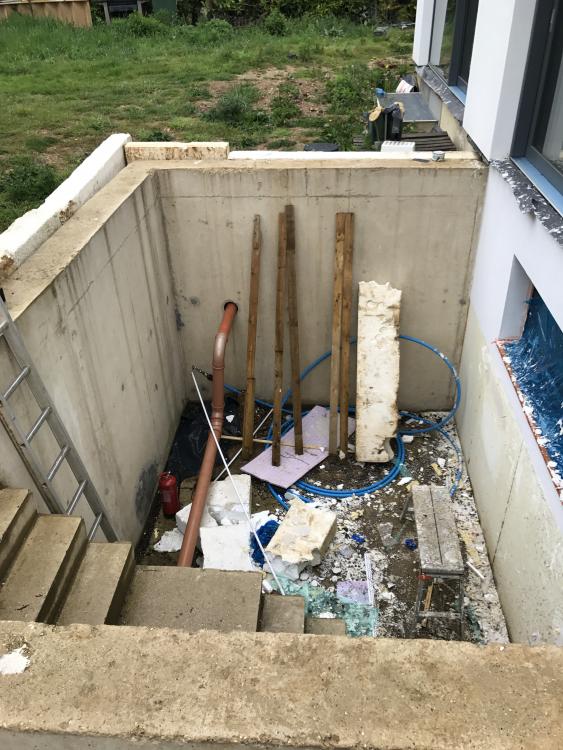
-
When we built the basement, we needed to run a set of external stairs up to ground level. Rather than have these awkwardly appear in the garden, we built a 3x4 m box around them with the plan to put IBCs in the bottom for rainwater harvesting and to run a deck over the top and create a mezzanine level deck. it is west facing so should be a shaded sun spot in the evening. All the roof rainwater is currently piped through this area in 110mm pipe on its way to a soakaway. I now need to buy 4 1000l IBCs and plumb them together to allow the rain water to enter the top (via some kind of filter) and have excess water go to the soakaway. I've made electrical provision for a submerged pump which will be connected to an outside tap. It's now time to order the tanks and figure out how to plumb them together. Looking to buy here but quite clueless on the fittings and sundries I will need but beyond that I'm pretty clueless! Help please
-
These guys did not get the memo...
-
Thats the first stepped MBC slab that I've seen - did that complicate matters?
-
We fitted them before plastering and I trimmed them with a multitool after skimming. Probably should have trimmed after boarding and before skimming to enable the plasterer to get a perfectly neat finish. Anyway, it really doesn't matter as the ceiling fitting overlaps by a good inch or so and covers up any imperfections.
-
Due to uncertainty over the manifold position, I over ordered on flexible and steel duct. Ended up using almost all of the 350m of flex and have about 6 x 2m lengths of steel 180mm duct, plus insulated flexible duct of the same size and a roll of foil backed insulation. Not entirely sure what to do with it - doesn't seem to come up on eBay or Gumtree much and the postage makes it impractical to return or sell outside of collection. Maybe I'll just strap it to the side of the house in a homage to the Pompidou Centre / Lloyds building.
-
Zero rated VAT
Bitpipe replied to Vijay's topic in Self Build VAT, Community Infrastructure Levy (CIL), S106 & Tax
Your planning permission approval letter from your LA. -
I still have three whole slabs (1.2x2.4) of 200mm EPS70 and two almost whole slabs left after doing the basement. That's after putting a layer under the garage raft foundation too. I took two jumbo bags of offcuts down to our local recycling centre, went into the general waste hopper. Might stick the rest on free cycle - too bulky to go into the garage roof void.
-
Agree - our assessor was based in Manchester and did the whole thing from drawings and other documents. We needed a 'quick and dirty' SAP before we'd even got to first fix to hit the FIT deadline just before it plummeted in Jan 2016. He was able to rate us as a D prior to any airtightness test etc. When we'd finished the build and could provide boiler details, air tightness certs etc, we got an A.
-
uPVC, Timber or Timber with Aluminium Windows?
Bitpipe replied to Lucy Murray's topic in Building Materials
From a performance point of view, if the u values are the same then there's nothing in it really from an efficiency perspective, although some frames may be chunkier than others to get the same performance. Note that as the window gets bigger, the glass becomes the dominant effect in the energy efficiency. I'd say the differences are mainly aesthetics and cost - what look are you going for and what style of windows are you looking at? Any sliders, patio doors to take into consideration also? Timber with aluminium will never need painting, will have a broader choice of colours (pretty much any RAL) and generally look pretty sharp. Looks prettier from the inside too and you have a choice of finishes - we went for a fairly cheap wood (spruce) but had it painted with a 50% opacity paint so the grain is still visible. In the basement we have UPVC with aluminium that matches the timber windows and you'd never be able to tell from outside. As the windows are high up, the white plastic frames are less noticeable (and these are occasional / functional rooms). You can get uPVC that has a coloured foil (if you don't like the traditional white) - not sure if the modern uPVC still suffers from the 'yellowing' problem that it used to have. Plain timber will look good inside and out but will need paining on the exterior and continued maintenance. However, unlike uPVC and aluminium, you can change the external colour if you ever wanted to. -
Send it to a steel fab for quote - a quick google found this... http://www.rainhamsteelreinforcement.co.uk/products/cbrod.asp However, who is tying your steel, doing your formwork and pouring your concrete? If you have a contractor doing all of that, I'd just send it to them along with the concrete spec and get them to quote it. When we did the basement, steel was just priced by the tonne, your schedule should have a total tonnage. TBH it was far from the biggest expense, making and striking the formwork was quote expensive as its fairly skilled and labour intensive.
