zoothorn
-
Posts
4747 -
Joined
-
Last visited
-
Days Won
3
Everything posted by zoothorn
-

Help with kitchen renovation/ 1st house.
zoothorn replied to zoothorn's topic in Bathrooms, Ensuites & Wetrooms
Its a Franke tectonite cream sink, £100+. I will have to file these drop bits.. but that means removing the surface/ these areas may go dark soon but I have no choice. I'm onto Franke but I bet its "sorry, please return it FOC for a full refund".. -
Help with kitchen renovation/ 1st house.
zoothorn replied to zoothorn's topic in Bathrooms, Ensuites & Wetrooms
"50 years" but I bet its only once its in the box or prior to fitting: if you've set it in, then they'll surely just argue "its the way its put in" (esp me not being a builder). And once I agree looked fine in box, then.. 'well did you check the draining section prior to fitting-?'. I just can't see how this 50 year guarantee applies, unless its obviously broken in the box. Am I being cynical or is that why its so big/ 50 yr..? -
Help with kitchen renovation/ 1st house.
zoothorn replied to zoothorn's topic in Bathrooms, Ensuites & Wetrooms
@PeterW .. sorry to ask (no,w this maybe very well be the daftest Q of all) but wet n dry 400 onto these tops.. am I using the 'wet' bit? or just the 'dry'. IE did you suggest 400 purely because its only available in the wet n dry type of paper? I mean talk of out of one frying pan & into another frying pan... My brain has come to the amazing idea of filing the 'drop points' of the damn draining board (& if I hadn't played snooker then it would never have come up with such a brilliant plan) as the water 'pool' is teetering only 1cm from all falling/ draining afaict. More frustrating is the top is nr as dammit level/ perfectly acceptably so, & put the level on the edge of sink & although its all fixed firmly flat.. its a chunk off level. Argh!! -
Help with kitchen renovation/ 1st house.
zoothorn replied to zoothorn's topic in Bathrooms, Ensuites & Wetrooms
Now I'll moan. The sink is cr*p. Alot of standing water on the draining board side which just stays there.. in a damp area this is exactly what you don't want as green mould will just set in. All under cups, the rack/ anything resting stays wet. Absolutely fkn Infuriating! Do not buy Franke sinks. -
Help with kitchen renovation/ 1st house.
zoothorn replied to zoothorn's topic in Bathrooms, Ensuites & Wetrooms
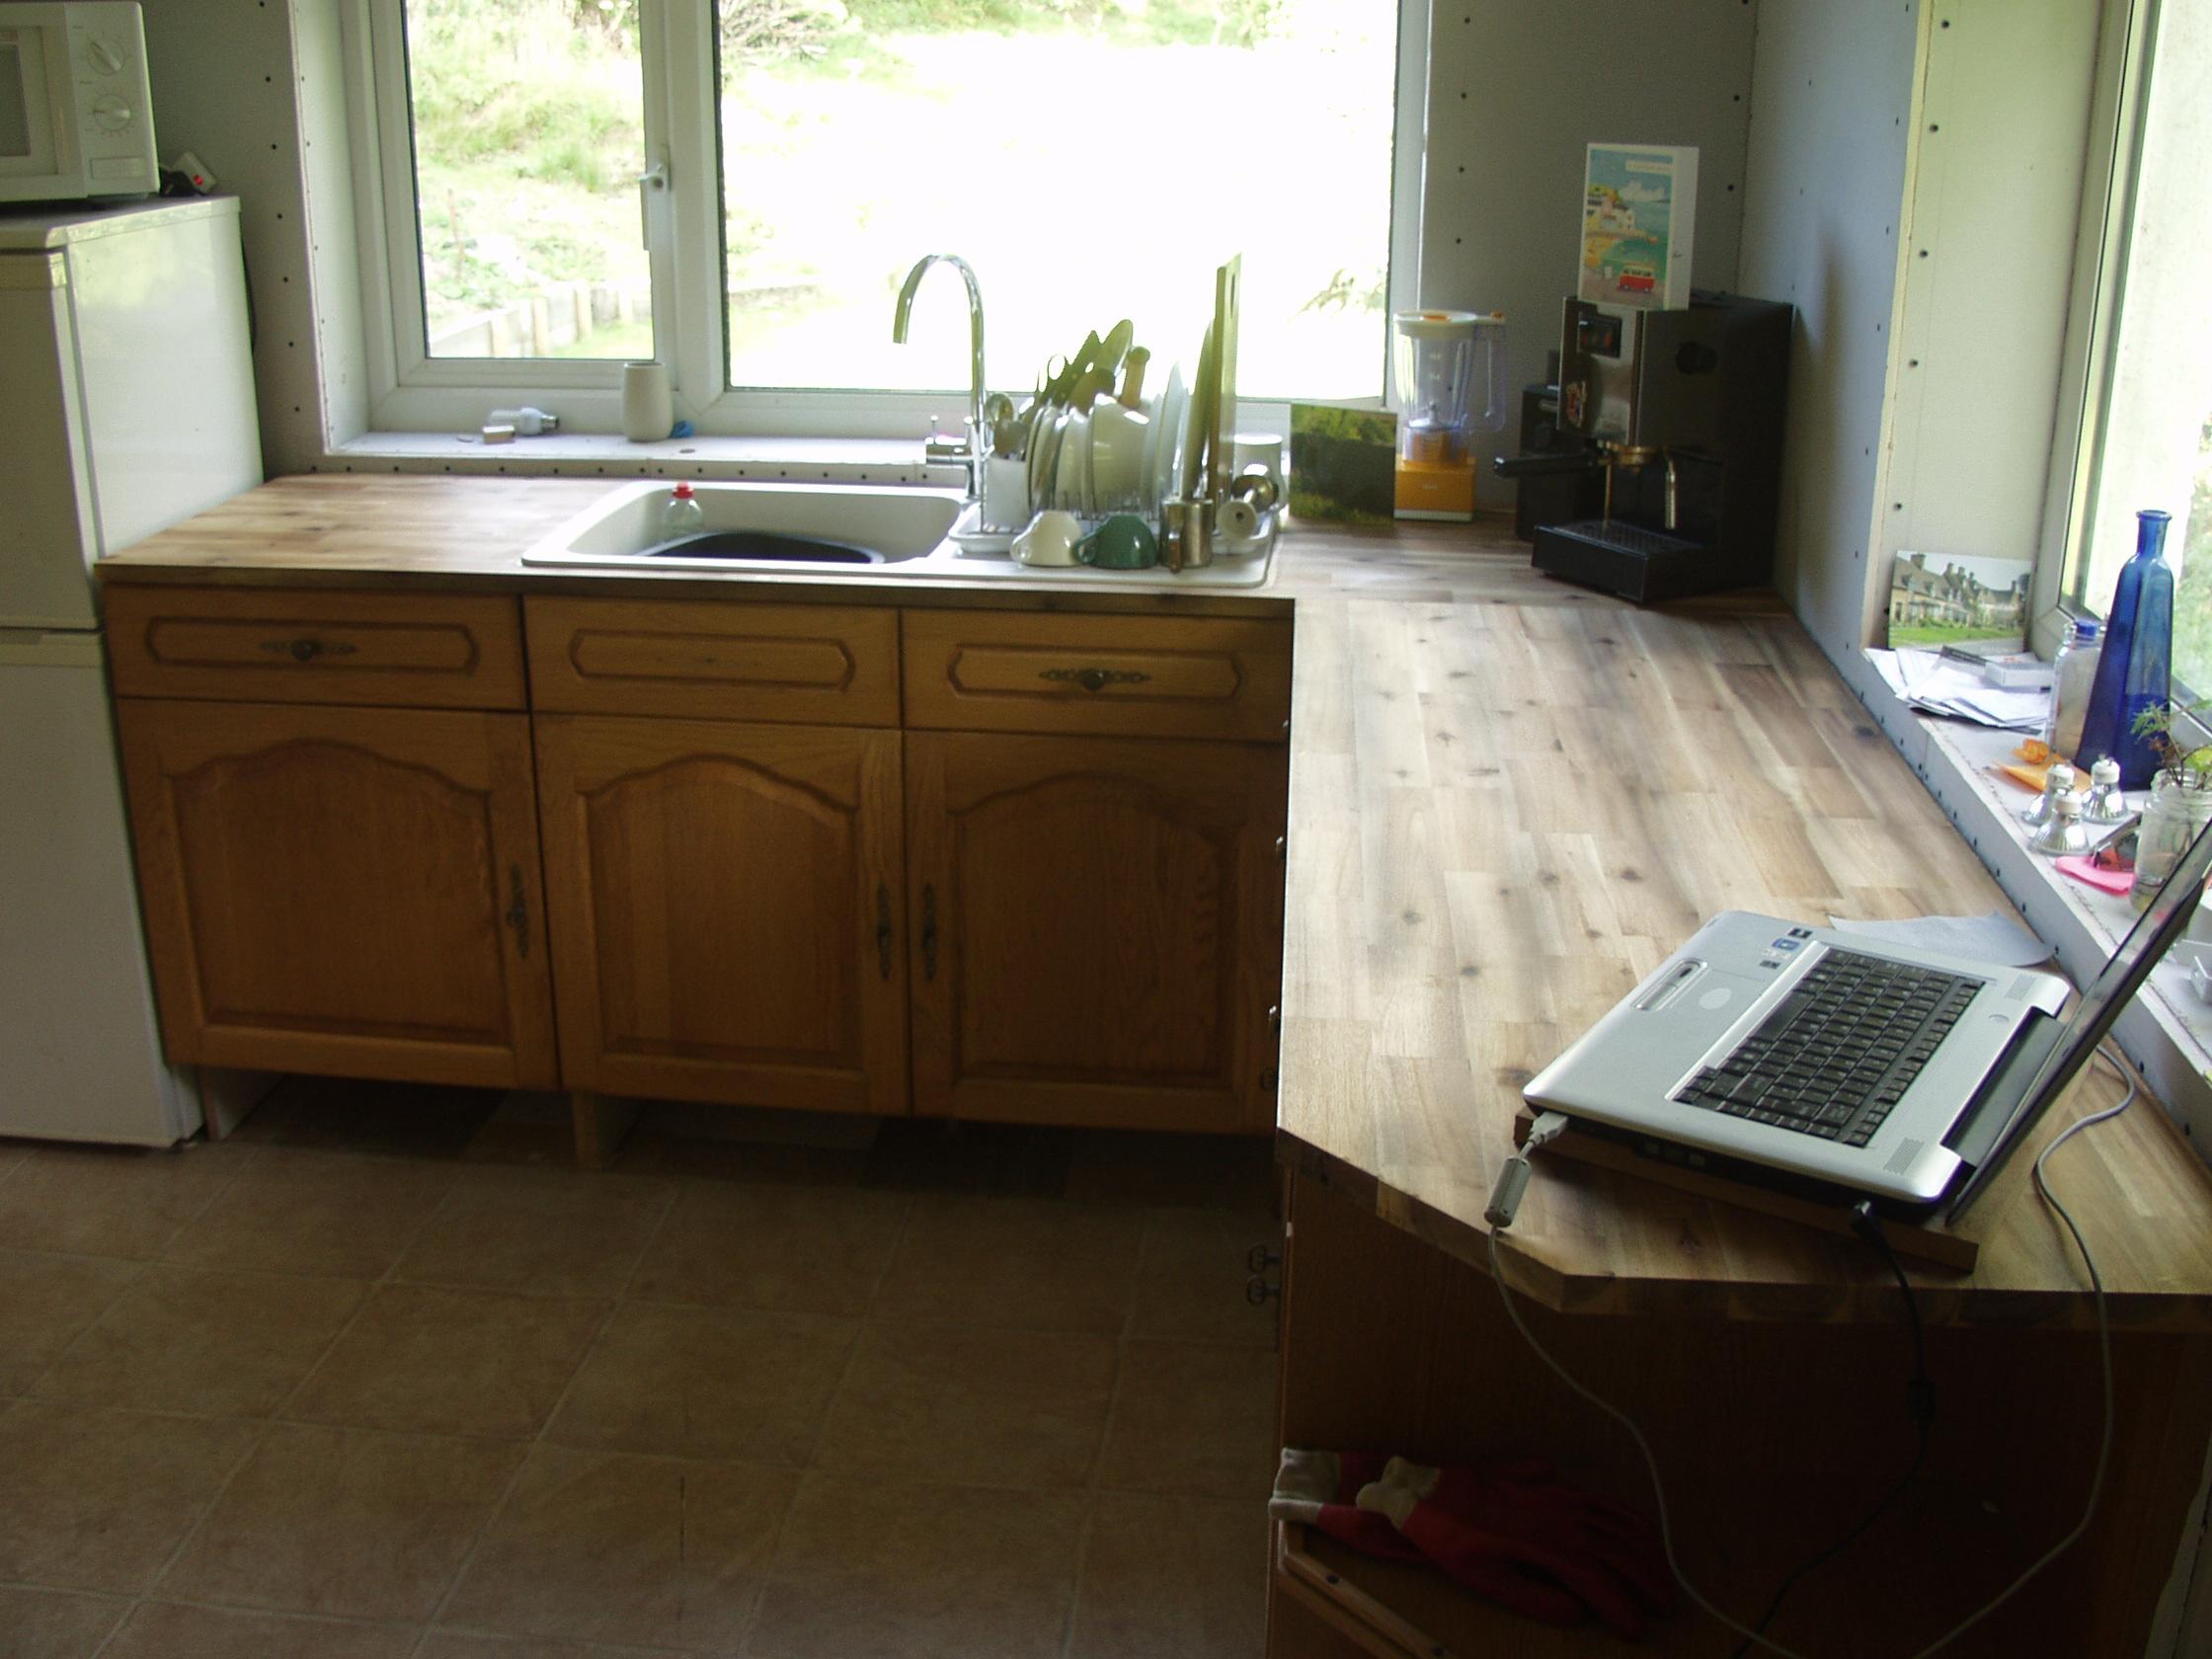
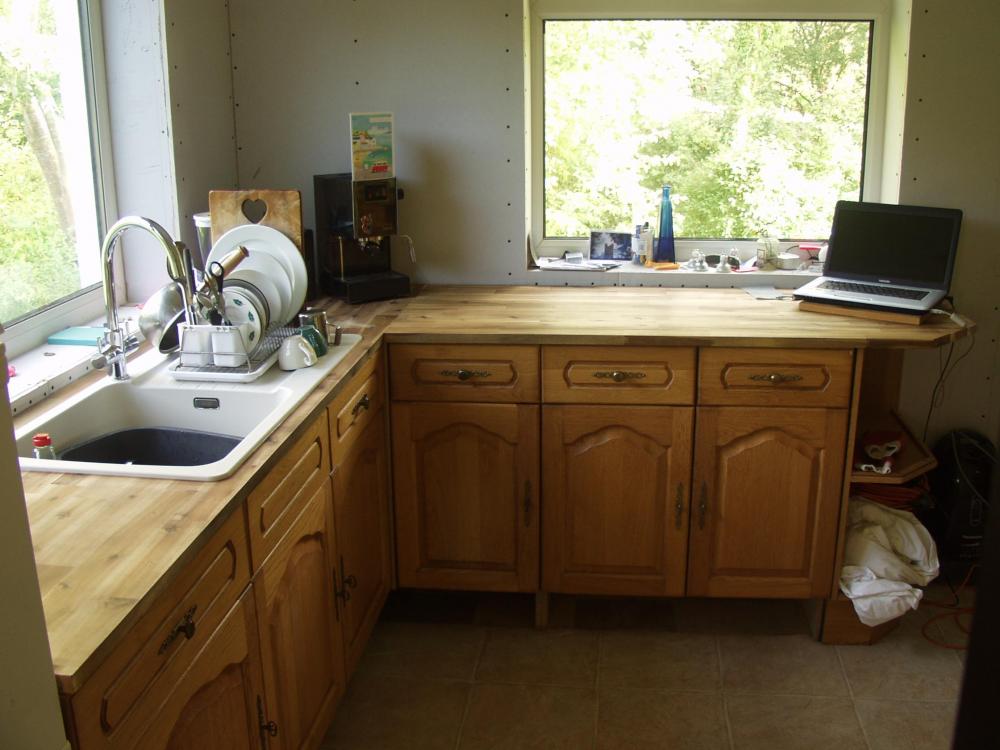
Doors can wait till very last/ cream paint + new knobs, one a time.. take my time. I need 2 cream strips below cabs to finish off woodwork too. The area around sink tho, even using tap carefully, causes splashes.. cos its a BIG DROP FKOFF TAP I need an action plan asap. Easiest to fix on is somesort of strip I guess, glue/ press, done. Tiling this piddly 3cm H bit.. a mighty faff in comparison surely (wood temporary strip looked quite good I thought, as basic idea too). Got a 5cm H "splashback" bit on other 1st window too, & sill.. prob best tile that too I'd think/ easiest. Overall plan: tiles on sill tops. Tiles up corner area ~50cm H. Other cooker side of kitchen tiles 50cm H behind top3, & around cnr 60cm W. Then I'll at least have a water resistant area/ I can relax a bit. Thanks, zootH -
Help with kitchen renovation/ 1st house.
zoothorn replied to zoothorn's topic in Bathrooms, Ensuites & Wetrooms
Ok that's what I had half in mind when I did.. good, ok then I'll just carefully blade off -all- the excess so i can sand right up to the sink. The splashback.. is my hardwood strip feasable, or daft due to, well, its wood/ not exactly waterproof! i need to be considering the tiling then along with a splashback around the sill behind sink. Is tiling directly onto pB the idea? I often quiz plaster skim or tiles, onto pB due to the surface being paper: surely your just 'hanging' tiles from paper? IE it seems not exactly so well bonded to the plaster inside sometimes.. pulls off alarmingly easily I found with binned offcuts, & alot of weight with many tiles. -
Help with kitchen renovation/ 1st house.
zoothorn replied to zoothorn's topic in Bathrooms, Ensuites & Wetrooms
I mean if Ive used the clear sealant stuff, to bond sink to top, what do I do with excess that squidges out? are you meant to totally clear all away.. or leave a shaped bead.. or clear away + then apply some other stuff (or is that not neccessary)-? -
Help with kitchen renovation/ 1st house.
zoothorn replied to zoothorn's topic in Bathrooms, Ensuites & Wetrooms
But what if Ive stuck down the sink, mastic's oozed out.. & moanin muggins here gone along edge bits like numpty stylee wiv a finger innit? -
Help with kitchen renovation/ 1st house.
zoothorn replied to zoothorn's topic in Bathrooms, Ensuites & Wetrooms
Old chap had a fall onoff? sympathies. Re. the splashback.. what do you suggest for this? I was thinking a strip of wood, of which I have, albeit softwood.. but then hang on that's hardly waterproof tho is it. The splashback is only about 3-4cm. I'll tile the sill area ontop of it. -
Help with kitchen renovation/ 1st house.
zoothorn replied to zoothorn's topic in Bathrooms, Ensuites & Wetrooms
Appreciated chaps. hadn't thought Id be able to have done this 1st thing AM. One thing I didnt do well/ I rushed, was the sink perimeter sealant. It did the ooze thing, but I ran a finger along.. & now ended up with thin film 1cm or so on surface adjacent to sink edge. What should I do? I'm thinking regarding the sanding > then oiling. Runa stanley blade gently around the perimeter onto the surface? or re-apply a sealant bead-? shoukld I hjave used a tool whatsit for this.. or is that only needed for shower trays etc-? -
Help with kitchen renovation/ 1st house.
zoothorn replied to zoothorn's topic in Bathrooms, Ensuites & Wetrooms
Cheers Peter.. couldn't have got this result without your help tbh. Yes oil.. 1st coat tonight. i do notice the surface is a bit rough here n there.. I wacked oil on a cheapo pine door I hung, & noticed the roughness after i oiled. What sanding do you suggest, can you remind me? I'm not going nuts with a makita.. I'm talking hand sanding/ as little removed as poss. Won't it go light in patches when you sand it, taking away whatever the coat stuff is on tho? -
Help with kitchen renovation/ 1st house.
zoothorn replied to zoothorn's topic in Bathrooms, Ensuites & Wetrooms
I was thinking of big Betty @ no.23.. "why me?" erm.. er.. (because you have an enormous batty-?).. mm maybe Mr.Jones bye" -
Help with kitchen renovation/ 1st house.
zoothorn replied to zoothorn's topic in Bathrooms, Ensuites & Wetrooms
Good lord I done it! hung 2 concrete blocks off the side, & carefully mm by mm tapped it home them swinging away under the sink! not perfect but a total result from the position I was in! jesusHchrist I need a beer..

-
Help with kitchen renovation/ 1st house.
zoothorn replied to zoothorn's topic in Bathrooms, Ensuites & Wetrooms
All set to go.. christ the ammount of prep for this!! its do or die now.. will take the afternoon/ post a pic later. fingers xxxx'd -
Help with kitchen renovation/ 1st house.
zoothorn replied to zoothorn's topic in Bathrooms, Ensuites & Wetrooms
yup onoff got a few VG ones.. but won't help: I need to force it down -whilst- shifting it into place. The clamp will give me the pressure I need, but I cannot move xyz once its in use. I'm gonna have to go the elephant route + a slew of pretty coarse language. -
Help with kitchen renovation/ 1st house.
zoothorn replied to zoothorn's topic in Bathrooms, Ensuites & Wetrooms
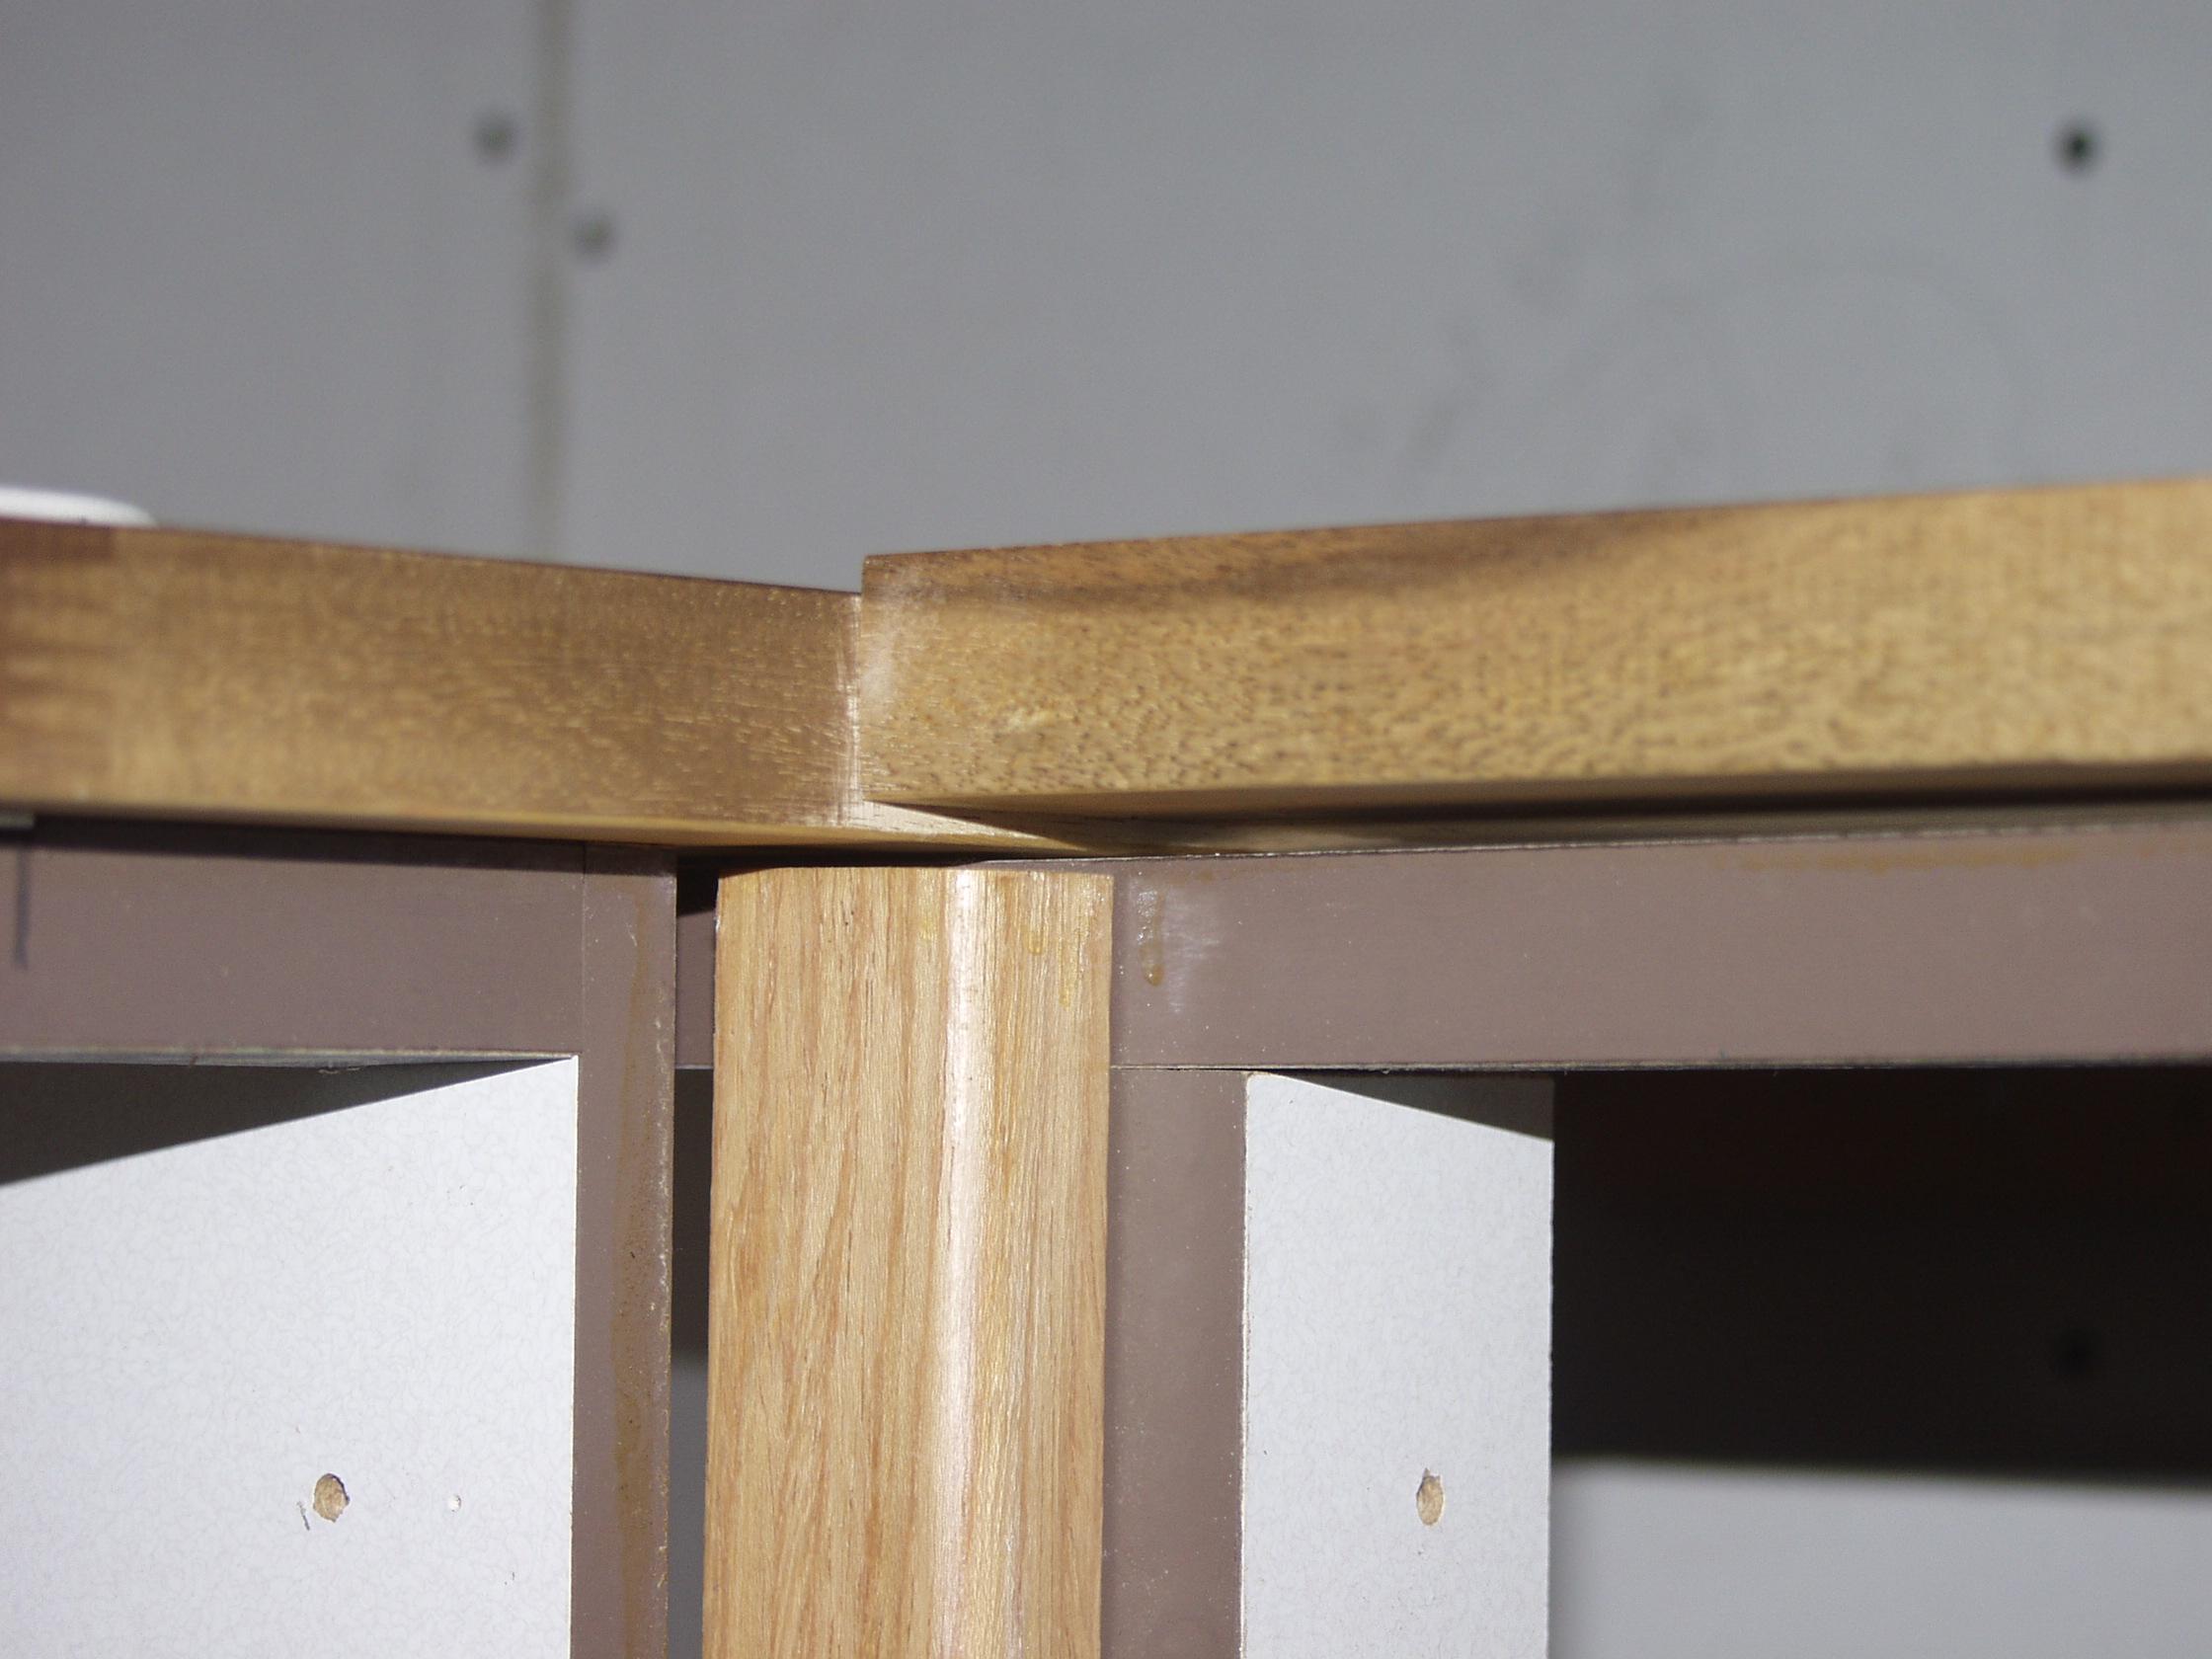
Thing is it'll be fixed in place/ inside.. the dust would be a n'mare considering I'm still having to use kitchen ad hoc same time. Im trying ewverything to mitigate against having to do this major sand job. at the mo I'm also a bit concerned with the join area not being supported anywhere near it to.. so I added this batten/ wondering too if it might be a Q of screwing from top down at a few points in to it @ edge, fill. What do you think?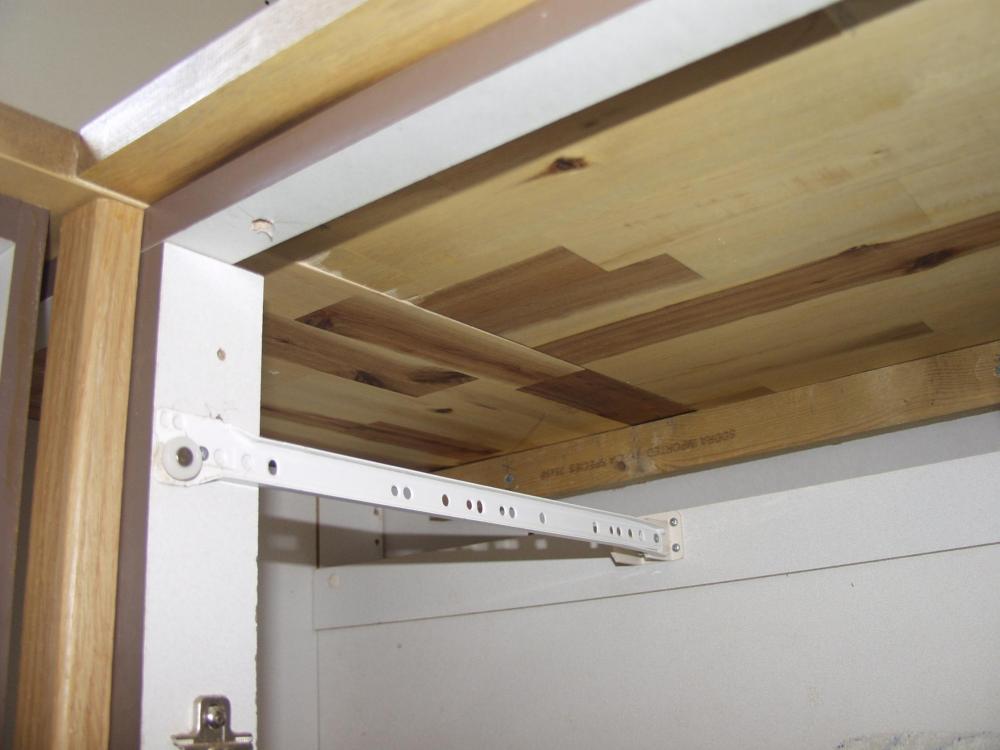
-
Help with kitchen renovation/ 1st house.
zoothorn replied to zoothorn's topic in Bathrooms, Ensuites & Wetrooms
Anyway it has to be done, even if it takes me all day using an elephant.. no choice. If it has to be sanded hugely then that's the only way I guess. but before that, its the meeting of the biscuits I'm most concerned about, it -has- to be pulled down in order to meet.. somehow. If they don't meet then its curtains & maybe I've ruined top1 too (if its in situ/ fixed in with sealant around 2 back edges then stripping the glue out/ re-rebating without the surface below it to rest the cutter on.. urgh cant think of it). So I 1st have to fix in top1. Ive left a 5mm gap (believe me around here every 1 of the 5mm may well be needed), shims ready.. but the sealant seems to be a thin bead.. Im gonna need a ton of it to fill this 5mm gap. What's the advice here? -
Help with kitchen renovation/ 1st house.
zoothorn replied to zoothorn's topic in Bathrooms, Ensuites & Wetrooms
This is what Im up against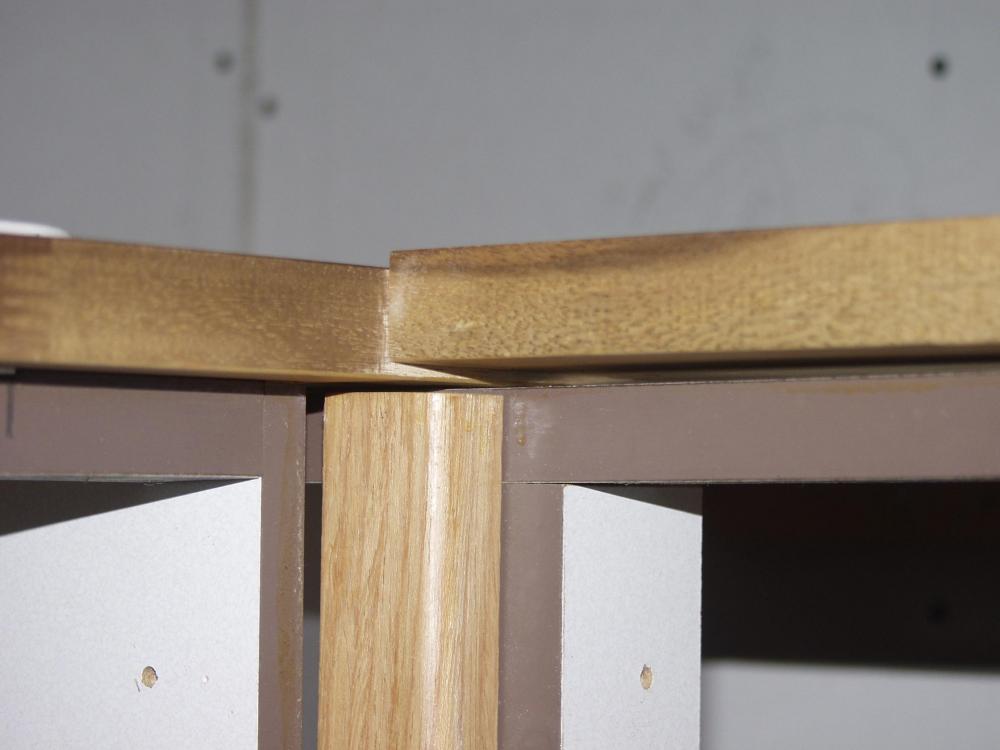
-
Help with kitchen renovation/ 1st house.
zoothorn replied to zoothorn's topic in Bathrooms, Ensuites & Wetrooms
Morning Triassic- good suggestion, but this job would be -the- biggest ballache with what I have, a small makita hand-held sander. I'd think with a belt sander it would be a breeze. Tbh its the one job I'm trying as hard as to avoid even 2mm proud.. dust another massive pita/ no extractor thingy really & makes me very very cross. I've managed to press maybe 1-2mm out overnight clamping the sod hard against the bow.. good result.. maybe if I catch it now it might behave. Urgh. this is the most stressful part of the fkn job. I need codeine to cope. Ive got wine in case it goes tlts up by elevensies. Then I shall just sleep. -
Help with kitchen renovation/ 1st house.
zoothorn replied to zoothorn's topic in Bathrooms, Ensuites & Wetrooms
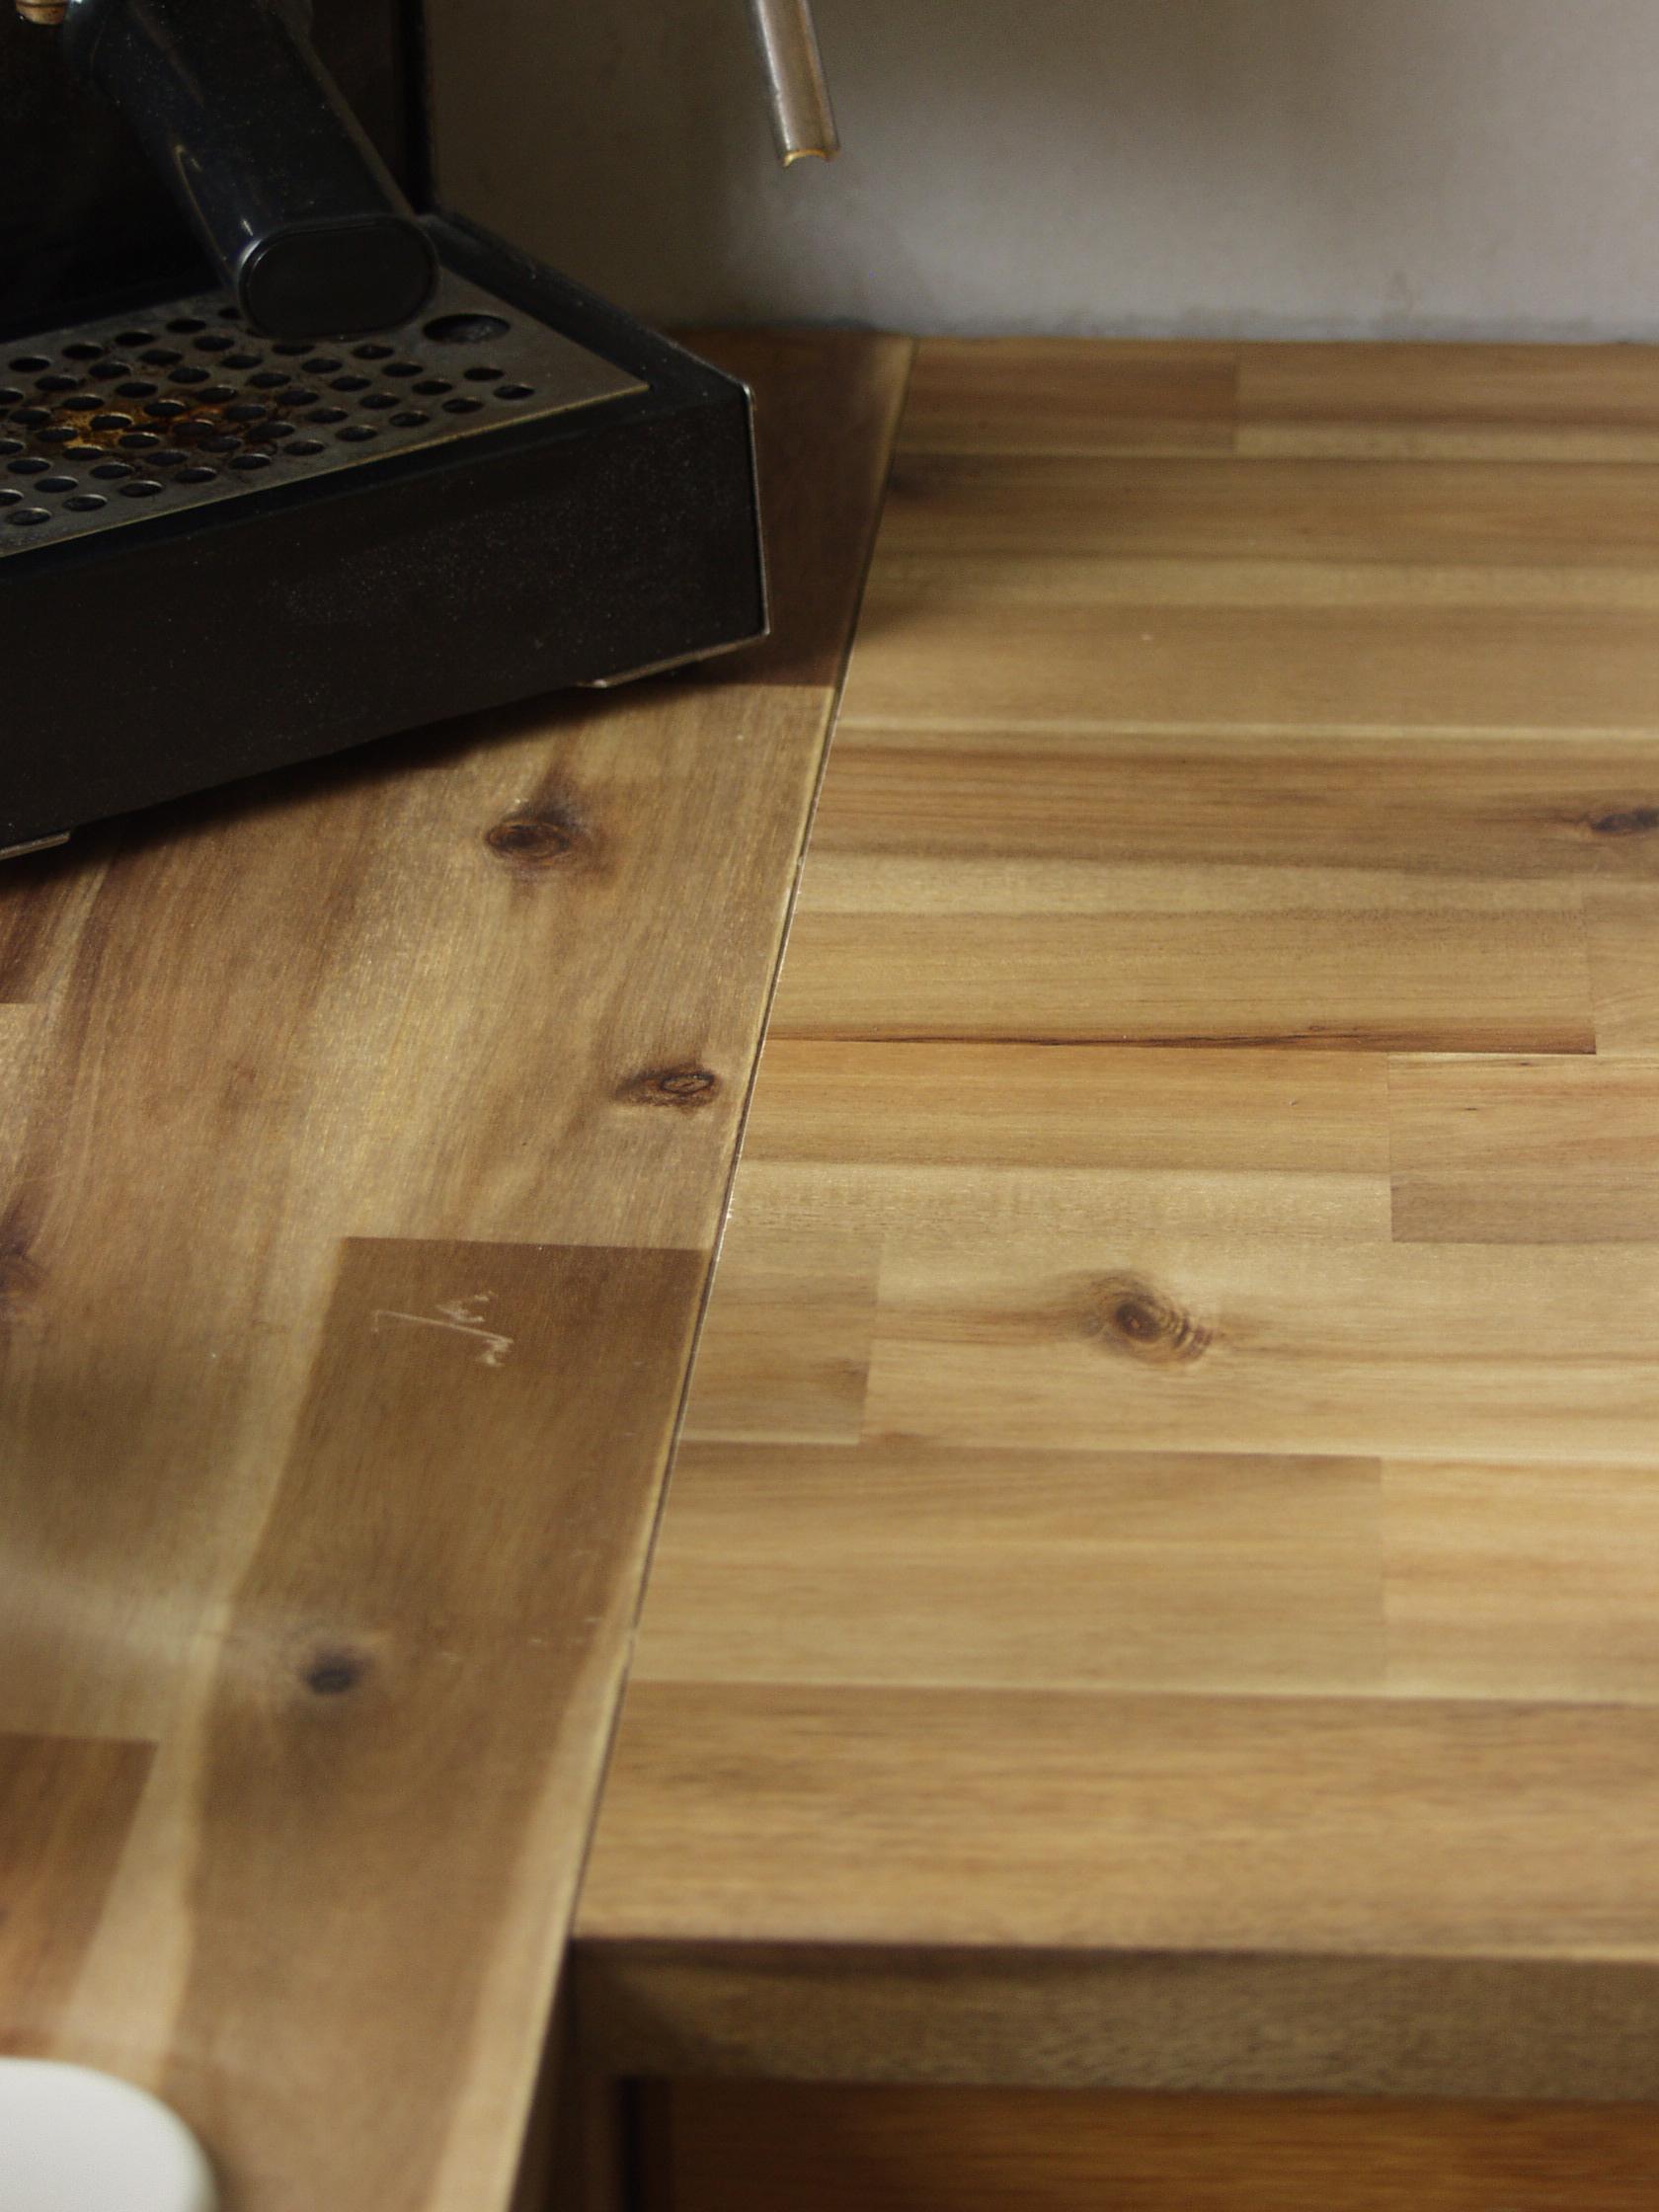
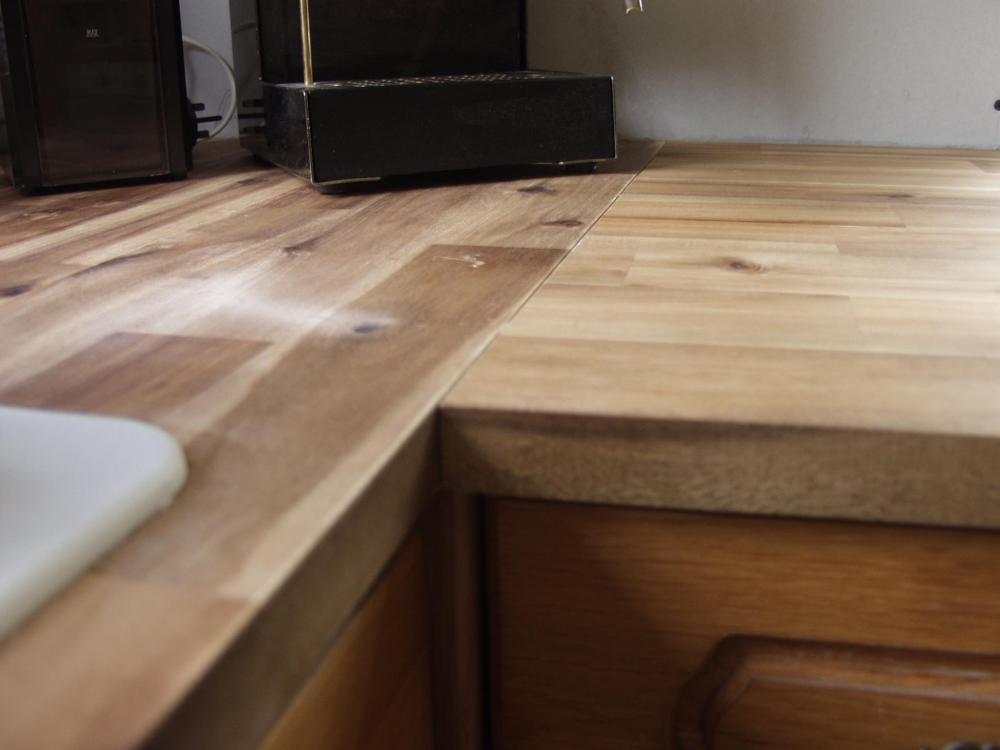
Hi chaps- actually I oiled under, & back edge only (other was doing one in place x 3). But warp was already in prior to oiling: it happened as soon as I cut across it, almost like a tension thing, the conditions at the time were not the very moist last few days. Mfr won't be interested now Ive cut the top in 2 places. Its my fault again, I should not have gone for wood tops.. but I thought chipboard might be even less stable, plus the fact of those horrible expensive join templates etc.. just for one join I'll ever do was prohibitive. I was thinking maybe bin this top (alot of work gone into it), & try top3 which was for cooker area.. but whose to say it won't bow the the same or worse? I can't scrap top1 & start again.. the ammount of time Ive put into it you wouldn't believe, so many marks/ scribbles/ rub-outs covering the underside like a kids wall. If I try to force top2 & try to join, I might ruin top1 if the biscuits get set in etc. I couldn't cope with ruining top1.. I'm close to not coping with this job as it is. -
Help with kitchen renovation/ 1st house.
zoothorn replied to zoothorn's topic in Bathrooms, Ensuites & Wetrooms
Hi newhome- will do tmrw. But issue is simply I have a warp/ bow in the top. IE if I put a straight edge across the worktop2 width I have 5mm gap in middle. So its concave. Trying to biscuit joint the end of this, to the top1 (sink worktop) side.. I'd say isn't possible (unless massive force/ a huge weight is applied which I just don't have). Trying to do a 5mm offset with 3/4" softwood is hard enough.. but 3x this width, hardwood? -
Help with kitchen renovation/ 1st house.
zoothorn replied to zoothorn's topic in Bathrooms, Ensuites & Wetrooms
Ive gone back over the info re. joining, & clamping is mentioned.. &/ or the screw plates understood once the joint is made, but how do I try & pull the bowed top into line for the biscuits to meet? i don't think its possible, is it? I just can't think of anything to help: I can't screw from under ^ up to pull it down, as then I can't move the two tops together. The two top together are 5mm difference one end. I think the only way is to buy a new top tbh.. but no Homebase anywhere near me/ a 120m drive to p/u. Or 2nd idea is to somehow join 5mm proud & sand the fk out of it.. but the work involved to do so I can barely think of, plus the join will have a 'step' right at the main junction/ seen. Anyone know if there's any way to force this hardwood bow out?? -
Help with kitchen renovation/ 1st house.
zoothorn replied to zoothorn's topic in Bathrooms, Ensuites & Wetrooms
Peter, sorry I'm still confused as to your 'not using anything under units, but screws & nothing else'. Its just the way with the www & not being able to speak in person (what did you mean by "not using anything under units"?? I can see one ply block which seems to span a join with the white stuff. But can you tell me what the other block is for, the smaller one? At the moment I'm having huge difficulties with these tops to join. Ive just spent the day getting the 3rd & 4th units in, & as best I can possibly do regarding level, & xyz relative to the sink tops. A hell of a job. Then got the sink into the top- very tricky this with sti=upid barckets that dont fot properly pulling down onto the cabinet walls. A nightmare day tbh. This top is yet to be fixed into the cabinet frame &/or the wall as I'm very concerned with the joining: Ive biscuit rebated 3x in each face. But the shorter top, even putting a huge weight on the thing to flatten in order to get cutter at its face.. was still pulling up 1-2mm. So I had no choice but cut like so. Now, getting them to join I think will be nigh on impossible: the shorter one I had to cut 2/3rds (1/3rd removed), is still bowing up badly meaning offering them together is a dogs dinner.. big disappointmernt after so much massively careful prep work. -
Help with kitchen renovation/ 1st house.
zoothorn replied to zoothorn's topic in Bathrooms, Ensuites & Wetrooms
iIm getting myself in another pickle here. Bought some "sticks like a sh*t" adhesive in screwfix last week (asked chap, said worktop etc/ recommended), todayreturned it for clear silicone after Peter's info ^. I had the Dow 781 stuff in mind on the screwfix site before > went in, couldn't fkn find it in catalogue. So got 785 'N' but with "sanitary" on. Is this correct, totally wrong? I don't know my arse from my elbow here. -
Help with kitchen renovation/ 1st house.
zoothorn replied to zoothorn's topic in Bathrooms, Ensuites & Wetrooms
But the frames are under the top, no-? not quite on board with your not using anything under units I'm lucky as today, very wet indeed, the bow seems to have flattened out! odd.. maybe its the Osmo oil.