

mike2016
-
Posts
646 -
Joined
-
Last visited
-
Days Won
4
Everything posted by mike2016
-
I'm 9 years in, 8 years trying to get it off the ground and what ifs, everything getting more expensive but in the end I put my house on the market, sales fell through twice and it took a year but then was firmly on the melting ice flow, renting a room and finally building since January this year. Definitely prioritize health and take breaks, the mental aspect is very real as relayed by many buildhub members stories here. Do what's right for you at this moment in your life! As for giving up, there have been tough days but I've been lucky with the trades and it's just small issues holding things up - like using a step drill bit to ream larger holes in mild steel and couldn't make any progress last night, trying again tonight. Hope it's not been overheated & hardened by the original driller! My world reduced to a 13mm hole in metal!!
-
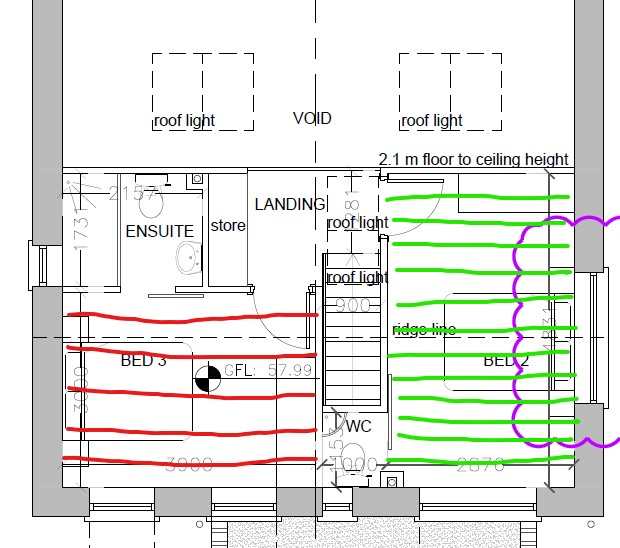
One problem is the neighbour fitting a wood burning stove and the chimney is closest to the ensuite, was hoping to place the intake closer to the front of the house where the prevailing wind would better clear any smoke from entering the system if it gets blown down the side passage between the two houses. Also have to fit two manifolds somewhere or push the MVHR unit downstairs. That 210mm is the insulated pipe diameter, it's smaller inside. Will have a look around the space later and make a decision. Will probably put joists in Bed 2 as it's only meant to be used as an office and not rented out (unless I blow my Budget!) and that will give me storage. As for Bed 3, full ceiling gives me the most options with ducting, it's always push here and it sticks out there with houses isn't it?!! I like the idea of the mid ceiling though but the intake would be obvious that way unless I bury it in the wall somewhere, ah decisions, decisions!!
-
Thought it would be echo'y and while I have a shed storage is always handy. Also I've to fit a MVHR system up there - the ducting will be going out the gable end in the left room with the unit situated in the "hot press" on the landing. Big 210mm pipes. I can box these out a bit but have to keep 2.5m separation when they exit the building if possible - off the left hand side. There is a major road 2 meters off to the right of the house blocking that path. Worth considering though, will have to have a think about the ductwork.....
-
I am planning to close off the vaulted ceilings in the upstairs bedrooms (new timber frame build) at the 2.4m height. One room is 3.4 wide and will need 12 x 175 x 44 joists, the other is 4 meters wide and needs 5 x 225 x 44 joists. The first room is fine but it's the second with the longer span that the joist height squeezes any useful storage space as it has an ensuite blocking some of the available space to contend with. I was hoping Pozi Joists, i-joists or Glulam would be available to reduce the height of the joists a bit but they are all 200mm deep at a minimum. I could reduce the joist depth to 200 or less but for that span if someone does put a load of books up there the deflection could cause issues / be unsafe. I could try splitting the span with a joist at 90 degree midway but there's only 2x4 stud at one side to support this whereas the other is structural. Question is - can I get away with a smaller joist if it's not habitable, storage only and to support a person crawling around? No water tank etc. Or just state NO storage here please and have limited flooring to discourage it. Might fit a Xmas tree but that's it! The other question is I plan to use a ledger board at either side with joist hangers, are there any good guides / specs for this & nails etc online? I could get an SE but it's a bit overkill for the use it will be put to. Open to advice on this though. Thanks!
-
Is it floor mounted or wall mounted? Check its level and when was the last time it was maintained? I have one downstairs outside my bedroom and can hear it going initially but doesn't bother me after that. It's on rubber bearings and runs for a while after I take a shower in the evening. It is probably driven by temperature drops but the installer should check all is working OK before excumunicating it from power each night!!
-
Advice please on guttering job
mike2016 replied to DIY novice's topic in Rainwater, Guttering & SuDS
Get a hosepipe and pour water onto one side of the roof furthest away from the gutter. Or fill a container and fling its contents onto the roof in the same place and watch the result? As long as no leaks you should be good. It does invite moss pools a bit quicker in the years to come but that's all. -
Great job! Took me 5 months of backwards and forwards to get the details of my brise soleil sorted out. SE's very busy. Keep at them!!
-
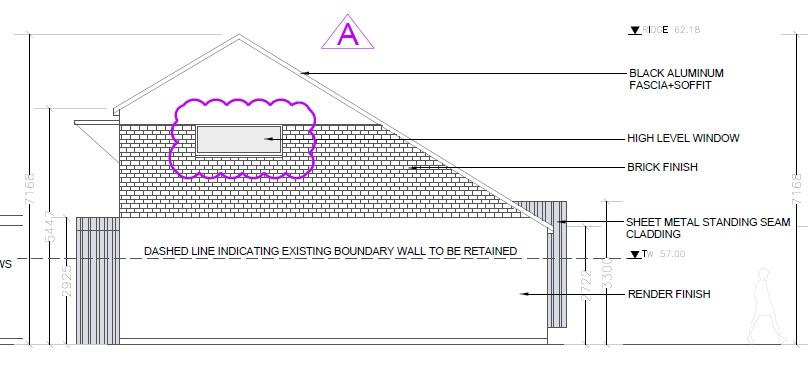
Hi - I've to render block above brick (same plane, i.e. brick not installed forward of block) - any examples I've seen use a stop bead, but is a bellcast/drip bead preferred / better? Thanks.
-
Polymeric sand for narrow joints and Rompox for wider joints - both set and prevent any weeds. Did my driveway 18 months ago and no weeds to date! Didn't use a sealer.
-
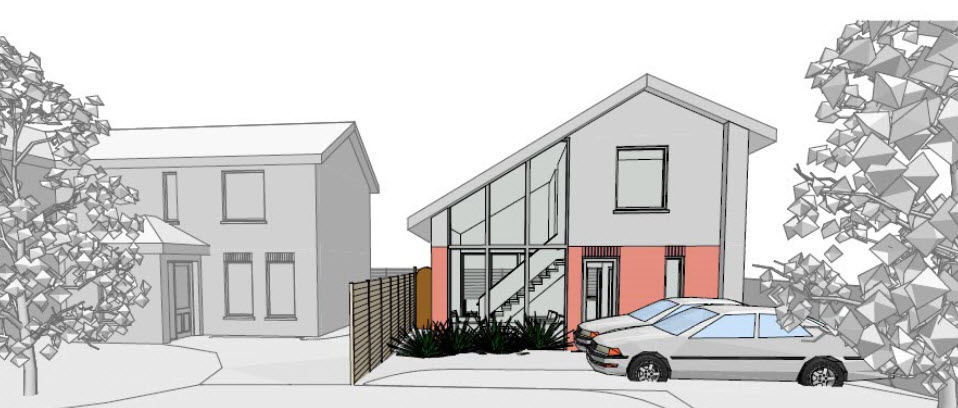
Just an update - had the last two weeks off. Ran a bit low on energy for first week and took a few days off from the build to step back and recharge. The bricklayers arrived onsite and I was able to collaborate with them and address any issues or questions they had as they started off. We're currently about 3 days from finishing - half way up to the 1st floor and it's giving me a massive appreciation for the hard graft/work bricklayers face every day. There are two of them and their labourer quit on the 1st day of my build. Apart from another young lad coming onsite for a day this week to give a hand they have been working between them to convey all the materials, mortar etc and mix the cement themselves without complaint (to me anyway!). I was facing a crunch a week ago - couldn't get a bumpa conveyor in time for the 1st floor and needed a driver to cover the insurance risk - we got a brilliant young lad who pitched in rather than sitting in the cab all day. Really made a difference, plan to get him an Amazon voucher as I wasn't onsite myself to reward him! The whole side of the house that's got a band of brick was finished a day ahead of schedule as a result!. Only hired for a day and it wasn't cheap but they lifted all their bricks/blocks up to the two scaffolding levels above ground and are set from that point of view. The cheap plastic bucket I bought them failed and they need to carry a lot of mortar up in the last few days, am looking out for a sturdy replacement if anyone has a recommendation? The Azaela Brick design is made up of 3 colours - got 4 pallets, probably 1 too many and they took bricks out of 3 of those to mix them up as each batch can be slightly different and this masks any variations. Will use the last pallet on the garden wall down the road..... I've been ferrying in water in 30 litre jerry cans, they use about 90 litres per day and around 6 x 25kg bags of cement. Bought more today to ensure they have enough to finish and top up the water regularly. Next up is measuring the soffit/fascia - 2-3 weeks to manufacture (metal) and although I intended to render the blockwork myself, due to my energy levels sagging last week, I'm getting a quote for a professional to see what that looks like. I can focus on the inside. Windows and Doors due Week 28, or mid July to the rest of the world! Internal Insulation and Air Tightness started - new skills! Have to keep ahead of the bricklayers though, turn your back and they are up a level and I don't recommend dropping anything down a 50mm cavity!!! It's very hard to retrieve! Penetrations like Electricity Meter Boxes are best prep'd in advance when you have full inside and outside access. Similarly my window preparations for the last window they reached weren't there and I almost lost the chance to finish it in time! I'm doing 25mm Bosig Phonotherm under the window and 40mm Gutex around the sides and top. The window is brought out to close the cavity (almost) by 47mm with this insulation in situ. There are batons to meet the window straps and the bricklayers come past this by 20mm if brick or match it if block (render will foll the reveal 15mm). That's the best I could come up with from the Architects drawings and some onsite photos they shared with me. It should help the windows perform well, we'll see. I'll close the cavity with a fire rated foam. I did have a worry over the DPM over the side window and when onsite yesterday this confirmed my fears. It has fallen down into the cavity leaving the window exposed below should the render fail. This corner faces 80% of the prevailing weather and is exposed as my new house sits proud of the existing one. I texted the bricklayer as they are onsite a lot earlier than me and when I turned up they had installed another DPM and this one was 100%. I marked three levels where I need to install weep vents (drill vents) on this window in my case but am much happier with the extra detailing and it was worth pointing out. The bricklayer came up with the idea of not using brick slips just below the window - although most of it would be covered by a aluminium cill, he suggested cutting bricks in half and facing them outwards. Less likely to move / get loose over time. He mocked it up and I approved, looks well don't you think?! The only upset was 4 stitches in my head from a scaffolding pole I rammed into just at the start of my holiday, I'll save you any pics, last thing you need to see on a Friday I'm sure!!
-
I was considering integrated panels on my new build to save on tiles, ascetics etc but due to no standard panel sizes am getting an on roof setup. Was hard to find any installers for integrated too. As its a new roof it should last well. Bird blockers to be installed too.
-
I meant to post this for a while about how I'm supplying power to my site during works. In the Republic of Ireland you can't get a temporary electricity supply like the UK, not unless you're a big developer anyway. You may be lucky enough to be building next door to a house you own, or have a friendly neighbour but in my case while I could go borrowing a lead the odd time, it would start to annoy people I'm sure. I did consider a generator at one stage, the old Honda route but I upgraded my electric car last year from an Opel CorsaE to an MG EV4. One of the main reasons besides a bigger boot, was the Vehicle to Load function. I immediately bought a V2L cable ready to live the dream. 64kWh of power at my fingertips! So how has it been? Well, a little mixed I must say. I've the car plus two batteries. The smallest 550amp hour Bluetti is fine for working from the site and keeping my laptop running and charged along with my phone mobile hotspot and charging headphones etc. The Laptop will run for 1/2 day but then needs power to get it through the last 4 hours of the shift. I might be only onsite to take delivery of items but this gives me some flexibility to be there and it avoids the toss the bricks over the fence scenario! The next Battery up I got a good deal on during a sale, it's a 2kWh battery bank - Anker 767 (called something else now!), 2.6kW max output enough for any of my power tools. It's an EU model thanks to Brexit but I've a couple of 13amp adapters to allow me to power loads. You can with both batteries power on selecting sections of connectors, the key items are the DC panel - only using what you draw, if you power on the AC it constantly drains the battery even with no load. I've had the 2kW unit for > 6 months and 5 months into the project only charged it once and have 61% remaining today! Mitre Saw & circular saw are the main items I've used. You might assume I've all battery power tools but I've built up a collection of 240v mains tools over the last few years of DIY as I owned a house with power sockets everywhere! These are what I wanted to keep powered. Why go out and re purchase battery versions of existing tools for this project?! I will say with hindsight I wish I HAD purchased the more expensive battery versions as I went along, all the same brand. A battery bank is very useful but currently very expensive still. But if you have, like me, a working set of mains powered tools, this is the way to keep using them. There's no substitute for battery versions though - I've drills, an impact driver and oscillating tool all DeWalt and battery powered and they are much handier! My Car can output 3kW and I've heard some people getting higher with the right adapter. I connect the V2L to an extension lead and run it into the main workspace without difficulty. This could also be run up the scaffolding which I'll be doing later when mixing render. Once you connect the cable you have to tell the car to start discharging and it sets a minimum charge level so you can get home! You can fully lock the car with this running and no one can drive off! It doesn't appear to time out at all. So what problems have I had? I've found tools work with one or the other. Today my angle grinder wouldn't start on the Anker 767 battery (the 2kW one), but would off my car. The McAlister circular saw I have along with an Erbaur Mitre Saw are both fine with the Anker, thanks goodness! A large angle grinder has problems with both the last time I tried it. A Titan vacuum cleaner worked fine with my car today, first time using it, not tried it with the Anker. The problem devices will usually try to start and then drop out - I think the Mitre Saw wouldn't work with my Car and I had to reset the V2L each time but never got it working. It can be a bit frustrating but for the tasks I'm doing now, the Anker is working out great and I didn't need to revert to using the car for a few weeks now, just did today to get photos for this post! A petrol genie would probably work far better with everything but I'm at tight quarters with the neighbours -tool noise comes and goes; a genie is usually left running longer not as suited to an ongoing 12 month building project but that's just my view! What way do you power your site / plan to? Did you go the mains power route for tools or are all your battery operated already? Leave a comment!
-
It's about getting an early alert if I'm out and about. All the alarms will sound locally if any detect smoke/heat (depending on detector) on mains or battery as you've stated. But isn't there a likely gap between a room fire vs a structure fire with only the latter likely to start interfering with whole house electrics rather than a single MCB/RCBO in the case of a room? It would be nice to be able to plug in extra detectors to extend as the original poster wanted but we'd have to have sockets in the ceilings for that!
-
I'm looking at using Aico smoke alarms with a 4 core wire to power & Connect them and a home assistant extension to get alerts into some type of trigger that can power down MVHR and pulse me an alert on my mobile. Interesting when sequencing makes you think ahead and future proofing to avoid issues - these forums always make me look around the next corner with the replies.
-
Am aiming for 15mm render, would that approach still work? Thanks
-
I've some brick in the middle of a rendered section of the gable wall - I need advice on the correct bead to use above and below the brick. Thanks!
-
With any self build, unless you can afford an Architect/Builder to oversee the whole project, you're going to be chasing people, materials, answering questions and more. My own project is up to roof stage, timber frame is finished, roof finished but outer brick/block leaf is next, then soffit, fascia, gutters, then porch, then windows & doors. Each have their own challenges. On top of my day job! I've a delivery of lintels tomorrow and I only thought to ask what size rigid truck is it to find out it's a full Articulated Truck with a moffet (look that up in goggle!!). Won't fit in my housing estate!! cue plan B, C and D !! We're going to offload it to a footpath outside my house on the other side of a council wall and I'll use a hand truck to get them one by one into the site through a gap some teen made wider last year and it was never fixed by the council! I'm sure each self builder has a raft of such stories. My house needs 2500 bricks and 1280 blocks. The brick supplier I'd booked and paid for in full, was meant to deliver this Friday along with the block supplier providing all the blocks, sand, cement etc. They gave away the bricks to another (assume larger) customer and it's 2 weeks to get a new order in from Belgium. I tried the other supplier I found in google for the same bricks and got through to the same woman I'd been dealing with, same company, one's a shell I'd say. Tried the supplier and they only supply to this one company in Ireland. Anyway, as a one off house they can bump you down the list so I tend to like to get things onsite a week or two early to avoid this added hassle. I've very tight for storage but if you have a brick layer onsite and no bricks you'll be forced to buy something, anything and have to live with it forever. Time management - getting answers to questions is one thing, learning on the job is another. I want to nail in about 200 nails by hand but after realizing my initial attempts were leaning tower of Pisa'esque, I purchased a first fix nail gun, my first! Wow! 200 nails in 3 hours, all batons attached to the window openings. I can sell it later but the right tool for the job for sure! I've to install my first express nails tonight after learning about them from a neighbour - fixes wood to concrete. The roofers left 6 Velux boxes behind with BBX on them. What are they for? An extra? Do I need them? I think they are to act as a vapour barrier and possibly air tightness according to initial google searches. Something else I've to figure out later on. The roof has turned out well hasn't it! They had to finished the Oriel Window Metal / Trocal flashing before they finished roof tiling. It has a ventilated ridge and those plastic covers at the edges all the way along the roof line instead of cement they used to use. I've about 40 spare tiles stored away! The outer brick/blockwork is my next major hurdle. There's a few items I need to buy, figure out and get onsite: 100mm DPC for above 1st course of blockwork above foundation 18" DPC for around windows Expansion ties - Ancon PPS200 ebonded Safety Tie - box of 250, at least I have spares! I can return the unused ones. Wall vents - using Timloc Cavity Wall Drill Vents - you drill a 25mm hold angling upwards and then plug this into it. This absolves the brick layer from having to install them as they go Wall ties - the timberframe supplier provides 4 boxes of these and marked up where the studs are to get good purchase Stop Bead and Drip Bead (plastic) for render, Weber OCR, Weber paint (I'm doing this job once the blockwork is finished), Mitre bond glue (2 part glue) Gutter Brushes for later Expansion Joints - I've two 10 meter gables, each require two expansion joints. There's an awkward window and ESB box on one end of one side so thankfully we're putting the expansion joint past both of these even though you should have one every 6 meters and within 1/2 of this distance from the corner, ours will be 3.8m from the corner. the timberframe amazing team marked up the best positions for expansion joints and identified this one before the Structural Engineer signed off on it. I've taped up all the Solitex on the outside of the Timber Frame, plugged the side door up with timber, OSB and more Frontex WA. We're still installing a lintel in the blockwork but will ignore it otherwise for the block course and if someone wants to open it later they can with an angle grinder! It saves wasting a lot of space in the utility room having a door there with no purpose. There's no sink = reason to not make it a boot room really. I'm lining all the window openings with insulation over the next week or so and adding batons to take the window straps. They want a strap within 100-150mm of any corner and no more than 700mm apart. The Straps are 1mm thick and come inside the window about 100mm. I've sourced wood to exactly match the insulation thickness which can be hard but avoids trying to plane / table saw wood onsite. This Friday I've to hope everything fits onsite as it's delivered and we've room for a telehandler afterwards for when the brickie's start! That's a snapshot of my week! I'll do a post about powering electrical devices onsite without a generator using an Electric car & Anker 2kW battery soon I think, some lesson learnt there!
-
Bumpa hoist looks worth looking into. Thanks!
-
My self build insurance policy doesn't cover plant hire. I need to get a telehandler in a few weeks and could get one with a driver, but that's expensive. The bricklayer has a ticket for one already. I can find a company willing to hire it and they state theirs has a code that if it isn't entered, it can't be driven off. But what about damage/ / fire / public liability etc though? Question: Would you hire for a week and hope nothing happens and get away with it or insist on insurance to cover yourself and get one with a driver? Thanks!
-
You can buy a sensor to measure humidity and see when it's highest. Vent as much as possible, open windows when cooking etc. Make sure exhaust fans / extractor hoods vent to outside and not just into a cavity. Does a lot of steam build up in that area?
-
Thanks! I can put the Intello Plus behind all the insulation but it means extending the detailing provided by the timber frame builder and I'm not that confident yet with so many critical junctions in getting them all right. I plan to install 220mm insulation, then the Intello, and test air tightness before adding the extra layers inside this. Not going for the certification as can't afford the Architect any more but wanted to aim high and the fabric is where I'm not holding back cost wise. Thanks for the advice/insight!
-
It's a case of the only twin stud wall builder won't supply to Dublin anymore, the team I got are excellent but have a preferred approach. As it's my first build I've been trying to get something built rather than getting it perfect first time. 8 year journey so far!! Timing is part of the reason I've ended up where I am today! PHPP dictates U values of 0.1 - I've compromised on the passive floor slab a bit as the pipe run drops were very tight, I hope to hit 0.1 on the walls and roof if possible. Paid a lot for that PHPP design! That's my current aim before I adjust for cost / skills / other reasons. It definitely looks like a second stud wall for fibre insulation or battens on top of more rigid insulation like Gutex to tick the box for me right now. I was out onsite today so planning on Gutex still for the underside of the roof and then either stud or battens for interior walls or a mix of both in different areas - the open plan kitchen / living space has very high walls challenging my stud wall skills a bit! Will chat to the builder and get their take on it. At least I'm 99% certain the Intello Plus layer is going to be at the 220mm Frame interior wall so can take my time to decide the rest of the build up until the first air tightness test is passed. Thanks all.
-
It would need to be offset from the outside wall wouldn't it? I like the twin stud concept MBC use but my timberframe provider doesn't supply that. It's just the thermal bridging I need to block.....
-
Sounds more like a Yurt in suitable to me?! Or a metal insulated shed than can be assembled on blocks. Timber is the obvious material but is there a kit form you can get from someone or just stick build it yourself? The only issue with low to the ground is damp, water ingress if it's on a slope etc. Drainage is going to be key. Ideally I'd sit it on a few groundscrews, at least the screws and machine to drill them in are light enough to be carried, build on top of them from there! Best of luck!!
-
Get a good roofing company / gutter supplier to work out the correct gutter size for the area of roof and run. You need oversized gutters and a downpipe as close as possible each end. I'd put an Acco in front of the garage door so I can put a downspouts right in that corner if there is space and save 2-3 meters of run over the garage door before it's discharged. You might be able to remove the other downspout altogether. Really just a case of too much supply of water and not enough discharge capacity. Standard gutters won't cut it. Now they will look and be a lot bigger so that's a conversation to have as they will hang over the neighbours boundary a bit but it avoids an intermediate downpipe on their side of the wall. Worth a look into anyway!

