Adsibob
-
Posts
3604 -
Joined
-
Last visited
-
Days Won
10
Everything posted by Adsibob
-
Other easier option is that it’s tear of pouring a concrete slab, you buy the plastic interlocking grids/trays. That will cost you about £120. Then you have the option of filling them with peashingle for extra stability/sturdiness, but it isn’t essential. You could just fill the grids at the perimeter or skip it altogether.
-

Foundations for a small out building next to a plum tree
Adsibob replied to Adsibob's topic in Foundations
It’s because of our neighbours’ trees and the deep clay, that the SE specified such deep foundations and that the BCO then increased them to something over 2m. I’m in very bad clay, the bbq is 1.1m away from a boundary line. I have no control of what is grown on other side of that boundary, so I based my ballpark assessment on the basis that the builder said 200mm and I thought, let’s add a bit to err on the side of caution, in the same way the BCO did. On reflection, based on the comments here I’ve clearly added a bit too much, but its future proofs the thing against any eventually, whether that be sustained drout causing shrinkage of the soil, or the neighbour’s trees growing even bigger. The extra 0.1m depth is an extra 0.144m3 of concrete, so extra cost but not extortionate. And given I will only have myself to blame if anything goes wrong, I just rather pay for the extra concrete. -
Foundations for a small out building next to a plum tree
Adsibob replied to Adsibob's topic in Foundations
I’m plugging in a kit. So why did my BCO insist on footings deeper than 2m for a part single storey part double storey rear extension? SE had specified 1.7 and BC increased these to 2.2m from what I recall. -
Difficult planning application for loft conversion
Adsibob replied to Ernie's topic in Planning Permission
Congratulations! I would wait a bit before raising it with the neighbours. Wait until all documents are online, and you’ve been formally notified. But you could start the process of appointing a PW surveyor in the meantime. -
Foundations for a small out building next to a plum tree
Adsibob replied to Adsibob's topic in Foundations
Refractory bricks are very heavy. At least 25% heavier than a standard brick. But yes, there is probably a degree of over engineering here. -
Foundations for a small out building next to a plum tree
Adsibob replied to Adsibob's topic in Foundations
assume that’s not an issue, because we can train the plum to grow away from the barbecue and onto the trellis on the nearby fence. Supposedly the one I have is not off the vigorous type. But maybe you are right and it’s safer to move it now whilst we still can. -
We are pouring a 160cm by 90cm reinforced concrete foundation for a brick barbecue we will be building. The construction of the barbecue will be single skin brick side walls and a single skin brick back wall up to about 95cm high (a U shape). Then there will be a 6cm thick reinforced cement platform and on top of that we will continue the three single skin walls with the same facing brick, but in addition add an inner skin made of refractory brick. That will go up to about 1.95m in height total, then we will buy a lightweight galvanised steel cooking hood and flue on it. The concrete platform will also be covered with a layer of refractory bricks. i estimate a total of 420 regular facing bricks plus about 170 refractory bricks. Builder initially advised 30cm reinforced foundation would be enough. But now he has asked about a nearby plum tree which I planted a month ago. I could move the plum tree, but I’m wondering whether I really need to. It is currently 1.2m tall and will grow to a maximum mature height of 2.5m (it’s a VVA1 semi-dwarf variety, known as a Plum (Prunus) Jubilee Bush). We are on London clay. The base of the tree is 1m from the planned location of the nearest side of the foundation. The root ball was only 30cm in diameter when I planted it last month.
-
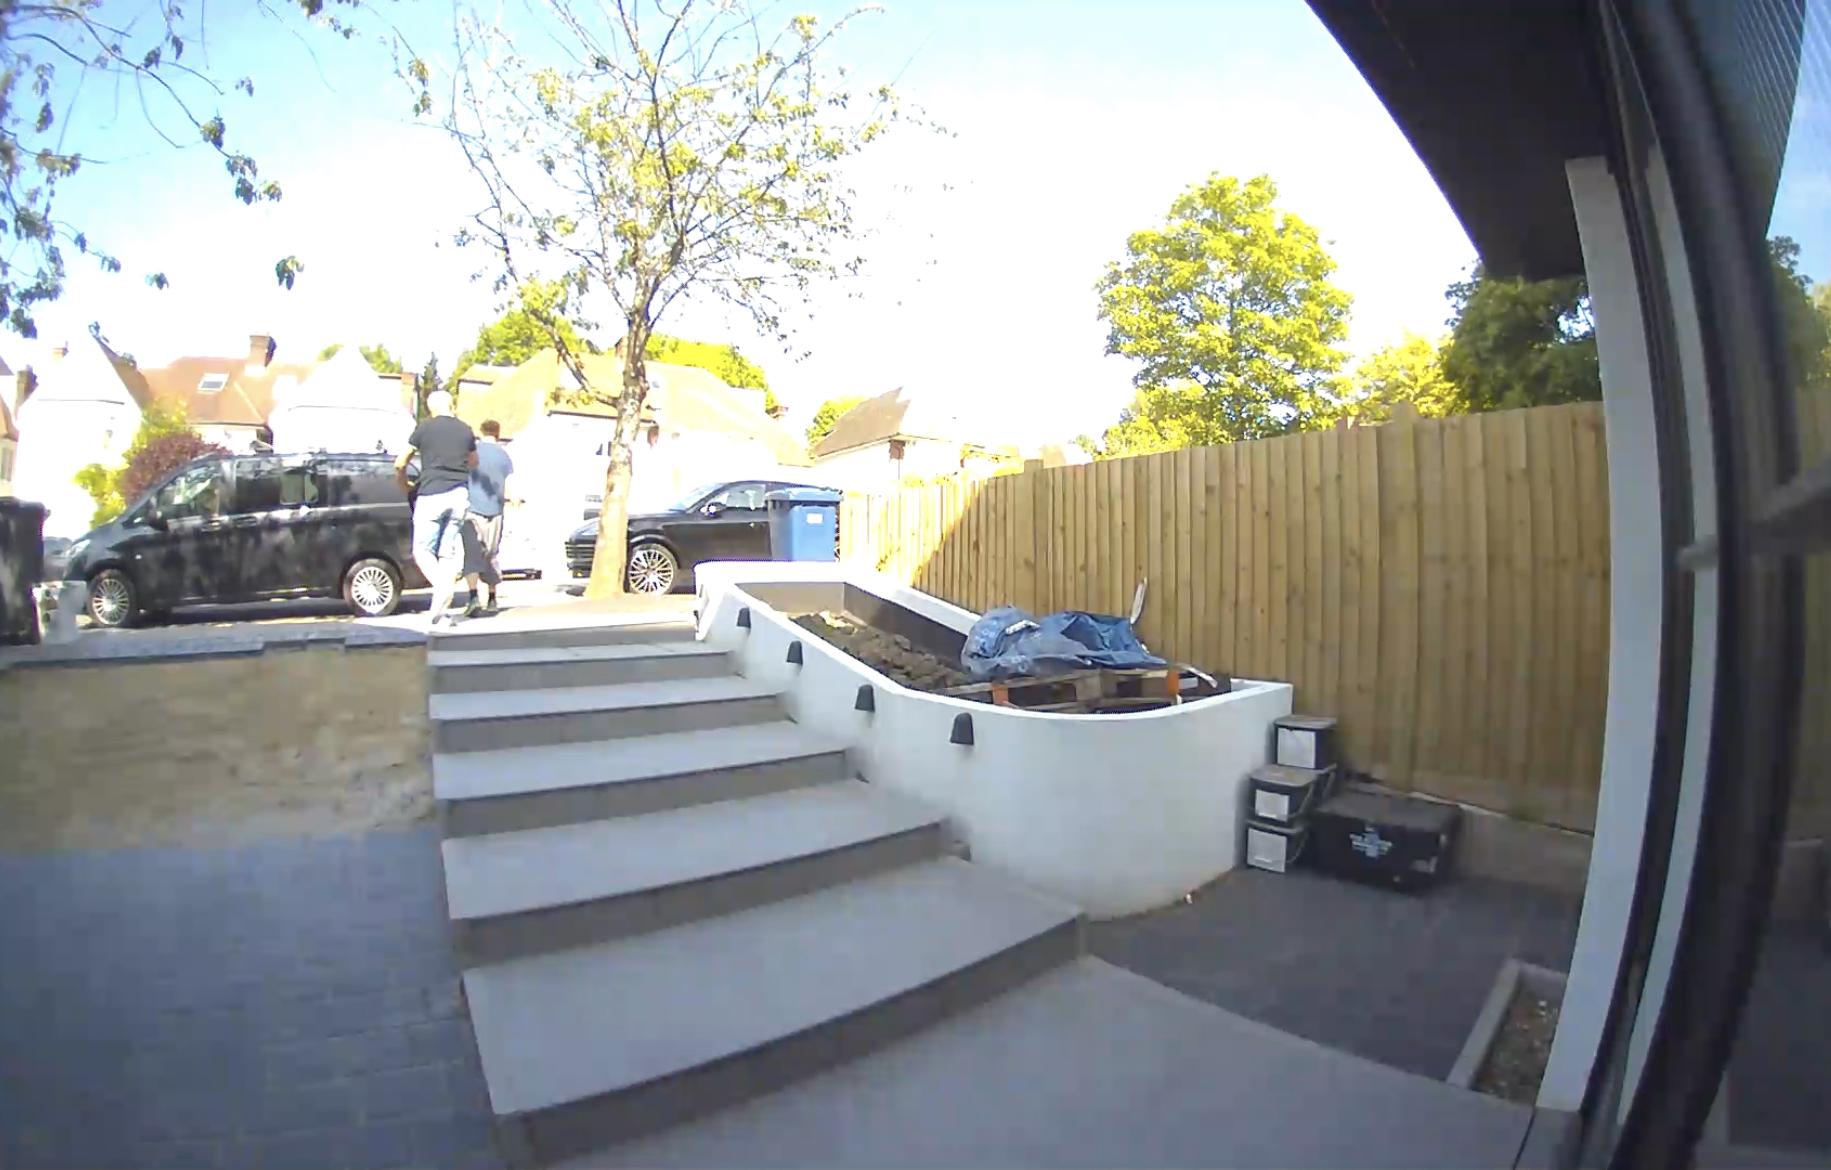
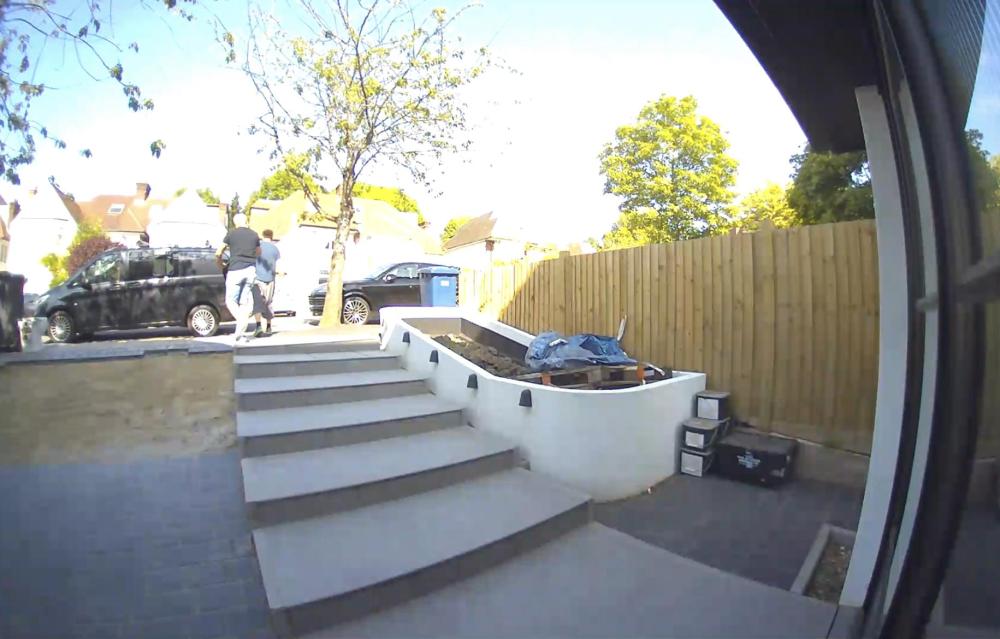
Ok, so almost a year after driveway V1 was finished, my trusty builders are back to redo it. Costing me an absolute fortune, but probably cheaper than couples therapy. Here is progress (of two guys) after day 1 (which started at 11ish and finished at 445): they have managed to take up almost half the setts. The rest will come up tomorrow.
-
On window 2, I believe you tape the window to the 4 edges of the reveal, which will include taping it to the closers, using a thick airtight tape (probably at least 50mm wide, so there is 30mm on the reveal, and 20mm on the window. Then separate bit of tape to seal junction between cavity closer and inside skin wall. Then plasterboard goes on the left and right reveals, and the top reveal, whereas window sill board goes on the bottom. Window 1 should be simpler, as no cavity closers to seal.
-
Cement particle board as interior wall feature - why not?
Adsibob replied to AppleDown's topic in Decorating
In the meantime, check out https://clay-works.com/ -
Cement particle board as interior wall feature - why not?
Adsibob replied to AppleDown's topic in Decorating
I have clayworks clay plaster on my ceiling and it looks AMAZING. Our plasterer had never installed it before, but he watched a couple of videos and was able to learn on the job. I also have bejmat clay tiles on a large feature wall, and that looks pretty special too. I will see if I can find some pictures. I’m away at the moment. -
Going to try to re-engineer this for an internal depth of 530mm. Not sure why, but the joinery company has allowed 20mm thickness for the back piece. Wondering what the downsides would be of replacing this with 6mm oak veneered plywood? The wardrobe is quite big, 2m wide and 2.73m tall although that includes quite tall shoe drawers under the wardrobe and some overhead storage above the wardrobe. The wardrobe itself is 1.63m tall. Maybe the backing piece needs to be that thick for structural reasons? Could be attached to the plasterboard wall though.
-
We are getting some bespoke wardrobes made up for our entrance hallway. Currently, the joinery company has proposed an overall depth of 550mm, but because the construction is very solid (these wardrobes will be very tall, floor to ceiling), once the oak veneered birch ply doors and the backs are factored in, the internal usable space will only be 510mm. This seems narrow to me. We would like horizontal clothes rails, but even ikea make their wardrobes 580mm deep. It’s all bespoke, so we can of course go bigger, the issue is that the bigger we go the more we narrow our entrance hallway. Will 510mm be enough to hang winter coats on a horizontal rail, or should we try and go for a bit more?
-
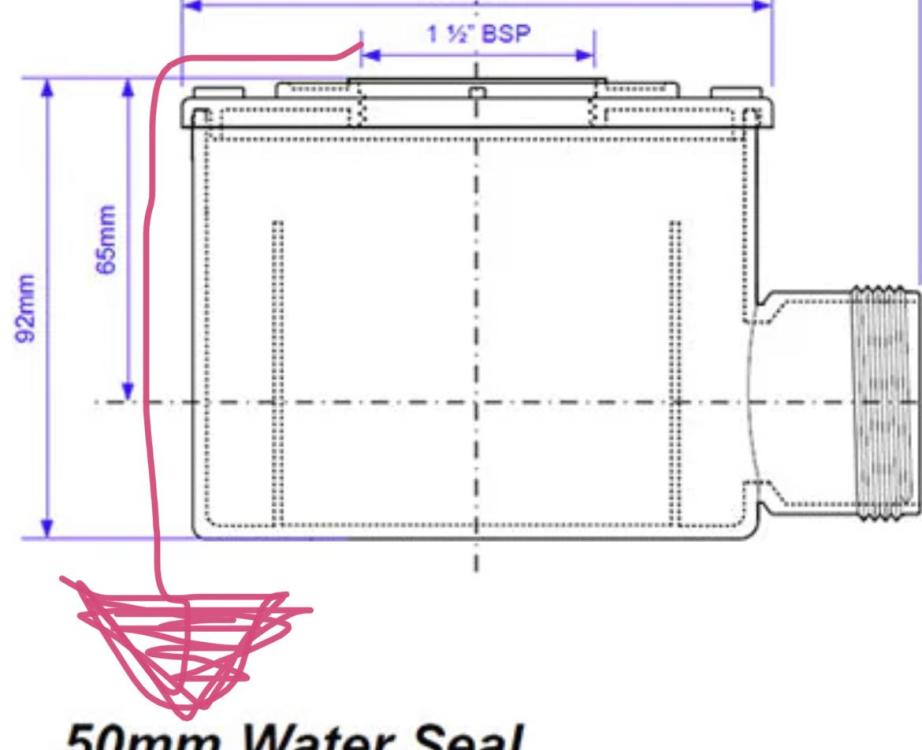
Any recommendations as to what to look for - what makes a trap apparently “better”, as opposed to actually better which would only be determinable after years of leak proof service.
-
What size of Pro Clima Tescon Varna tape?
Adsibob replied to CalvinHobbes's topic in General Self Build & DIY Discussion
50 rolls seems excessive. I just taped all junctions with windows and doors, and the house is very airtight. I think I used about 12 rolls. -
The leak is back. Will speak to builder about this tomorrow. Worst case scenario, will the wet room need to be broken up and re-tiled, or can it all be redone via cutting into the utility room ceiling?
-
So is it a case of asking the builder to put some sealant somewhere to prevent that 1mm of movement making any difference? If so, the million dollar question is where?
-
Okay, so I did it, only for three minutes, but flow rate is pretty high, so easily 45L or so. No leak. Maybe it was that 1mm difference that caused some water to travel like this: The leak was pretty tiny, we are talking no more than 30 to 50ml of water after a 8 minute shower.
-
Trying to bring the discussion back on topic, I checked the way I had reinserted the drain, and it’s possible I hadn’t replaced Everything exactly at it was; but at most we are talking about 1mm of difference. I pushed the drain piece down by that 1mm and have now been running the shower hose directly into the drain for 5 minutes, to see if I can recreate the leak. Nothing. Very odd. So either that 1mm difference in the position of the second item (the little 9cm tube) made a difference, or the leak is coming from elsewhere. I guess to see if it’s coming from elsewhere, I need to hose the edges of the shower area, and not just run the shower directly into the drain. But I’m too scared!
-
1st idea from architects - feedback welcomed!
Adsibob replied to Beechgate's topic in New House & Self Build Design
Yes, my thought too. I think if the plot is big enough, you could make it narrower and shorter, but still achieve what you want by using more space from the back garden. The TV room and utility or plant room could also go in a basement. -
Thanks. I owe the builder a 5 figure retention sum that is due when he tends to a few snagging issues in the next couple of weeks. He’s actually due to start that work very soon. Is this a legitimate snagging issue? Surely his installation of the drain waste was sub par if it couldn’t withstand it’s first proper clean?
-
No, i don’t think so. Also, the implement I was using was very thin and bendy, so it’s just bizarre that it would have the rigidity to do any damage. I can only conclude that the installation of the shower waste was pathetically bad, such that 15 minutes of fishing for hair had damaged it. Completely ridiculous that I deliberately avoided using the acid products, because I didn’t want to damage the pipe work, and yet I’ve ended up in this position.
-
No. The nearest “entry point” from the utility room underneath is a hatch in the utility room ceiling to access the bath waste which is about 1.6m away. It’s Sod’s Law that I read on here (possibly a post by @Bitpipe) that the Lusso Stone bath we had ordered (a free standing bath) had a dodgy waste, so i insisted we have an access hatch to it. Never occurred to me we would have a problem with a shower waste. How bad is this situation @Nickfromwales? Will they have to cut into the ceiling from underneath, or can it be sorted from the wet room? On the plus side, it would only be ruining the decor in the utility room. On the downside, we spent a small fortune sound proofing the utility room, because part of it sits under our bedroom and we run laundry machines at night.
-
1st idea from architects - feedback welcomed!
Adsibob replied to Beechgate's topic in New House & Self Build Design
If you want to have your heat source hidden in the ground, why not get a ground source heat pump? -
1st idea from architects - feedback welcomed!
Adsibob replied to Beechgate's topic in New House & Self Build Design
The corner window! That alone will be £4K plus.