crispy_wafer
-
Posts
1201 -
Joined
-
Last visited
Everything posted by crispy_wafer
-
Number 4 for me
-
Backer board or plasterboard
crispy_wafer replied to Super_Paulie's topic in Bathrooms, Ensuites & Wetrooms
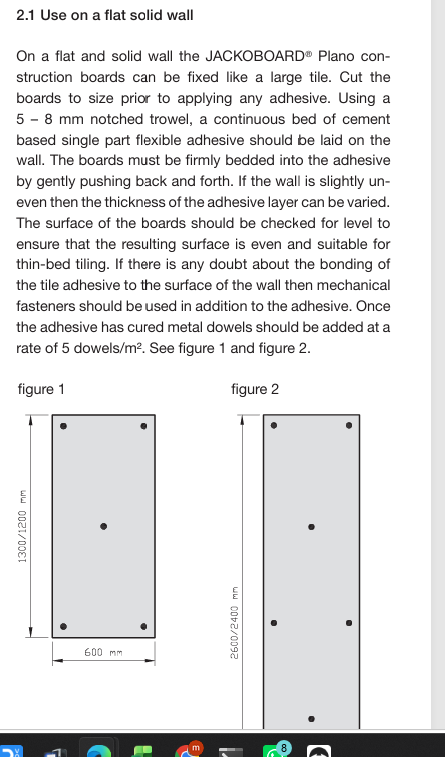
5, if the same as jackoboards, their instructions suggest one in each of the corners and 1 to the middle.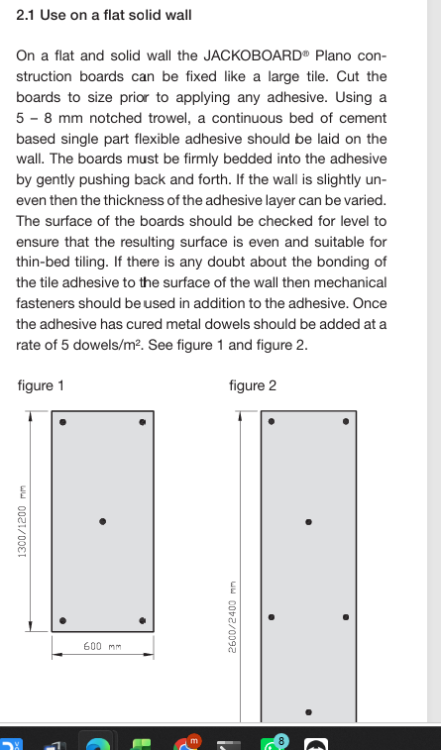
-
Bathroom wet UFH floor buildup
crispy_wafer replied to Super_Paulie's topic in Bathrooms, Ensuites & Wetrooms
Apologies for butting in, this PVA, is this the same as the contractors liquid PVA that you dilute down, or is this special thicker stuff specifically used as a glue? -
I've taken to using a spare empty/clean 10l paint tub and a drill attached paint mixing tool to mix up small batches. Just made peace with the fact that there will be a bit of wastage. Bag of adhesive @ £18 vs CT1 @ £13, my wallet says stay with the bag of adhesive.
-
Composite decking stains
crispy_wafer replied to Pocster's topic in General Self Build & DIY Discussion
gpt reckons vinegar, or citric acid and leave for 10 minutes to try and dissolve the calcium deposits... Might need a few repeats. -
Composite decking stains
crispy_wafer replied to Pocster's topic in General Self Build & DIY Discussion
bigger plantpot = what stain 🤣 -
Upstairs Bathroom floor, leads onto landing. Bathroom floor will be tiles, landing will be something else and there will likely be a transition strip. The door casing is such that the door will be inward opening. I'm trying to set out the tiles for the floor, but am coming a little unstuck on where the transition from tiles to the other flooring ought to be... What do tilers usually do? Tile to outer edge of door (Landing side)? Inner edge? To the Centre line?
-
Supporting a sink with two bowls (1.5) ?
crispy_wafer replied to Spinny's topic in Kitchen & Household Appliances
when sat into a worktop and supported on all 4 edges it'll be fine. -
What have you used for the grey panel?
-
Same here, but I’ve added utility sink too just because rising main is under there and I couldn’t think of a compelling reason to soften the utility cold.
-
used mlcp for my upstairs bathroom rad installs, used geberit press chrome pipe tails. used mlcp because roll ends left over from ufh install. Already have a press tool, so found and bought the required jaw from ebay. That said, I'm not sure I'd go out my way to specifically install mlcp, I only did to get rid of them 15-20m sections of pipe I had left over!
-
what the feck on earth is that?
-
Insurance for garage demolition by family
crispy_wafer replied to Jane W's topic in Self Build Insurance
Same, what they going to do if you forget the digger isn’t a zero tail swing jobbie and you accidentally take out a wall, then because safety reasons the whole structure had better come down. -
I was thinking 100mm from hob, 300 from sink.
-
Any recommendations for tanking this plant room?
crispy_wafer replied to Great_scot_selfbuild's topic in General Flooring
Would it still need to be plugged if there is a water seal in the drain trap? -
22*75/100mm strips of timber perpendicular to the joists @ 400mm centres with packers to make a flat level surface, 75mm/100mm so there’s plenty of scope for not being just so with measurements for board endings. Or you could use res bar and pack out, or mf5 top hat and pack out.
-
Multitool with metal blade and cut each side of the cable into the grommet holes on either top or bottom whichever is easiest one cable out then the box will come out and the other cable will feed out. Or cut away more plaster and slowly tease and feed the cable backward into a U shape on the outer side of the box and pull slowly and gently try not to snag the cable and hope the rubber grommet protects against the sharp edges. There will be some making good required but that’s par for the course I’m afraid!
-
I agree with the man that says loctite 55 🤣, wrap it, tighten it, back it off so it points in the right direction job's a goodun. That said, not tried it with metal into hdpe.
-
What wall type should I use?
crispy_wafer replied to BotusBuild's topic in General Self Build & DIY Discussion
Nice, I like this a lot -
Can that section of floor be cut lifted and shimmed level? Would be my first thought. If not then slc over ply appears to be the method I read about most often. Only a DIY’er so take my thoughts with a pinch of salt
-
just to clarify for me, or to confirm, now that the picture shows more, you wanted to plumb the toilet into the the fitting into the cap? So the location of the pan will be there. And all that will be behind boxing when completed, yes? If that's the case I think there's a definately a way you can reconfigure that so you can bring the toilet exit horizontally with a slight fall and have the vertical stack interface so it doesnt impede or interupt the flush. Haven't got my crayons but that's where my mind is heading
-
Keep going, you’ll get there!
-
I’m sure I’ve read on here that others have lashed something up that resembles an access ramp to get through building control, then when building control have duly signed off, you can remove and get on with life!
-
MVHR Design And Install
crispy_wafer replied to Adrock's topic in Mechanical Ventilation with Heat Recovery (MVHR)
if you can lay your hands on a big fan (machine mart), a sheet of osb or similar, cut osb to fit one of your window openings, cut a hole for the fan. Fan on full whack pointing outside, you’ll soon start to depressurise the house, then stick radio on and wander round finding sources of ingress.