


crispy_wafer
-
Posts
1197 -
Joined
-
Last visited
Everything posted by crispy_wafer
-
Back on this... finally found one close'ish to home so bought myself a 2nd hand - nearly new du-200, looking for disc recommendations please for porcelain 8mm through to 10-11mm, saved a chunk on the cutter so have some funds to invest in a good quality disc.
-
Thanks guys, I’m doing ok with bagged, not worried about it going ‘off’ really, it’s just I’ve a small amount of tiles to fit to finish off so I guess I need to master the art of a small batch mix.
-
I know bagged adhesive is the go to, but, for those moments when you are short on time or just fancy doing part of a job outside of a wet zone and don’t want to deal with cleaning down buckets and mixer is there any tubbed adhesive that can be used? Asking for a friend 😉
-
Should top of Drainage Chambers be Level ?
crispy_wafer replied to Spinny's topic in Waste & Sewerage
as suggested, as long as the fall is in the right direction at the base it'll be ok. The risers can be trimmed carefully so that they appear horizontal, like most things easier said than done though. -
Steel Single Spine Staircase worries
crispy_wafer replied to crispy_wafer's topic in General Structural Issues
I'll do my best... starting from the floor Looking at the Block/Beam Floor schematic, we have Floorspan T4 type beams at 440 centres and suggest Medium density 1450kg/m3 blocks inlaid. Cannot recall exactly what they were, but they were heavy/white and dense jobbies DPM - 300mu 150mm PIR - Ecotherm - comprising of one layer. DPM - 300mu 70mm Cemfloor - no mesh, or fibres Staircase weight - I'm told 204kg. - Wooden Treads * 12 @ 18-20kg each I'm quoted, I havent got as far as having these made. The bottom 2 treads are box like bearing on the floor covering the base, before the rest of the treads that are designed to fit on plates. The plans suggest Structural steelwork to EXC3 Baseplate 600*350 * 8mm - the base plate would be perpendicular to the beams, will certainly straddle over one haha, I won't - Got door casings to fit so that's my next week planned. -
Steel Single Spine Staircase worries
crispy_wafer replied to crispy_wafer's topic in General Structural Issues
there's the 4 in question, you know they are there because the staircase is due to have a wind at the base, and I left a nice big gap for a standard timber staircase to bear down away from pipework....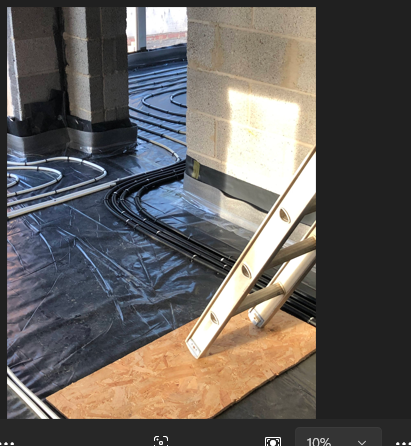
-
Steel Single Spine Staircase worries
crispy_wafer replied to crispy_wafer's topic in General Structural Issues
crikey, good job, well done you! I've got a very rough idea where my pipes are... and they are encased in conduit. So if it comes to it I could cut and excavate, but only really as a last resort. -
Steel Single Spine Staircase worries
crispy_wafer replied to crispy_wafer's topic in General Structural Issues
Large plate as a load spreader to minimise point loads? The bottom tread is going/was planned to be an large oak box type affair, so depending on if the plate is recommended by the SE then its likely to be covered... We'll see -
Steel Single Spine Staircase worries
crispy_wafer replied to crispy_wafer's topic in General Structural Issues
Yeah I realise the only real answer is an SE, but sometimes it's good to talk and get stuff out there even if it means admitting to not thinking something through... Anyhoo where there is a problem, there is often a solution and maybe, just maybe somebody on t'internet may have just come across a problem similar to this in the past. Appreciate the comments nonetheless and I don't take anything to heart. Am big enough and ugly enough to meet problems head on. And yeah a bungalow would solve the problem 🤣. -
I feel a bit daft asking, but I'm looking for advice as I may have jumped the gun a little. with my heart leading my head, I've had a Staircase fabricated at a local firm, and whilst I was getting carried away I didn't have any focus on what the staircase is sat on! And now I'm trying to figure if, it'll be alright, or if I need to undertake additional work before attempting to install. My ground floor is Block/beam, 150mm PIR, 70mm Cement based flow screed. The closer I am getting to installing the more I suspect this isn't sufficient to bear the weight of this staircase, but I don't know for sure. To complicate slightly I have 4 ufh pipes running under where the footplate of the staircase would sit - I did have the footplate made larger and bolt holes drilled away from where the ufh pipes are. Are there any clever bods in buildhubland who can advise? Thanks Marek
-
Rodding points or inspection chamber for rainwater
crispy_wafer replied to lizzieuk1's topic in Rainwater, Guttering & SuDS
Interested to know, because we didnt have any that rodding points on the rainwater pipes that surround the perimeter of the build and nothing was raised when they came out at the time, however, I have heard of some BCO’s wanting rodding points where a run exceeds a certain distance. It might be one of those ‘depends who you get’ -
I've got these in my black book of suppliers have a look to see if what you want is in there https://stairpartsdirect.co.uk/product-category/metal/
-
ASHP schematic - Noddy question - CCT
crispy_wafer replied to crispy_wafer's topic in Air Source Heat Pumps (ASHP)
Yep the cylinder is already prepped ready with the 3 port valve. No worries on that! My main queries are what to do at the ufh as I need to finalise the pipe work at the manifold. My manifold and pump set was all supplied and purchased years ago, taking for granted that blending valves and pumps were required. But I’m sure I’ve read that these were not necessarily required as design and thinking has evolved. - then I started thinking that perhaps the fixed flow pump in the HP may be able to deal with the ufh, reducing complexity and pipe work faff. -
ASHP schematic - Noddy question - CCT
crispy_wafer replied to crispy_wafer's topic in Air Source Heat Pumps (ASHP)
Yeah it’s one of the R32 with fixed flow rates, picked up cheap a few years back. I think the Chofu manual shows the cooling control but tbh I’ve not looked deeply into it, when the place is habitable it may be a point for experimentation. -
ASHP schematic - Noddy question - CCT
crispy_wafer replied to crispy_wafer's topic in Air Source Heat Pumps (ASHP)
Thankyou, that advice works for me -
ASHP schematic - Noddy question - CCT
crispy_wafer replied to crispy_wafer's topic in Air Source Heat Pumps (ASHP)
My understanding (please correct me if I'm wrong) to protect the ufh circuit and floor coverings from over temperature should mogwai eat cookies after midnight and turn into a gremlin and takeover the system! Seriously though, I'm trying to learn, this bit of my Self build is a new topic for me! I would put it off for a little longer, but I need to get that last bit of wall boarded over so I can the plasterer in to finish the skimming. -
ASHP schematic - Noddy question - CCT
crispy_wafer replied to crispy_wafer's topic in Air Source Heat Pumps (ASHP)
So, UFH fed from ASHP, my design flow rates are approx 17l/m. The internal pump on the Grant can do 20l/m. I don't mind straying from the schematic. So, if I remove the pump and mixing valve from the manifold, then pipe straight into the UFH. In the plant room I'll have the auto bypass and then the two port valve for the UFH zone. Can I locate a blending valve in the plant room, or does this need to be situated close to the manifold?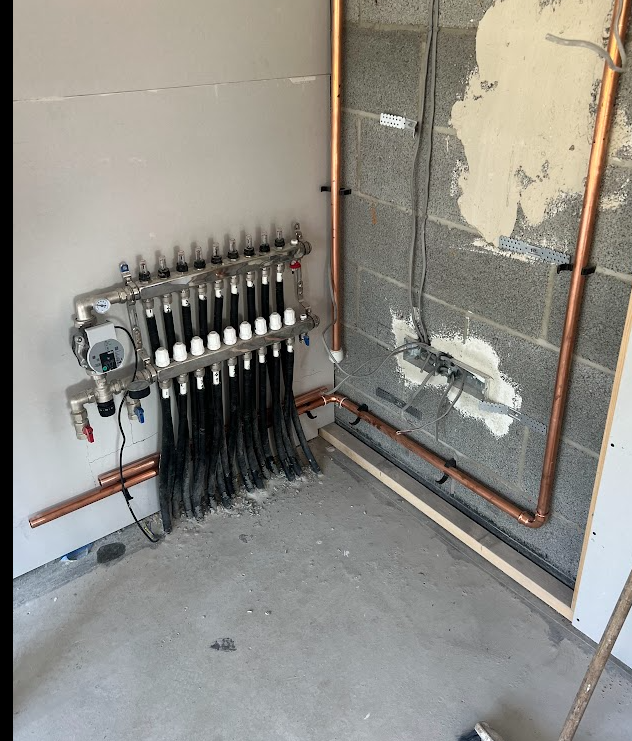
-
ASHP schematic - Noddy question - CCT
crispy_wafer replied to crispy_wafer's topic in Air Source Heat Pumps (ASHP)
No, I've planned as just UFH, but... being the chap I am I've run 3 pairs of MLCP pipework for 1st floor rads/fancoils back to the plant room if the need ever arose! -
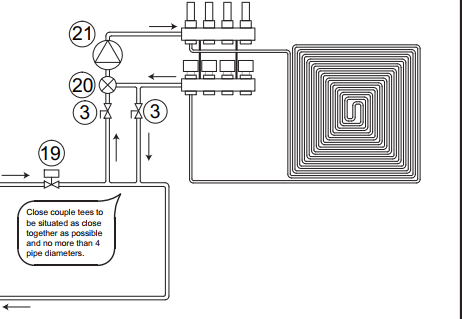
Just running through my Grant ASHP schematic before I start putting pipes together. Schematic wants a close coupled tee, what does it do?
-
Is this a reasonable cost for plumbing first fix?
crispy_wafer replied to Great_scot_selfbuild's topic in General Plumbing
If you have the time and inclination then it’s doable, work out the pipe runs to minimise crossovers and interference from other services if space is tight, go buy rolls of said pipe and clips to keep it tidy and go for it. Many of us have trod this path, and history shows that we do like a good plumbing thread if you are so minded to let others have their 2p worth. Biggest minor issues are how to bring the pipe work tidily into plant room if having individual runs, you can end up with 20 or so individual pipes. And the various wall plate elbows and terminations at the end point. I’m not sure it’s 4 and half grands worth of work in total, but in this day and age where labour costs mucho money then I’d diy it. -
We've had some success with Dulux super matt on ceilings, and diamond matt for the walls.
-
360 degree laser level recommendations
crispy_wafer replied to flanagaj's topic in Tools & Equipment
Another with a huepar and would also recommend. Mine went out of level through an accident on my part, a video of me running the calibration test and they sent me a new unit. -
Painting wood burner
crispy_wafer replied to BotusBuild's topic in General Self Build & DIY Discussion
Back in the day, we used to use hotspot black grate polish to rub into the castings. The rust would only ever be surface dusting of corrosion on the old hunter and Dunsley’s and would pretty much disappear when rubbing a finger over it. -
Yeah, type 1, just to give the slop a bit of body! and a 9t of sand for the brickwork delivered. That was late August, so ground pretty dry, but a downpour raised my pulse level a bit! Then well, I couldnt stop myself, in and out of the trench, when really I should have kept well clear. In terms of concrete, not sure, let the builder deal with that. The concrete firmed up pretty quickly though.
-
Been thinking about sharing these... Found's werent as longs as yours and no pump, because we had reasonable access all round @flanagaj but if you wanted a quick vid or two, we did have a bit of rain between dig and pour, and we handballed a little slop out when an edge or two fell in. But that's the nature of it. If I remember rightly, we had a surveyer mark out the layout, sprayed blue line paint between the pins. Nothing too technical. We used pins in the sides of the trench for depth management. and a laser with staff for levels!
