Onoff
-
Posts
21056 -
Joined
-
Last visited
-
Days Won
206
Everything posted by Onoff
-
????? The Einkita / Makhell hybrid chainsaw only WORKS! It's alright too. No proper oil so I've put 20w50 (for the Capris) in. Video tomorrow / the weekend.
-
My old XP pc has a a mouse and keyboard with the old, round PS2 style connectors (green and purple ports). The pc also has USB ports. 2 on board and 4 on an expansion card. I tried unplugging the PS2 ones then plugging a USB keyboard and USB mouse into USB/PS2 adapters and plugging these into the green & purple PS2 ports. It just booted up with a keyboard error. Then tried plugging the mouse and keyboard into the original, onboard USB ports. Nope. Then tried plugging the mouse and keyboard into the USB expansion card ports. Nope. Then one device in an onboard USB port and the other in a card USB port. Yep! ? I'll try the KVM switch next.
-
I'm after a Makita dual charger. Are the Chinese clone chargers worth a punt / safe? This sort of thing is half the price of the genuine Makita one: https://www.ebay.co.uk/itm/Fast-Rapid-Battery-Charger-for-Makita-DC18RC-Li-ion-LXT-7-2-18V-Double-Twin-Port/254452036281?hash=item3b3e85f2b9:g:9rcAAOSwKsRedcj~
-
All soldered up and tested. The jury's out. Need to try with good batteries. I'll assemble the chainsaw with the blade etc tomorrow and try it: Short video:
-
The 1m copper L gets put in and bent over. Found it easiest to do with a bfo screwdriver with the end ground flat. one leg is 20mm that gets bent and soldered, the other leg 21mm. You MUST get them the right way around! Ready to solder. Just realised I'll have to do this all in situ and risk melting the PLA behind: The "springy" bits that engage with the blades on the Einhell tool were next. Took a stab at bending them over a small drill bit then levering the copper with the same bfo screwdriver: Which is how I unfortunately managed to break the clip that locks the adapter to the Einhell tool (again)! Definitely because of the layer orientation I'm sure. Nothing to do with my heavy handedness.....Going to super glue it and squirt a shot of CT1 down behind.
-
Cutting the copper battery terminals for the adapter was fiddly. The rectangular ones are good. The L shape ones need a little fettling with the needle files: This is the Makita battery side. The leg of the L gets bent over and soldered to the face of the rectangular bit sticking up. That engages with the Makita battery. The other side that engages with the Einhell tool. I'm pointing to the other leg of the copper L. I have to "kink" this leg to make contact with the Einhell tool;s battery connector "blades". The soldering might be fun. I don't want to burn the PLA when I do it. Might print off a sacrificial "former" to hold the pieces for soldering.
-
Thanks. Material stock would be my issue immediately. How many grams per band / bands per kilo and can it be any colour? I wanted 1kg of black Steadytech PLA the other day. Had to settle for x3 300g.
-
Wouldn't mind printing some. So many designs though it's knowing where to start. What material are you printing in? Can you print just the bands or do you need to supply the visor part too?
-
No complaints here it was FOC!
-
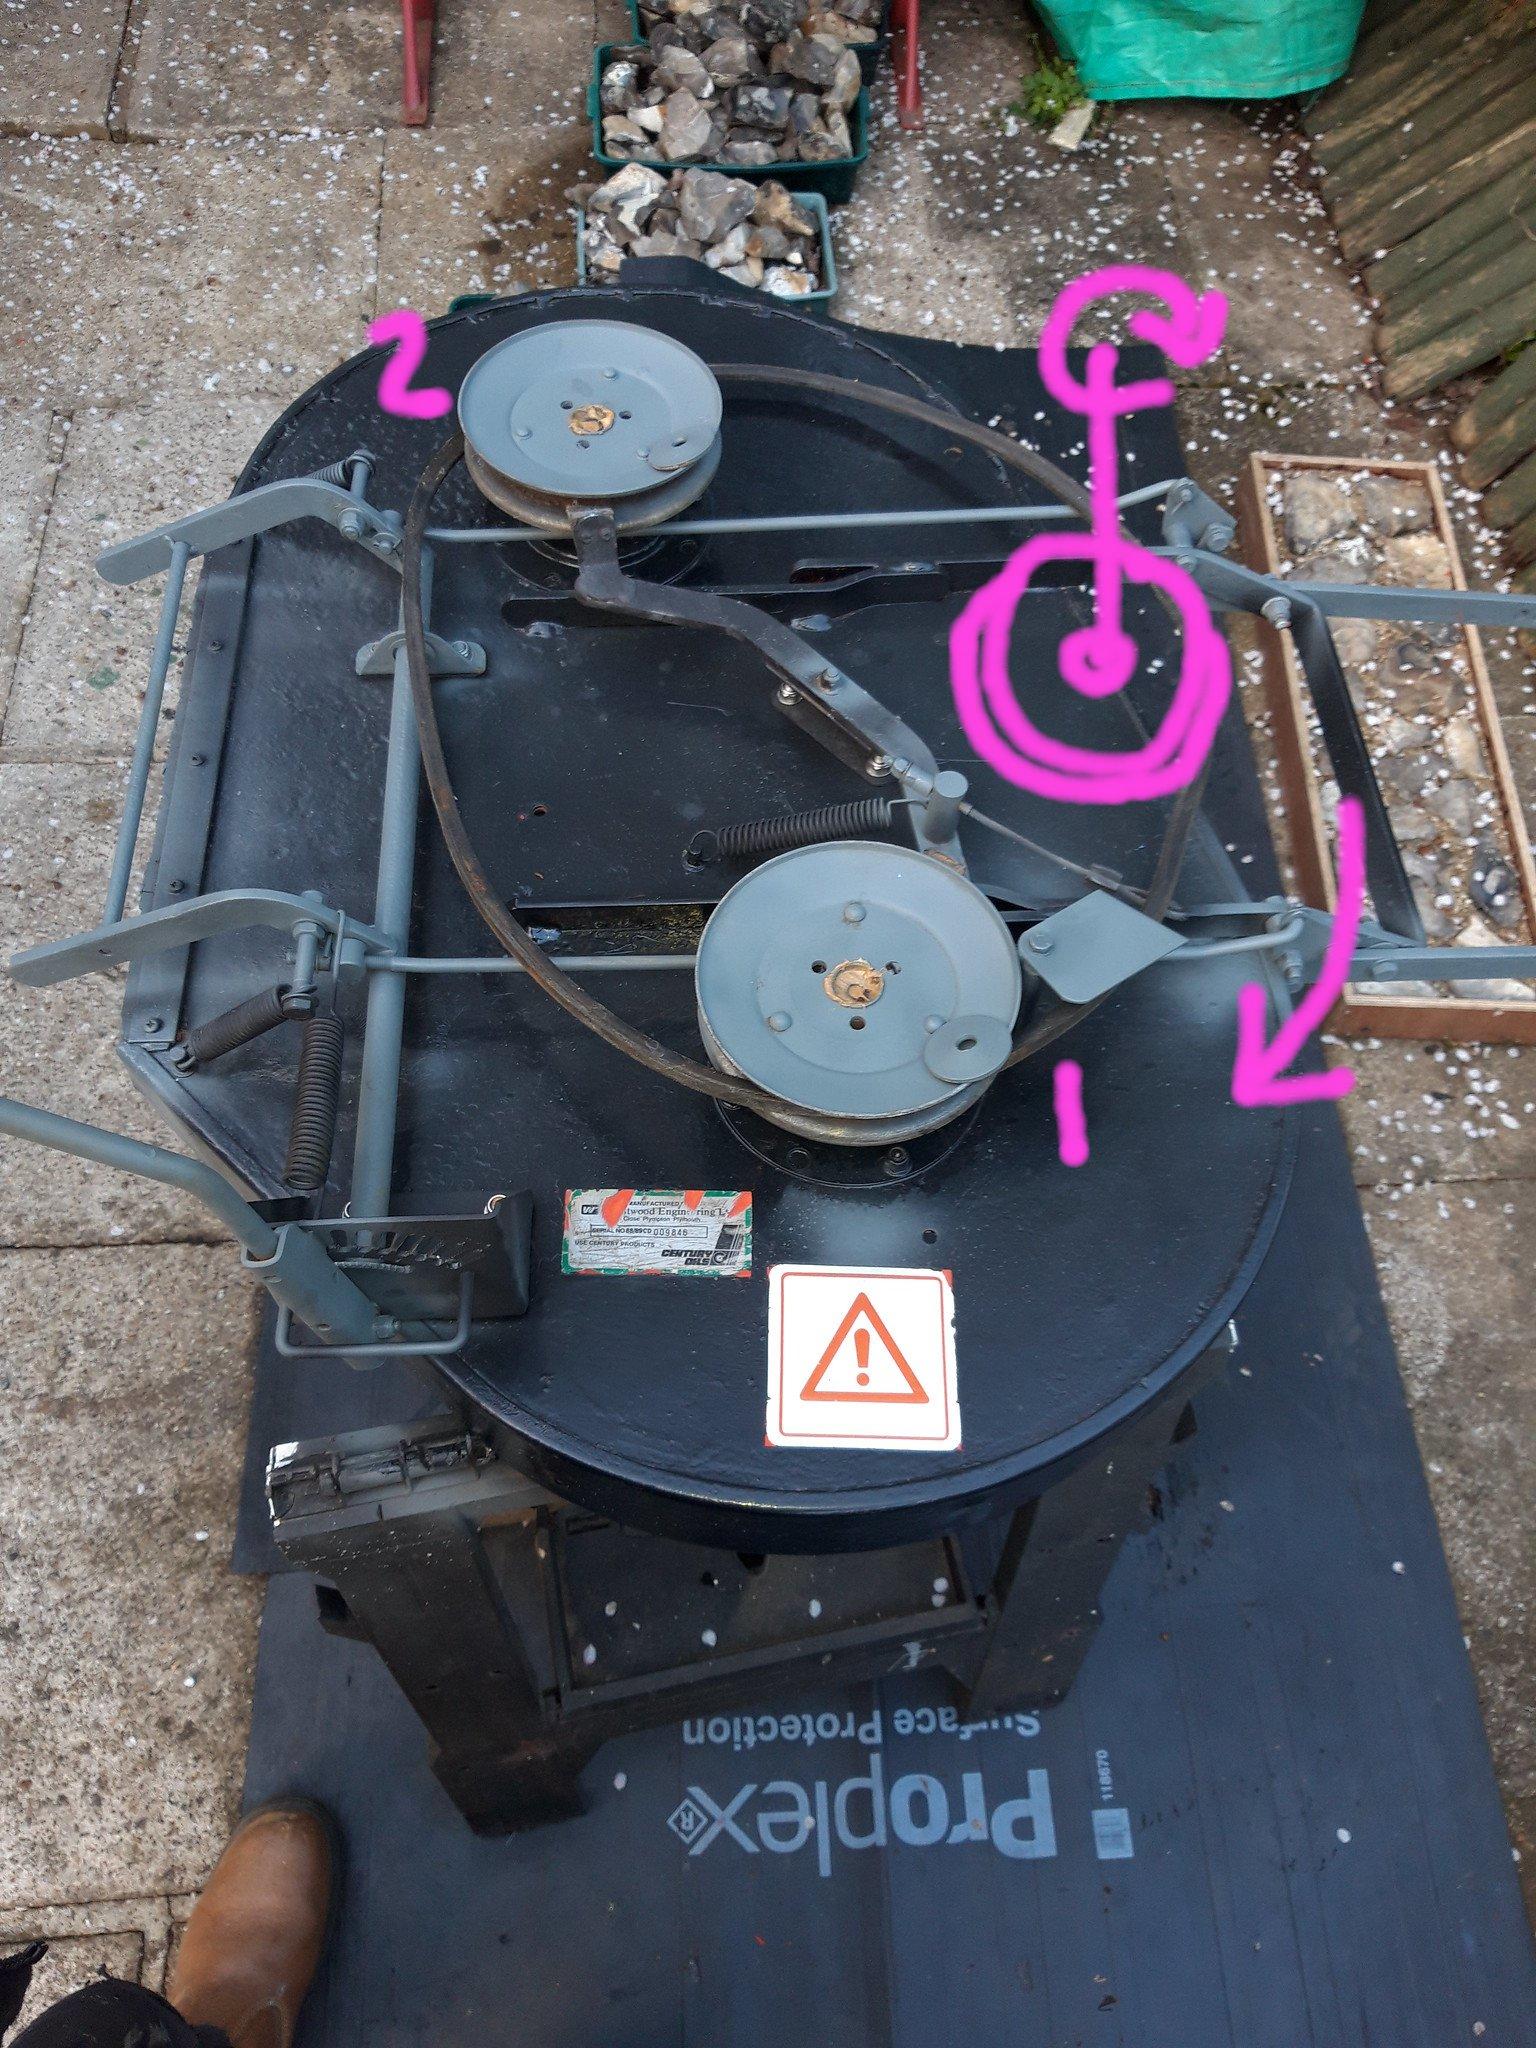
Seems I had in wrong in my thought process above! I had it backwards. Belts pull only so all of the slack will be at 1 (which is where a tensioning pulley would be if fitted to take up any slack in the belt). I had to ensure the brake pads weren't engaging with the pullies when the cutter was engaged. They're not If the belt is flapping there badly then I either have a belt that is too long or the engagement needs some adjusting. Belt WAS the right one originally... Tried starting it just now on the pull cord, to video the belt slap it but no dice. Was starting fine yesterday!Anyway, ref the deck/belt. After refitting the deck the belt was smoking like Hell on trying engaging the cutter, blade pullies weren't turning and the belt was "slapping " terribly at 1, marked pink, above.We adjusted at the back here: And it's in these holes at the front, (before it was 1 hole back): After adjusting as above the belt smoking stopped pretty much and the cutting pullies seemed to be trying to turn.Deck fully raised, belt is level: Deck fully down, belt looks at too steep an angle to me: The belt is wearing here: Grateful for any pointers.Cheers
-
"Oh look, he's got a small compromise!"
-
Hmm...deck back on but..... Picture below shows the repaired deck pre refitting. I've added on in pink the drive pulley on the bottom of the engine. The belt runs anti clockwise. The original pullies that turn the blades are shown at 1 & 2. They are stiffer to turn than I'd like. If, with the deck on I engage the cutter the belt jumps and slaps at 1. I think what is happening is that the drive pulley feeds the belt onto 1 which turns relatively freely. When it gets to 2, because that is stiff to turn the belt "backs up". New bearings ordered!

-
Got up at 4, my lad still hadn't gone to bed! ? He had though printed the second battery adapter: A little rough at the very apex but there's a bit of a uniform pattern in the "weave": Copper sections next to make and solder. Then fully assemble the chainsaw and test with Makita Li-ion batteries. Hoping PLA stands the test of time and I'm not left wishing I'd printed them in ABS!
-
Think about it in our case. It takes a team of 6 guys to change a window on average. There for the whole long day as in 10 hours plus. 4 hours is literally spent dossing whilst the silicone cures enough to put the unit back in. That's 24 man hours, 28 if you count my time in it, just waiting. As the frame has to be reused there's no way around it.
-

Oil Prices nearly 30% Down
Onoff replied to Ferdinand's topic in General Self Build & DIY Discussion
I did. Got about 250 gallons left in a 670 gallon capacity tank. I reckon the price will go up once lockdown eases here. -
The fitters I see often use a cheese wire type saw.
-
Pretty happy with that I think. Second one just started printing. The battery "terminals" for this are fab'd from 1mm copper sheet, soldered together. Some deft tin snipping to be done.
-
I get involved with bfo commercial glazing replacement on high rise buildings. Often the case that the frame is bespoke. These units are siliconed the full perimeter of the glazed panel where it sits in the frame. Take the frame and glass out as one, sit on trestles and cut through the silicone. Remove the broken glass. Clean up the frame, new glass in. 2 part silicone from a compressor fed gun. Wait 4 hours to cure enough to put back on the facade.
-
The Makita battery to Einhell/Ozito continuation: Einhell it seems bought Ozito. From that came the Power X Change system. Seems the same batteries fit both makes. Off of Thingiverse we downloaded a ready made adapter by a chap named Seibar. That itself was his take on a model developed by a chap, sportsedan. Seibar's was a little loose for my liking so we increased widths/thicknesses here and there and made it a bit tighter. The visible face on his, you would see, where the Makita battery clips on looked dog rough imo: So our 1st print was done with the layer orientation at 90deg to Seibars: It fits nice and tight, Face you see not too bad: But.....it was printed with this end sitting on the bed, where the supports came off, it's horrible: The clip broke as well. Pretty sure the layer orientation didn't help: Printing another with the end squared off and more "meat" on the clip: 0.2mm layers, black Steadytech PLA. Watch this space about 8pm tonight!
-
You could reach that with a short pole.....sorted!
-
Master of the reach around already!
-
Lift the carpets and see the piece of GTX can under there...
-
No HDMI here. VGA on both machines.
-
I was literally aiming to plug the XP machine into the router, same as the Win 20 machine so I could share data that way. Not sure on the risks of that. Only the Win 10 pc will have a used browser on it.
-
I've VMWare Workstation 15 Player installed. It takes too long to boot, runs too slow. Quite happy going the KVM route. Just ordered a couple of USB to PS2 adaptors.