gavztheouch
-
Posts
253 -
Joined
-
Last visited
-
Days Won
2
Everything posted by gavztheouch
-
MVHR ducting to outside
gavztheouch replied to Moira Niedzwiecka's topic in Mechanical Ventilation with Heat Recovery (MVHR)
My house is 210m2. Anyone else have a similar m2 and if so what diameter of pipe did you use for the external piping. Zhender have a pipe that is pre insulated I think it is 160 internal and around 250mm external. im also going for wood cladding. It’s open rainscreen so I need to make sure I’m weather tight coming through the membrane. What did you use here, I’m thinking an epdm grommet if they come big enough or possible just tape but I think that is always harder than a grommet. -
MVHR ducting to outside
gavztheouch replied to Moira Niedzwiecka's topic in Mechanical Ventilation with Heat Recovery (MVHR)
Is it still recommend to put the inlet and outlet 2m apart? I see Zhender have a combined inlet/outlet that have the pipes right next to each other. I guess there will be a baffle arrangement to prevent cross contamination. https://www.fastlec.co.uk/zehnder-2x160mm-right-hand-external-wall-grille?utm_campaign=smartsh&gad_source=1&gad_campaignid=17190426677&gbraid=0AAAAAD8Nz9f-3-LzDnHIlsuV-MleAAoms&gclid=CjwKCAjw6vHHBhBwEiwAq4zvA_Lglcqpz9-48JocAj6NXNiC2dTtCF737MkcyS5OSb9FuJkesldSKRoCFYcQAvD_BwE -
Is it a bad idea to have inlet and outlets into prevailing wind. I would imagine with the relatively low flow rates of Mvhr the wind might cause havoc also wind driven rain will make sealing the pipe harder?
-
Exposure time is usually rated for mid summer ie worst case you should be ok over winter. Make sure you have as many battens on as possible. I’m just putting my battens on now. Membrane has been on for 8 months already. It’s a black uv resistant version, even so I want it covered as soon as possible.
-
Moving in to an unfinished self build
gavztheouch replied to hbooth's topic in General Self Build & DIY Discussion
I’ve got 3 kids. 5,3 and 5 months old. We live in a flat we own about 1 mile from site. It’s about 70m2. The kids are driving us insane with the constant fighting and screaming. Our down stairs neighbour has had enough of our noise and this is stressing out my partner. There are no properties to rent nearby and my partner is desperate to get out of the flat. I phoned our self build insurance to ask if we were sleeping inside our self build would it invalidate the insurance and to my surprise he said no. It would cover the building but not the contents. so there is a possibility to move into a building site with three young children or some sort of hybrid living between the flat and build that will take the pressure of our neighbour. trouble is I’m missing 4 external doors and 4 windows. There is no cladding, and the inside is basically just stud work. I need some sort of plan to be out of this flat by christmas -
Retired chippy would be perfect
-
I’m looking for help finishing my house. Prob a good joiner or general builder would be best. I would love to work with someone say 3 days a week consistently. This would give someone guaranteed steady work, could be attractive vs bidding for work quoting etc.. Most big joiner companies don’t like just giving one man they usually come with a labourer which really pushes the price up and I don’t always have work for them. Any advise on seeking extra man power? Spoke to a local joiner could do two days a week but their rate was £50 which was a little steep I thought. Was budgeting on £35 I could sustain that for a few months at least.
-
How do you deal with the screw heads holding on the battens. I have screws every 400mm holding the battens on. Just wondering if they will be a problem when I come to screwing the cladding on. I haven’t done my battens yet so I could pre plan if nessesary.
-
Thanks Tosh, yes I’ve been in contact with metal solutions they are very helpful. The Glasgow depot is close to me. I liked the idea of cutting and folding my own cills. A future project of mine is to learn how to work the metal for standing seam roofs and cladding.
-
Timberframe cladding - Cost of cavity barriers and insect mesh
gavztheouch replied to AliG's topic in Timber Frame
I have an open rainscreen. Bought the rainscreen from russwood after conversation with my BCO he confirmed the open rain screen is not a cavity and therefore we don’t need fire battens. However my architect thinks they are wrong and are arguing with the bco for me to put them in! I know they know how much it will cost but I hope they know how much work this will take if I have to remove all the battens to get access to the wood fibre to cut a channel round the house to receive a hard batten to take the expanding strip. This will comprise the membrane too. Nightmare. If I don’t do it properly then the whole exercise will have been a box ticking exercise. But then why challenge the original decision in the first place. -
I have a metal roof made of green coat steel from sweden apparently it should last 50 years. Is this also a good material to make window sills from. I can get it up to 0.9mm I think.
-
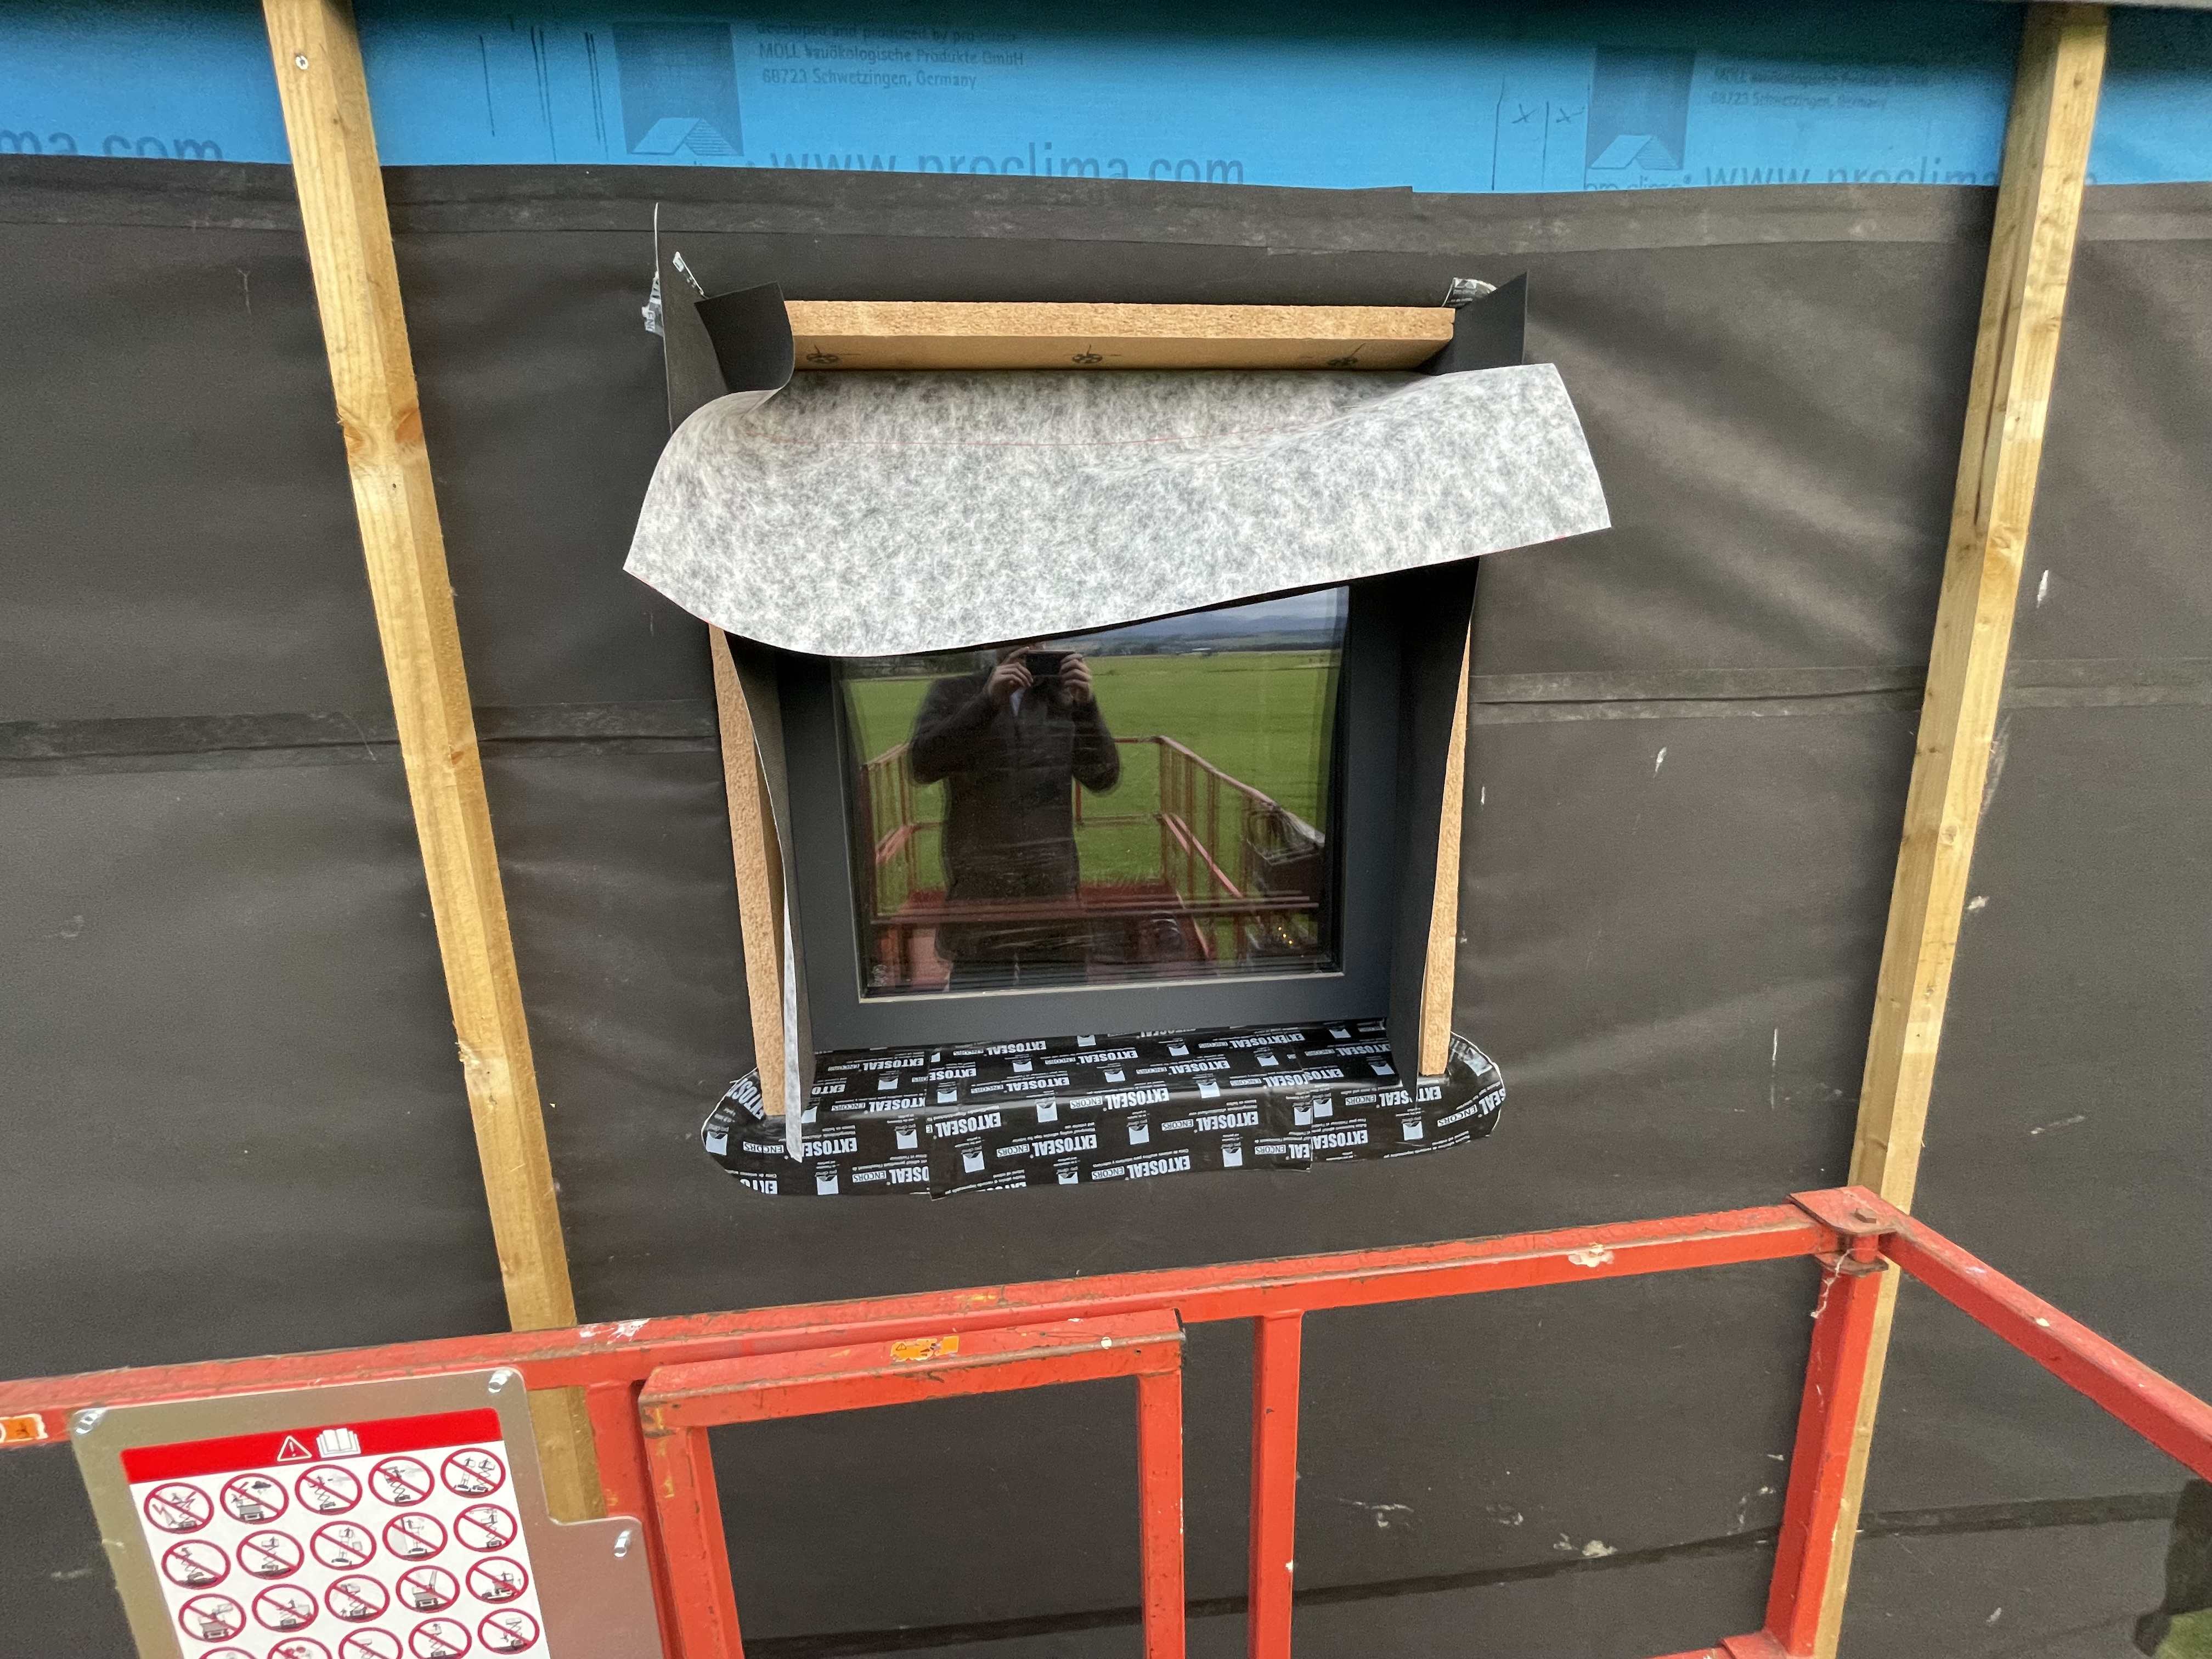
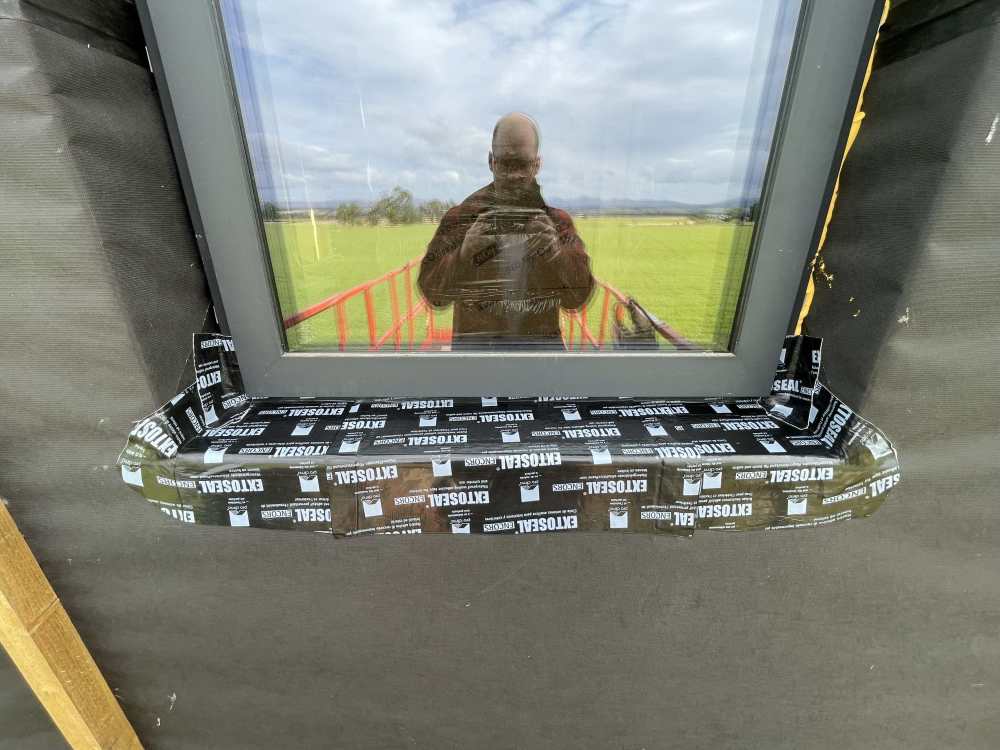
Started dressing in the windows on the outside ready for the cladding. I’m using extoseal for the sill and wood fibre insulation around the windows with a wrap of membrane around the insulation. Take ages per window

-
My architect detail has the membrane taped to my foundation which is an insulated raft. It is taped with a tape that can be rendered over so it covered with the concrete render that covers the raft insulation. I’m not sure of the idea of taping the membrane to the raft as any water that gets behind it will be stuck.
-
Cavity barrier and wood fibre insulation
gavztheouch replied to WisteriaMews's topic in Timber Frame
My building control officer has told me I can use an open rain screen and therefore have no cavity barriers. -
Hi I’m thinking about buying a roof rack to carry 4.8m timber on my van roof. It’s a standard van length (Peugeot expert) i think I need a full rack as the mounting points on my van are quite close together so a full rack will give extra support in the length. I think the rack is 2.6m long so I will have 2.2m of overhang to split between front and back somehow. The first job is to pickup some cladding battens which are 42mm by 42mm, they are 100 miles away and I will need to go on the motorway/dual carriage. Is it a bad idea to carry loads like 20 or 30 battons on a roof rack long distance. I have tried searching for pictures or folk discussing this online but I don’t seem to see anything. If they came off during transport it would be extremely dangerous
-
Hi I have some external doors to fit. My frame is 245mm studs with 60mm external wood fibre and then rainscreen cladding. My foundation is insulated raft and the concrete in the raft is the finished floor. I’m going to use flashing tape, it’s pro clima extoseal to flash the threshold. The door will sit on top of this flashing on packers. There will be a gap I was planning to fill. The architect suggested packing with structural grout but I was thinking something like sikaflex structural glue/silcone would be better. Lay it down on a bed of the stuff, and hope once it’s sets it should be solid underfoot. How do you seal your external doors to the weather under the door frame?
-
Cladding battens, Pressure treated or not
gavztheouch replied to gavztheouch's topic in General Joinery
Thanks everyone a few good options here. Looks like it’s a sensible option to use stainless steel. just need to decide if I stick with the pressure treated spruce or ‘upgrade’ to thermopine. In theory the thermopine might be longer lasting but I guess it’s hard to prove without testing it myself for 50 years, which I can’t. My biggest worry was the screws rusting, I guess stainless helps there. @Duncan62 did you have any issues with the stainless screws snapping. im hoping for 50 years out of the larch cladding which I think is possible. Some of our shed doors at the farm are wood and still in good condition. Need to decide if pressure treated spruce can match the 50 year lifespan -
Anyone else get nervous when it’s windy like this. My house is not up to full strength and every time the wind blows like today i think of all the things getting stressed by the force of the wind. I have a very exposed site and a lightweight construction which doesn’t help to calm the nerves.
-
Fire barriers required behind cladding.
gavztheouch replied to Big Jimbo's topic in General Construction Issues
Thanks Mark, I spoke to my warrant officer and he said I wouldn’t need fire battens as just like you said he would not consider it a cavity. My architect is arguing that he is wrong and I will need them. -
Cladding battens, Pressure treated or not
gavztheouch replied to gavztheouch's topic in General Joinery
Thanks @Duncan62 Can I ask what brand/ type you went for. -
Hi I have some 47x50mm pressure treated battens (The green coated ones) My screws to attach the battens are 180mm heco-topix that hold on 60mm insulation too. They have a standard galvanised finish. Im worried that they won't last the hopefully life of the cladding about 50 years. apparently the copper in the pressure treatment will cause the screw to rust fast. A solution would be to use stainless screws (very expensive @ 180mm) or change to a non copper based treatment. batten. I have struggled to find decent battens at 50x50mm, most batten are made from crap wood. I guess I could have them milled from something naturally durable like larch but I assume there is a solution already out there or I am overthinking things again
-
Battening for Vertical Timber Cladding - Tips, Hints and FAQs
gavztheouch replied to Thorfun's topic in General Joinery
Were they the green pressure treated variety? I have pressure treated but I noticed my screws are only mildly galvanised so they may not last with the copper in the treatment eating the zinc. Stainless screws would be good but I have external insulation so that would be a large expensive screw in stainless. Even the blue and red 25mm roofing battens are pressure treated with a copper based treatment which I think will shorten the life of the screws and nails. -
Fire barriers required behind cladding.
gavztheouch replied to Big Jimbo's topic in General Construction Issues
My thoughts were a cavity barrier won’t stop the supply of air but they might physically stop the movement of a flame progressing upwards. However as my boards are not very deep it would only be a 90mm jump for the fire to bypass the cavity barrier and jump into the next cavity. one positive I can think of with open rain screen is there is less of a chimney effect cause it’s not closed off like a chimney. Did they not try and make you use a closed cladding system? -
Fire barriers required behind cladding.
gavztheouch replied to Big Jimbo's topic in General Construction Issues
Hi I’m in Scotland and would love to not put horizontal cavity barriers behind my open rain screen. Mainly because wind driven rain will get past the cladding and then I have the worry of horizontal cavity barriers (held on with screws) blocking the water escaping easily and potentially seeping in behind the cavity barrier fixings. And then there is added cost and complexity. Probably 5k in materials and time. what was your main argument? -
Insulated threshold detail for insulated rafts
gavztheouch replied to WannabeBob's topic in General Construction Issues
Hi nick, my door is also set back like yours. The sill does not cover the remaining part of the isoquick upstand. In a bit worried about people standing on the edge of the polystyrene. How did you finish you sill detail at the doors?