redtop
-
Posts
490 -
Joined
-
Last visited
Everything posted by redtop
-
too late, got machine and doing digging myself, took 2 hours to dig out the deep area where the manhole goes, now got 15m of trench to do plus some hand digging so I don't damage the sewer pipe
-
never heard of a clay spade, which one did you use?
-
its clay like, solid when dry and sticks like s**t when wet.
-
1/2m deep at moment, will be going to 1.5m deep in next 5 metres, then need to dig out inspection chamber. anyhooo digger hired coming monday
-
dug first 4m of 20m run by hand, the easy bit cos it slopes uphill from here so gets deeper. ground rock solid. hired digger from Monday, have I wimped out ?
-
Discount Offers of the Week
redtop replied to Ferdinand's topic in General Self Build & DIY Discussion
well, was it any good! -
one of our regular pubs has one just like it, walk on glazing over the top and a stuffed bear inside. perfic and will never go out of fashion ?
-
2nd for titan, tough as
-
lol, no although I did forget to turn the stopcock off and open a tap one very hot and sunny day and the pressure in the copper got sooo high it only blew the bloody tap of ? soldered joints held ok lol. Anywhoo, do I need to worry about pressure build up downstream of the PRV??
-
soldering that would be fun :-) been exposed to the elements since soldered, but yes it was clean before soldering!
-
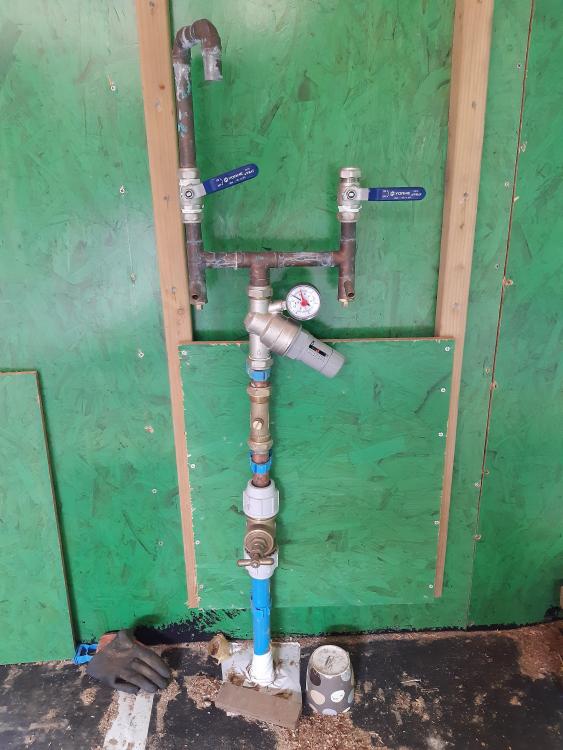
Now I know I have put in 2 drains that drain the same pipe... But basicallyy you can see 32mm MDPE, stop tap, check valve, pressure reducing valve and then it splits, one will feed external taps and the other will go off into internal house plumbing (going to use Hep2O wherever possible). Quick question, anything wrong with what I have done, and at the moment there is nowhere for the water pressure past the PRV to go to when iot heats up from the sun / etc. Do I need to add in a pressure release valve, tank or will it be fine when it has the additional pipework added and has somewhere to expand to? cheers yall
-
ours were odex piles (I think), 220mm diameter and knocked in until hit rock, then a bit more and then a 1.5M drill through bottom. Steel case is used as the pile, then rebar and grout to top. 42 for our house and was apparently overkill for a single house, but there we go. 25K and 4 weeks work
-
Where to put the electricity meter
redtop replied to MortarThePoint's topic in Consumer Units, RCDs, MCBOs
ours is outside in a cabinet with an 80A consumer side switch / fuse protecting the rest of the circuit. Takes a few mins to fit by a sparky and DNO didn't mind at all. Currently just feeds a site supply so also has an earth rod. it wont be moved when we make final connection so no more DNO involvement (unless they are needed to connect the 'proper' earth??) -
so house consists of 3 flat roofs, 2 at 1 floor high and 1 on 2nd floor. 2 ground floor ones are done and covered with 18mm OSB. they are dead flat as slope will be put in with insulation. I need to keep them waterproof to avoid water damage and keep house below dry. Probably for 2 to 3 months until 2nd floor is done and I have money to pay for insulation and EPDM. I do have the Vapour layer already bought. So how best to waterproof for next 2 to 3 months? If I put vapour layer down I will be walking all over it to sweep water off and to use it to stand on for 2nd floor so risk damaging it. Also vapour layer is a fully bonded one and i will be having flat roof lights fitted and don't want to build upstand until we know exactly which ones we will be getting so plan was to temp fill hole with battons and spare board. So thinking putting tarp or plastic layer or cheap DPM over it and battens round edges as temp cover. I cant leave it as is as water drips like mad through 3mm edge gaps and I need to use space already under roofs as working area for next stage. advice welcome please; how best to temp waterproof OSB flat roof? Advice welcome please, being in cornwall this dry weather wont last!
-
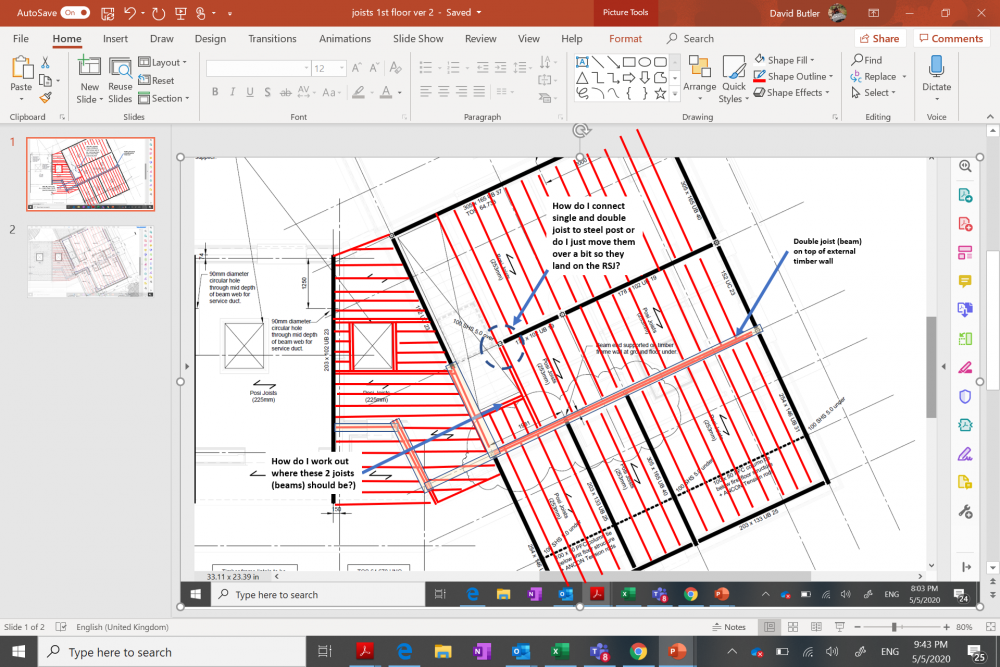
thanks for the advice, as always I wish I had provided more info at the start! Steels are already fixed in place (all manhandled, no access for a crane) and the area you can just see of to the left, kitchen / dinner single story only, has already been joisted using timber in-fill and joist hangers. i will take a look at stairbox!
-
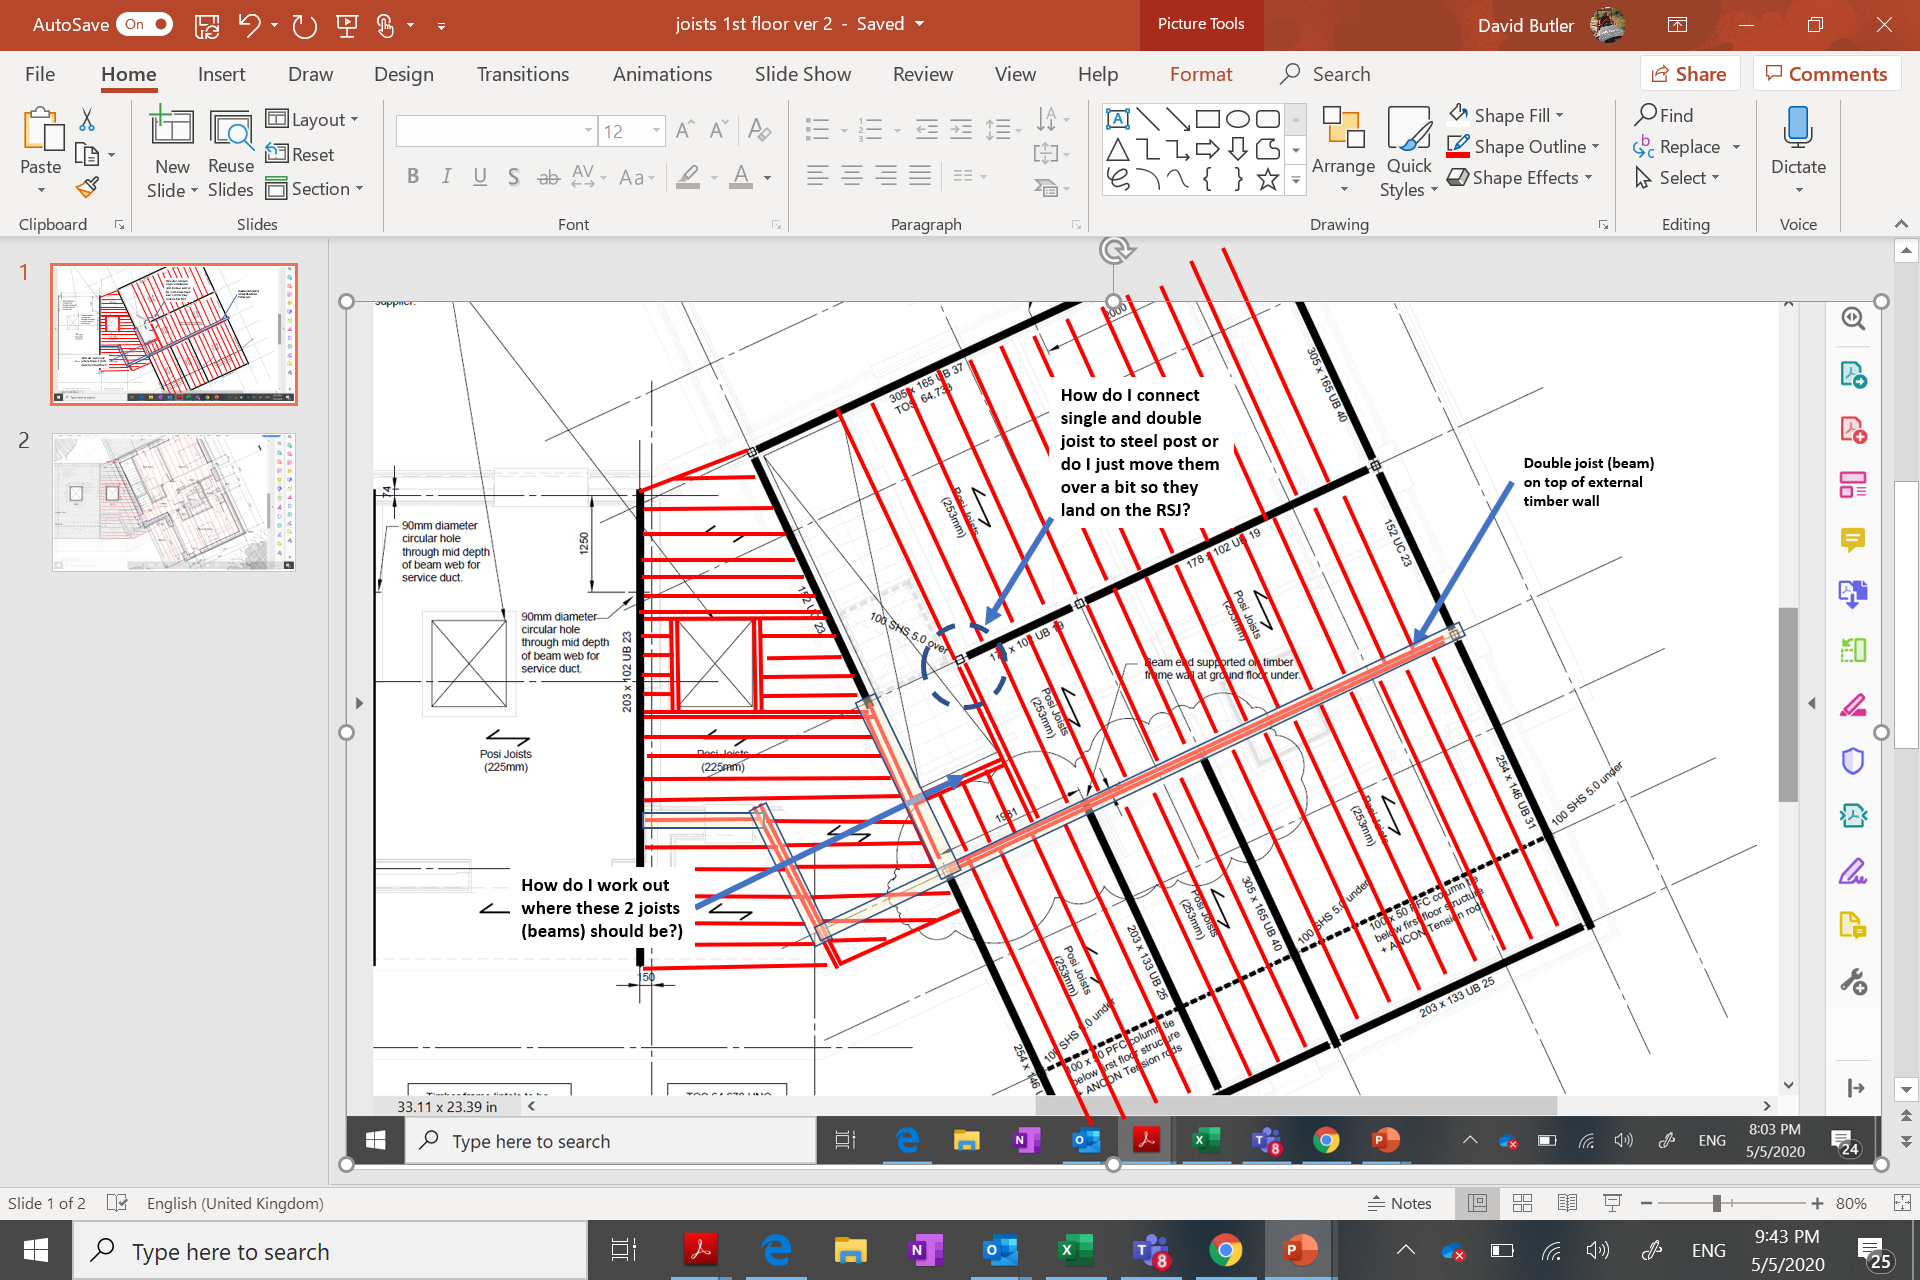
and architects 2nd floor diagram,
-
I have asked the SE but wondering what your good self's think.. Planning on using C24 225 x 45 which more than meet the span requirements. All joists centered at 400 (so ignore ragid spacing on diagram) with noggins to meet plywood edges at 1.2M (not shown on diagram), close double red lines indicate double joists bolted together. Note the bit on the left, with the horizontal joists are roof joists as that area is single story only (flat roof). Solid black lines are steel RSJs, frame is timber.
-
we have 200m sq of flat roof and the soakaway, approved by BC, was sized at..... 1m cubed. And all done with no perc test. Anyhow I am planning on putting in more than that, probably 3 to 4 m cubed once I get round to running the calcs
-
well I havnt got one and will need one, so depending on price yes.
-
yes to me!
-
I forgot multi-tool! that's on my 'gonna get' list anyway. plunge saw and rails; sounds intersting
-
so in an effort to cheer myself up given my builder has done a runner; ime going to top up my tool store ? So, timber build with timber cladding and loads of decking. Already got a decent mitre saw, hand held circular saw and cheap jigsaw. whats the next most useful tool to get. Going to have to cut everything from chamfer for timber infill for RSJ's down to angles and clean cuts for ceder cladding, kitchen worktops, etc. Might also be getting some rough cut oak planks for free to turn into shelves.. and everything in between. Table saw, planer, thicknesser, router?
-
thanks, and arguing over delivery of rest of materials we have paid for... TBF I was on site every single day; evenings in the week and all weekends. I know that building inside out! I have every drawing, in fact the architect and SE based the design on the spec I gave them. but detailed drawings they are not. I just need to work it out in my head. If we end up 25K down it will be a result...…. next few days will tell, in the meantime I fixed up a roof steel this evening, 6M long and bloody heavy (not very big really 203 by 101 UB 23, me and my 19 year old manhandled it round, into the building and onto the tops of the walls. The steels were the complicated bit really!
-
-
one advantage I have is the whole house sits on steel posts and then a steel ring beam. and these are infilled, joist hangers and joists; already done and passed by BC. so the roof and 2nd floor joists are exactly the same as ground floor. Timber in fill and wood on top and then standard hangers. I have all the timber; green and joists. its actually not a complicated build timber wise; 2 rectangles on ground floor with a triangle joining them and one rectangle on 1st floor with steels doing most of the support work. have I built a house before, nope. but I have renovated quite a few so know my way around the basics and have all the tools. I have done the underground drains, can do the plumbing, electrics, UFH, etc. original plan was to finish ourselves once roof was on. TBH I have spent ages going round correcting the mistakes the builder made, was just shoddy work.