


Adam2
-
Posts
793 -
Joined
-
Last visited
-
Days Won
1
Everything posted by Adam2
-
Am about to pour our first floor. It's a semi basement with no drainage so just thinking about providing electricity for exterior lights and a power run down to the garden. Don't want to drill through 200mm of concrete so thinking to put 3 steel conduits about 10mm dia through the walls now. 1 each for 2 external wall lights and 1 for power to garden. Is this best or should I do 1 conduit maybe 20mm and install conduit in the external eps ?
-
Came across these Porta incredibly cheap - hence incredibly cautious! Would be good to hear from anyone that has used them - or a similar factory pre-hung type product
-
triple glazed sliding doors so will be heavy - ref my point about waiting on weights/assess best option etc. I saw the calcs earlier and can run those when we have the door weights - but I've realised there is always more to this so will run by the SE as well - I recall him mentioning something about the movement being another factor to consider vs it being a static load.
-
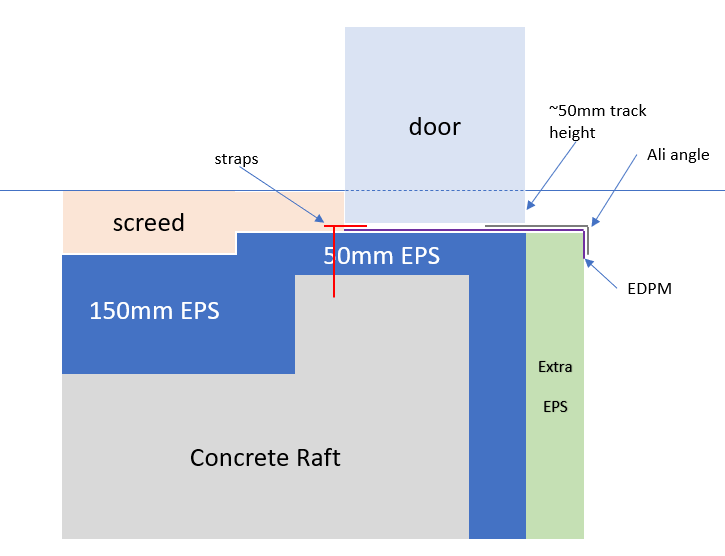
Is the ply over the eps cavity closures or instead of? I was thinking of something like the below image for mine - just waiting on door weights (triple glazed sliding doors) to understand if advisable to consider replacing standard Nudura EPS with something more suitable or adding a board of some sort (ply or Storbord as suggested). Will also see with door supplier exactly how the straps and aluminium angle are installed as their detail implies they fit under the inside and outside edges of the track but that would leave the central section unsupported by (I guess) 2mm or so for the whole length unless they place packers all the way along.
-
Great, did you find out what type of eps Nudura ? I couldn't see it anywhere but well ask next week. I guess for the small amount needed xps500 is a low cost option. Am waiting for weight info on my sliders, could be a lot when 3 triple glazed units are all slid to one side!
-
Wondered what you ended up doing with your doors / heavy windows - just kept with Nudura eps closures or did you go with Marmox in the end?
-
I'm a bit late but another user of fine mesh metals used 3mm with 4mm front and top faces. Used rubble and front faced with local gabion stone, no need for separate wire separator just use a nit of ply that you can pull up as you go. If you need to walk on them a lot while building put some boarding over to protect the shape. Some pics in my blog of this in progress and when complete.

-
My SE has recommended I get test cubes (7 day, 28 day and a spare) for 1 in 2 of my concrete pours. This is going to get expensive!!!! We're using fairly standard mixes from Cemex who of course have their own QC processes etc. Cemex will of course charge for each set of cubes and I'm looking at maybe 20 deliveries so this will be adding up to a cost I need to understand the value of. The batch plant for Cemex is 2 miles away so very low chance of traffic delays causing big issues so I'm just not sure if this is really necessary, we can easily of course do a slump test on site so have that basic level of reassurance. Would appreciate thoughts from the more experienced out there if this testing is usually done like this. For context, the project will have 3 separate floor slabs (300+ thick), ICF walls (200mm core), in-situ poured concrete terraces (200mm thick) and hollow-core concrete planks for intermediate floors. 2 of the wall sections would be classed as retaining as the floors are semi-basements.
-
Took a little time but here you go:
-

Internorm: Order with solar glass, or apply external film later?
Adam2 replied to tanneja's topic in Windows & Glazing
Great thanks for that. Will contact them and see how it goes price wise as looking at 6.2 wide x 2.8 high -
Internorm: Order with solar glass, or apply external film later?
Adam2 replied to tanneja's topic in Windows & Glazing
They look great. Any price info, if you wouldn't mind sharing would be handy by pm. -
Internorm: Order with solar glass, or apply external film later?
Adam2 replied to tanneja's topic in Windows & Glazing
@Russdl would you mind providing some info and pics on what you installed. I'm thinking through blinds vs brisse soleil -
SW - the pines/other trees nearby create some shadow until middayish but afternoons through to evening we have good sun exposure. I had a fig at my last house - grow very well (I planted in a bucket with holes in IIRC), may well get some of these in early so they can get established. If you like you can collect as many pine needles as you can carry :-) After the current winds we're going to have bags and bags of them!
-
Thanks - we're planning to plant a mix of lavender, grape vines and olive trees in front/above them which will soften the look and add some colour. We've a few baskets left so am sure we'll add to them
-
We found that a blower does a good job - if you blow in the direction the grass naturally (ironic) falls then the needles go past without too much bother. My neighbour has tried grass for 4 years and it's clearly not working - the needles are very acidic apparently so we'll need to factor that in to planting decisions.
-
Every time I hear a chainsaw I look hoping someone is doing that ? But no, we really like the combination of the pine trees and the water. From the house elevation that's a nice combo and the risk of doing anything without permission is not worth it. There was a fairly recent case which I think ended up with a 75K fine!
-
Not sure but I couldn't add any more images to the other blog post so this is a continuation..... The interesting plot has 2 downhill aspects ? One is the main garden and the other is to the left/front of the house where we will have an elevated parking area - there is an earlier entry describing the build of the metal structure and helical piles etc. This pic is after the beam & block & rebar just before the concrete went in. Back in the garden w finished the lawn and built a shed. About a day to build and same again to paint, sticking some lawn on the roof means it will hopefully blend in well with the garden when seen from the house (& our neighbours!) On our boundary we hoped the ground would be stable enough to leave exposed for a while but unfortunately not as it was all made ground and not the lovely compacted sand we expected! So a little extra bit of work for a retaining king post wall - steels 6m in the ground. The excavated level needed to go down about a meter from what is shown here Moving on up we could finally start in the basement floor excavations - here is the 1.5m deep trench getting dug. The basement is a reinforced concrete raft 300mm across the centre with edge thickening to 450 and a LOT of rebar. Next pic is the deep trench filled and ground almost ready for a concrete blinding layer. We had a beautiful concrete pouring day! Blinding layer poured no problem - you can also see in that pic some of the 10T of rebar for the basement floor and walls + the start of the waterproof membrane install. We've had a few dramas on the project already - abrupt change in groundworks company, unexpected retaining wall, covid delays, other delays, missing steel in rebar delivery and we're only just getting started. But we're still smiling and still saying it's about a year away whenever anyone asks when we'll be done.
-
Seeing as we were going to be using the whole plot width and the overgrown garden would then be impossible to access (sensibly) with machinery we bit the bullet on a big clear-out. Getting our soakaway in also meant this was a good thing to tackle before the house so we've spent a few months of stripping things out so we could create the soakaway area, building a lot of gabion walls and laying artificial grass. Oh and we built a shed - a very fine shed indeed ? The soakaway is deep under the ground in the foreground - which helped to elevate this end of the garden to create quite a nice level area with space to the side for us to run drainage down and to plant some trees & other screening plants. The gabions are part filled with rubble and faced with local gabion stone. Gabion steps are a great idea but they aren't very durable left unfinished so we'll be designing a top surface for them later. We managed to redistribute a lot of the very sandy ground from the main plot area to level up the ground down here. Everyone needs a shed and every shed needs a base. Unfortunately there was a misunderstanding somewhere and the orientation of the slab didn't match the shed footprint hence the add-on on the right! we have some large over-hanging maritime pines which endlessly drop needles - grass would not last so after much research decided on artificial grass. This is mid-way through installation over a bed of 50mm compacted sand on top of the mainly sand base. From the top looking down
-
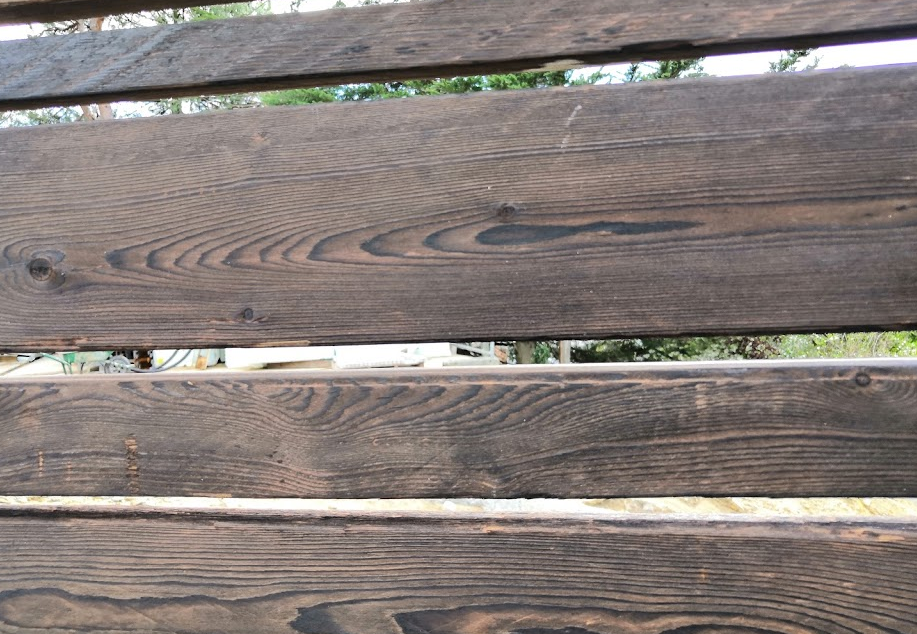
My neighbour has been burning the face of his larch to turn it a dark brown - it's looking quite good but does take some time to do. Apparently then it will not go grey. Will dig up a pic
-
Replacing boundary wall with side of house - neighbour issue
Adam2 replied to Adam2's topic in Building Regulations
Hi yes, we will - though we're building with ICF so the "build" part will be done from our side but we'll install cement board or similar that will be painted white to match with the rest of the boundary wall. I think we should be able to paint that before fixing in place. I've just heard back from the neighbour after explaining that we do have building regs approval and she just gave a thumbs up image so this may all have been just a neighbour hearing something from someone and passing it on to me in a helpful way :-) -
Replacing boundary wall with side of house - neighbour issue
Adam2 replied to Adam2's topic in Building Regulations
Heights are a little difficult to tell as the ground on the neighbour's side is a bit built up with tree debris etc. Though the land does slope down from the wall to the neighbour's house so naturally I'd expect land on our side of the wall to be a little higher. The neighbour's house is at the other end of their garden - our plots are at 90 degrees to each other so the wall is actually the rear boundary of their back garden - unlikely that they would intend to build in that location but building a single storey there wouldn't bother us I think. -
Replacing boundary wall with side of house - neighbour issue
Adam2 replied to Adam2's topic in Building Regulations
Wow thanks to you all for such speedy and helpful responses. The wall in question will not have gutter etc as there is no roof over, above this is a terrace for the floor above (as per image). Possibly this is the real issue but this is not significantly different to what was there before & the neighbour did receive plans and raised a couple of points which we did address at that time. On that side we'll have obscure glazing 1.8m tall to avoid over-looking The ground levels on either side are within about 30cm or so -
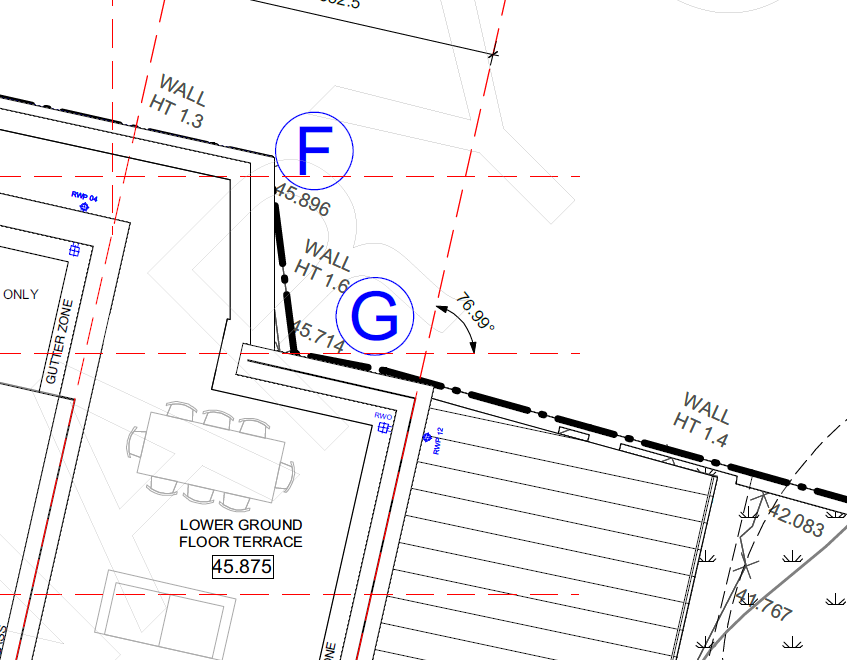
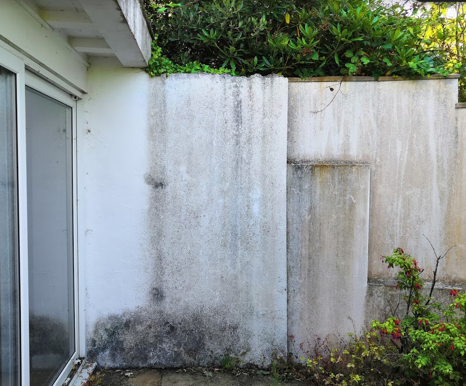
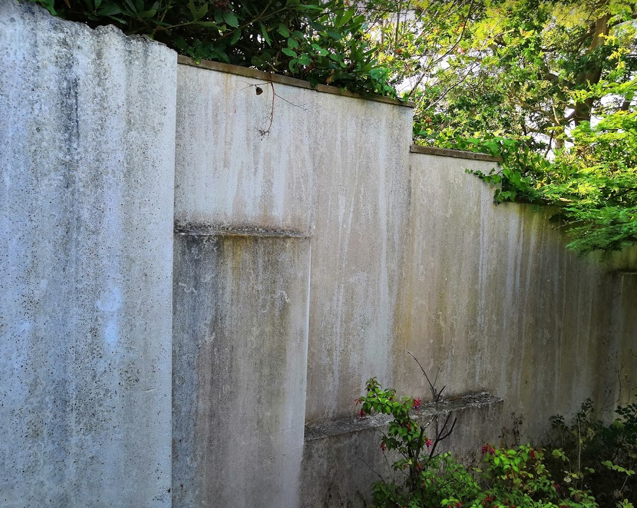
We have planning and building regs approval for our build. The design includes replacing a 2m part of a boundary wall with a single storey part of our new build. My understanding is that the boundary wall is ours and is on our land - deeds do not mention this at all but the wall in question extends along our plot whihc has boundaries with 4 houses' gardens which back onto the side of our plot and the wall is the same all the way down which I believe was built by the previous owner of our plot. I just received a text from a neighbour whose garden backs on the boundary wall in the area where the house will be located saying that the wall can't be part of the house as it will not comply with building regs - I don't think this is correct as we have sign-off on the design and many properties of course are built up to the boundary line. There is no structure on the other side of the boundary within say 30m so I did not follow a party wall agreement approach. We have had good relations up to this point and I notified the neighbour of the plans to remove the wall, they would of course had the plans from the council also. I wanted to check on anything I may have missed before going back to the neighbour with a response - I'm of course keen to keep things friendly but do wonder why she would have sent the text if it was not to frustrate the build process. The wall in question is just below the "G" on the site plan. This section of an existing wall has been taken down and trench now poured. The wall continues then down the black dashed line. This is a pic of the wall and original house. New house is moved down the garden a couple of meters so now the side of the basement floor (semi basement really) forms the boundary wall This is a pic of the wall as it continues down the garden, same construction as it passes by the other neighbour's back gardens. I did have another look at the party wall act booklet and my understanding is that building up to the boundary line (subject to no buildings on other side etc) is fine and I should notify my neighbour and advise when I will start but I do not need their permission/response to do so. I've kept them informed as we've progressed etc so think I've done what is necessary. The issue of course could be if in fact we do not own the wall or if it straddles the boundary line but I do not think this is the case though it is hard to prove either way I think if not mentioned on deeds. When the new wall is there it will be pretty much like before aside from it will be a bit higher though this is behind bushes/trees.
-
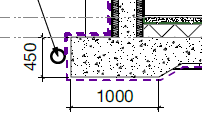
What is best practice for locating the perforated drain? To me it would seem logical to have at the base of the wall (outside the waterproof membrane of course) as that would take any water away from the house wall. If it is outside the toe then this seems to me that it may be less effective + also will need more space outside the slab which we would like to limit if possible. Appreciate views on this - context is a semi-basement, concrete raft and waterproof concrete in ICF walls and waterproof membrane.
-
Internorm: Order with solar glass, or apply external film later?
Adam2 replied to tanneja's topic in Windows & Glazing
Did you also consider the benefit of solar shading protruding from your wall above the window? Either fixed, or a sail type removable option. The brise soleil I think works quite well if you don't mind the look as (depending on orientation etc) is effective against the higher sun position in summer when you need it and less so in the winter when you don't. Though if SW facing with a lot of afternoon/evening exposure that may not be so effective. I did a model (on here somewhere I think) of my calcs using data from an external database to help estimate solar gain per month

