MarkyP
-
Posts
151 -
Joined
-
Last visited
Everything posted by MarkyP
-
my walls were a sand/cement basecoat over blockwork, finished with a pre-coloured spray applied rough cast.The rough cast it turned out was reasonably easy to scrape off, so I paid a lad from the village to do that which revealed the sand and cement underneath which was nice and flat. Subsequent advice was not to have bothered unless the roughcast was blown or loose, which it wasn't. The adhesive makes it easy to set boards flat, you'd be OK over your roughcast. You might want to go over the whole wall with a clip hammer or maybe a scraper to chip through the paint and give a bit more key, I think the adhesive would hold better - but even so the fixings clamp the boards down hard so this might not be necessary. my soil pipe was internal. I guess you could box it with EWI either side, or take it off and re-fit on the surface of the EWI.
-
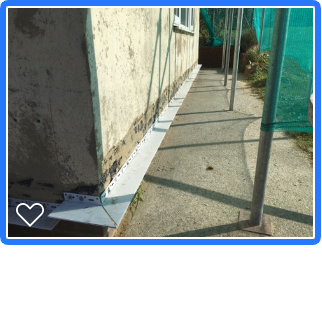
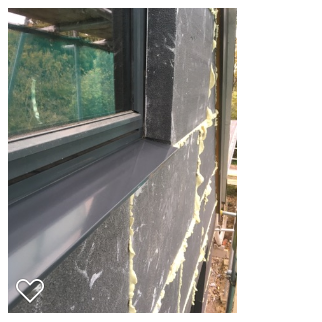
sorry for the photo spam, this is the starter track. I'll dig out the concrete path next year and run EPS down to the top of the footings. I needed to get on with thew main elevations while we had the scaffold. The plinth EWI will be 25mm recessed to form a drip detail, more aesthetic than because a drip is needed. we hacked the existing render off before fitting the track, the existing render had a very pronounced bellcast bead at the bottom and it kicked out about 30mm. The track allows for a push in bead, you fit the EWI and then a mesh bead slots into the track over the face of the EWI, it means you dont have to worry too much about build up depth. Wemico is the place to look for beads.
-
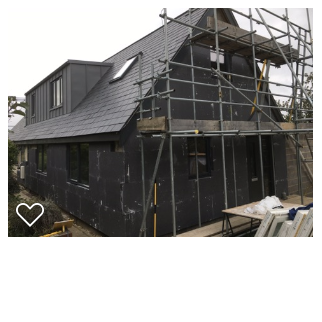
two elevations covered in graphite enhanced EPS
-
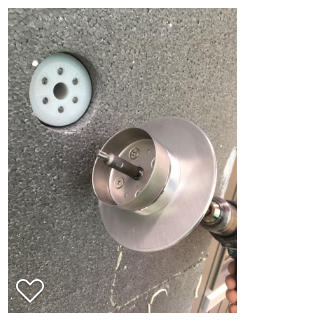
the fixings I mentioned: and with EPS cap

-
foamed joints
-
loads we could talk about here. I cant give you a cost off hand for my DIY EWI but I recall it was approx 60% of the quotes I was getting which, again from memory, were in the order of £90 - £120 per meter squared all in. reasons I went DIY in addition to cost saving: method statements from suppliers were often behind the times in terms of detailing. for example, I religiously foamed every joint in the EWI boards to ensure thermal continuity, most of suppliers said they didn't do this, one said they filled any gaps with base coat! I used thermally broken fixings which via a special tool are recessed below the EWI surface, these are then capped with a little EPS disc. As well as being better thermally, this also removes the risk of a proud fixing "grinning through" your render. I also used frame seal beads around all the windows, another small detail but one which greatly improves the quality of the reveal render finish and the wind tightness (no need to silicone). I used a PVC starter track, many suppliers quote aluminium which creates a cold bridge should you also go below DPC. So these were all examples of detailing which would have cost me extra or just not been done. Next up, below DPC. Several just weren't prepared to do it, still caught up in trade folklore about the sacred DPC. I think the tide is turning, many system suppliers now have below DPC details, usually called plinth EWI. Most would require the DPC be continuous so break the EWI at the same level. This has been discussed at great length on the other place, and general consensus is that there is no reason to bother breaking at the DPC for reasons of dampness. This means you could just run one pass of EWI from footing to soffit. However, using a starter track does have the benefit of providing a nice level bed for the first course of boards. In my case it also allowed me to break up the work and get the main elevations done. Next year I will install the plinth layer of EPS below the track, slightly recessed, and then go right down to the top of the footings. I fitted the boards myself. It's not too hard once you've done a few, getting the first course plumb and level is key, then it's pretty easy. An 1800mm level and a 2.4m feather edge were hand for checking flatness and plumb. I got whole elevations within a mm or two variation over the 2.4m straight edge, my renderer was very impressed which meant I'd probably gone a bit overboard! I don't much like the texture and finish of the standard thin coat render which most systems use. Avoid, in my opinion, the acrylic and silicone thin coat finishes, go for silicate which is very mineralic and matt and could be painted over in the future with a mineral paint. Another option would be a use a mineral paint over a nicely float finished base coat, that would be lovely I think and very suitable in a period building. I used Baumit render. Very good product and was very happy with the on site and phone tech support. I used their nanopor fine silicate finish which is a very fine grained and very matt, very happy with it. If you are ever over the east side of kent you are welcome to come and have a look and I'll talk you over the whole EWI experience. You can have some fish and chips on the beach afterwards.
-
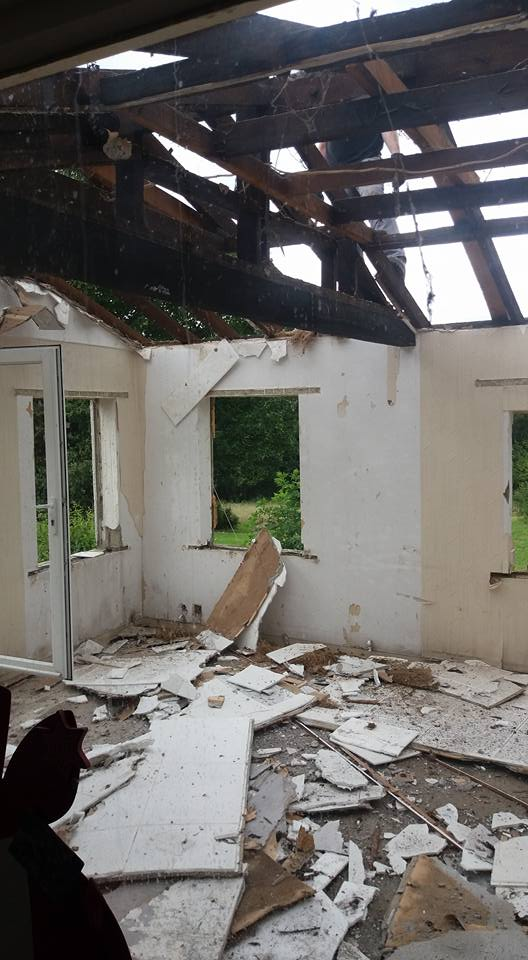
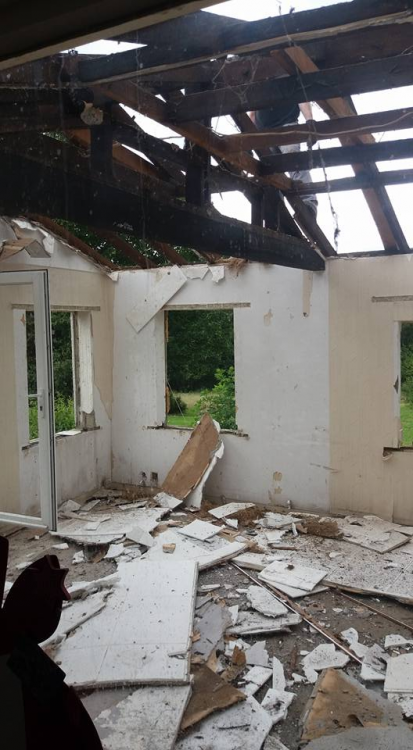
oh, one more of the demolition in progress. this is the rear of the building. Lovely place, wasn't it? doing the demolition by hand saved us around £9k (based on best quote). it was hard work and time consuming but with help from friends and family, it wasn't too arduous. We salvaged enough stuff (thousands of concrete roof tiles, lead, copper) to sell and cover the cost of numerous skips we filled. So other than ours and friends time, the demolition cost nothing. Sadly, with the exception of a couple of nice beams, the timber was no good for anyone, having been creosoted. During the work, in a void in a timber wall, we found a timber off cut signed in pencil by the local joiner who built the place, his name, village, and date (1925).
-
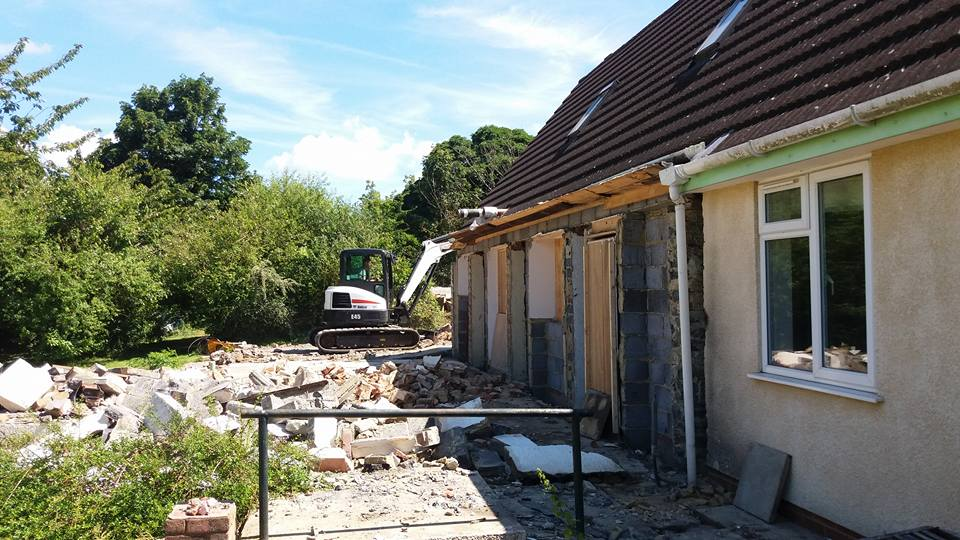
after a week of demolition I got the digger in, the ground worker did the last of the demolition, knocking down a few brick walls and digging out the old over site.
-
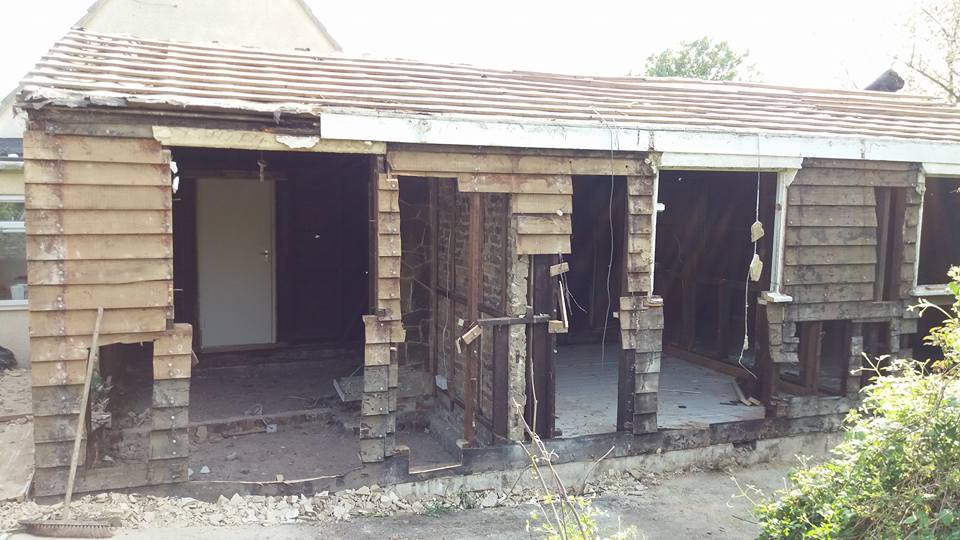
more demolition, this was someone's DIY effort from the 80s being stripped
-
this is the stone clad bit on day 1 of the demolition. I did the demolition myself with a reciprocating saw and a crow bar and some help from friends. This was hard work - the building had been cement rendered over the timber. Had to whack it with a sledge hammer and use a crow bar to get it off. Then started cutting it up with the saw once we'd go the windows out.
-
I'll dig out some pics of the EWI. It was quite a bit of work but actually has come out really well, very pleased I did it.
-
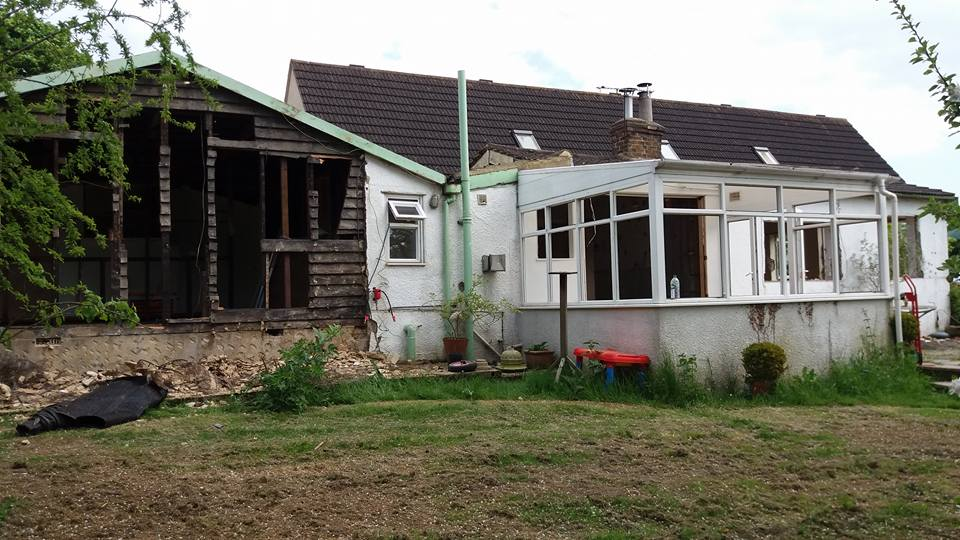
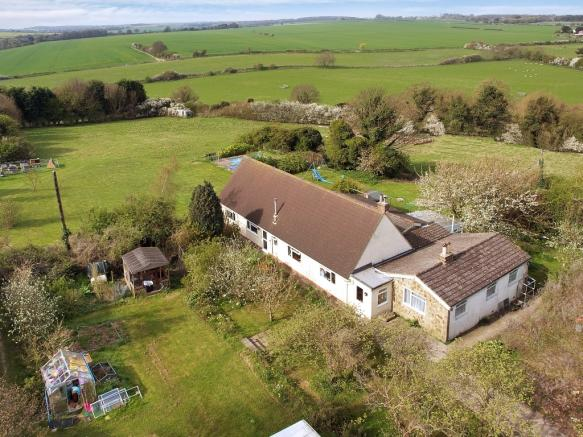
well, this is what we started with. The long section with the steep roof pitch was built approx 1999 as an attached annexe, this would become the basis for our project. The stone clad bit was built in the 1920s and was a pretty typical timber framed building of the era. And to the rear, behind the long section, are two further timber frame sections, one built god knows when (it was very DIY looking), another built in the 80s. And, if you are eagle eyed, you might just see a crappy conservatory round the back as well. The older timber sections were all rotten, freezing cold, and lacking any insulation. The people we bought it from had been there 30 years and were older and rather stoical, they said how warm the place was and how it didn't need too much work! Basically they spent I estimate about £3000 per year running an old paraffin fired aga 24 x7 which is probably the only reason the timber sections hadn't rotted to powder. During the demolition I uncovered military markings on the roof timbers, I found out the building was used along with others nearby during the war though for what I'm not sure. Prior to that it was a farm. Anyway, we loved the plot but were less in love with the building that came with it. In fact my wife didn't even go inside when we viewed it as she loved the plot and didnt want to be put off! We were lucky, it fell through twice previous to us finding it due to the "computer says no" effect of the lightweight timber frame sections on main stream lenders. The sellers dropped the price massively and were considering going to auction but I somehow managed to find a lender who would mortgage it despite fairly grim comments about the building in the valuer's report. We lived in rather miserable conditions for a couple of years while we figured out what to do with it. There was a toilet which was walled with badly cast concrete, another DIY effort by someone to infill and create a room in a little gap between the buildings. In the winter the walls were so cold and damp that a large colony of slugs would somehow get in and graze on the mould. One of the timber section smelt awful, I realised that the floorboards had been creosoted so we basically shut that bit of and didn't use it.
-
don't know why I didn't sign up sooner. I have been following the forum for the duration of my project, I kept meaning to sign up but never quite got around to it until now. I've still got loads to do, so plenty of mistakes to come which I'll happily share with the forum ?
-
Kentish Man by birth but afraid now well into Man of Kent Territory!
-
Hello all, I've posted a few times here but thought I would introduce myself. I live in east Kent near the coast and am 2 years into the extension, loft conversion and major renovation of a large bungalow. I've been a DIY'er for many a year but took it too another level when we found a dream project (rather rundown and barely habitable) home in a large plot which was too much to pass up. After a few years spent securing planning consent, we eventually started work in 2016. The house was in two sections - an almost derelict timber framed bungalow (which was barely habitable) and a more recent (but still pretty grotty and very badly insulated) long, barn-like extension which was built by the previous owners as a granny annex. The advice we were given was universally knock the whole lot down and start again but we costed that up and reckoned we could do the job for half the amount by keeping the long annex as a basis for the house, demolishing the timber framed buildings and extending back onto the freed up footprint. It also meant we could live in the project and do it in stages. I had some eye-watering main contractor quotes and quickly realised that the only way forward was to manage the work myself using sub-contractors and doing lots DIY. We started in April 2016 and spent two weekends with a reciprocating saw cutting down the old timber framed building. I then had sub-contractors each for ground works for the extension, block work, 1st fix joinery for the new intermediate floor and roof timbers for both extension and loft conversion. And finally roofers for both slate and zinc cladding to new dormers. I also did EWI to the existing building DIY fitting the insulation and then had a local renderer finish. I also DIY fitted 20+ windows and doors. There were lots of tricky issues and decisions along the way, some intensely stressful periods, and It's already taken way longer than planned, but remains largely on budget. Most of the major works are done but I have an empty boarded-off stair well with a ladder to the entire upper floor at bare timber/1st fix stage to tackle and finish over the months ahead. I've also got a single storey kitchen to externally clad with more insulation and timber, heaps of landscaping to do, also MVHR to fit and commission, two bathrooms to install, plus a load of decorating, snagging and odds and sods to take care of. I expect it will take another couple of years before it's really at a point where we can call it done. I'll post a few pictures here at some point to give a flavour of what we've been up to. I've been following discussions here with interest and finally go around to signing up recently. I'm looking forward to joining in with the discussion.
-
the one I'd add to the list is to learn to haggle and haggle over absolutely everything. It amazing how much some people will move on price, both for contracted works and suppliers of materials and fittings. This is one benefit of self managed builds where you are dealing with multiple sub-contractors and often sourcing materials yourself, if you are prepared to be really business like you can save a great deal. I have a column on my build cost sheet with quote price and discounted price for every single line of spend and the saving is now very large, paid for a hand made kitchen. You need to be fair and sensible with contractors, having an idea of the market trade rates for their services will help but I found most would usually give something back if they liked the look of the job. Suppliers are different, your goal is to find their very bottom price and it's amazing how much margin they have on many products. And watch out for what I called "Grand Designs Tax" - contractors who look at your project and think your fancy self build means you have a bottomless budget. My favourite was a largely competitive ground works quote which had a nice breakdown of works and line items, at the end of the list were lines for "setting out" £1000 and the rather ambiguous item "on and off site" £750. The quote otherwise already contained all the major elements of the work in detail, this was very obvious fluff. A site meeting took place where I asked what on earth two blokes and digger might need to do to generate this £1750 of additional mystery cost for these works, contractor gives a cheeky grin, "oh right, yeah, that's a bit salty, must have been someone in the office, we can drop those" the setting out took a couple of hours, two blokes and a ball of twine, some stakes and a can of paint. On and off site I assume was a proposed levy for regular trips to and from a local cafe. Neither of which, I'm glad to say, I paid for!
-
I'm interested to know the purpose of the air gap? I haven't come across it before in a fully filled context, we didnt have one (dritherm32 batts fully filling a blockwork cavity). The Denby Dales houses spring to mind - they were I think 300mm cavity fully filled with mineral wool batts and again no air gap that I recall.
-
in chatting he said they'd have been interested in our project. I'm not sure it was quite grand enough but it does have a few unusual twists, and despite all advice we only demolished the old derelict timber bungalow and kept a large modern extension as the basis for the project (which made it bloody complicated but financially more viable). I also project managed and did (am still doing) loads DIY which is another plus as they like the owner getting the tools out. But god am I glad we didn't do it, I had some pretty dark times during the worst of the project (we lived in it throughout). At one point we had the whole roof off, the side of the house open, a mud bath all around us, freezing cold, a storm had ripped off some temporary weathering and we'd had a load of water damage, we had 3 weeks without heating, a massive cock up by supplier of windows (26 of them, all wrong), not to mention the standard headaches with constantly cat herding the sub-contractors. If Kevin had turned up during the autumn of 2016 to skip around the site grinning and making patronising remarks he would have mysteriously disappeared. I had a soakaway being dug which would been the perfect size for him!
-
a producer of Grand Designs has kids at the same school as mine and I have spoken to him a few times. I asked why people go on the show seeing as you don't get paid. He gave a few reasons: The first was that some people just really, really want to be on the telly. The second is you get a letter from the production company confirming that you'll be on the show. This apparently unlocks the door to all sorts of discounts which for a large, high spec project can literally be worth thousands where suppliers want you to use their product in the hope of a bit of screen time. Another reason was that it tends to gee the builder and contractors up a bit, people still get messed about and have issues with schedules but knowing the camera crew is coming does rather focus the mind. He also said that the production team will get involved themselves if things are going really badly. It's not uncommon for them to be there doing second fit, decorating and dressing rooms in the days before Kevin is due to turn up for the episode finale as they need at the very least a few rooms to be finished. And, yes, very often the furniture isn't the owner's and has been hired in the by the production co and the family hasn't really moved in.
-
there are dozens of EWI render system suppliers to choose from which would be suitable for your EPS. K-rend and Weber are often stocked in builder's merchants these days. You should read the manufacturer's guidance on application but most systems adopt the same approach - typically the basecoat is applied in two passes over EPS - first pass around 3 - 4mm, then it's worked over with a toothed float to ensure an even coverage, the mesh cloth is embedded, then another tight coat of base render is applied, then it's flattened off with a sponge float. Following that you have two choices - prime and then use a system supplied thin coat finish render - it's like textured paint which is troweled on to grain thickness, or you could go with a mineral paint direct over the basecoat (I prefer this over standard paint as it will chemically bond with the render basecoat rather than form a film over it). If the EPS has been exposed to UV for any period you should either by an EWI rasp or use an old saw with the blade held at a shallow angle zand drag over the EPS to remove any UV degraded crust and improve key. For my EWI project I used Baumit render over graphite EPS. The basecoat was StarContact White (a lime/cement hybrid) which was finished with Nanpor fine (a silicate thin coat). Silicate mineralic thin coat is the most expensive but I much preferred it over acrylic or silicone.
-
There is a specialist UK firm where one of the surveyors has written a book on the murky topic of electricity wayleaves. I got a second hand copy for a quid (I have a couple of poles on my land which I want moved) and it's very informative. It's also an excellent cure for insomnia. Search for "Charles Hamer Wayleaves" and you'll find it.
-
my first post here ! I did a fair bit of research into anhydrite when our 60mm screed was poured. Laitance removal is required where there is a need to bond a floor finish or intermediate product to the screed. The laitance skin can debond from the screed causing failure of flooring systems. I read conflicting views on whether laitance removal speeds up the drying process, I found a study (which I will try to relocate) which found it made no difference. I found most suppliers recommended removal of laitance as speeding up drying but none quantified it, all required it where a bonded floor finish was planned. All of the suppliers I considered permitted the use of UFH to accelerate the drying time. Ask your builder for the contract documentation or at least the supplier's name so you can ask them for the aftercare documentation, they all provide this with the contract as a backside covering exercise. In this you should find guidance on drying and whether you can use UFH. Our documentation went into some detail about UFH temperature control and increasing from ambient temp in 5 degree intervals over several days. We ran ours at a low 35c degrees supply temp for a week and it was bone dry (following a period of 6 weeks of natural drying). I don't think you need to remove the laitance if you are laying a floating floor (not glued down). I nearly forgot to mention that our screed supplier stipulated 48hrs of wind tight drying (all windows and doors shut or openings poly sheeted and taped). It then required 7 days of natural drying/curing before use of force drying with UFH was permitted.