Rob99
Members-
Posts
323 -
Joined
-
Last visited
-
Days Won
1
Everything posted by Rob99
-
@Thorfun good spot this 👍 Just had a look at the specs. As with Mike's other products it's well thought out and designed. Similar max power throughput (8A) as Loxone but higher single channel at 3A (instead of Loxone's 2A) but the biggest difference is the PWM rate. Loxone is 123Hz which is quite low and some people can sometimes detect a hint of flicker, also very noticeable if you've ever taken a video on your phone with the lights on. White wing is 750Hz which is massively different and no chance of any unwanted effects.
-
Am planning on a couple of shed builds over the next 6-12 months, small one (2m2) for garden tools and a larger one (8m2) as a workshop. Intending to use 45x45 framing, OSB roof and shiplap or T&G cladding. Will a second fix nail gun be better than screws, especially for the cladding?
-
Loxone Server Backup System
Rob99 replied to tuftythesquirrel's topic in Networks, AV, Security & Automation
Hardware failures of the Miniserver are relatively rare but if they do happen then swapping it out for a replacement is fairly quick and straightforward. It's more complicated if you are swapping a Gen1 for a Gen2. I do keep a couple of spare Gen1 and Gen2 Miniservers just in case a client needs a quick replacement to get their system back up and running. The main failures are more likely with the SD cards, so always keep a back up with a recent copy of the config file. The Miniservers are just the hardware, all the system config software is on the SD card.- 1 reply
-
- 2
-

-
Velbus Automation - Thoughts?
Rob99 replied to Duncan62's topic in Networks, AV, Security & Automation
Niche is ok as long as its cheaper, better and less flaky than other options. I don't know anyone who has installed or is using Velbus so can't comment on how good or bad it is but it seemed to me a bit like a KNX bus type system. The programming software did look a bit clunky, although that could be the way the guy was demonstrating it. Lots of people on here have used Loxone (me included), some also use KNX, probably fewer with Control4 or Crestron. Some initial questions I'd be asking are: How popular is the system in the UK and who sells it (if not the manufacturer) What support is available (e.g. community forums, manufacturer, installer) and is it chargeable. Maintenance/software/firmware updates (how, who, how much?) Can you make changes to programming yourself, or is it an "engineer" only system (and therefore chargeable) -
You need seperate MPAN's for import and export, and they aren't the same as the numbers etched onto your meter. It's not a requirement that Octopus obtain the MPAN, nor are they exclusively the ones able to do it. You should be able to obtain an MPAN from your DNO yourself, if they have had all of the paperwork required for the installation from your installer. Our installed requested an export MPAN at the same time they submitted the paperwork and we had it by return email. I sent this to Octopus and was set up for export in a matter of days.
-
That phrase always rings alarm bells with me. Which specific grant scheme is this? Just because they are funding it doesn't give them the right to impose poorly designed installations which it appears may not even comply with MCS standards.
-
Simple DIN rail x 4 enclosure for Loxone etc
Rob99 replied to Alex Fossa's topic in Networks, AV, Security & Automation
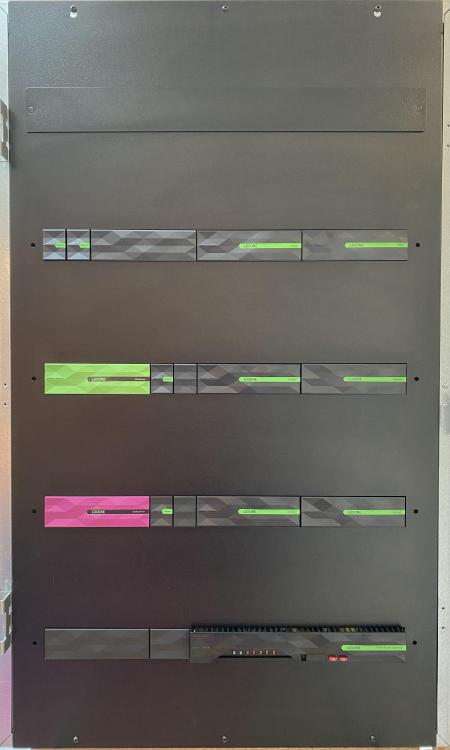
I'm a Loxone partner and have previously looked around for metal enclosures for the control panel builds I do but always kept coming back to the Future Automation ones. They're very well built and robust and I like the fact they are designed to accommodate Loxone equipment which looks really smart when done right. Here's one of my previous builds as an example of how they look. Some clients leave them like this without the door on as they like the look of them. -
Loxone presence sensors in bedrooms
Rob99 replied to Thorfun's topic in Networks, AV, Security & Automation
As @Dan F says, it’s usual to use operating modes for this type of control. Operating modes are hugely useful for lots of stuff. I use them for whole house evening and night modes, individual bedroom modes, heating/ventilation, guest mode, at home, away, holiday etc. They can be used with schedules, triggered by other logic or using switches and other inputs. Incredibly useful. If you used the config planning tool and auto config then it will create a whole range of operating modes automatically. -
You should start by using the project planning part of config. Input all of your room, circuit and equipment details and you can automatically create a complete config file. It will create most of the blocks and logic for whatever you have said you need and put them on separate pages named for the rooms. It’s not perfect but will be easier than creating everything from scratch. You then just go through and make changes or add additional logic.
-
No. Hybrid inverter will disconnect itself from the grid automatically when it loses power and will only reconnect when the grid connection is restored. They are designed this way and only approved for connection to the grid on this basis.
-
Yes, all the earth connections are made with the earth bars fitted to the back plate of the enclosure at the top/bottom. The main issue I see is that you need a way to distribute the RCBO feed to the relays but without the triple height blocks you can't do this at the terminal block end. It's not an ideal solution but one option would be to take the RCBO feed and loop it across to one side of all of the relays which link to that RCBO so that when you wire the other side of the relay back to the terminal block you are effectively feeding switched live into each terminal block. Your neutral would then be commoned across the terminal blocks.
-
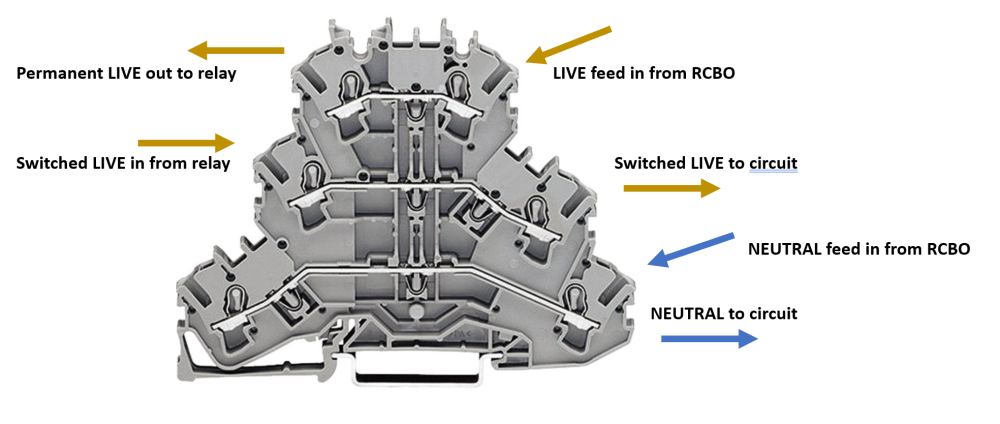
If those are double height terminals on the top DIN rail then you won't be able to use them to distribute power from the RCBO, through the relays and out to the individual circuits as there aren't enough connection points. I use triple height blocks for RCBO fed circuits. The Live connection sequence needs to be....... RCBO >> Terminal Block >> Relay >> Terminal Block >> Circuit. To achieve the correct connections, the RCBO Live feed goes to the top level and is commoned across all terminals at that level. The RCBO Neutral feed goes to the bottom level and is commoned across all terminals. The Live to each relay goes from the top level out to the relay and returns to the middle level. Circuit connections on the outgoing side are then made at middle level for the switched Live and bottom level for the Neutral. Hopefully this might help:
-
If there's no connection of those cores at the other end I just keep them the same length as the Orange/Green pairs and then coil them round the screwdriver shaft and tuck them into the back of the box. If they're left inside the back box they are easy to find later if needed. If they are behind the box in the wall space then you might need to remove the box to get at them, possibly damaging your decorations.


