Jump to content
  • entries
    26
  • comments
    247
  • views
    68832

Part 6 - Foundations completed


Stones

5541 views

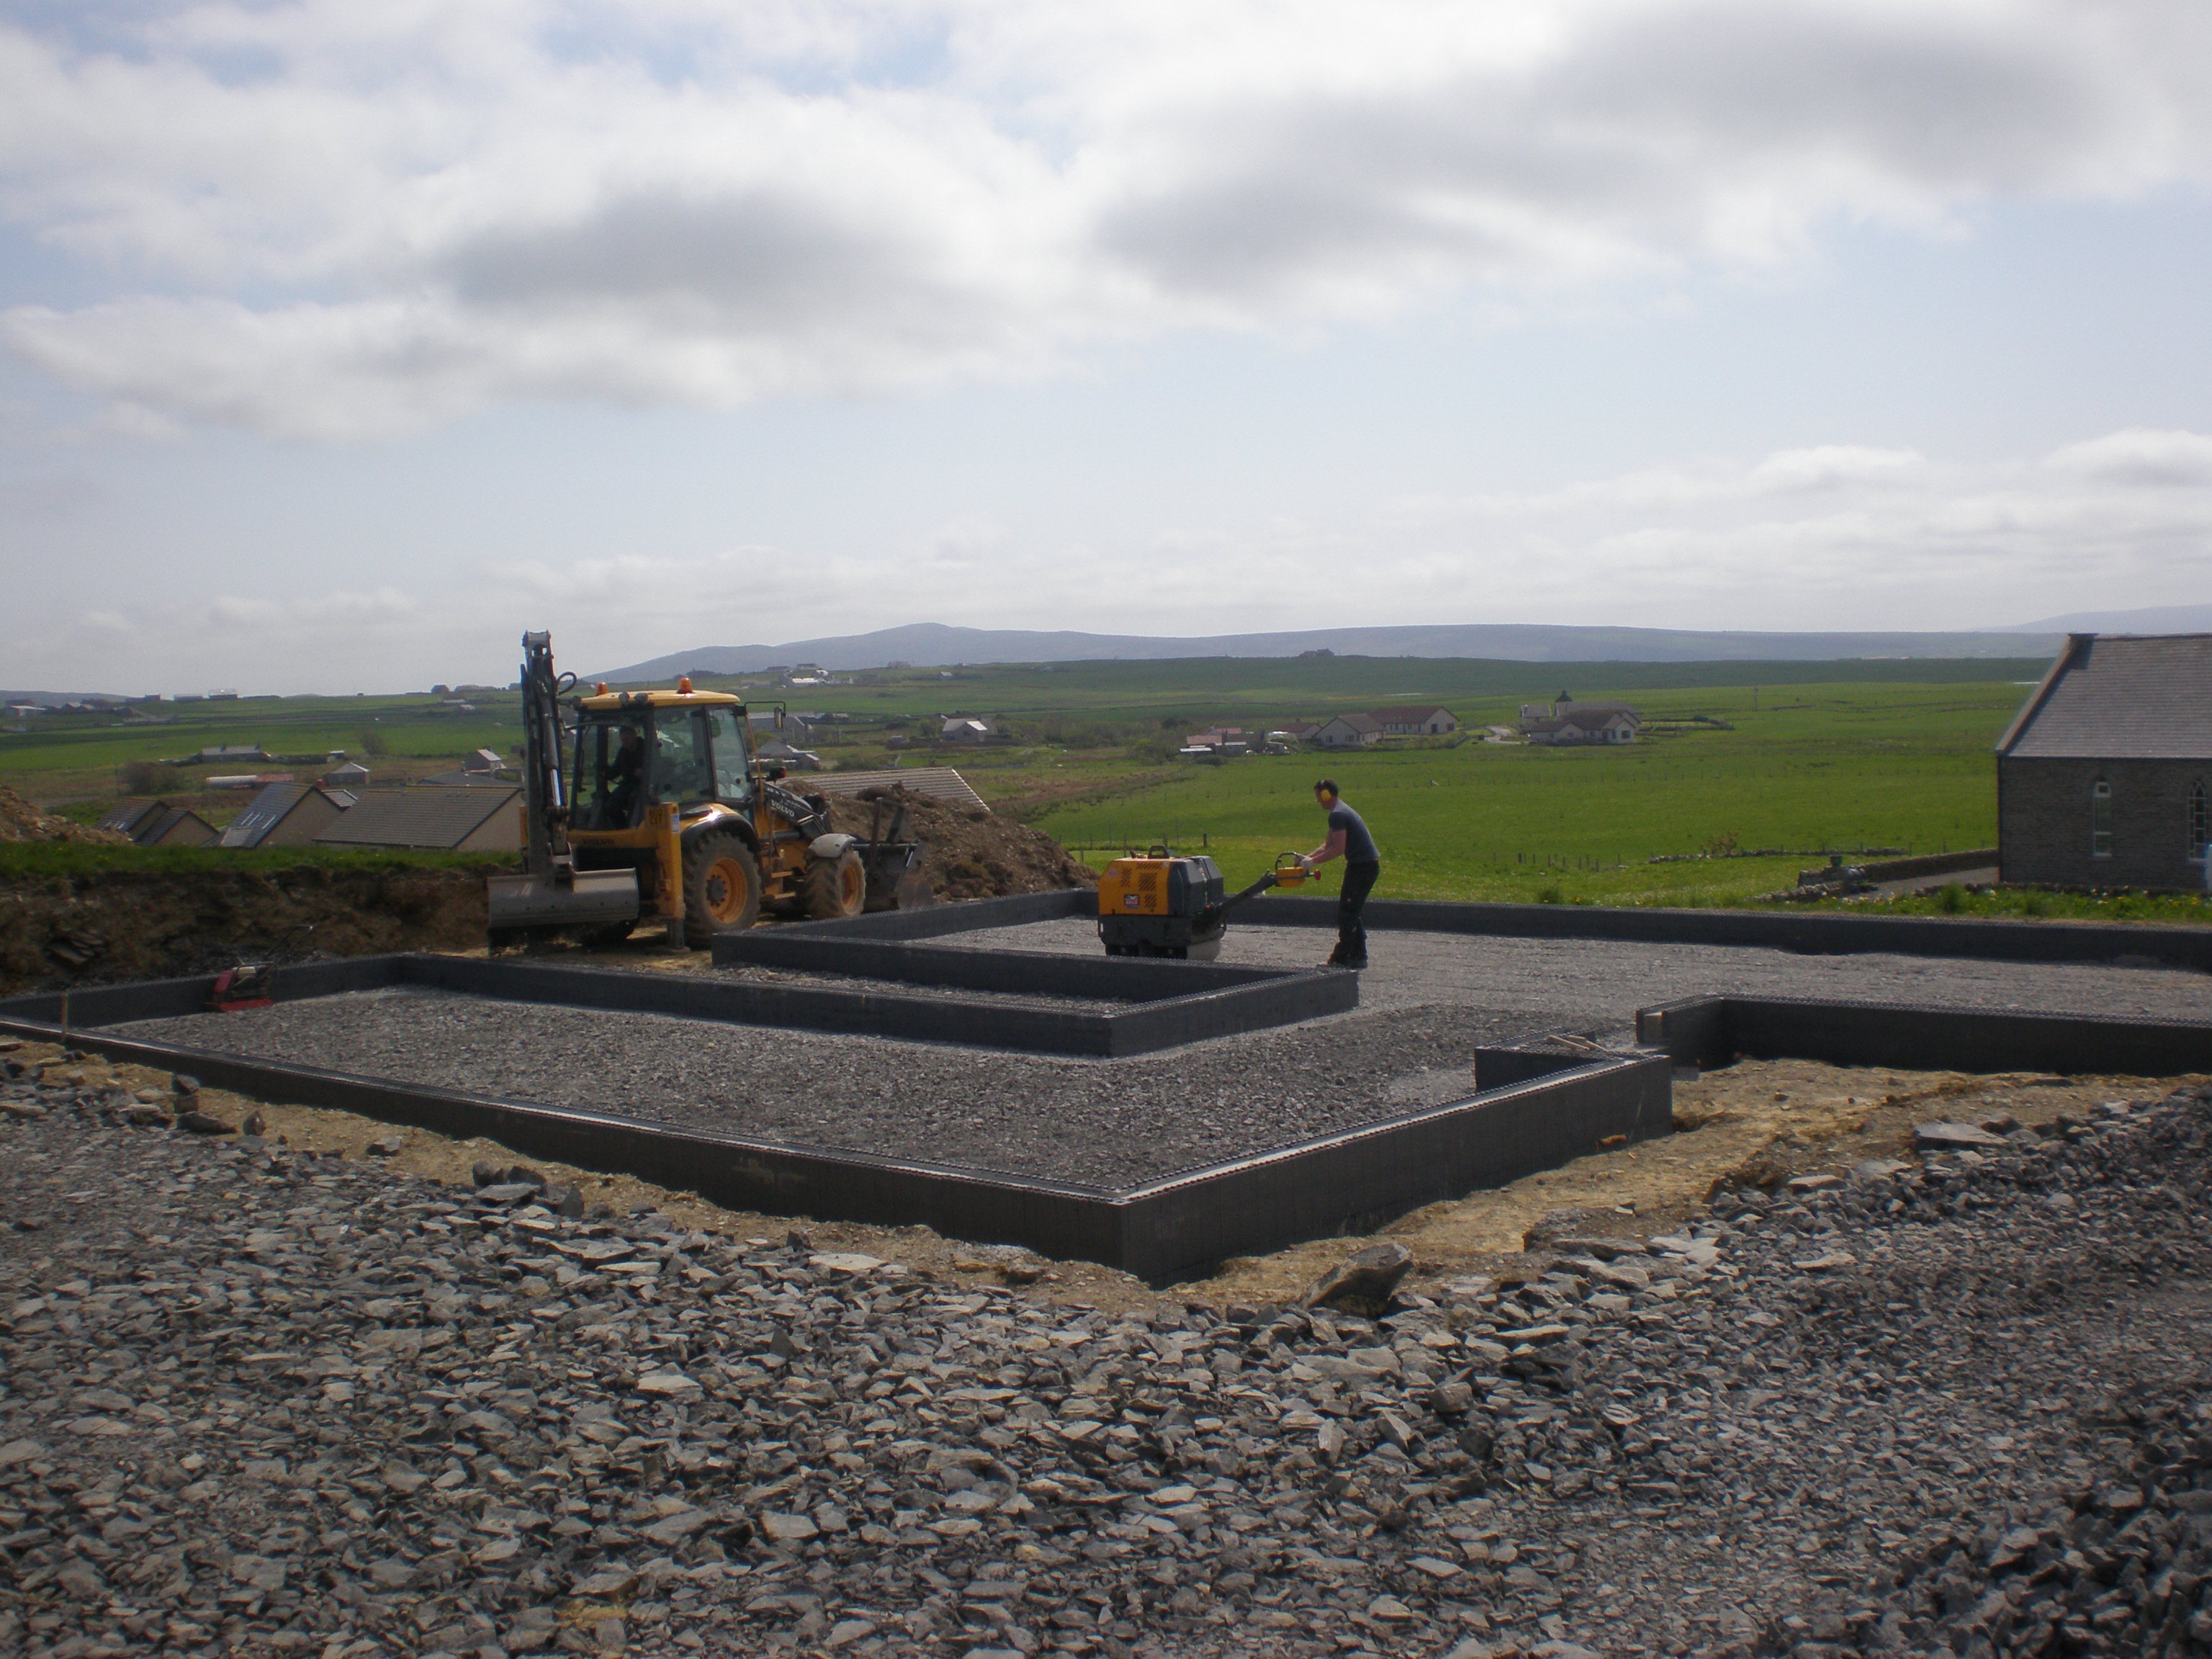
Another week of hard work by the builders and the foundations are complete.

Type 1 up-fill (only 100mm or so required) was spread then compacted down with a vibrating roller.  A final layer of quarry dust was added to finish the blinding.  In keeping with previous comments about a clean and tidy site, you can also see the digger spreading type 1 around the foundations.


P4270053.JPG


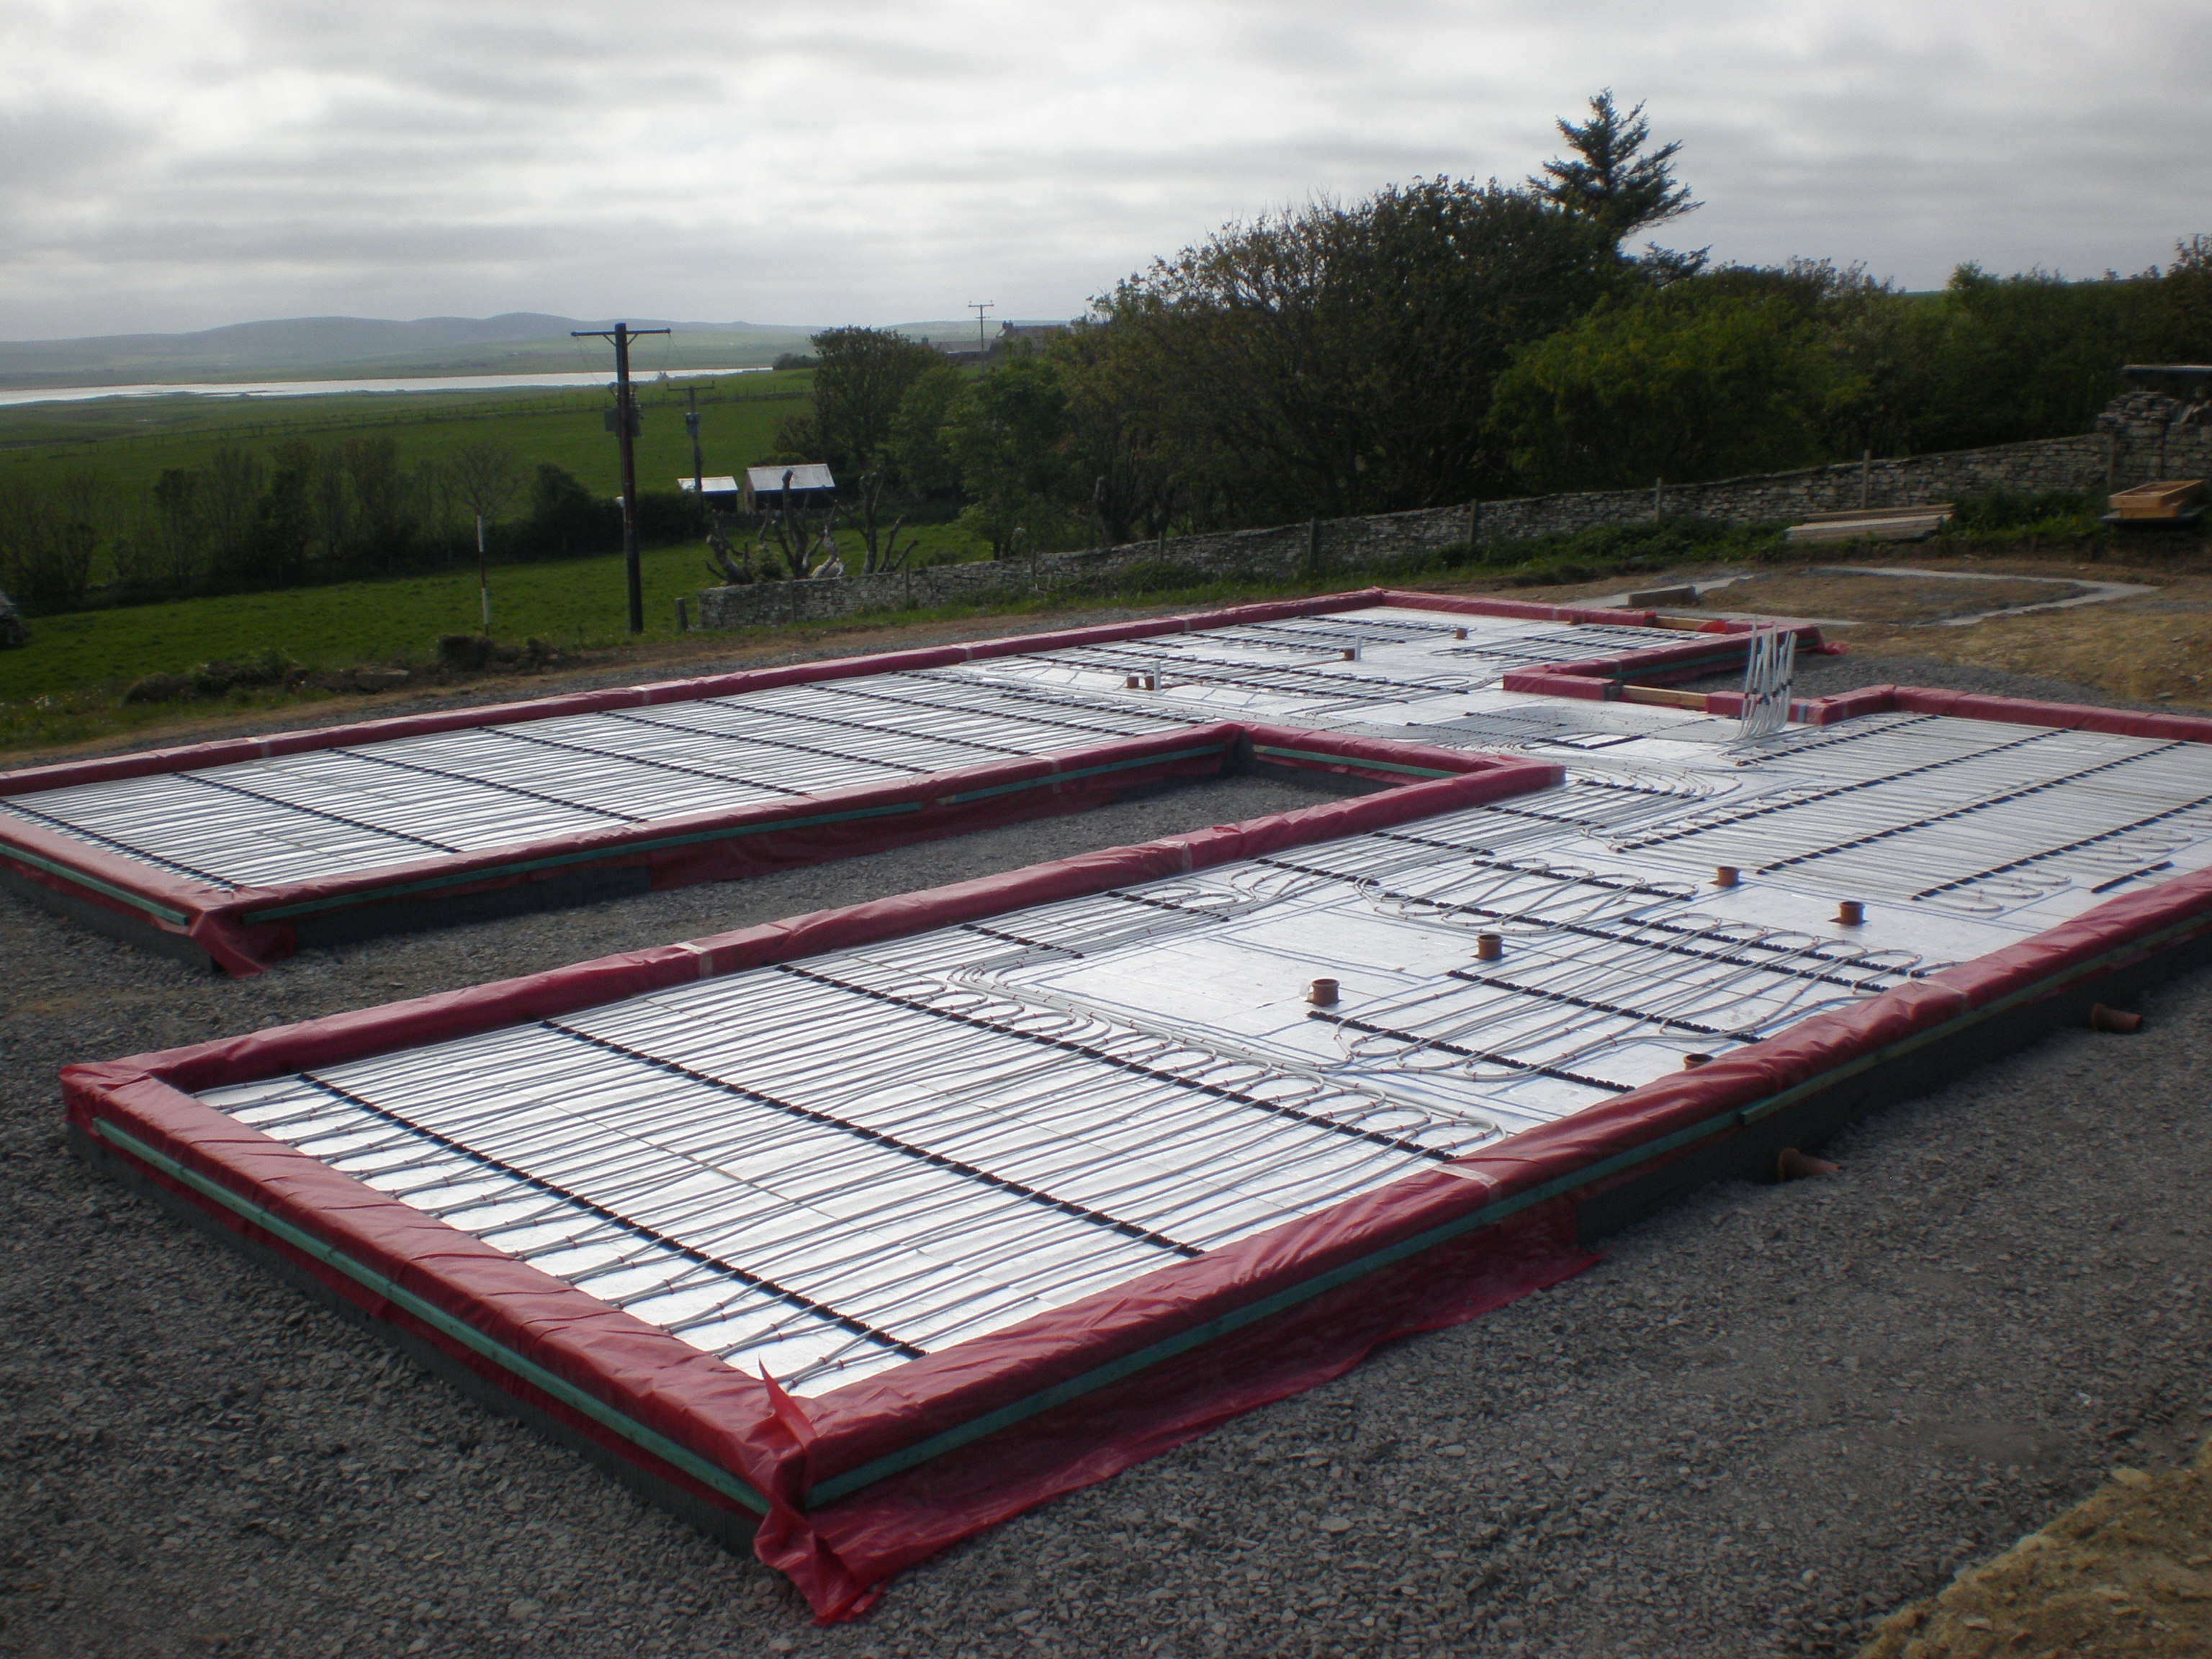
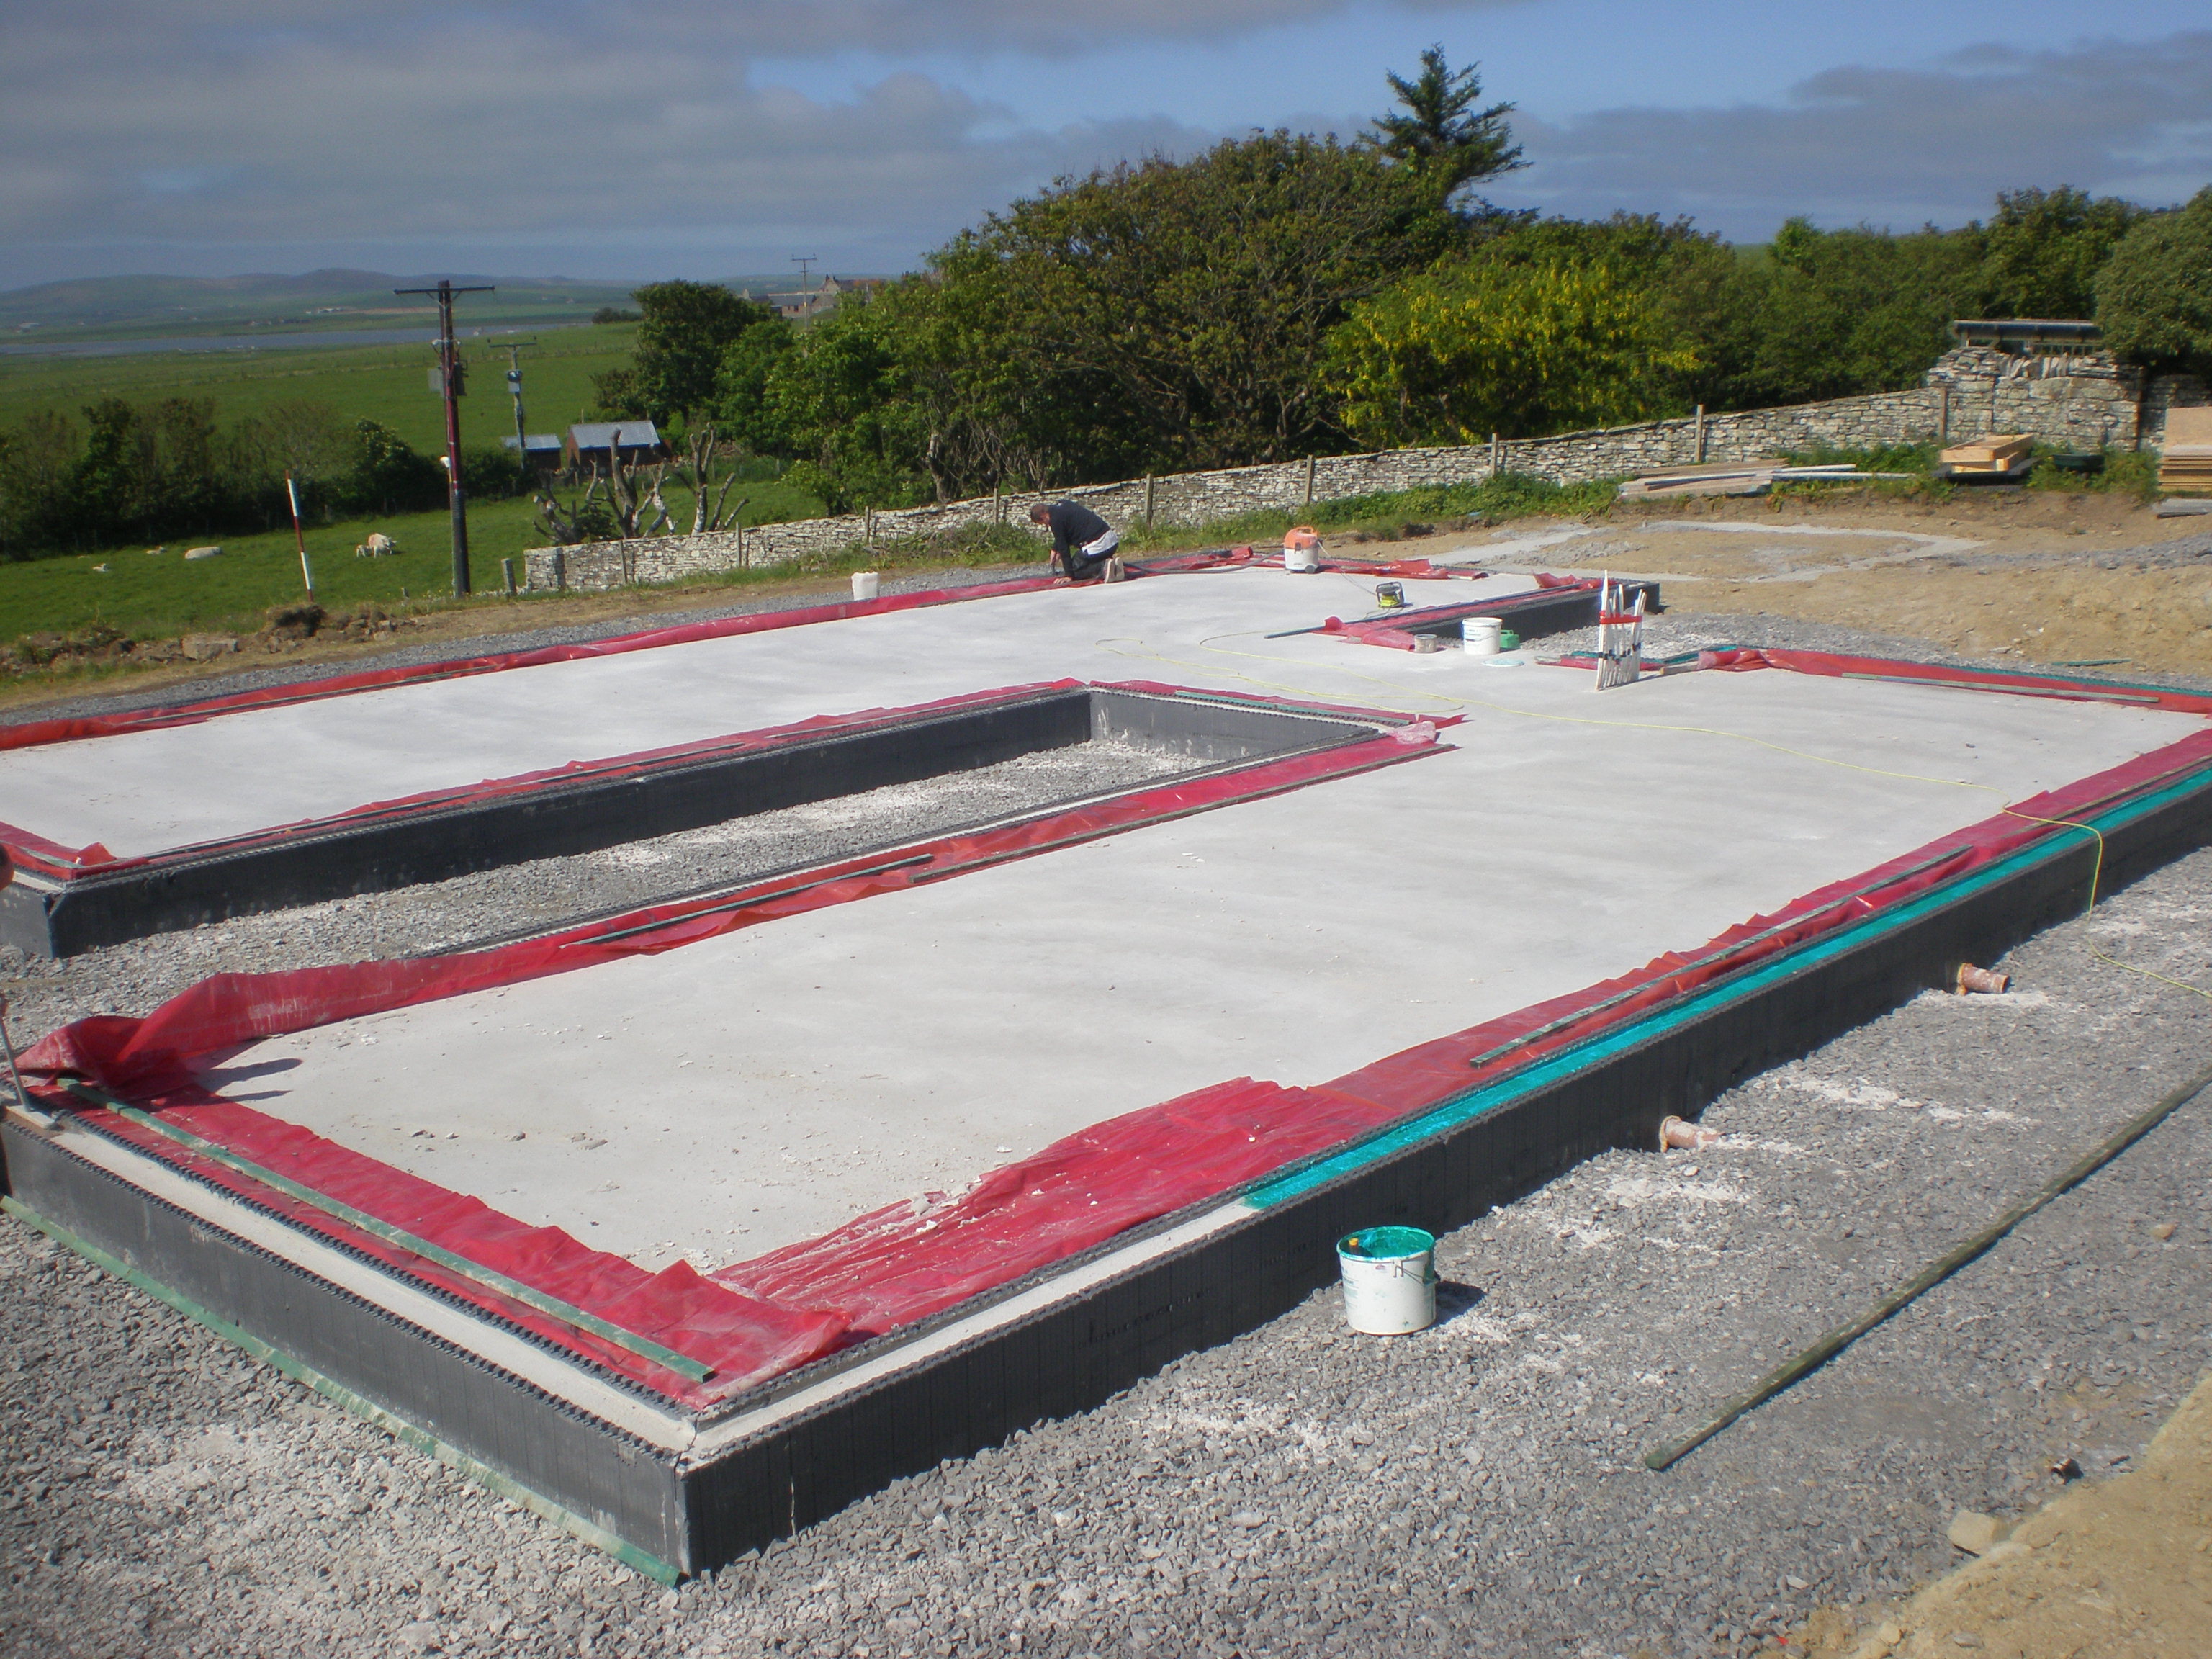
Internal drains and ducts are added, DPC / Radon barrier laid and 150mm PU insulation fitted.


P4300002.JPG


P5010013.JPG


Whilst doing all this, the concrete wagon stopped by and the strip founds for our garage were put in.


P5010015.JPG


The plumber subsequently put in the UFH pipework, over 1 KM of it!  A track system was stuck down (black lines you can see) onto the face of the insulation and pipework clipped in. Individual clips direct into the insulation were used where required.


P5020020.JPG


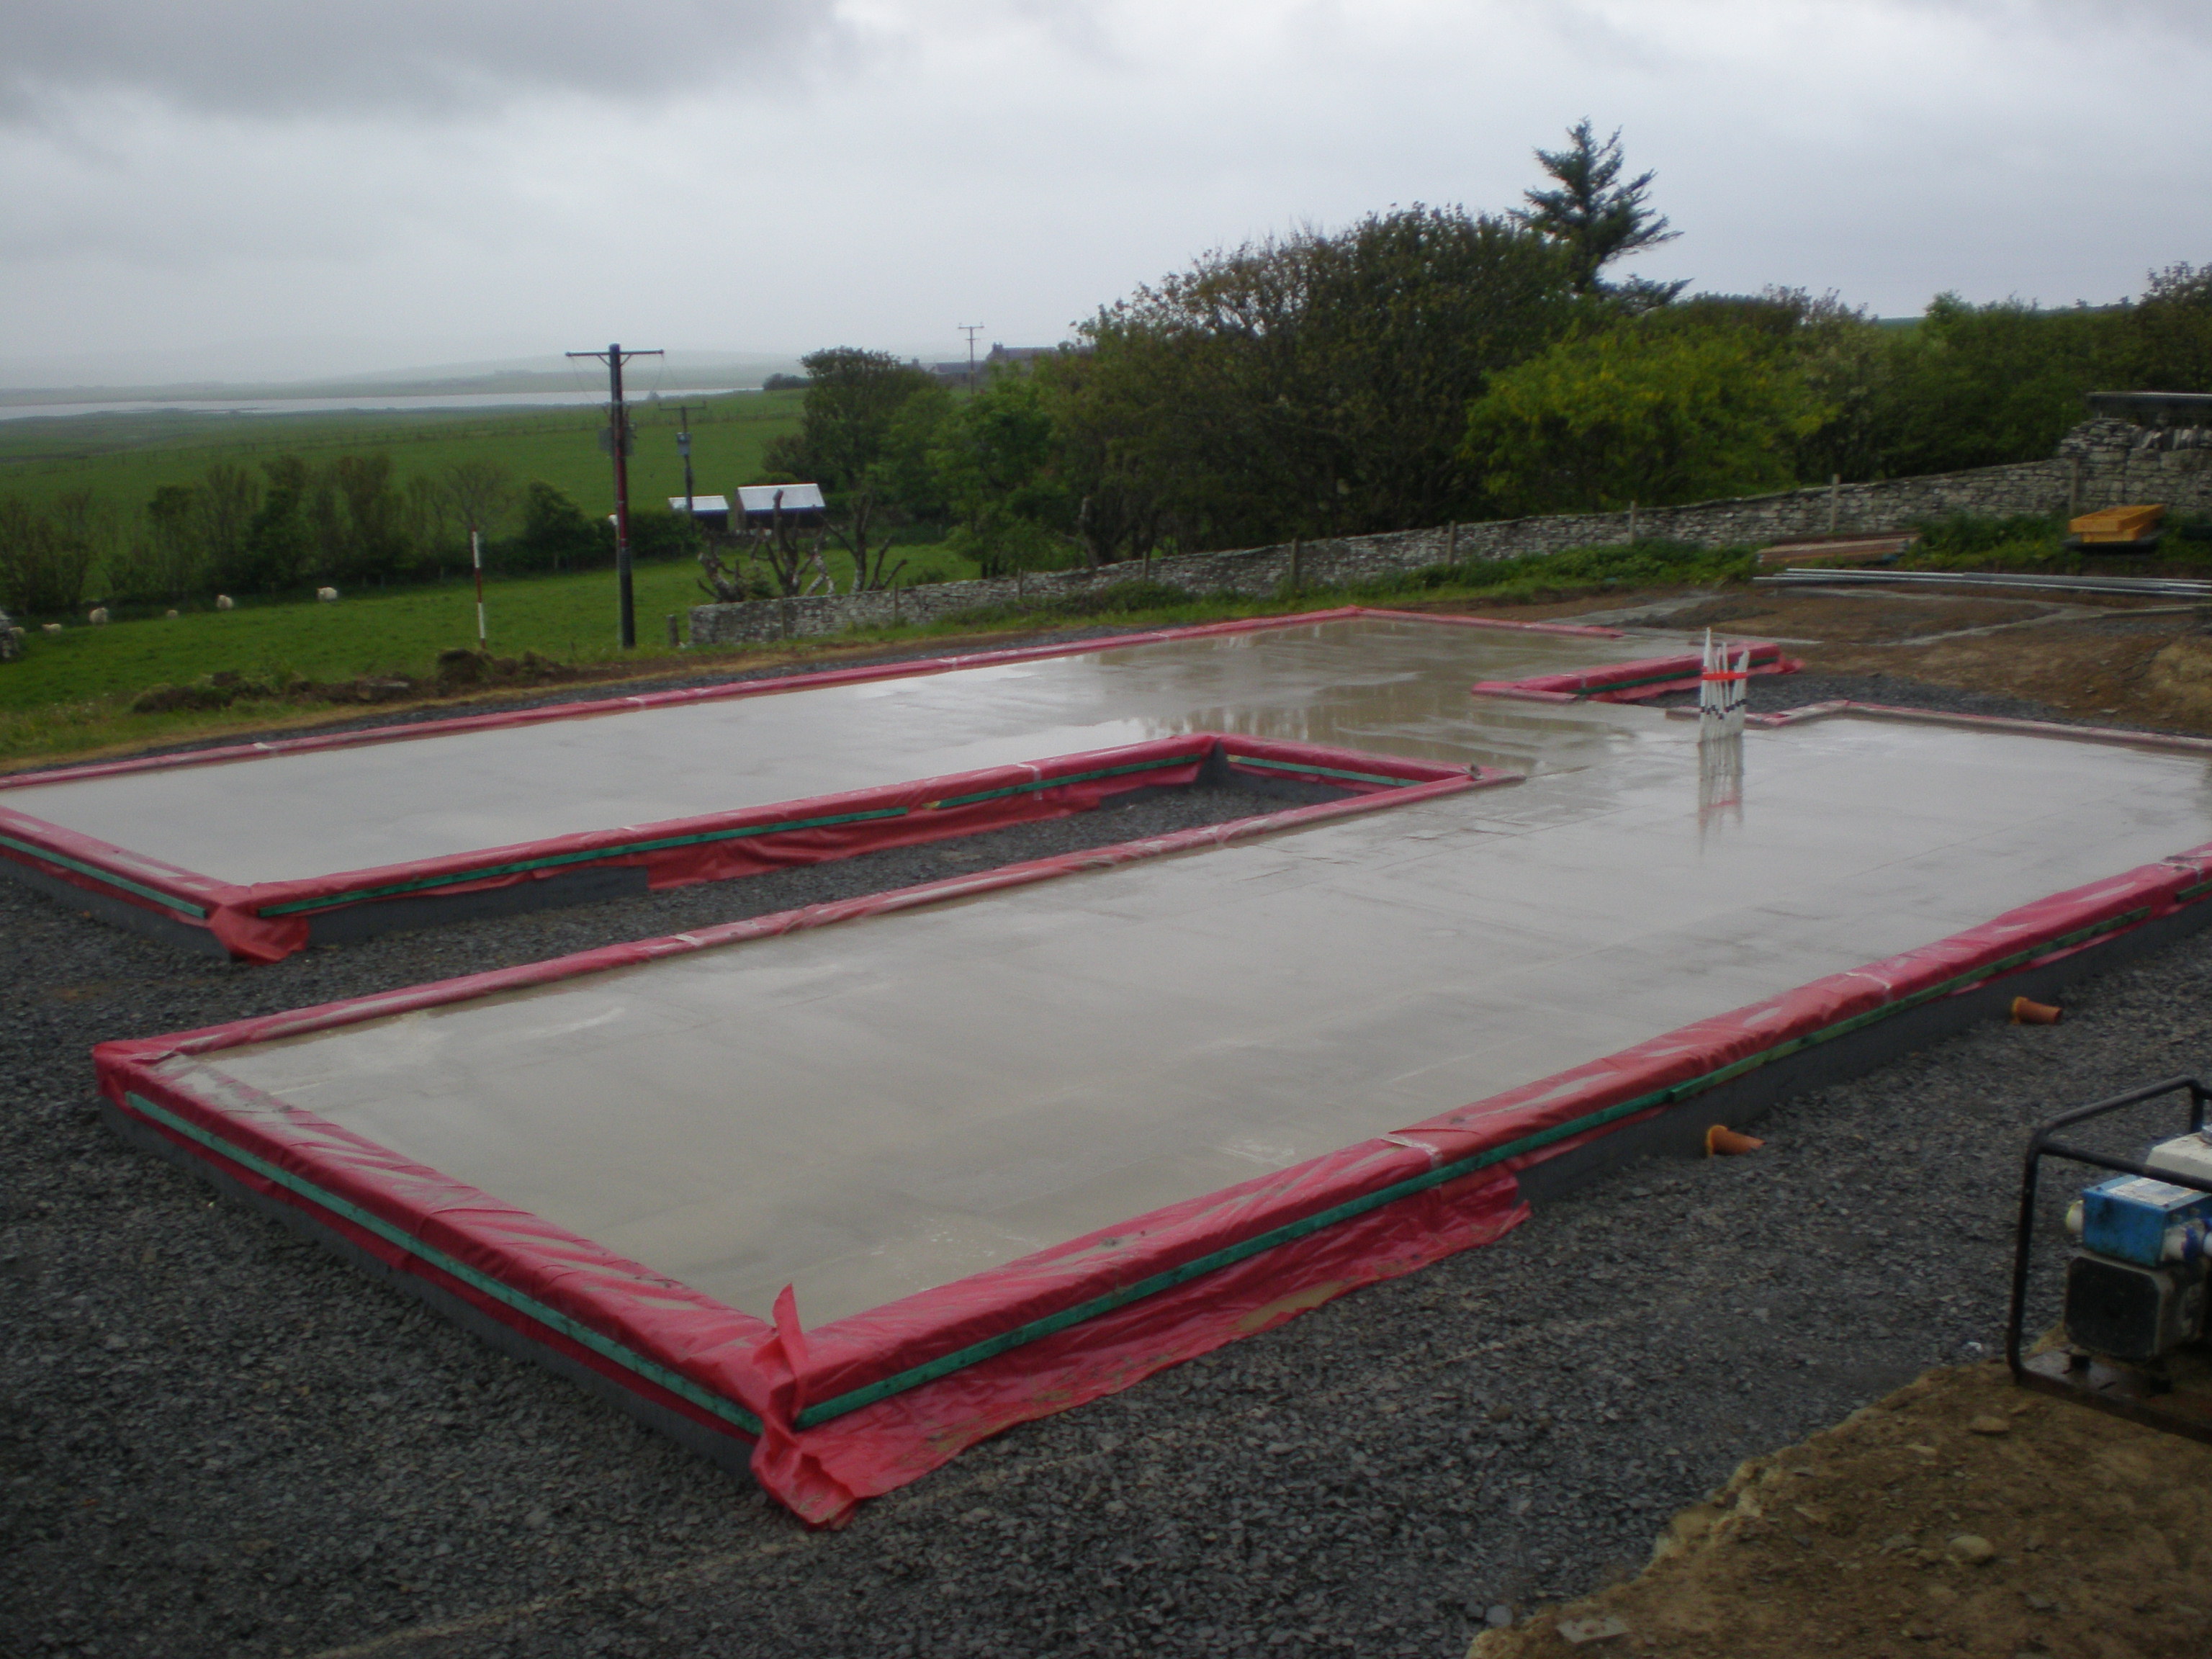
The following day, an hour of light drizzle forecast, the main concrete slab was poured.  Two wagons and just under 14 m3 of concrete with glass fibre mixed through.  Again, a concrete skip and crane were used to move the concrete from wagon to foundation.


P5030033.JPG


P5030038.JPG


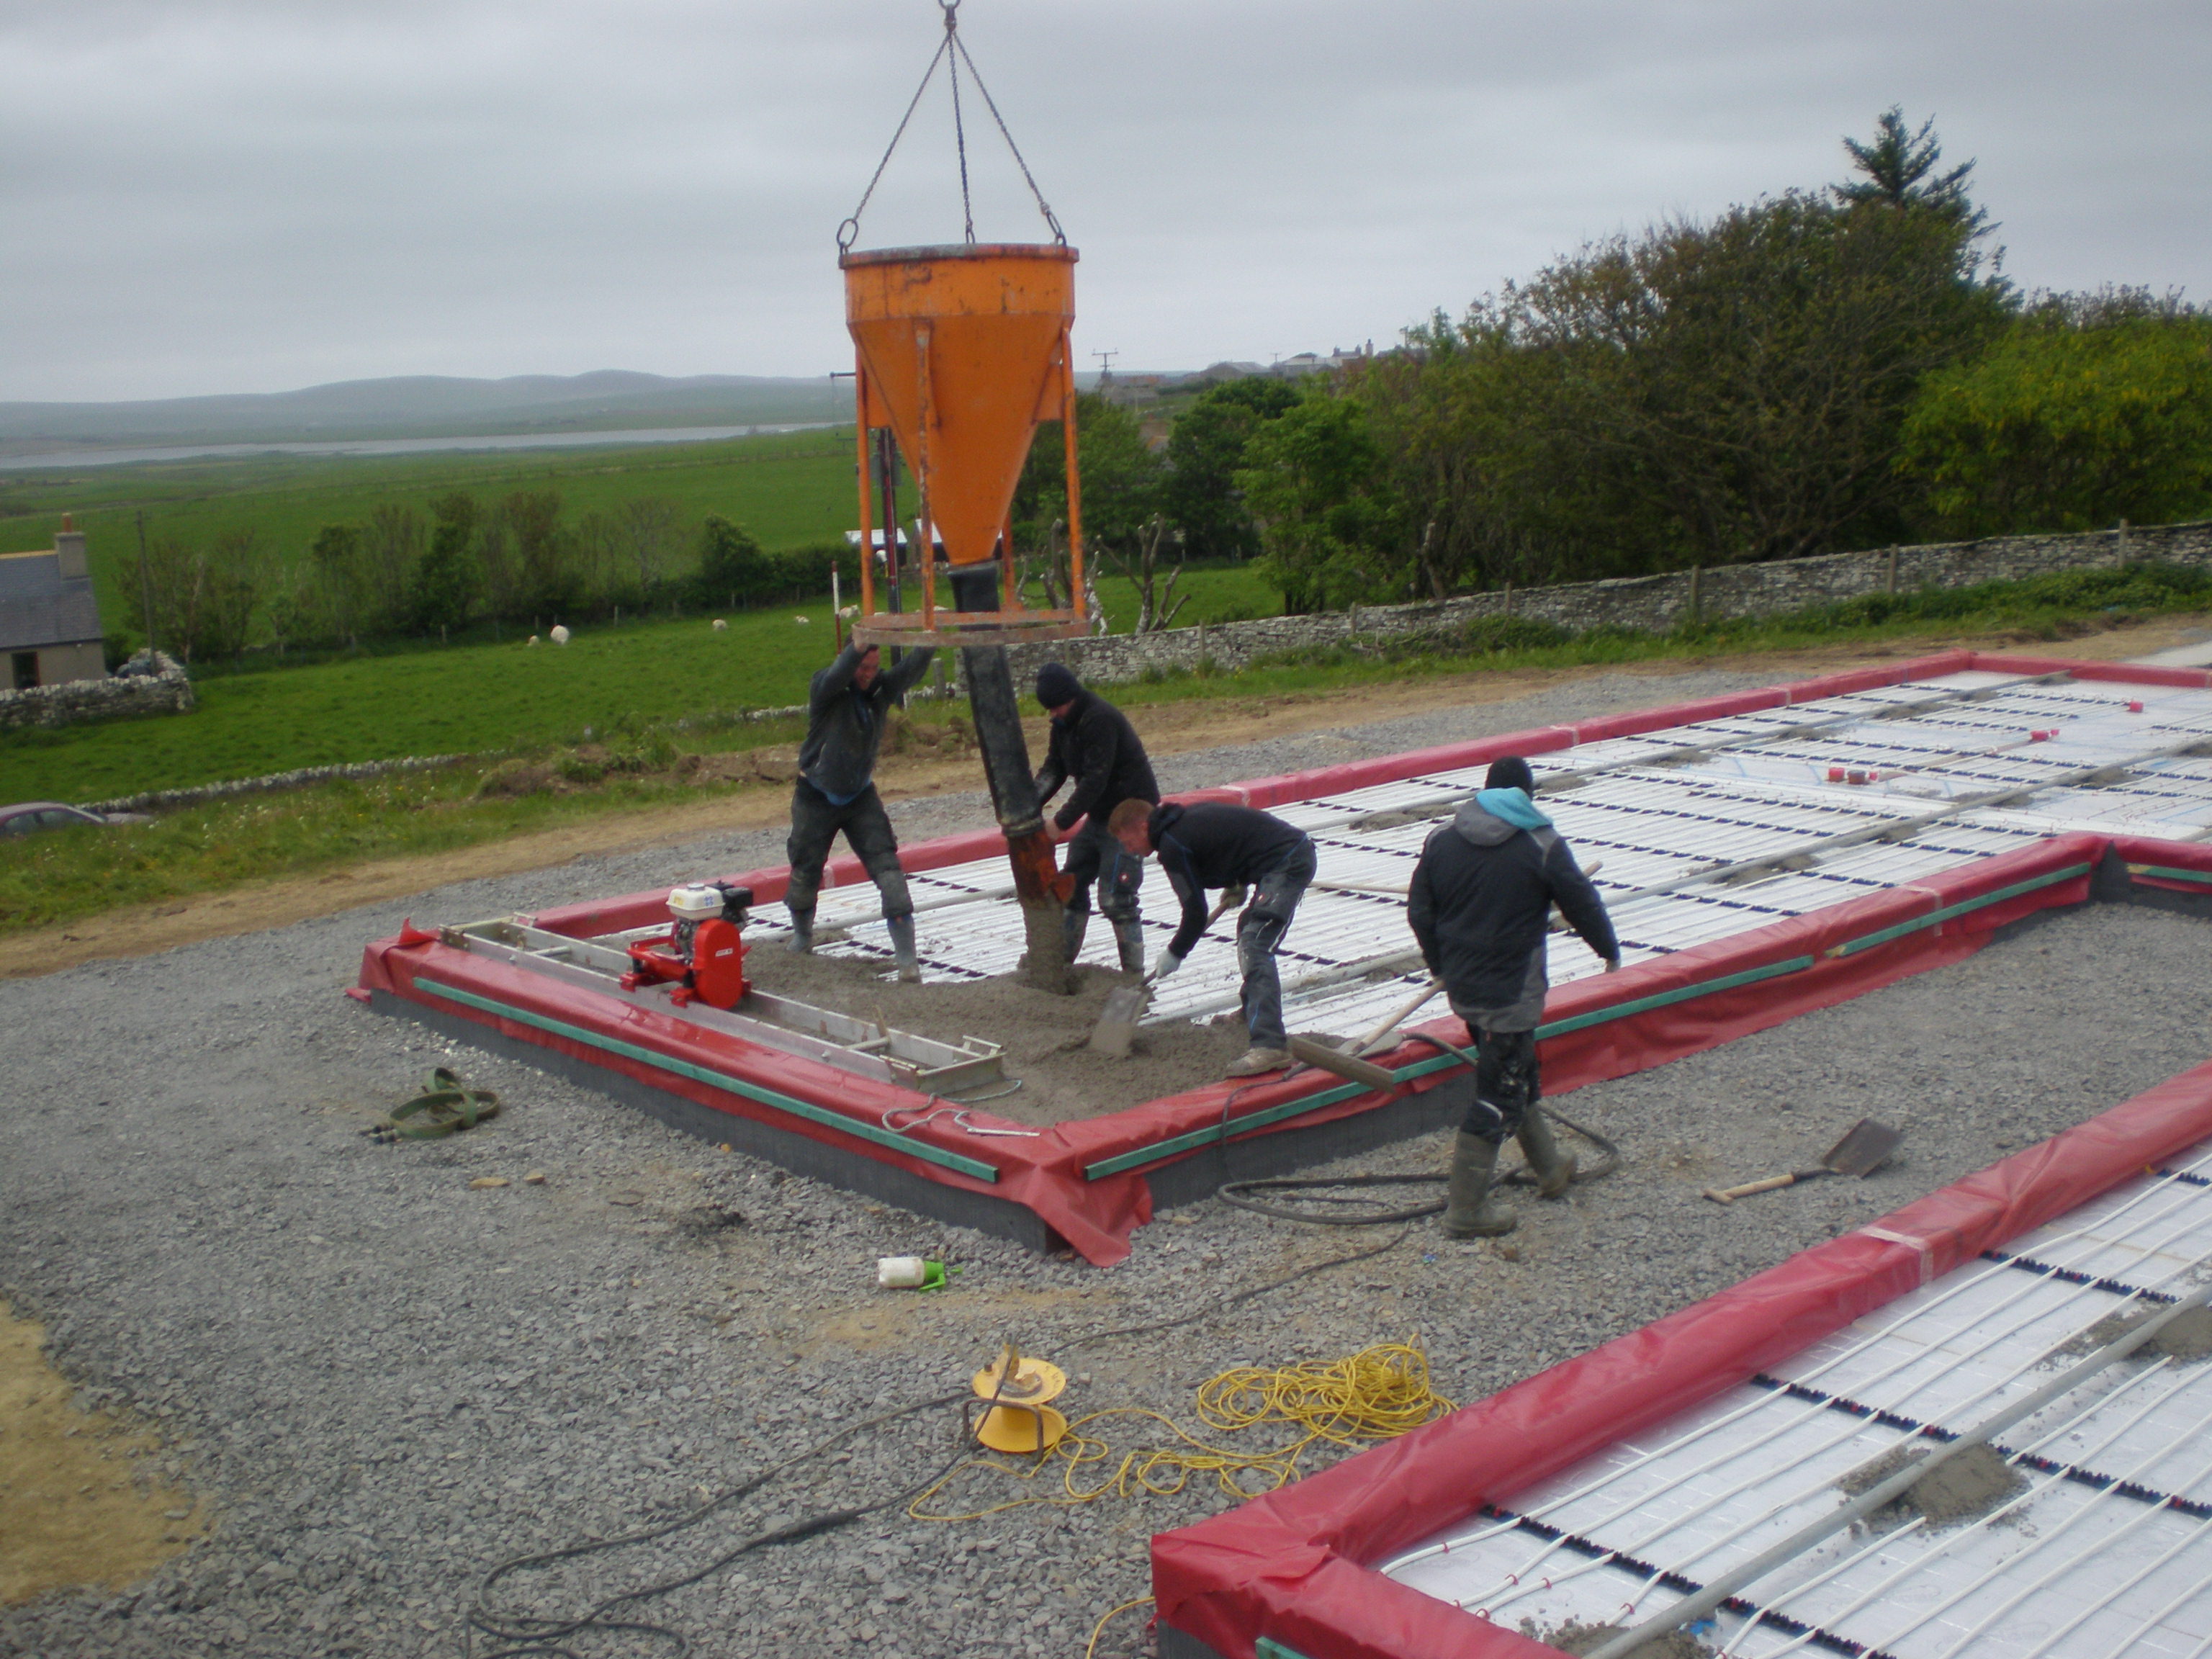
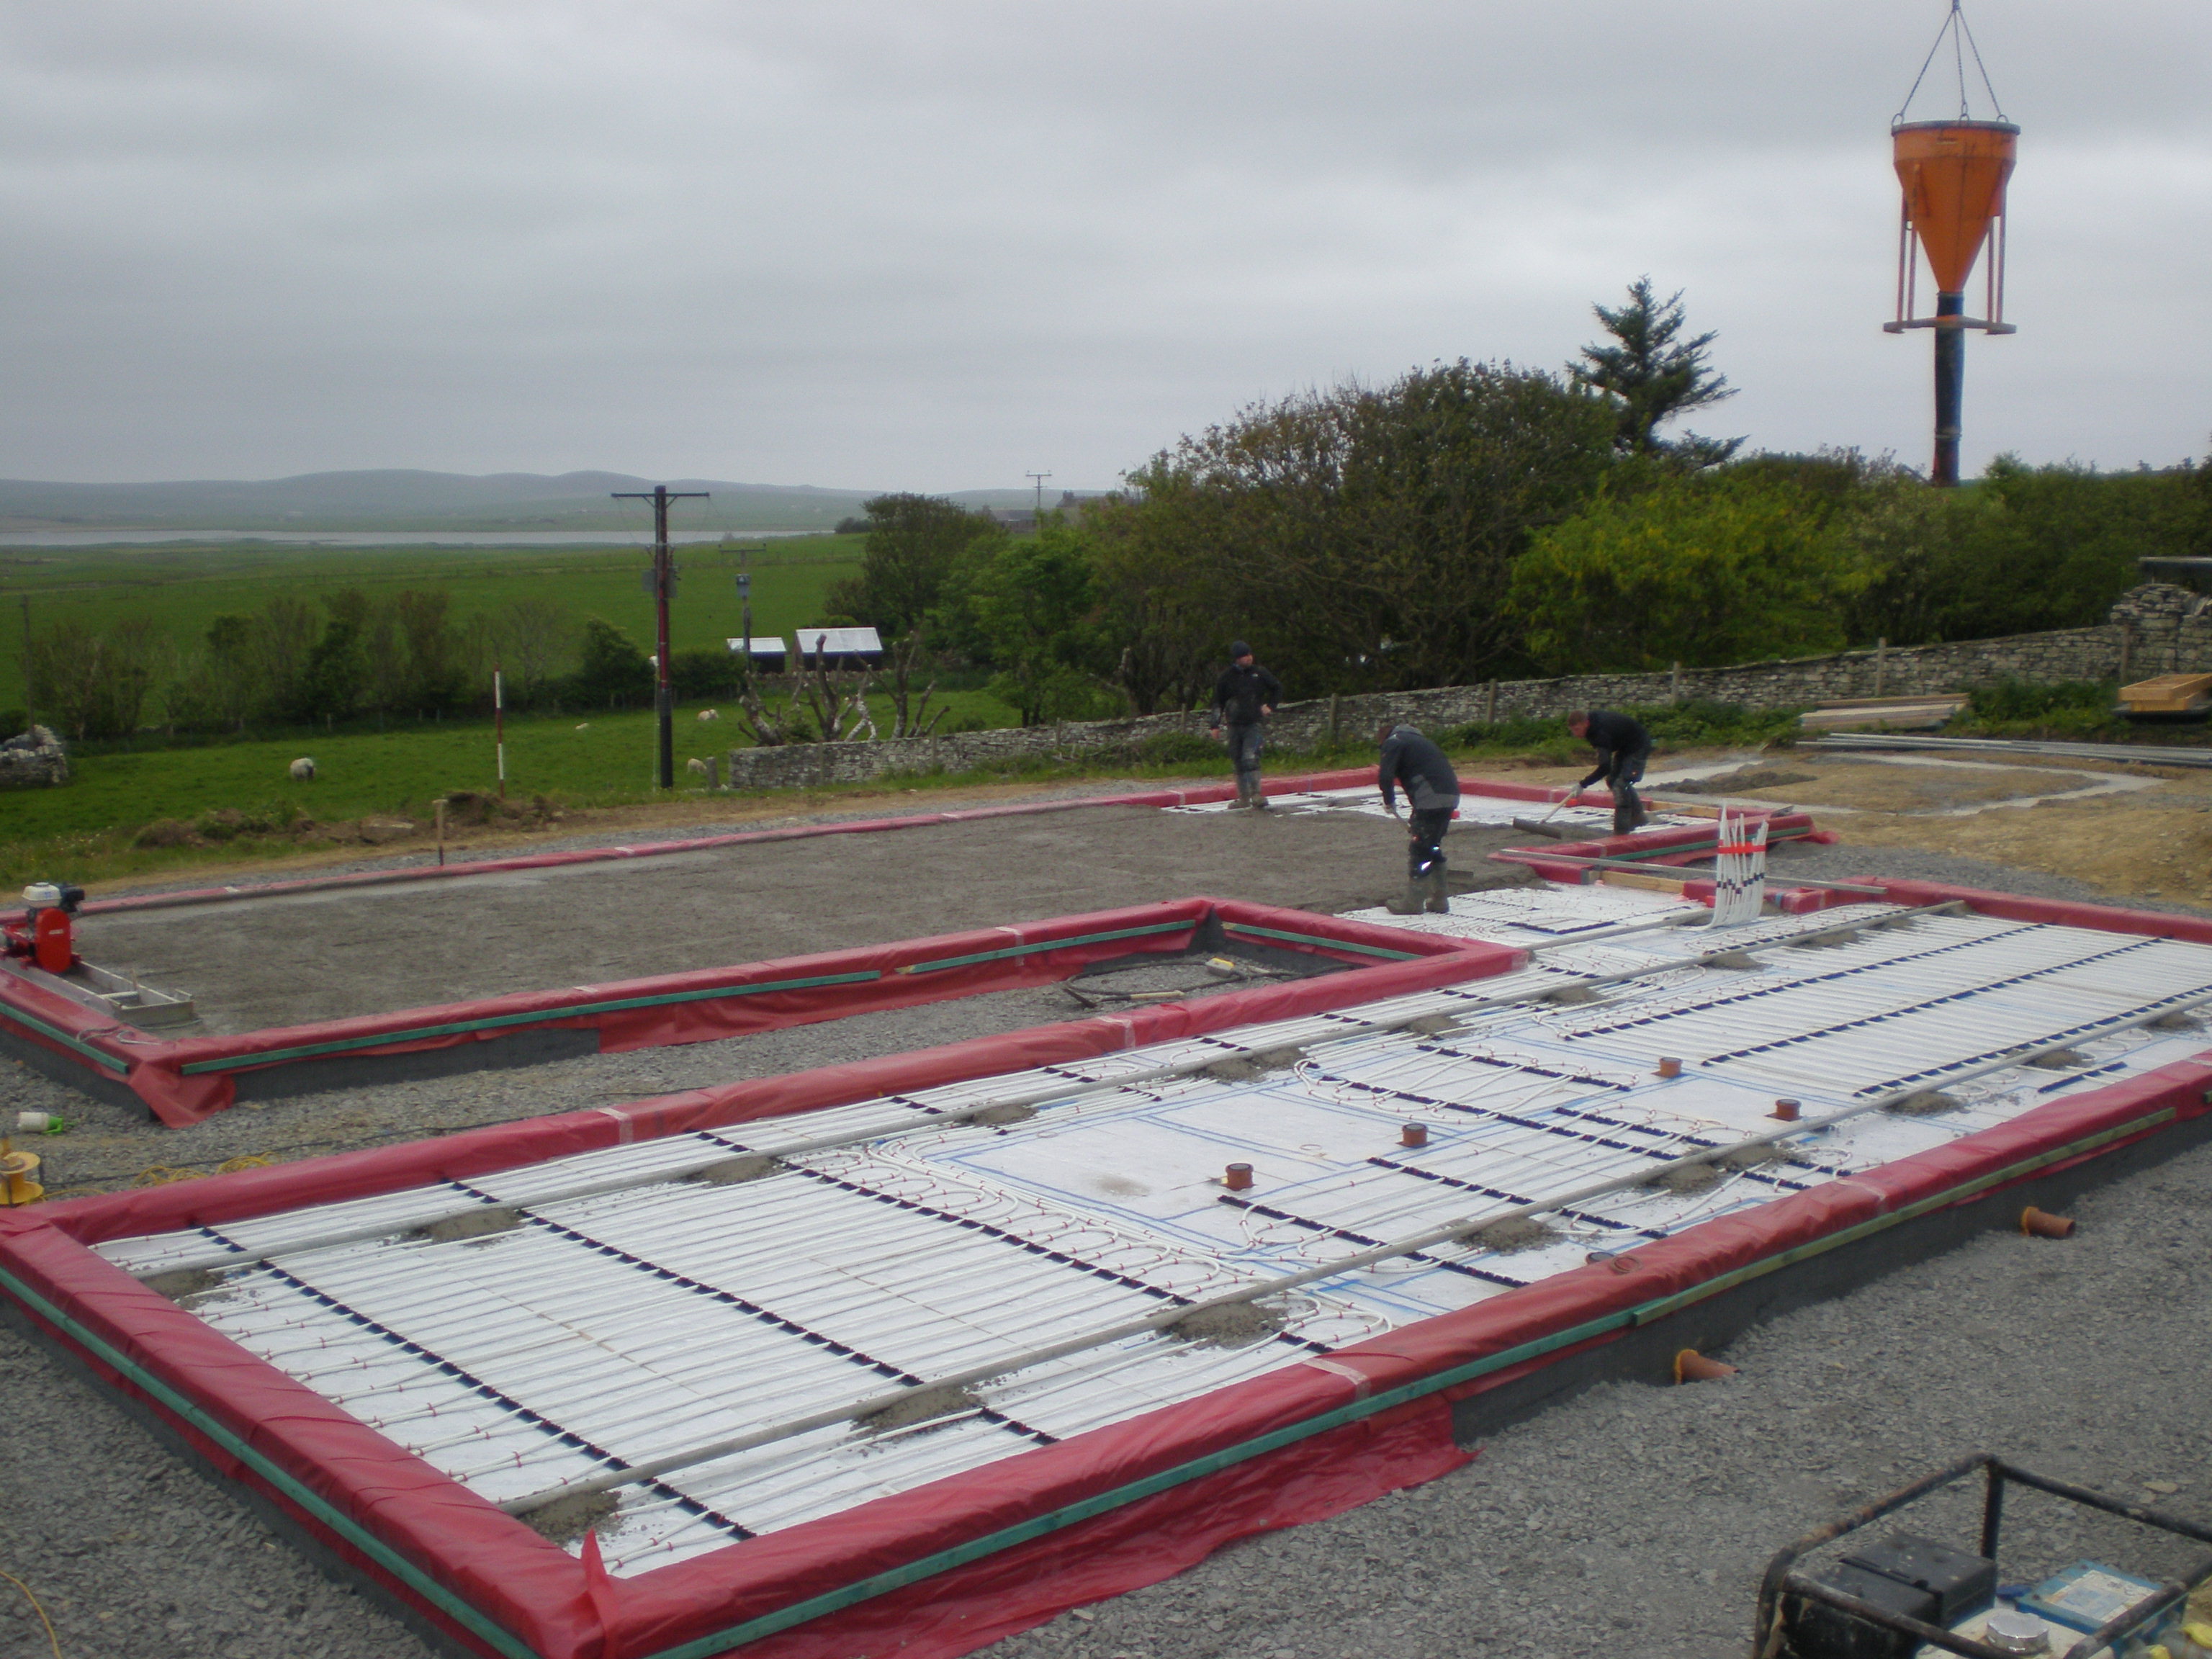
You'll notice the twin (scaffolding pole) rails running the length of the foundation.  They had simply been set as guide rails for the vibrating leveler to run on and were removed once the main vibration runs had been completed.  The next shot shows the slab ready for power floating later in the day.  


P5030044.JPG


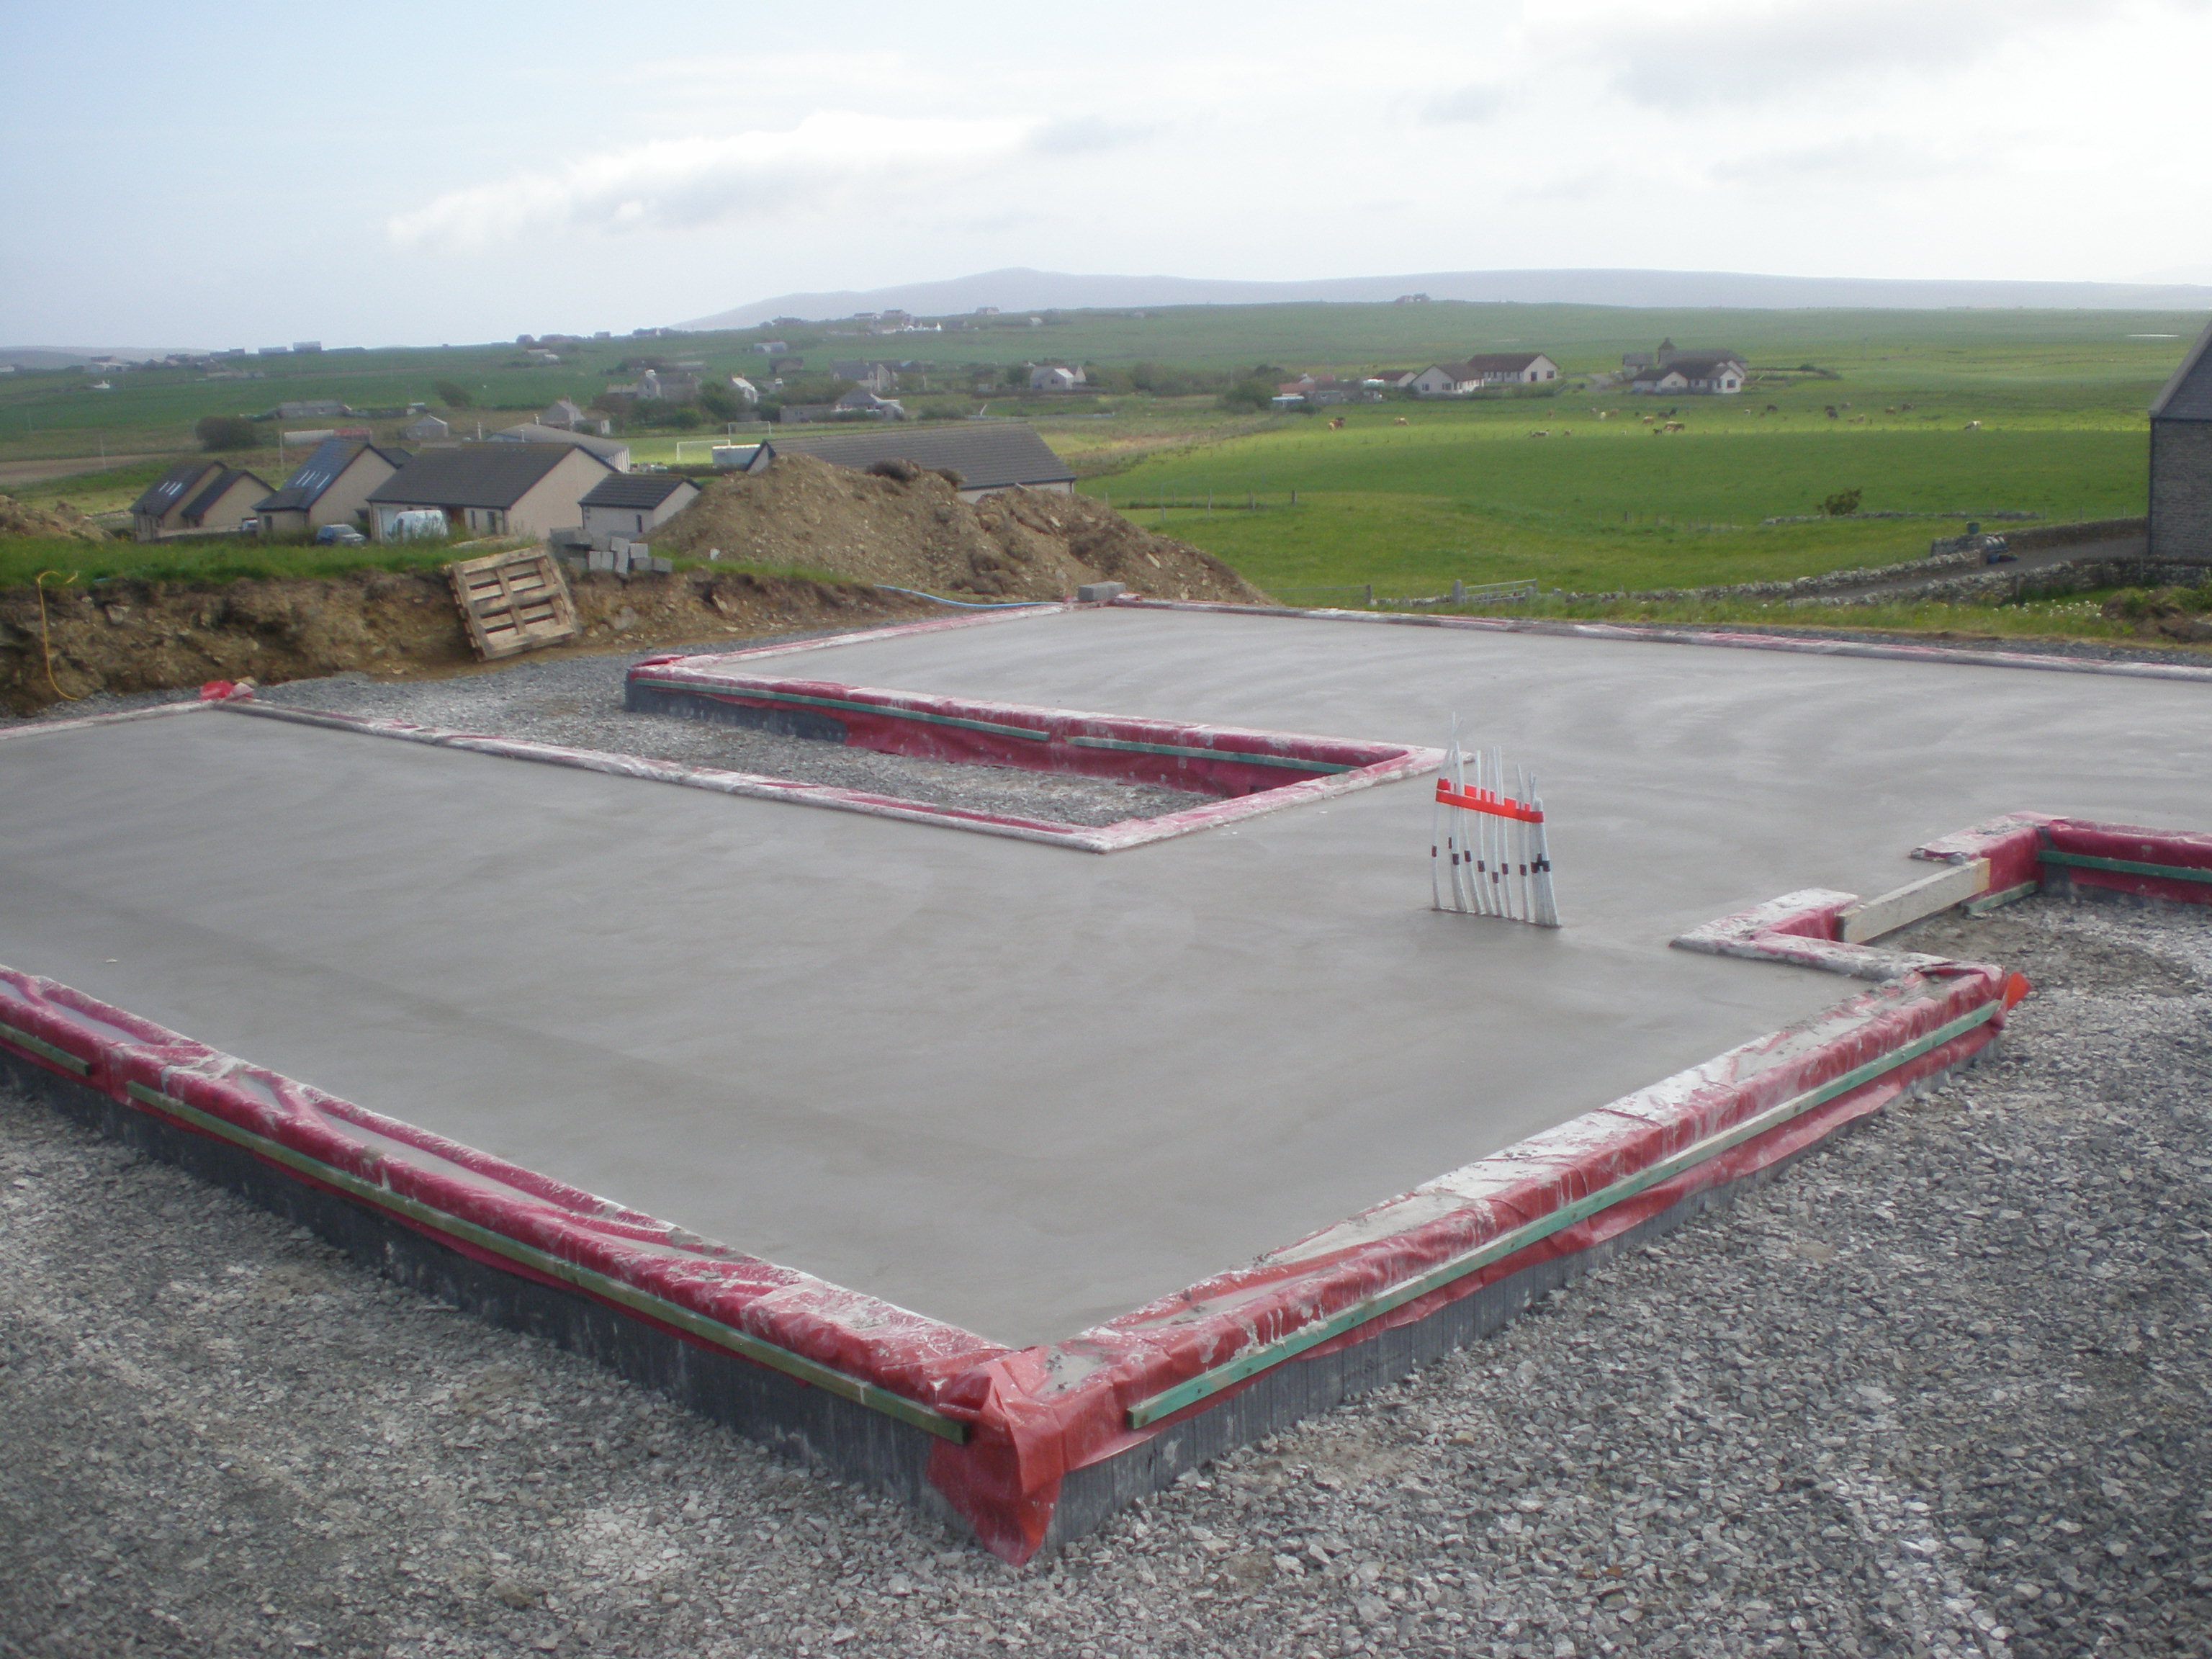
Unfortunately, it kept on raining which meant a 0430 start the following day for my builder.  He did a cracking job power floating the slab, which is now beautifully smooth and level.


P5040045.JPG


The final stage before building the walls can start, is painting a radon barrier ( the green paint you can see ) on the concrete core of the ICF block.


P5070089.JPG


Apart from a bit of unwanted news - 3 week delay for our windows due to a summer factory close down - things are moving in the right direction.  The walls should go up this week so we are going to see big changes over the next few days.


  • Like 6

18 Comments


Recommended Comments

A very tidy bit of work on the foundation, but where did the drainage and ducting go?

Edited by IanR
Link to comment

The second picture you can see the drains just visible through the surface of the quarry dust blinding. At the moment they just go through the ICF wall and no more.  All the drain runs will go in once the scaffolding comes down.  In the third picture you can see what looks like a drain in the insulation, this and the white pipe beside are actually ducting for water and electric cables for the kitchen island. Ducts for BT and main electric come up next to the UFH pipes  at the main entrance.

It does indeed look like everything has disappeared under the floated concrete slab. Everything was capped and is just below the slab surface, 1 or 2 mm ( when you are on the slab you can see where they all are) and easy enough to uncover again. Just seems to be the way the builder and plumber do it, I think primarily to ensure the floor can be properly and easily power floated.

Edited by Stones
Link to comment

I think he means in the 2nd, 3rd and 4th pictures there are drain runs under the slab. but now the slab is poured, they don't come through the surface of the slab.  Is that a "whoops" or are the positions accurately known so you can break through to them later (with the risk of damaging the pipe?)

Again that site is far too tidy, you are in danger of getting builders a good name.

Link to comment

As per my last comment, covering the drains was intentional on the part of the builders.  All were cut such that they were just below the level of the rail system used for the vibrating leveller.  Standing on the slab you can just see the circular outline of the various drains as they are literally a few millimetres below the surface, so I don't envisage the builders having problems locating or breaking through to them.

Edited by Stones
Link to comment

Did the drainage pipes have connectors already attached or is it just bare pipe under the surface of the concrete?

Link to comment

I hope they plugged the ends!!!!!

I can see why they want to do it that way to make power floating the concrete easy, but I would want it in the contract that THEY are responsible for ensuring the drains pass the pressure test, and they are responsible for fixing any damage to the pipes in the proceess of uncovering them.

Link to comment


Prior to the concrete pour, the guys ran the vibrating leveller down the rails to make sure the drainage pipes were just below the surface.  In the picture below, you can just see the grinder used and a small offcut of pipe where one of the drains was trimmed down.  All of the drainage pipes were finished with a coupling and plugged with rubber type bungs.  The ducts were plugged with a duct tape covering.


P5030031.JPG

Link to comment

I like the marking out on the EPS to show where walls are - I'm looking at using a self compacting / levelling concrete to remove the problem of levelling, but I want to weld in threaded studs to fix the stud walls down prior to pour. Marking walls would make that easier !

Link to comment

That sounds like a headache. TBH, if you primer the floor, lay a bead of exp foam, drop a stud on it and hold it whilst it goes off, it'll be like it HAS been bolted down. Unless you're stick building, I think that'll be a logistical nightmare, trying to pre drill the footers to allow them to slide over exposed studs, and for the stud to be in perfect position afterwards.........seems a bit too optimistic to me. 

Good idea with the ground workers setting the penetrations under the surface of the slab. That must give an uber flat floor vs trying to go around obstacles. The only thing I'd have done ( unless they did so ) would have been to put 6" blank plugs ( upside down ) over the top of the 4" sockets so that they could be removed after the pour in case of damage to the seals. The plugs would get chipped out / against as sacrificial units leaving the sockets free to be removed and a gap around them, but still maintaining a good seal below of the concrete against the actual pipe. Breaking out concrete around a set penetration is a right pita, and to do so without causing damage to the pipe makes it incredibly slow going. On a previous job I had to dig 4 of them out! They were in the right place as far as MBC were asked to put them, but then the customer changed the remit and I had to move / cut back almost every one :(. Not a nice or easy job, especially when I had the rebar in the slab to avoid.

Looks a nice neat job with these guys though so it must feel great to have a clean working platform now :)  


Link to comment
1 minute ago, Nickfromwales said:

That sounds like a headache. TBH, if you primer the floor, lay a bead of exp foam, drop a stud on it and hold it whilst it goes off, it'll be like it HAS been bolted down. Unless your stick building, I think that'll be a logistical nightmare, trying to pre drill the footers to allow them to slide over exposed studs, and for the stud to be in perfect position afterwards.........seems a bit too optimistic to me. 


Plan is to use metal stud so expanding foam may not work - it does give me a bit more flexibility in locating studs on pins.

Link to comment

Ah! Agree, and with wood not so easy :). I've never found a house with metal stud work that has anywhere near the feeling of strength in the walls that you find in a all timber property. When doing my BIL's bathroom in Kent I literally had to stuff the throats of the metal studs with ply, then overboard them with 18mm shuttering ply ( cheap and light ) and then fix a 9.5mm plasterboard to that and then tile. I was in no way happy to tile the existing walls as I could literally move them by pushing / leaning on them. It was a mass produced cheap n cheerful house, but just something for you to consider. Maybe ask for an example wall to be erected on 400mm centres and then see if you may be better at 300? I'd think long and hard about over-boarding in the bathrooms and kitchen at least. 

Link to comment

Ask who...?? I'm the builder... B|

I will be using Fermacell on the walls and using that on metal stud both sides is pretty bomb proof and feels very solid. There are very few internal stud walls due to layout so it's a speed vs hassle discussion on using metal or timber.

Link to comment

:D

Ok, I'll concede that fermacell will change the characteristicts vs regular PB. Just a bit of inside info for you in case you ended up with wobbly walls :ph34r:

Link to comment
7 minutes ago, Nickfromwales said:

:D

Ok, I'll concede that fermacell will change the characteristicts vs regular PB. Just a bit of inside info for you in case you ended up with wobbly walls :ph34r:

What are you saying about my ability to use a spirit level..??!! O.o

Link to comment
59 minutes ago, PeterW said:

What are you saying about my ability to use a spirit level..??!! O.o

My speciality is getting things just enough off horizontal such they are really annoying, and people remark on it.

Did it with an extractor fan. Yesterday afternoon :-).

Why do they have to put their logos on the damned things? If it was white and round no one could tell.

Ferdinand


Edited by Ferdinand
Link to comment

I absent myself for a few hours and you lot end up discussing wobbly walls and squint extractor fans! Focus people :D

Link to comment

Create an account or sign in to comment

You need to be a member in order to leave a comment

Create an account

Sign up for a new account in our community. It's easy!

Register a new account

Sign in

Already have an account? Sign in here.

Sign In Now
×
×
  • Create New...