


Gus Potter
-
Posts
1612 -
Joined
-
Last visited
-
Days Won
18


Gus Potter's Achievements
Advanced Member (5/5)
1.1k
Reputation
-
Introduction post. This is Paul doing a barn conversion.
Gus Potter replied to PaulFC's topic in Introduce Yourself
Sounds a bit too cheep to me at 900m? That's half mile! That will need a big cable to avoid voltage drop, a good few lecky board guys to unroll the reel and some fancy connections at each end.. all for 3.0K? Have you sorted out any wayleaves you need? -
Thanks for the compliment, much appreciated. The amatuer point, well I still qualify as that as this sort of stuff is complimentary to my day job.. SE / Architectural designer. Great succinct writing. The house I look after is big. I forgot to mention that it also has a large "garage" which has space for a few cars and a games room. That has it's own boiler that runs off oil. I think Clive's thinking was to have options.. switch from a big LPG tank to oil if the price changes. He really future proofed the place. But that comes at an upfront cost. @MuellarIn terms of protecting your asset (when you come to sell) then connecting to the grid, even if you have a small main fuse is probably the sensible thing to do. But you do have the standing charge. Much will depend on the value of the house cf the capex cost of connecting to the grid. That said if you are a bit strapped for cash then you could set up your own of grid system and get grid connected later, so long as you plan for it then you may have options.
-
Thanks for the heads up. I'll mull it over.. see if I can come up with a anything that may be worthwhile, most of you have already claimed the good ideas and given sound advice in my mind. For all. That's the great thing about BH.. the sharing of ideas, a bit of maths, design principles, Architectural, Goetech, Electrical ( long list) design, innovation and not being to afraid to be off the mark from time to time. I always appreciate BH as if you're a bit off or say something silly you don't get ripped to death.
-
Feel for you. Best to redo it in the long run.. unfortunately.
-
Hi all and @Muellar Here is a bit of a story but some ideas for you to have a look at. I'm and SE and Architectural designer but here is some of the stuff I've picked up along the way. Servicing a site can be expensive.. a decider often. I look after a house for a great friend who's husband died. It's around 500 - 600m^2 and well out in the country. We ( the husband who was the techy guy) both did a self build at the same time (mine was a lot smaller) but Clive (the husband) who was a scientist / technologist say like @SteamyTea and @Alan Ambrose were well ahead of his time and brought loads of info to the table as he use to work in Finland / Sweden etc. In some ways the bigger the house the easier off grid is to do. The house I look after also has some 5 acres of land so plenty scope to "do stuff". It was Clive that got me into UF heating systems /off grid stuff / electrical diversity and trying to get the maximum kVa out of a transformer on a pole that is several hundred meters away (voltage drop see later)... and that was 30 years ago. This worked for us as we were well out in the sticks and we use to have power cuts for days at a time when the temperature was regularly -15C and at one time hovered between - 19 and -23 deg for three days in a row.. even our drink froze / the diesel vans did not start, my German Shepard got a bit cuddly and that was a great experience big dogs are warm! This is the Scottish Borders I'm talking about when we used to get hard winters. Basically we flew by the seat of our pants and hoped it would work in the Scottish climate. We had no internet to research and a set of Y fronts each! they came before Speedos I think. .. for the younger these are male under garments that we use to wear. I'll come to the off grid stuff which I love later.. on my bucket list. Ok what Clive did was to have a LPG gas generator for when the power went off. My power cable which was right at the end of the line was a 95mm^2 aluminium three core cable, each core! What the electricity board was to connect all the cores together so we got single phase (220 -250 volt) but delivered through each of what could have been a three phase supply. This mitigated the voltage drop. But the big cost saving was me digging my own track and backfilling. DNO obligations, diversity and demand: My level of understanding is pretty basic @ProDave may chip in to clarify. Also @Carrerahill is off line at the moment, but I'll see him early next year and he does this stuff as a day job. Anyway @Muellar I would come at this from a different direction. Generally the cable that comes to your meter is protected by a main fuse. These tend to be sand fuses and work in a different way from everything after, usually the tails to the meter. I'll call it a sand fuse as there is a table in BS 7176 that lays out how they perform. @ProDave can you correct my interpretation if my laymans explanation is off the mark? Now lets say you have an 80 amp sand fuse. That is the one in the meter box that has a seal on it. Up stream you have a DNO cable ( belongs to the lekky board) which they are interested in protecting and everything up stream of that only. Your in house system is of little interest to them. Now a sand fuse / breaker does not blow like a fuse / MCB you have in your consumer unit. I'm trying to find the BS 7671 table but you could draw several hundred amps through a sand fuse over a few seconds before it blows.. and that is why you should not tamper with it!. Sand fuses work by heating up and then they blow, the sand stops the fuse blowing when say you blow a socket in the house and you get a surge of current.. but the MBC's etc on your consumer unit stop you getting killed as they trip quickly.. hopefully. The stuff in your consumer unit works on miliseconds.. the sand fuse in minutes. Now say you had an 80 amp sand fuse and you were drawing 100 amps.. it may last a few minutes before it blows. The whole objective of the leccky board fuse is to protect their equipment and not yours. Where I live here is a local transformer that has a fuse rated at 600 amps. but it I think serves 10 -15 houses. The electricity board apply diversity depending on the number of houses. Again their fuse at the sub station is not the same as the ones we have in our consumer unit. Ok lets put some sums to this and why. Copied from internet to be lazy.. In the UK, the declared voltage and tolerance for an electricity supply is 230 volts -6%, +10%. This gives an allowed voltage range of 216.2 volts to 253.0 volts. Now your supplier has a legal obligation to meet the statutory voltage range... and that is easier said than done! @Muellar this may lie behind the quotation you have. Try and get to the bottom of this. If you have long cable you get more voltage drop prid pro on on the cable area. It may not be the amount of kVa that is the sticking point... could be their obligation for voltage? If the cable is too thin / long it causes a voltage drop that could expose your suppplier to a claim if your appliances stop working. The sums are Kilo Watts = Volts * Amps. Say you have a 15 kVa transformer up steam. It's the current that overheats a transformer generally. How many amps could you draw if you were the only customer at 216 volts. ? 15000 watts / 216 = ~69 amps continuously... like for an 20 min to an hour say . Transformers are designed to cope with a surge in loading and that is why they are oil cooled and have fins for example. But if there are other folk using the same transformer it gets more complicated. A good example here is that you get a DIY guy that likes to do a bit of welding. They may be drawing a lot of amps but only for a few seconds. In summary I would try and understand what is lying behing the quote from the Electricity board. Most of their Engineers are quite helpful and will be happy to share their technical knowledge. You could ask the question.. can I have a 40 / 60 amp fuse, all sealed so it protects your network? Funnily they may be more than happy to engage once the find out your plans for off grid / with a bit of back up. They may support you a lot as they could use this as part of their environmental accreditation? Sell it to them! Write to the head honcho! Many ex council houses have 60 amp fuses so this is quite common. @SteamyTea has done a spread sheet on diversity.. but I would start with the main fuse to get this issue out the way and then you can play with you off grid stuff to your hearts content. To finish the DNO . I would love to have another go at doing an off grid house. OFF grid! Love this but the key for me is to do it and still be able to sell the house when you move on. Another poster has made the point that it is a neice market. True.. but if I was doing it I would keep it as simple and stupid as I can and keep some data on performance and an operation and maintenance manual. Make sure you future proof things like underfloor heating pipes.. the things that can't be easily changed. @SteamyTea Combined heat and power is fantastic. If you have a bit of ground then grow some willow, encourage wildlife and as it grows like fury it could well be enough to keep you warm in the winter. I'll need to stop here.. but @Muellar love your idea. Don't forget.. you can write to the head honcho of the leccky board.. lay out your case and they may suppport you! Get your ducks in a row and you may get a nice surpise and support.. this lunch won't be free but..
-
Often I may come over as a bit of a crusty / sceptical. In mitigation I designed and installed my first UF heating system some 30 years ago.. long before this came more main stream. I'm an SE and designer now.. still learning lots. But many of my Clients are folk that want to build say an extension (some are big mind) the odd new build and some really big barn / church type etc conversions. Most don't have a bean to rub together.. every pound is a prisoner! They have a mortgage and want to protect their asset. Often I say.... hey look you can have fancy controls, systems but lets also look at the value of these when you come to sell. Lets also look at the maintenance costs.. the reality of sticky valves, ducts getting clogged.. who can mantain all of that and at what cost. For example I have some Hive controls... nice graphs on my phone etc but if I want to move house it's difficult to transfer the ownership.. in fact a nightmare. Now many modern systems have software, controls that are difficult to maintain after five or so years. Now if you have plenty of cash to splash and want to make an environmental statement or just like techy controls then on you go as far as I'm concerned. If you are happy with the maintenance and potential loss of value when you come to sell. If that is what you want then I'll get that into the design. Mind you during the design process you may change your mind and come round to my way of thinking! Especially once we start to look at build cost /benefit in detail. This is a good point. Old crusty ends.
-
Now here is the rub. Personally I would live in a house that has some element of air heat recovery in terms of ventilation at a push. But not having windows that open is beyond comprehension. What happens when you have wet dog, want to dry some extra washing on the bannister..or just want a blast of outside air. This is not a home to me.. it's an extension of a crappy sanitized office. Ok you want to have MHVR and a wood burning stove. But I will bet my last cent that you won't change the rope seals every year on the stove door! A rope seal kit is about 12 -15 quid.. but most folk won't do it. As @SteamyTea says.. these wood burning stoves can be a killer. Always have a CO alarm in the room. Design your house and systems to last and look at think how you are going to maintain it and the cost of that. Be practical and not just aim to meet the regs. That is good design that will protect the value of your property and make your effort worthwhile and rewarding in the long term. Remember when you come to sell, some hard arsed surveyor is going to look at all this and may well write down the value if they can't understand what you are up to! This is not Fred Dibnah.. folk need to get a mortgage. Does any one think the same calculations and controls will work the same way in 20 years time? Any takers?
-
I love @SteamyTea post above. In a few lines he spells out what you need to do and why. Don't forget the saving that you will make on the standing charge for gas and electricity.. it maybe only a pound a day but that could pay for maintenance of a generator. changing the filter and so on. That's my tuppance! Combined heat and power (CHP)..it's a no brainer in my mind.. there is a massive amount of heat to be extracted from the exhaust gases of a generator. Mind you it needs to be done safely..I would make sure I put all that gubbens in an out house. I think this may be an advantage prid pro quo.. provided you design your house more as a box, like a long house.
-
My thoughts are. Safety on site is paramount. This is works on an old unstable structure and this happens in real time. Sometimes it is not possible to safely brace a structure during demolition and you need to take it down to ground level. This is good evidence of you working safely. Did you leave the existing founds and masonry below ground? If so then it is argueably a repaired wall rather than a new wall structure. Let's see that photo they have of a "cleared site".. to qualify as a complete wall removal they must have a photo of the ground from above.. rather than just one taken from an oblique view! Wall removal means all of it right down to the top of the founds! Complete removal means the founds too. Bet they don't have a photo of that! With my SE hat on. Now you have left your neighbour with a potentially un supported party wall. That party wall may have a chimney breast. If you are end terrace then your house (and the roof) may have been butressing the rest of the houses in the middle.. I could make a bit of hay with that as an SE. I would go back and distill down why you did what you did , why you did it (on advice from the builder and BC) and then maybe get an SE to back you up. If there is still some evidence that an SE can work with then they may be able to help. In summary I would get all my ducks in a row before responding to the council. Ideally any response you give has to force them to incur expense (eat into their time..) or take a pragmatic view and that will concentrate their mind. The low level planning / BC officers have managers who look at the cost / time sheets.
-
Recommendations please for “quiet” chimney pot top
Gus Potter replied to joe90's topic in Ventilation
Hi Joe. Have a look at how an OH cowl works. When you live near say trees and say have a down draft (positive wind pressure on the roof) the vertical sides still cause a draw due to the Venturie effect. It works in all directions wind. I think it's rare that these cause "whistling"

-
No because you have not provided any drawings! Fesse up and share your drawings. Folk will then chip in and in return we may also learn a bit from you. Them's the rule of the game!
-
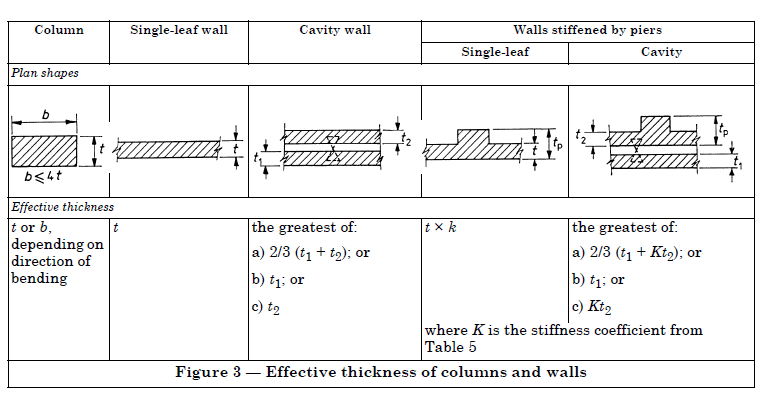
Good advice. In a standard cavity wall (say 50-75mm cavity) the two leaves act together. When doing calculations we derive an effective thickness of the wall. A bit like this bit from the the BS code. But the strength of the wall as @Iceverge say rapidly decreases exponentially the thinner the effective thickness. There are other kinds of masonry walls. Solid walls are say built with English Garden bond. These you can't really take down the inner skin in any practical way. There is a wall called a collar jointed wall. Here the cavity is no more than 25mm and fully filled with mortar. One key thing here (collar wall) is that the wall ties are much thicker and more robust. Ancon do a wall tie for collar jointed walls. A collar wall tied with the right ties acts like a solid wall so you get more bang for your buck. It's a good idea to value you time. £20.00 per hour seems reasonable. That's £160 a day. A trade rate up near Glasgow can vary from say £100-120 a day for an inexperienced labourer up to say 220 - 250 a day for a good experienced joiner( chippie)... more for a spark and techy folk. Now if that is all through the books and you are doing an extension there may be vat and an extra contractor profit / overheads to go on top of that. When you look at it this way it can be good or bad! If your time spent on site is doing some work then you win a watch. You efforts are tax free and not subject to contractor profit for example. Any time spent keeping an eye on the builder is still worth while as it can head off disputes and extra claims for cost later on. It can help keep the quality of workmanship up too.
-
True enough but we need a starting point. I suppose it's like asking a farmer for directions. "If you want to get to there don't start from here.."
-
Aye on the top line full poke for about half an hour to and hour but we have and always have has a contractural obligation to supply to the EU..so they take some of our power and leave us looking daft and our pensioners freezing. I studied this at uni and we have never had 90GW able to cope with a 4 hour peak supply under our own UK steam that was available soley to us without breaching our EU contractural obligations. We have signed up to make the French / Germans cosy! Now even if you take pure peak delivery. Some of that comes from the Scottish Hydro.. (pump stograge) but once the head water is exhuasted it takes time to pump back up... days The 90 GW is bollocks! @SteamyTea We do not have 90 GW reliable supply in the UK. It is far from a non story. We are in / close to shit street! For interest.. I worked on the construction of Torness Nuclear Station and then designed some stuff for the decomissioning of the Bradlwell Station. As a point of note. Biomass takes time to crank up.. oh like a coal station..it takes time to heat up. Wind turbines.. well you don't get peak wind over a whole large wind farm. Twenty years ago we had from recollection some 64 GW of balanced supply. There is no way that has jumped to 90 GW.. even if it had the transmission system has not kept up.
-
@SteamyTea Had to look that word up! In retort. Genetic algorithsims. I had a dabble in this at uni as we were looking for a way of getting to grips with cold formed steel distorsional buckling behavoir.. but the Yanks / folk in AU got there with a "simple solution" that did not require massive computing power. For the novice (me) mathematician.. we have numbers called imaginary numbers... it's to do with calculus... which us as SE have a interest in? For the remotely interested. An imaginary number is something we introduce to an equation at the beginning to make it work.. and at the end it disappears again! I'm not shitting you! And now you may be wondering why you trust folk like me to design your house! It's ok in my day job I'm grounded.

