MortarThePoint
-
Posts
2198 -
Joined
-
Last visited
Everything posted by MortarThePoint
-
Looks good and very neat PIR insulation
-
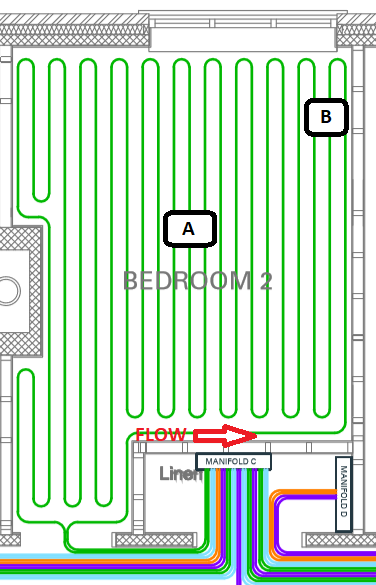
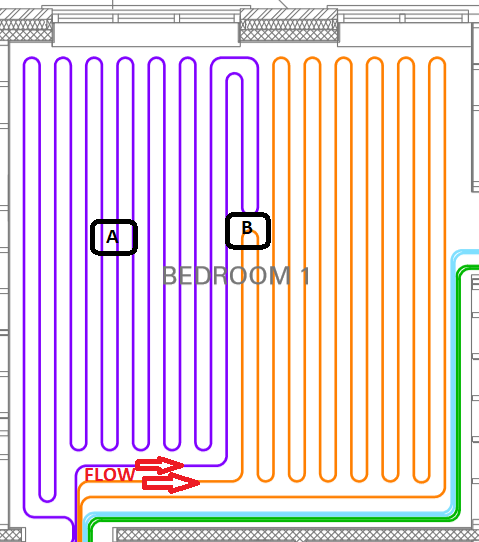
Easy when you know how! I'll have to avoid crossing over like you have as I don't have the mesh, but where I have serpentine pattern I can just go between two loops. I see you have put your sensor at the hottest point (B from my original post)
-
Cool, that allows fixing them if they break which is good. Can you recommend a type of pipe to use?
-
I've been getting my bits from WUNDA and wondered ( ? ) if their floor probes (aka Thermostat sensor) are any good? Being something that gets cast into the screed I can't change my mind later. Also, in terms of placement within the room. Should they be placed near the start of a floors circuit (B) or mid circuit (A)? Near the start makes sense to me as the purpose of the sensor is to protect floor finishes and so the hottest point needs to be detected, but I may be missing something. Finally, I also assume that the Thermostats can only take one temperature sensor input. @Nickfromwales Is the doctor in session?
-
Fan Coil Units for use with a (cooling) ASHP
MortarThePoint replied to ProDave's topic in Air Source Heat Pumps (ASHP)
This is cool, literally. If just looking to cool the floor, is it just a matter of having the right ASHP? Sending 15C water through the UFH pipes feels pretty low risk from a condensation perspective. If concerned by condensation on the manifold, one can always run a separate dehumidifier nearby or perhaps just a fan blowing over their surface. -
Fan Coil Units for use with a (cooling) ASHP
MortarThePoint replied to ProDave's topic in Air Source Heat Pumps (ASHP)
What flow temperature do people use to cool their UFH? I'd imagine wanting to use a higher temperature (to avoid condensation) than an air blower would need. -
Castellated panels will likely 'breath'
MortarThePoint replied to MortarThePoint's topic in Underfloor Heating
Those are around 1.4 kPa of screed weight. -
Castellated panels will likely 'breath'
MortarThePoint replied to MortarThePoint's topic in Underfloor Heating
I agree and the leakage is what will allow it to 'breath' and push air in and out of the living area. Yes, it's nothing. I'd prefer that to the air going in and out. -
Castellated panels will likely 'breath'
MortarThePoint replied to MortarThePoint's topic in Underfloor Heating
But unless there is a sealant, it's going to leak out. If not, it would raise the floor by approximately (1/20) * 25ml / 7cm * 7cm = 1/40 mm which is admittedly tiny, but probably enough to open up an air leak to release the pressure. -
I hate working this sort of thing out as sometimes ignorance is bliss. For a gas, pressure (P) is proportional to temperature (T) in Kelvin for a closed volume. Therefore if there is a dT there is a resulting dP. With the UFH off for some time the floor will be at the same temperature as the room. With it on, the temperature will rise above the room temperature by dT (e.g. rising to 36C giving dT=15C=15K). That's going to create a pressure difference of dP = (15/300) * 1Atm = 1/20 Atm = 5kPa in any air trapped below the floor. The weight of 50mm thick screed is around 2.4kg/m3 * 0.05m * 10N/kg = 1.2kPa. Presuming a continuous air gap under the screed that would lift the screed if it didn't leak out, so it will leak out. That's tiny you'll think, but most castellated panels increase the volume of air involved greatly. The volume of the castellation and ridge per unit cell is probably around 25ml (a shot glass) per 70mm x 70mm unit cell, so 5.1l per m2. So, a 20m2 floor will breath 5.1l per cycle. So what? I don't know, but I thought it was interesting. I had planned to glue down my castellated panels, but this makes me think of the air going in and out pushing out any warmed up fumes from the glue. Probably no biggy as the temperatures aren't very high. Has anyone thought about this before? @Nickfromwales you normally like talking sense against this sort of nonsense.
-
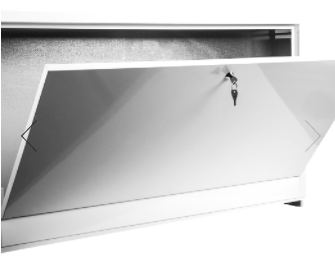
My manifolds are all going to be in cupboards, so is there any point in putting them in manifold cabinets? I can see them being useful if in a rental property (locked) or having the manifold in a room not inside a cupboard. The only reason I can think I could justify using one is to save the manifold getting knocked by someone tossing Henry (or Harry) into the under stairs cupboard. I don't think it would stop spiders of dust. Does it look unprofessional not to have one? What did others do?
-
So just to be clear glue only, no screws or bolts?
-
Poor guy, but hopefully he saw the funny side eventually.
-
I just found this link too: https://www.sunamoon.com/articles/fix-down-toilet-without-screws.htm CT1 looks good. I had a friend you sat on the toilet and it sank through the floor. When he subsequently flushed it went everywhere. All round at a new girlfriend's house. Didn't put her off though as they are now married.
-
Can a glued down toilet weather the storm?
-
Anchoring studding sole plate to concrete
MortarThePoint replied to MortarThePoint's topic in Timber Frame
Unless you're Jim in American Pie -
I think I recall someone saying somewhere that they had glued their toilet to the screed rather than bolting it down. This is of interest to me for two reasons: Allows UFH pipes to pass below. In one place I haven't finalised the toilet position Safer over any membranes If glued down, is there any way of getting the toilet unstuck without smashing it if you need to remove it later?
-
Anchoring studding sole plate to concrete
MortarThePoint replied to MortarThePoint's topic in Timber Frame
Thanks Markc, Can you recommend a glue for metal Frame? I was worried that the smallest amount of water would cause the galvanising to whiten and I think I recall it being pretty easy to pull that off. -
Anchoring studding sole plate to concrete
MortarThePoint replied to MortarThePoint's topic in Timber Frame
Do you think this would work with a metal frame partition? -
En-suite loo position - an unholy convergence
MortarThePoint replied to MortarThePoint's topic in General Plumbing
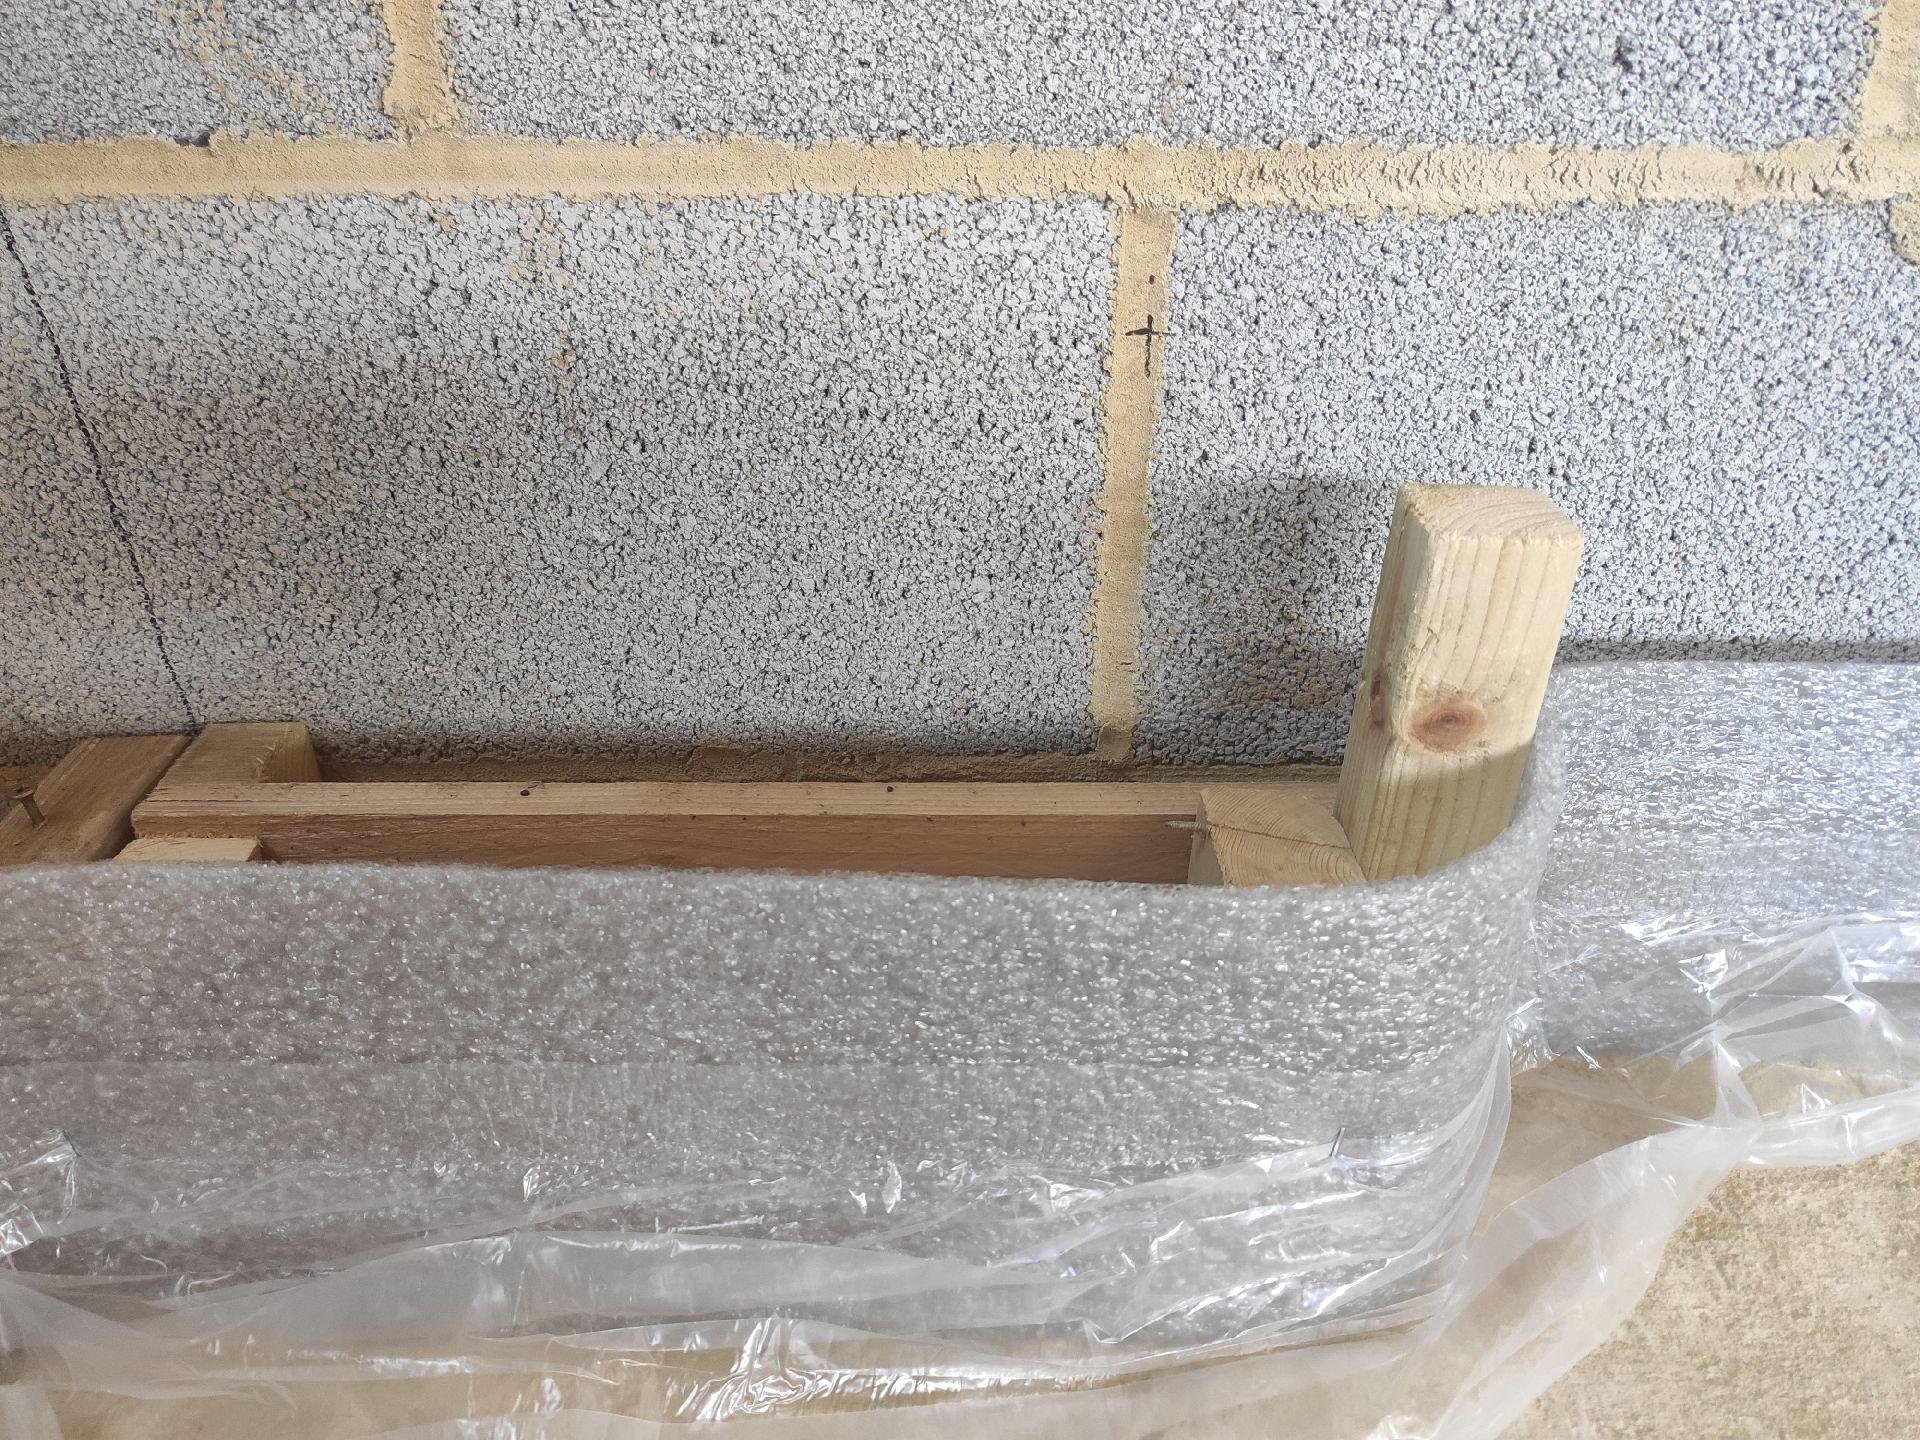
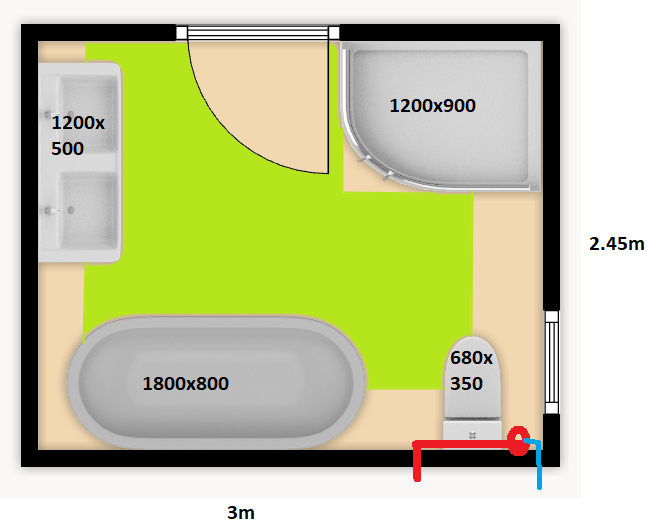
Some photos. In the one from above you can just see a line 450mm from the side wall and a second 450mm from the top wall. They mark the edges of the currently proposed UFH layout (green in previous post). The second photo shows a pen X on the wall which is in-line with the waste of the toilet the other side of the wall.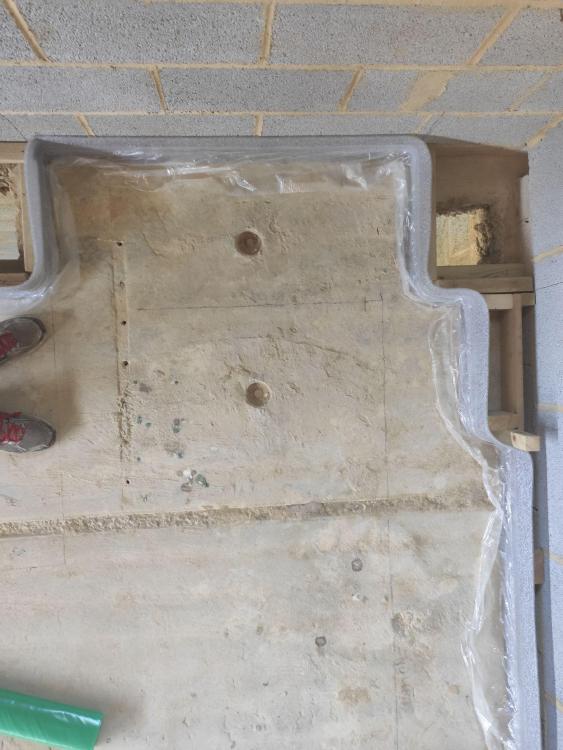

-
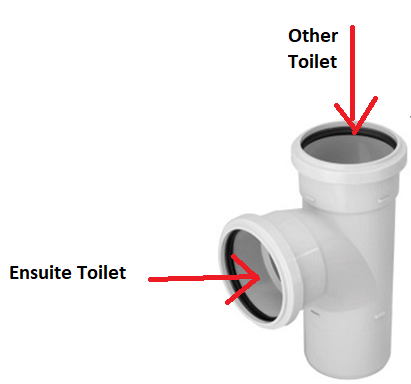
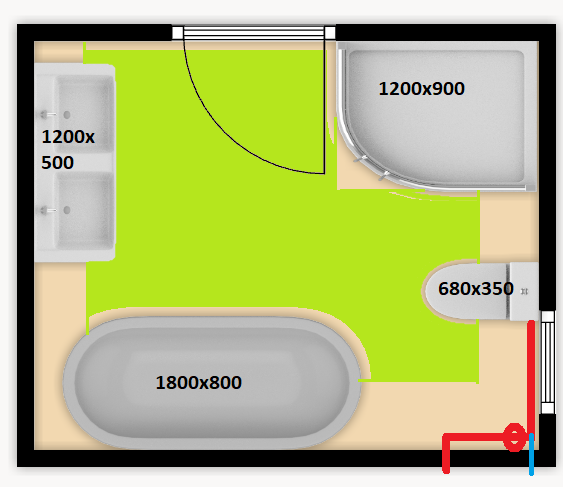
I know all of these sorts of things should be worked out way in advance but... I am struggling with the placement of the loo in our ensuite. There are a few pipes that need to converge to then pass through the concrete slab floor (first floor). 2no. 100mm toilet pipes and 1no. 40mm shower waste. The overall size of the ensuite if 3000mm x 2450mm. The ensuite layout basically comes down to two options shown below. I am laying the UFH (water based) and need to finalise the position as to keep both options alive but than risks cold feet whilst sat on the loo. I can't get the UFH pipes to close too the area where the toilet mounting screws will go as that's a recipe for disaster. I have shown the current UFH planned area in green in the layouts below. I don't think I can extend the pipes to create an area to heat the right foot in the second layout due to the mounting holes of the toilet. I think the second layout would need a T-junction mounted on the rear of the ensuite toilet (see image below of what going in where) and there would be a minor heights issue as the other toilet's waste will need to have dropped due to pipe fall, but I think that's only within tolerance though so should be fine. I'm not sure how I would join the shower waste that's coming through the wall though. I could just send it through the hole in the floor and join lower down which is where the ensuite shower and bath wastes will be joining having passed through their own holes in the floor. I may have to have push the loo away from the wall and have a box that goes as high as the top of the ensuite toilet cisten to buy some space (?) Holes quite forward: https://www.victorianplumbing.co.uk/burlington-close-coupled-wc-ceramic-lever-flush-bur-p5c1 Holes towards the back, perhaps 300mm forward of wall: https://www.victorianplumbing.co.uk/melbourne-ceramic-wc-pan-cistern RED: 110mm soil pipe coming from toilet mounted on other side of wall so at it's exit height. BLUE: 40mm shower waste pipe coming through the wall at a height of "in the screed".
-
Anyone used Tradeline or Libra Resilient Bars or MF?
MortarThePoint replied to MortarThePoint's topic in Sound Insulation
This is Libra: https://www.abcdepot.co.uk/libra-resilient-bar-3000mm.html I bought 100 lengths so that may have helped. -
Anyone used Tradeline or Libra Resilient Bars or MF?
MortarThePoint replied to MortarThePoint's topic in Sound Insulation
Have a look at abcdepot, but I got it from Travis Perkins -
Cool. How did you do joins in the membrane?
-
@joe90 did you just use duct tape to secure your membrane to the perimeter insulation skirt?