MortarThePoint
-
Posts
2198 -
Joined
-
Last visited
Everything posted by MortarThePoint
-
75mm < required 125mm minimum noncombustible depth
-
It's not fully below slab, but comes to the surface. It will then have a noncombustible 75mm over the top. Looks like Knauf do mineral wool perimeter insulation so that could work but it expect the screed would soak in.
-
Back wall is brick so not getting plasterboard. I'm supposed to have something between the screed and wall to cope with 'expansion'. Sure it doesn't need to be thick, but should be noncombustible which the foam isn't. Is there something thin and compressible that is? I thought of trying to creat this with wood sheet. 'oilboard' could be an option as has a smooth face, but I have to be certain I can get it out afterwards so I'd rather something noncombustible I can leave in.
-
I think I need something there for expansion
-
The depth should be fine, it's round the edge between wall and floor I'm concerned about. I've seen some links that say 125mm depth for constructional hearth and I'll have that. One WBS will definitely be 12mm compatible but not certain of the other.
-
We've two fireplaces to receive stoves (WBS). Screed going in very soon and finalising UFH in the rooms. Am I right in assuming Cemfloor will be fine here? There will be an additional hearth material laid on top (e.g. 75mm stone).. I have standard expansion perimeter strip elsewhere, but what should I use in the fireplace? It needs to be noncombustible for around the fireplace.
-
Can't build house so making shepherd's hut / site hut
MortarThePoint replied to MortarThePoint's topic in Garages & Workshops
Just a large pile of wood and relocated chassis. It's now a post build project. -
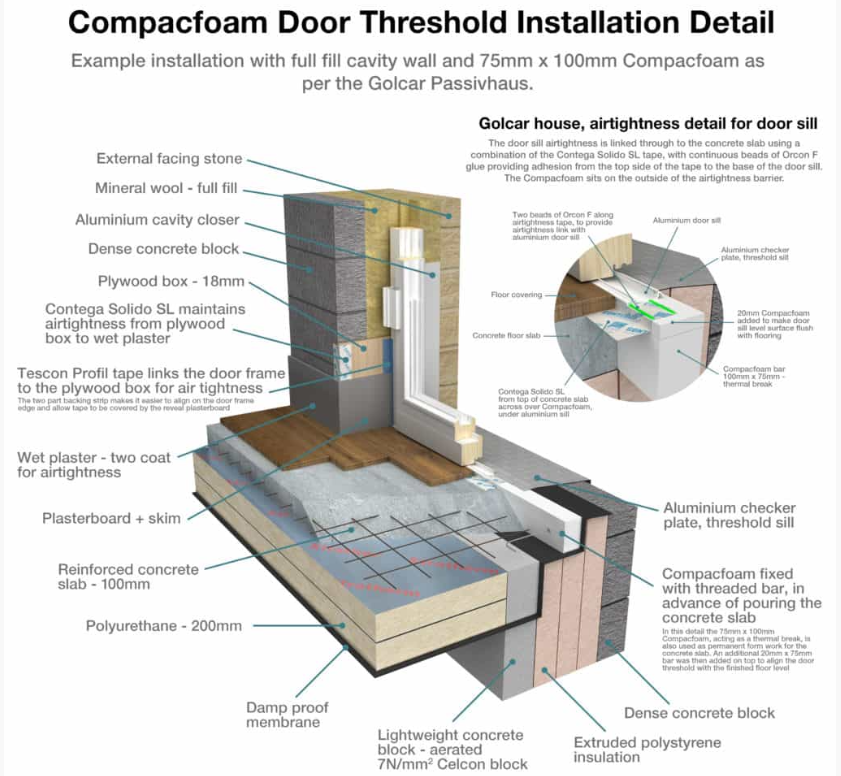
What goes under the door sill?
MortarThePoint replied to MortarThePoint's topic in General Construction Issues
In the spirit of over engineering. I could use both. The slate would serve well to spread the load as well as adding stiffness. I'd need something thin and compressively strong between the slate and the HardieBacker. I wonder though if this concentrates the stress on the screed at the end of the slate? Would it want to crack between the two Es of SCREED? Not is there's no movement going on I suppose. Should convince the wife that a slate floor would look nice. ?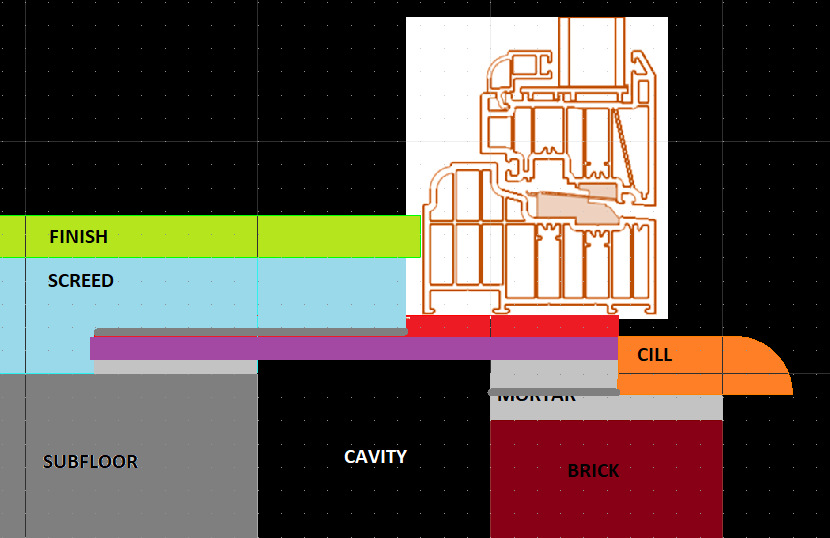
-
What goes under the door sill?
MortarThePoint replied to MortarThePoint's topic in General Construction Issues
Reconsidering slate as I have some on site: Rearranging the equation for Flexural Strength, the fracture force is F = (2 * width * thickness^2 * flexural_strength) / (3 * span). Popping some numbers in: thickness = 0.005m (roofing slate is 5 - 7 mm thick) width = 100mm = 0.1m (complicated this as there is obviously more to the side of the loaded the area, but if there is load spreading under a point load...) span = 100mm = 0.1m flexural strength = 50MPa (various sources state a range of 50 - 80MPa, link, link) This gives a fracture force of F = 833N = 83kgf. Almost identical. Thermally, the thermal conductivity of slate looks to be around 1.6W/mK so 10x more conductive then HardieBacker and being half as thick it will be 5x overall. That's a shame. Despite the worse thermal properties I am tempted by slate as I expect it is stiffer and probably more usual to find in this sort of position. I know that it behaves well with mortar too. -
What goes under the door sill?
MortarThePoint replied to MortarThePoint's topic in General Construction Issues
CompacFoam appears to be an option when you have a thicker slab rather than just a screed. Included here for anyone who's interested. https://www.greenbuildingstore.co.uk/products/compacfoam-200/#prettyPhoto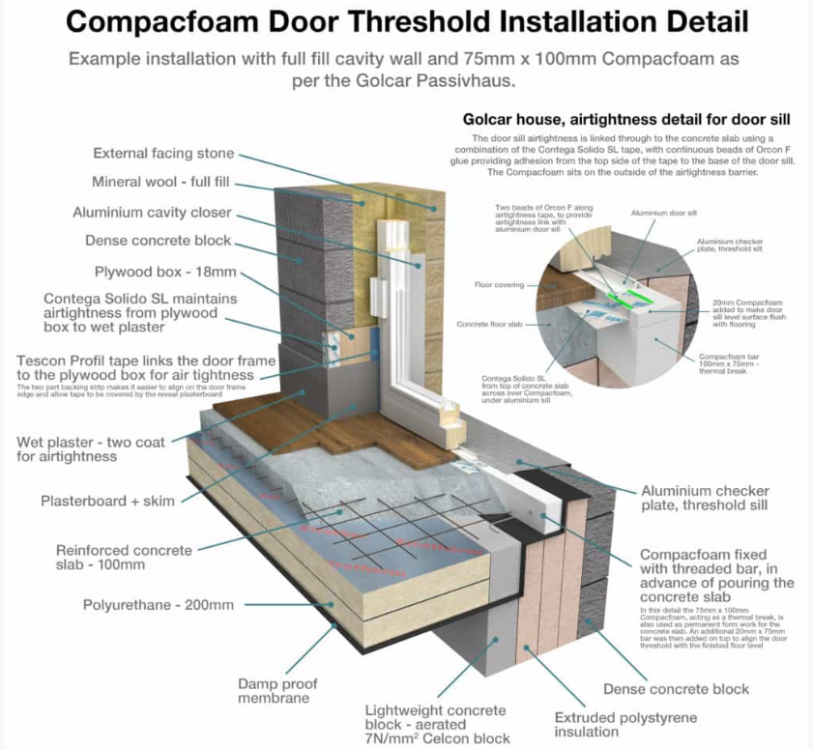
-
What goes under the door sill?
MortarThePoint replied to MortarThePoint's topic in General Construction Issues
I can't do that unfortunately as my insulation is underneath the concrete subfloor (precast Thermabeam). Looking at the datasheet, HardieBacker looks like a good option. Below is the table relevant to the HardieBacker 500 Cement Board which is 12mm thick. It has pretty high flexural strength, 2x or 3x that or cured screed. Purenit (datasheet) has a compressive strength which is only 4% of HardieBacker, so it's flexural strength will be poorer as well. Halving the thickness of a bending member reduces is stiffness by a factor of 8 and its strength by a factor or 4, so even though the HardieBacker is half the thickness of 25mm Purenit, it would have about 6x the strength. Rearranging the equation for Flexural Strength, the fracture force is F = (2 * width * thickness^2 * flexural_strength) / (3 * span). Popping some numbers in: thickness = 12mm *(100% - 6%) = 0.01128m width = 100mm = 0.1m (complicated this as there is obviously more to the side of the loaded the area, but if there is load spreading under a point load...) span = 100mm = 0.1m flexural strength = 10MPa (this was the stated requirement and the result was higher) This gives a fracture force of F = 850N = 85kgf. Great, that should strong enough! A bloke in high heels can stand on the centre of the cavity and not crack it. Thermally, it has half the thickness of 25mm Purenit and about twice the thermal conductivity, so same result. The Psi-value would probably be something like 0.19W/mK * 0.012m / 0.030m = 0.08W/mK. That's better than most lintels (0.3 to 0.5 W/mK). So if 2.4m long and a 20C temperature difference, it will conduct 0.08W/mK * 2.4m * 20K = 3.8W of heat. I used 30mm as the length of the bridge as that is the distance between the warm screed and opposite cavity edge. It's even thin enough that I can get a nice bed of mortar under it on both sides. Would be cool if you could get it in ~225mm wide strips or ~225mm square tiles, but it should cut easily.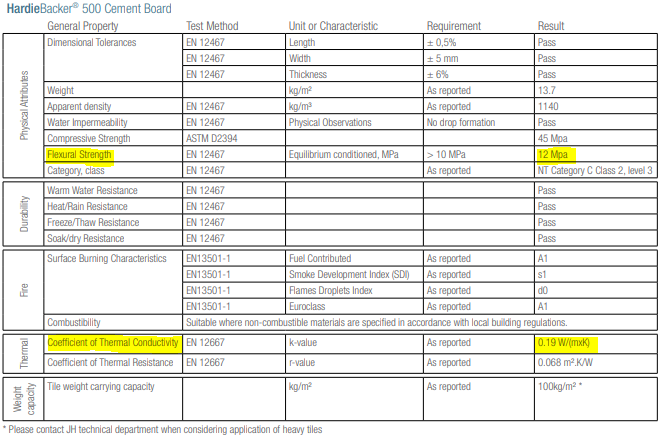
-
What goes under the door sill?
MortarThePoint replied to MortarThePoint's topic in General Construction Issues
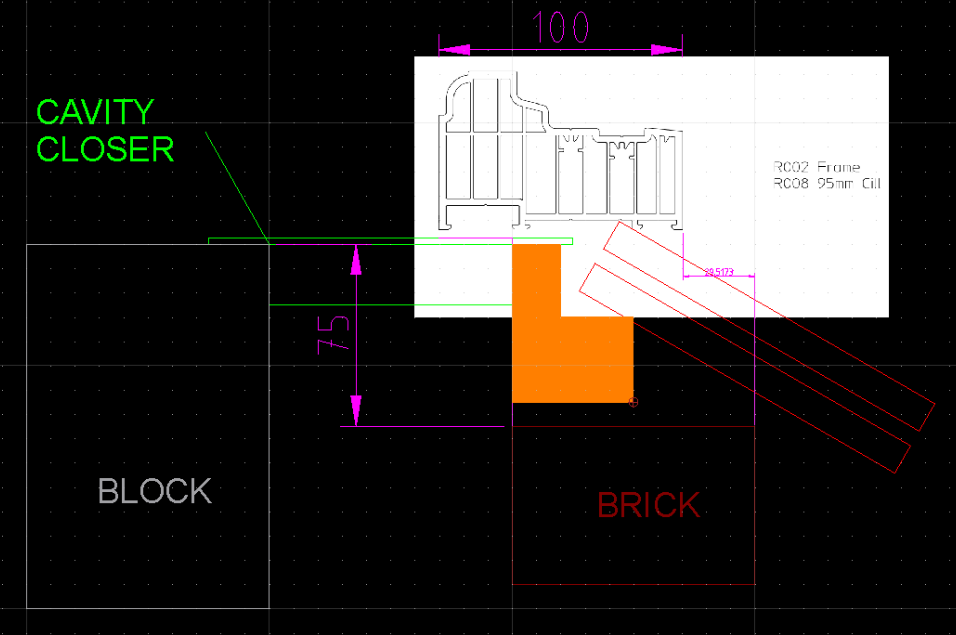
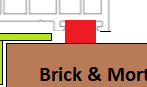
I think I may have enough height for something sensible to bridge the cavity. Not sure what, but the image below shows the structural material in RED bridging the cavity. Some candidates: Purenit, ideally 20mm or less bedded on mortar on the Subfloor and outer leaf brickwork. Slate, plenty of space for slate. It forms a cold bridge but not much of one in comparison to all the people that just bridge the cavity with screed. Hardie backer type cement board A metal sheet ~3mm thick It would be great to be able to use something like wood that could also be cut to form the cill, but I think the rot risk with wood is way too high. Is there a nice structural, hydrophobic but paintable, easily machinable and cheap material that I could use here?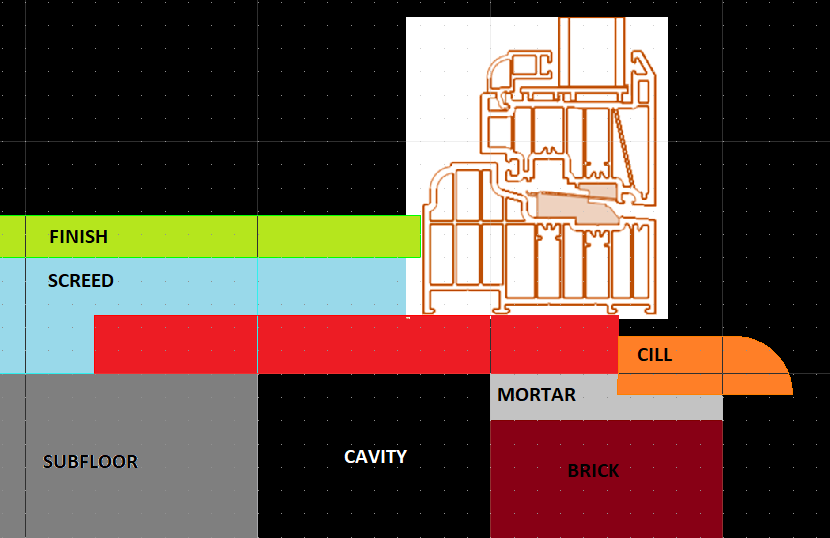
-
Interesting, so is that an Aluminium/Plastic/Aluminium sash with timber frame? Makes sense to have no sealant past the end of the timber frame. Does leave a bit of a spider home, but spiders are good.
-
But the cavity closer needs to support the frame. Would be easy if I was just trying to hold the closer itself up. Or do you think the frame would be self supporting enough from the side mountings?
-
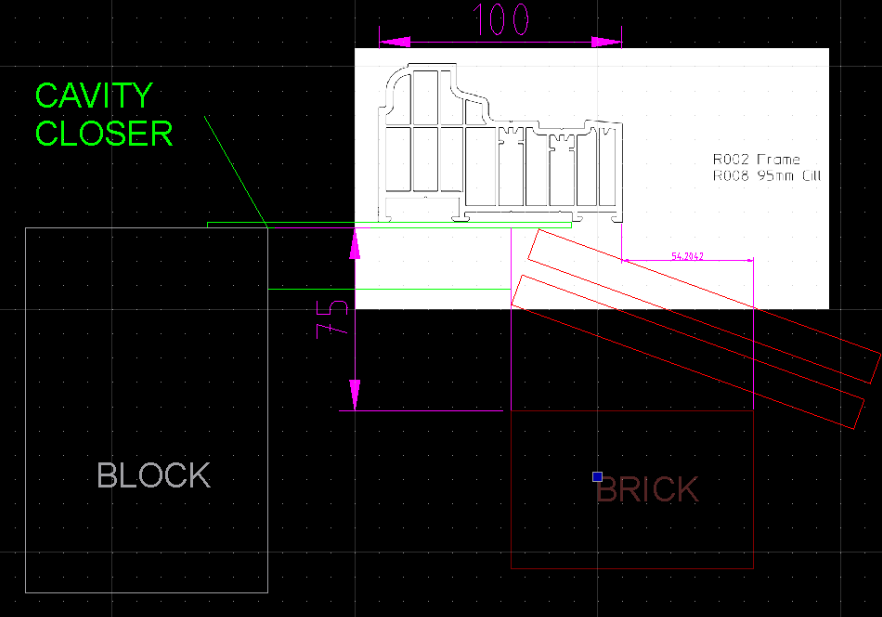
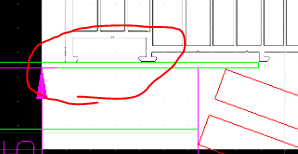
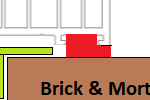
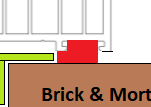
This is getting annoying complicated now. The technical guy from Cavalok is on holiday, but I suspect he'll just say that the cavity closer has to be supported by a brick. Below is the original plan with the frame shown against the cavity closer, though in reality there will be a packed out 5mm gap there. The front face of the window is 54mm behind the face of brickwork. The point of support of the window frame will be the two barbed sections along the interior face of the window (circled in smaller extract below). An option that comes to mind is to use a piston brick to support the cavity closer. This would require the window to move outward and the tile angle to be steepened. It could perhaps be cut from a standard pistol brick or be fully custom. A benefit is it throws in an alternative to the batten that is usually used to get the tile angle. It places the second frame ridge (as you head from the interior) above the brick so Cavalok will probably prefer this. I have shown the arrangement with a standard pistol brick below in ORANGE. If we angled the cut on the standard pistol brick slightly it would make room for the window to move back about 10mm. I have spoken to a brick fabricator and to cut a pistol normally costs £1 each, but with the additional cut it would be more like £1.30. Pistol Brick:
-
It's Cemfloor Therm which is cement based liquid screed able to walk on after 24-48 hours. I had considered Thermio+ which is an Anhydrite screed, but I wasn't keen on it's durability against water and the latiance which I was quoted £720 to remove. I could have gone thinner with Thermio+ (above UFH pipes: 20mm vs 25mm), but I don't consider that an issue. Similar, but Cemfloor Therm has a better thermal conductivity (2.9 vs 2.5).
-
The screed is in and looks awesome to me. The pressure rose and I let a bit out (into the capped off end of an isolation valve). My gauge only goes up to 6bar and It maxed out during the pour having started at around 4bar. I'd guess it got up to 7 or 8 bar, but that's a guess. Back down now. I'm really impressed with how flat and level it is. I've put my 2m level down in a number of places and can't see any real gap under it. There are a very small number of bumps that are kind of like a piece of aggregate causing a 1-2mm hump about 5mm wide. I'm sure those are super easily sorted and I'm pleased. Thanks for the help getting ready for it ?
-
Different people seem to interchangeably call them fixing lugs, fixing cleat, fixing clips and fixing straps, but they all seem to be the same thing which is a piece of metal clipped and/or screwed to the side/bottom/top of the frame which then gets screwed to the structural reveal. One installer I spoke to thought the standard ones (1mm to 1.5mm thick) weren't substantial enough so uses 3mm joist straps which he cuts to size. I digress. It's obvious how you pack a frame when you are using the 'screw through frame' mounting method, but how do you do it when you are using fixing lugs? Do you just squeeze them in and then silicone them in place? I have Cavalok cavity closers so the windows sit mostly over that, with perhaps 15-20mm extending out exterior of that. That 15-20mm is where the Compriband TP600 / Bloco 600 / EXP6 is going to form my weather seal. So ultimately the packers need to go between the window frame and the Cavalok cavity closer. Hmm, hope there isn't too much movement to the Cavaloks! Should I use a glazing shovel to pry the gap open slightly and squeeze the a packer in? Frame packers are different to gazing packers as they are U-shaped designed to go around the through frame screw. That seems less relevant when the screw is elsewhere.
-
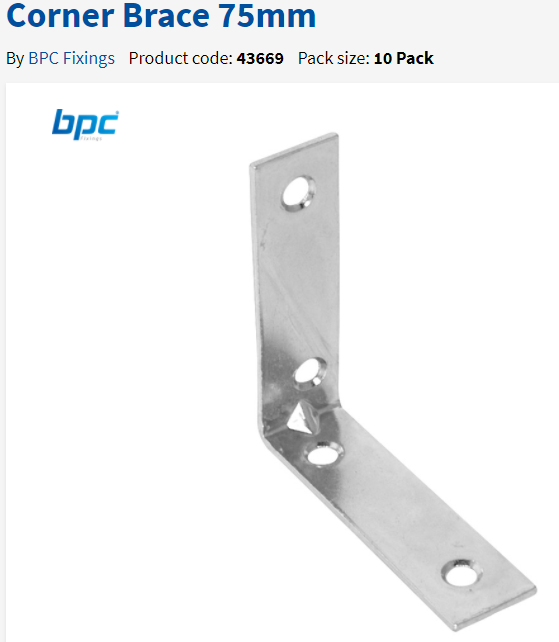
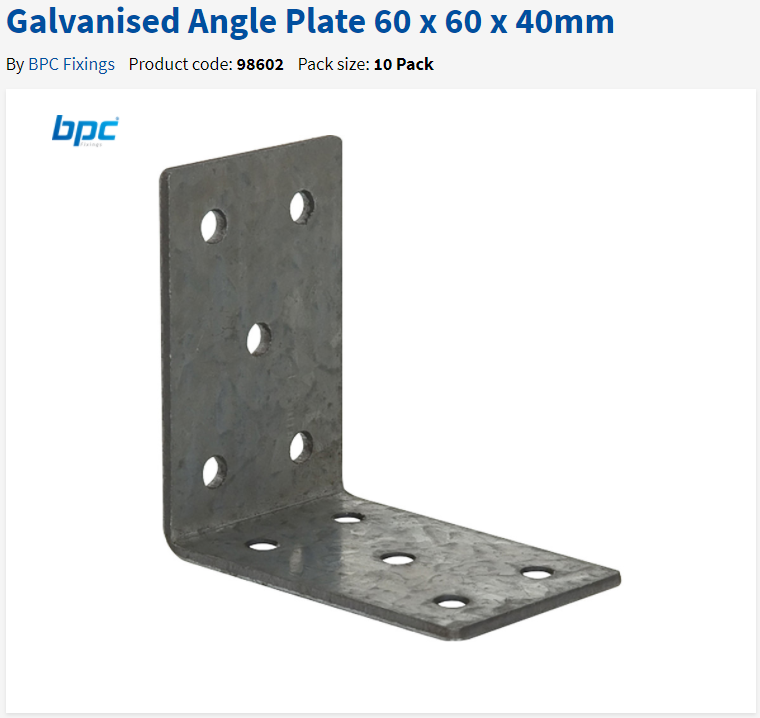
I think I have a candidate for option 3: https://www.toolstation.com/corner-brace/p43669?utm_medium=feed Put in at ~300mm centres they would provide vertical support to the cavity closer. These windows are about 10kg per 300mm so that's quite a load. The inner leaf would take about half that, so each of these would need to be holding up 5kg through a single screw hole (lower one will be below cavity closer). More expensive alternative that my not be quite high enough but has more holes: https://www.toolstation.com/galvanised-angle-plate/p98602
-
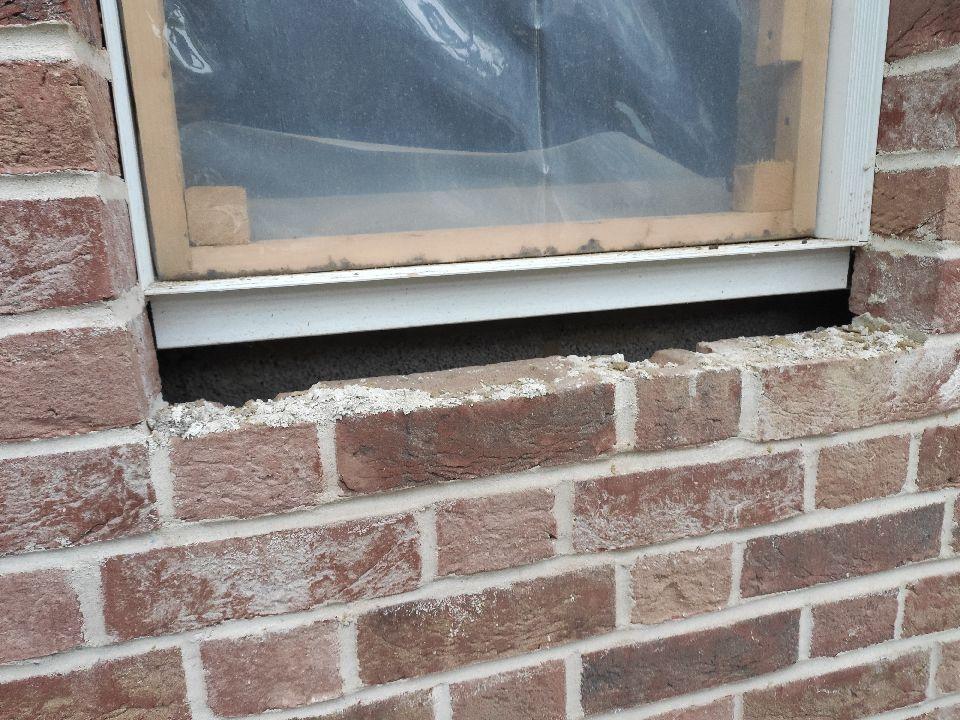
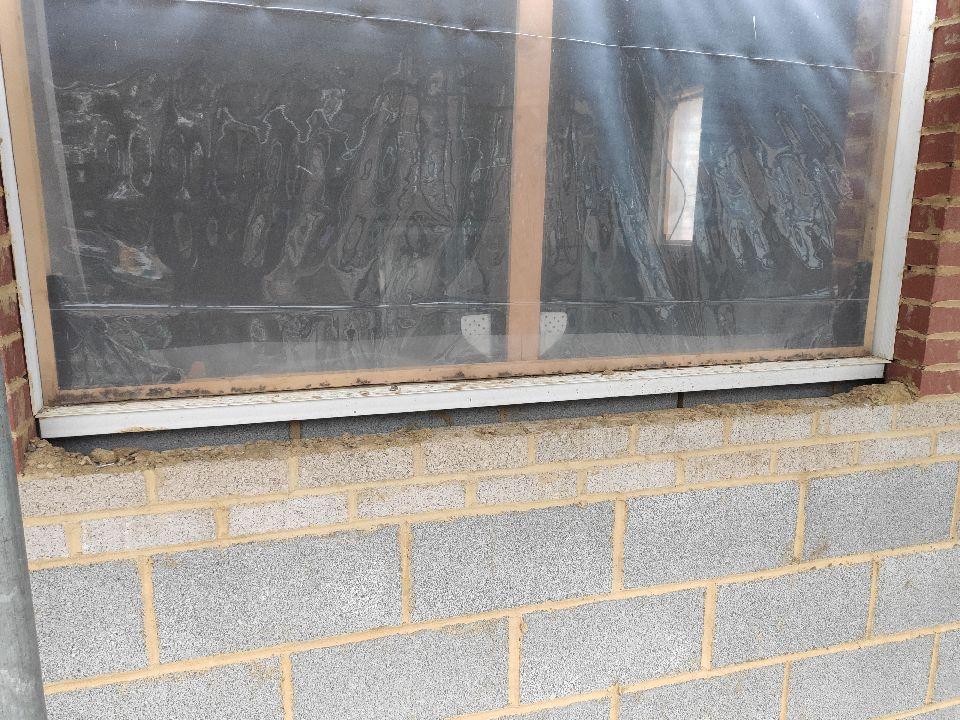
Here are some photos to help see the issue. The first is only 620mm wide so not much of an issue. Being a lighter window and not much distance to the Cavalok cavity closer's corner it won't twist much. Packers at the bottom near the corners and packers + fixing lugs at the sides, job done. The second photo is more of an issue, 1800mm wide. Cavity closer isn't so stiff against twist at the centre is far from corners. Packers at the bottom near the middle will twist the closer outwards. Solutions I've thought of so far: Put temporary blocks (wood) under cavity closer to support against twist until creasing tiles added later Screw top of window frame to underside of steel lintel. This would provide vertical support, but put the frame in tension not the normal compression. I would need self tapping pan head screws long enough to go through the frame and at least 15mm further (5mm gap + 10mm into lintel). Probably means a 70mm screw which difficult to get so may end up as "woodscrews". Imagining that a approx. 75mm high galvanised L bracket exists that I can put a few in. The vertical part would screw to the fat part of the cavity closer and the horizontal part would screw to the top of the bricks. Google waits. I don't think it's an option to just support the bottom in the corners as the window will then sag in the middle. Longest window I have to solve this for is about 2.5m wide.
-
Fitting windows now. The tile cill is to go in after (recommended by Brockie) Wondering what is going to support the window at the bottom though as the cavity closer is only supported by the inner leaf. Packers between the frame and cavity closer would be normal I guess but the cavity closer isn't fully supported.
-
Sorry forgot that. So that leaves a pocket 12mm by about 40mm around the window. Are you sealing that off with anything or leaving it open to the outside?
-
Most people use low expansion spray foam I think, but I'm going to try an expanding foam tape. As you say the airtightness is then done separately. Thanks. Did you take your tape yo flush with the front face of the window or still recessed behind? The second being either filling a groove or overflowing behind. If not groove, I guess its a matter of how close did you get to the front face of the frame?
-
That's not so encouraging ? The Iso Chemie Bloco 600 is '10 year performance guarantee*'
-
I also see that Iso Chemie make Bloco 600 which appears Similar.