Big Neil
-
Posts
594 -
Joined
-
Last visited
Everything posted by Big Neil
-
I have various wall posters and other such articles suggesting fit out routes, but having read them before one thing that always struck me was that they seem to be written for people who largely already know what they are doing.
-
I hadn't considered that Fair point I probably wasn't clear enough i sort of mean to do the cable/pipe bashing bit of things before any ceiling went up such that it could be picked up easily once upstairs. My thoughts sort of went towards passive slabs, where if my understanding is correctly everything pops up from under the slab through ducting. I thought a similar approach might work My thought on this was that if you do this first, you either have to go for a UFH system above the subfloor thus reducing room height, or you have to put the spreader plates in from below. I would want to remove any reaching above me as far as possible. Plus when it comes to installing things like those downlights, you're working more blind than if you had an open space below you. Does all this make sense even if I was thinking wrong.
-
..following on from part 1 of course. Now that you have downstairs all boarded, skimmed and painted with all lights in, lighting circuit to be powered to test firstly but assuming all working to provide good light for working downstairs. All sockets for electric, network etc can now be fitted. Upstairs now fit any insulation in the floor void as already decided and install the wet UFH system assuming spreader plates and connect to manifold held in place teporariliy against a joist. Now board out upstairs whilst ensuring sufficient marks are made that when installing stud walls, UFH pipes are not compromised. working platform now in place. Stud walls up First fix upstairs electrics and plumbing. Board out Bedroom number 1 including ceiling. Work around edjacent rooms installing insulation to dividing walls and immediately boarding thereafter. Continue in this fashion until all bedrooms/dry areas are completed. Now following same process with bathrooms/ensuites/weteroom etc. Following same process as in part 1 and have all areas skim coated where required and paint. Also as per part 1 drill all holes for lighting and fit downlights in place, GO into attic space, connect lights and test soooooo - I know there are a load of other steps, but i just wanted to understand if what i've described is feasible as an option or there is an issue with it in some way?
-
So i guess this applies to any type of build method but I'm specifically thinking of ICF at the moment, just so we aren't all thinking at cross purposes. Example; Walls up and poured, first floor posi joists in. rood structure also on and waterproofed, and works going on externally. Doors and windows fitted. All (hope i use these next two words in the correct context) 'first fix' electrics and plumbing completed (what i mean just in case is all cable and pipes run to appropriate positions including soil pipes). Ground floor UFH laid if not done within slab and screed poured and cured fully. Would it be completely bang out of order at this point to now plasterboard and skim the downstairs entirely including the ceiling, spray paint when dried (lets say all walls and ceilings in white for the time being). At this point (assume all downstairs lights are downlights) go around and mark positions for downlights then follow along with a hole cutter and create the holes. Slot in all downlights then go upstairs (which remember is currently just an open void), and connect them all up. I know this might sound like an odd idea given there are no floorboards up there at the moment and no dividing walls (although i have an unusual idea of how to mitigate the normal lack of working platform). My reason behind the thought process above, is based on knowing my own skill level firstly and secondly trying to organise internal works in a fashion where you aren't working AROUND other things more than necessary. As a complete amateur when it comes to house building it strikes me that if you can concentrate on one thing at a time and make sure it is out the way and doesn't need disturbing again, that's likely to result in a better quality product with less comeback. Part 2 coming as I didn't want to make this any longer than it already is
-
Floor plan — comments welcome
Big Neil replied to Dreadnaught's topic in New House & Self Build Design
If it's only a 2 bed for now, might there be anything to be gained with chopping out the communal bathroom, throwing another en-suite at it and then moving things around with that in mind -
You probably all were aware anyway, but I came scross this company who have neet little links to free ticket registration pages, knock yourselves out. https://www.fleminghomes.co.uk/events/
-
Has anyone whether on a build they have completed or as an exercise for one in the future, taken a record of the embodied carbon involved in all material and transport for their project. Never mind about carbon cost to run, i mean (fingers crossed hoping i've used the word embodied in the correct context) to produce the materials used to build the place and transport all that to site. Maybe even to include an allowance for the labour element, so their vans/trucks etc.
-
ahhhh - the other side of the river. Near/not far from Martlesham if I recall. Enjoy the search
-
From vague recollection Great Horkesley and the surrounding areas had a few self builds scattered around it from the time I lived there. Mind that was more than 10 years ago now, but it's a quiet enough area with good links and it's right close to Colchester
-
Welcome Paul, Welcome. Whereabouts are you thinking of looking for land,any ideas yet?
-
Fair point on the lack of cranes, but i guess there is still an absolute f-ton of waste in the shuttering, where if the whole thing were ICF you wouldn't have plus would have no need to install insulation after the pour. I assume it is still braced underneath the roof section I might look into it more during the start of the new year some time.
-
Not sure i see the point in that spider tie method that wouldn't be just as well achieved with say precast concrete panels.
-
non autoclaved concrete
Big Neil replied to scottishjohn's topic in Insulated Concrete Formwork (ICF)
an interesting application of existing technologies certainly. I just don't see that it overcomes any problems particularly. Plus think of how the material will balloon. When it gets to the top of the structure you'll either need to trim or pour in another material which doesn't expand, to get a level surface. I Do think there is an interesting question here about why such technology isn't being used to create aircrete blocks already. Seems if they have similar or identical properties to AAC blocks as are currently available, the embodied carbon used to make them would be lower on the basis of not needing to power autoclaves to do the baking -
Actually Russell you've highlighted as an issue something i hadn't considered, that being experience. I saw that they existed and just wondered why they didn't seem to be getting used more. I was random you-tubing the other night and my interestet was grabbed by the attached video.
-
Particularly I guess to those of you using ICf systems for most of the house, have any of you considered ICF roofs? If so and discounted, for what reasons??
-
I guess for me it's just another of those things I need to get over. I'm just struggling with it at the minute because I can't picture a circumstance in which concrete might crack but i'd be ok with it. Also no-one seems to use micro-rebar much over here where it seems a bit more widespread across the pond.
-
Seems like a prudent thing to do even if the SE doesn't require it. @Vijay other than around the openings and as you have described above, are you throwing any reinforcement at it. I know polarwall don't require it, but I can't myself get away from thinking that there's no harm in (figuratively speaking of course) throwing some in there, with the guidance of an SE, as a belt and braces approach.
-
bang on taaaaaaaa
-
Morning one and all. For anyone who has already poured or are planning to for this construction type, in stages, have you employed a mechanical method to tie in one pour to the next, such as bar poked into the top of one pour which would then come through into the next?
-
how above a frame behind to bring the bottom out at an angle? Would allow more than adequate cooling as-well i would think.
-
Also Mr G, is there any particular benefit to doing it the way you are? It's something i've considered in the past. I assume for example given it being an ICF build, you would't need to put expansion strips on those walls?
-
I assume doing it this way gave you the freedom to use a thinner level of insulation to lay your UFH onto? Could you in this case for example opt for those slotted boards? how are you going to go?
-
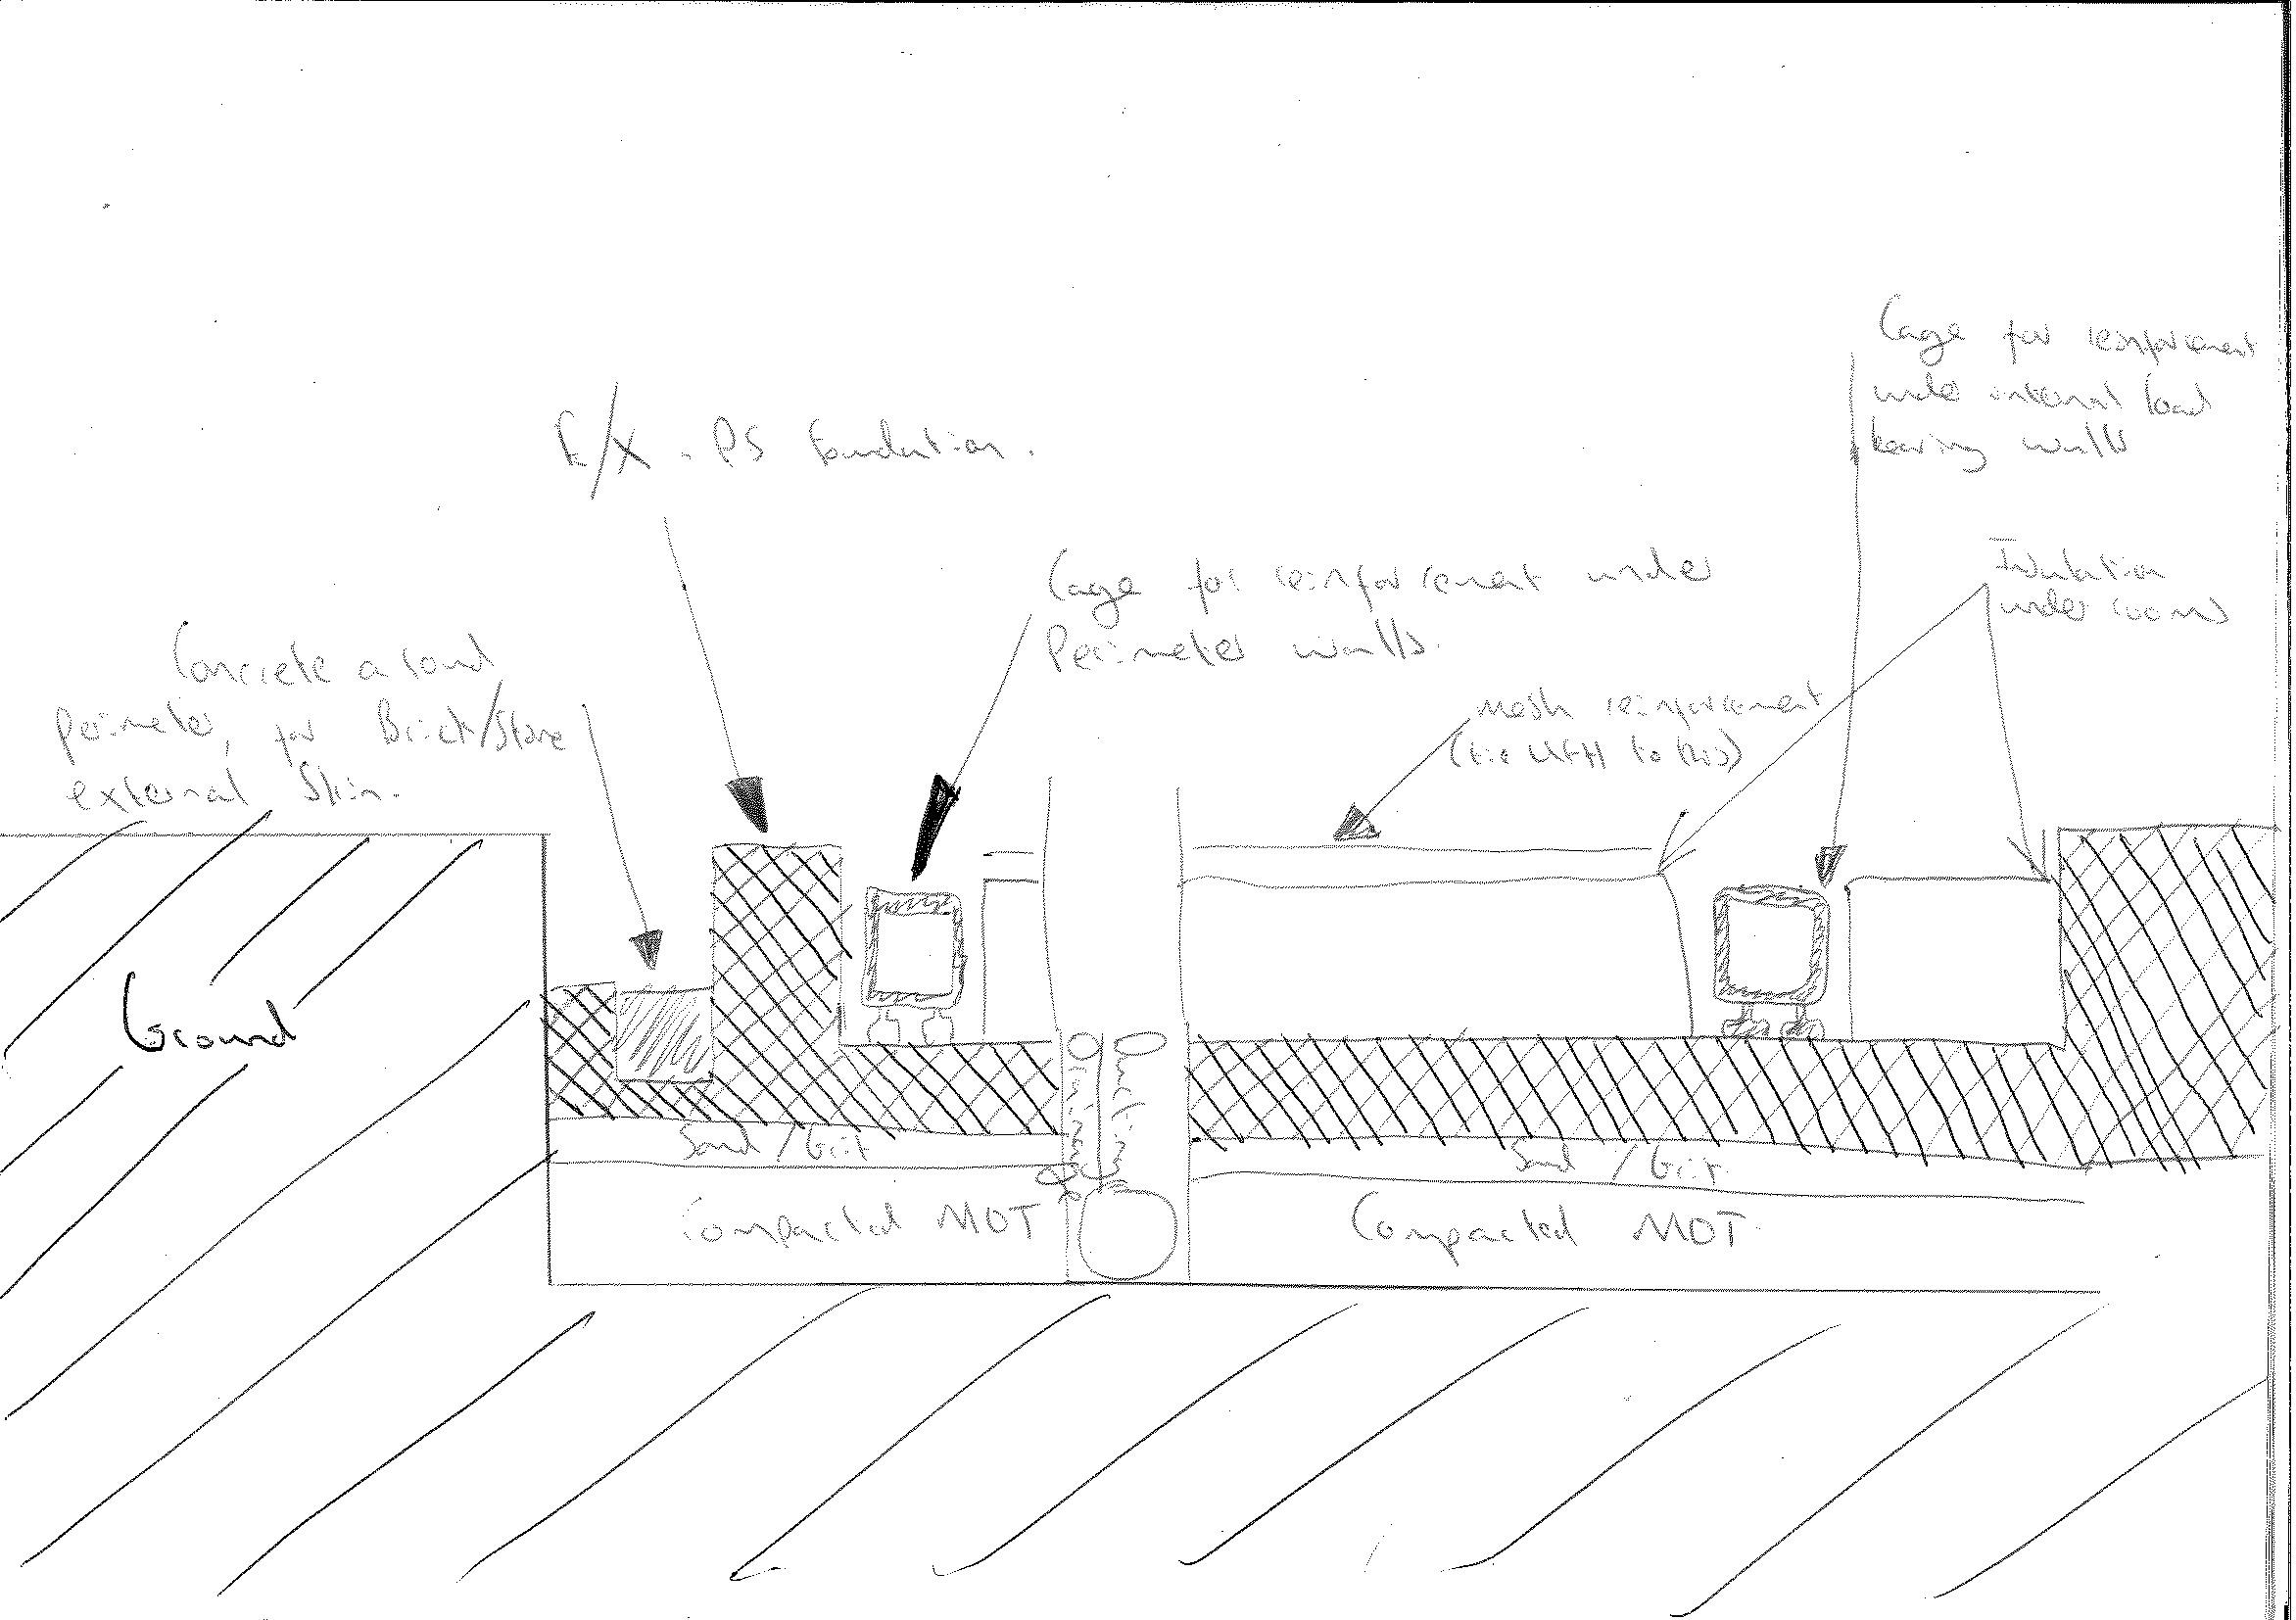
To add to the original post, if the cage part of things is correct, could one forego the need for mesh over the rest, by use of fibre/micro re bar? This way @JSHarris, could one then staple to the insulation and THEN pour. Might even reduce the likelihood of abrasion.
-
thanks @Russell griffiths. Would there have been any way of bracing your props without doing this, but which you might have discounted for whatever reason?
-
boooom - any better for people???