zoothorn
-
Posts
4752 -
Joined
-
Last visited
-
Days Won
3
Everything posted by zoothorn
-
Sorry me no understand. It is Onoff joke?
-
Just receieved shoes, taurus, but badly made/ mishapen not a square up bracket on one (& holes 10mm not 8mm/ just bought all hardware -& £5 10mm bosch bit- for 8mm FFS). No hole in side either. How hard would it be to drill holes in this stuff?
-
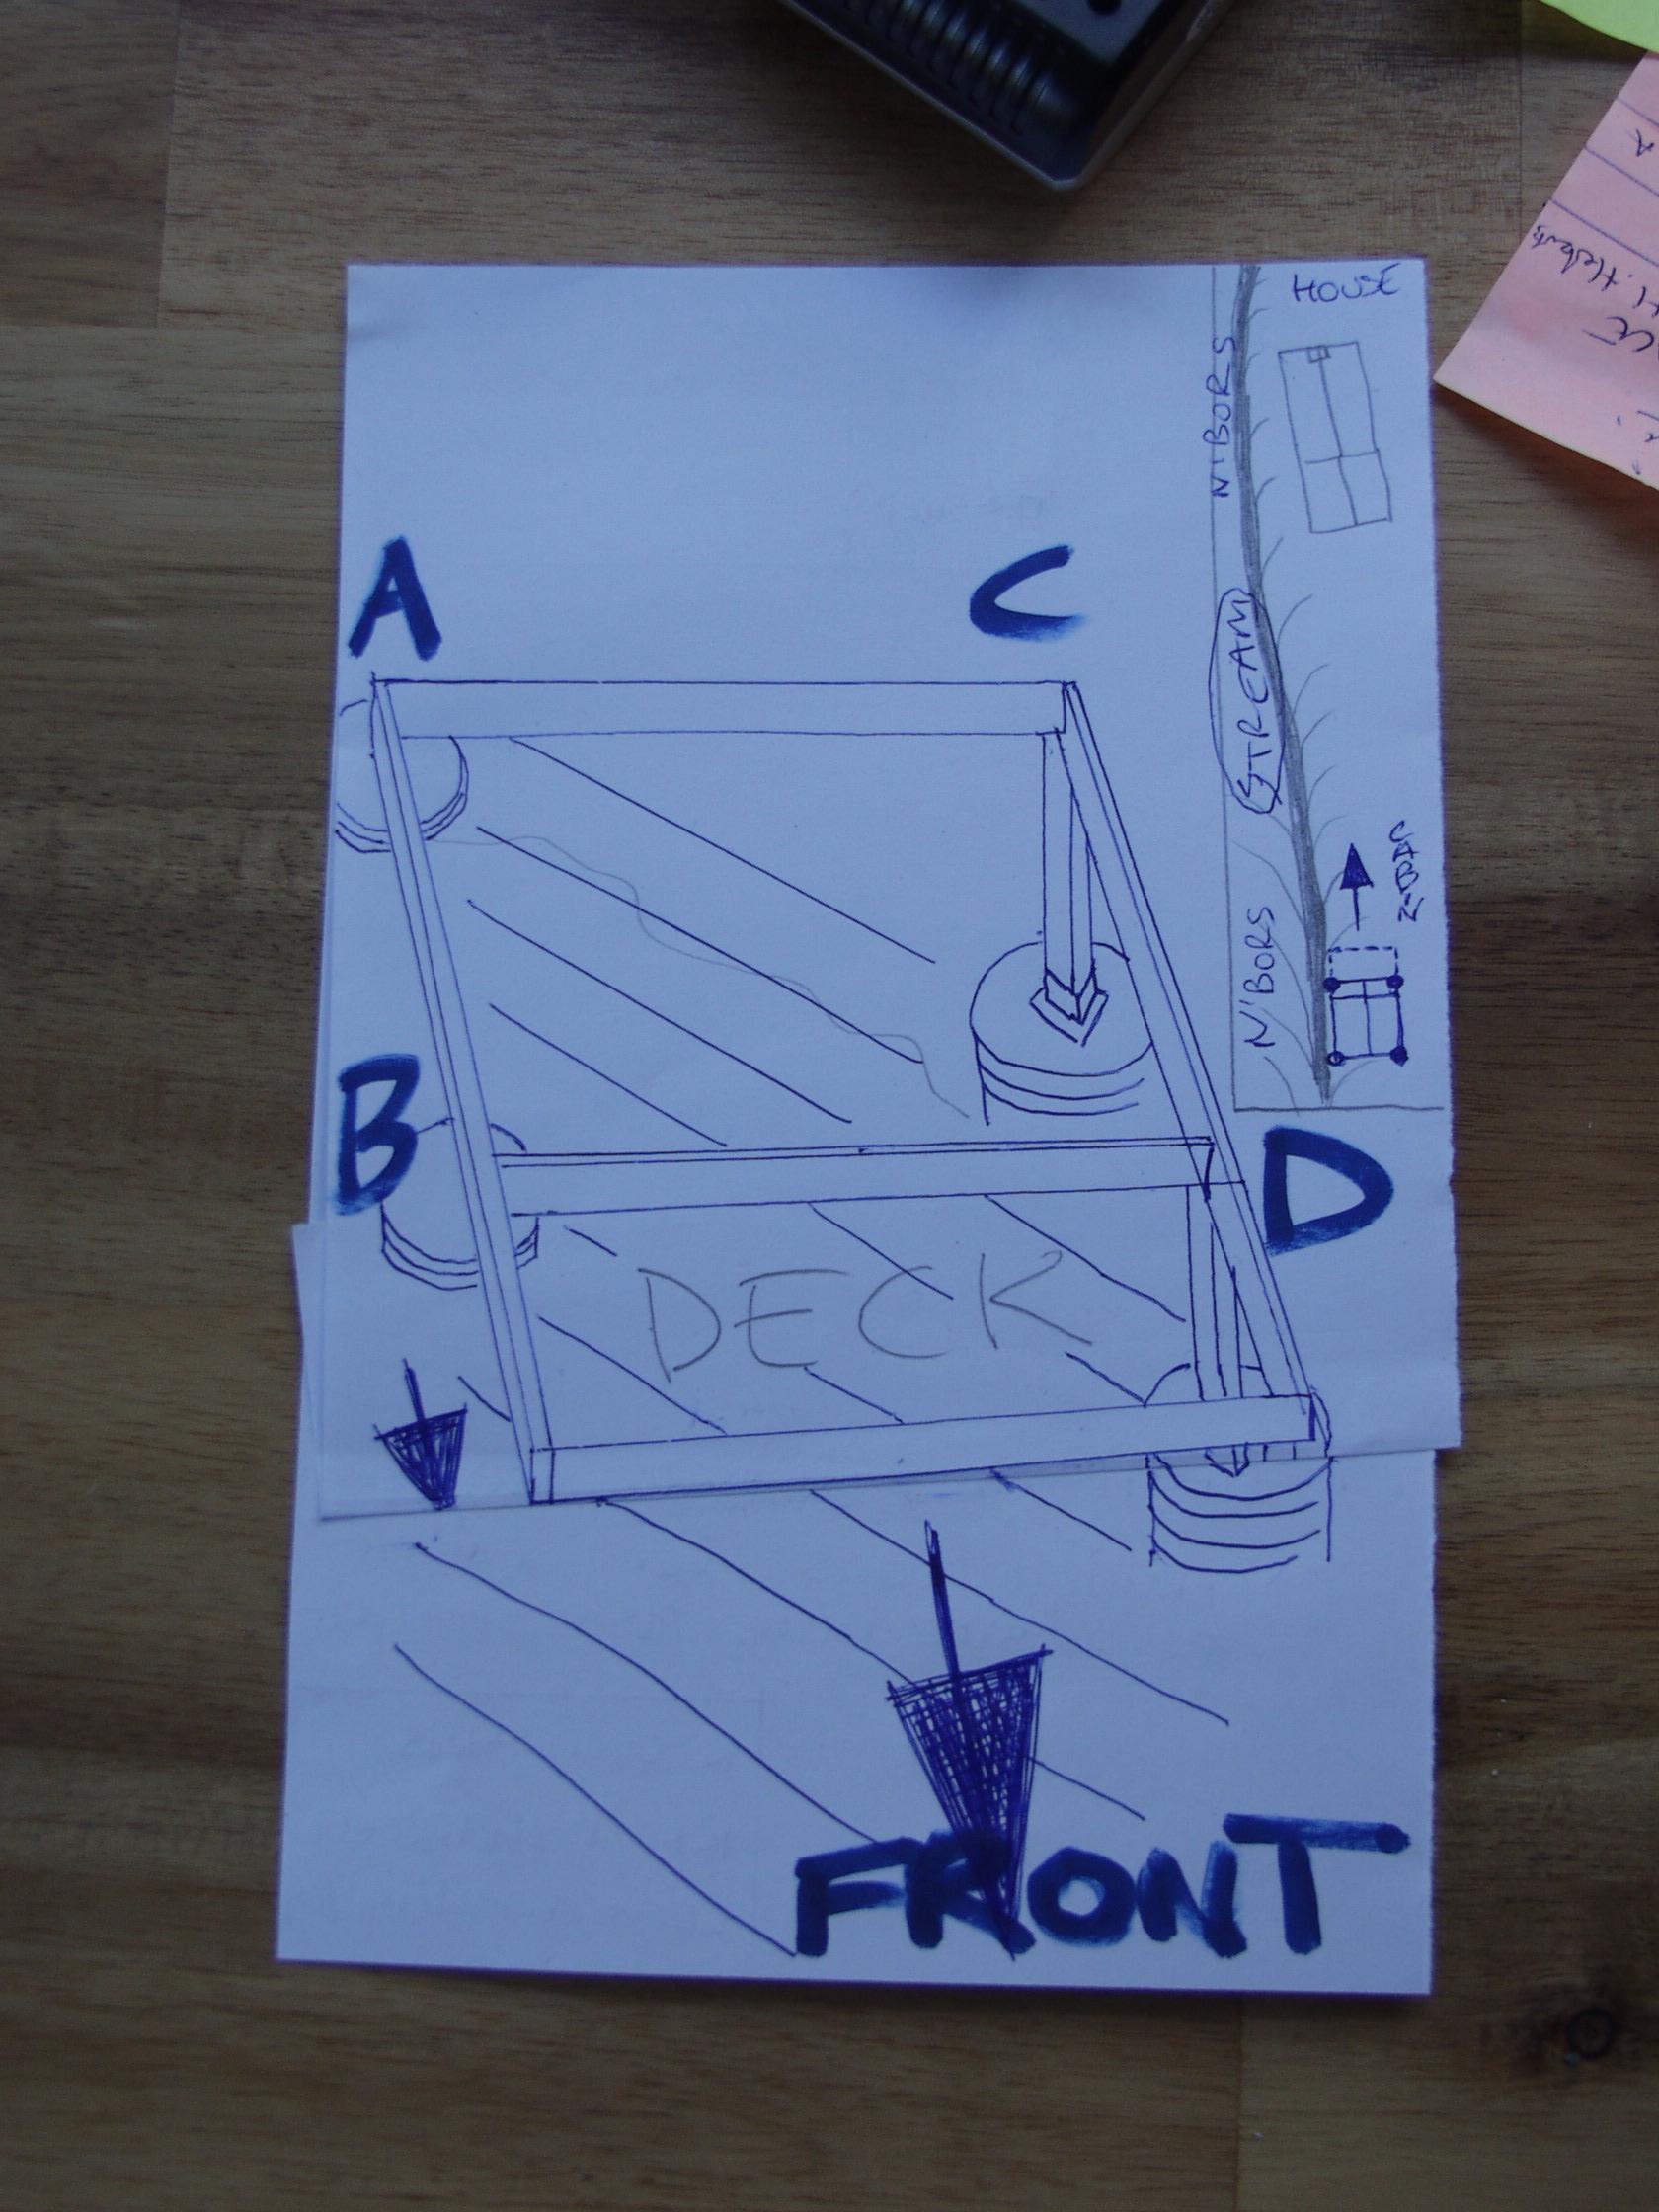
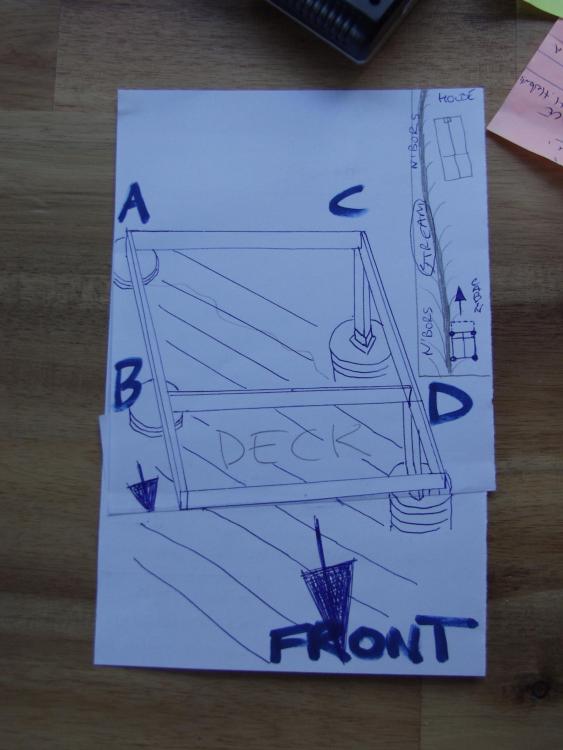
I have been planning it meticulously from the start. I couldn't have done any more extensive planning.. Anyway. This is my plan as of now. A revised plan. Until yesterday (coinciding with your confusion where front of cabin was).. the cantilevered addition was over the stream, RHS, on the -side- of the cabin (always was & can only ever be the side of the cabin/ it cannot be the front of the cabin as Id look into a sheer dark bank 4m away). A & B the high side. C & D the low stream side. Lines \\\\\ indicate steep slope to stream. The front of the cabin = BIG arrow. This hasn't changed. The cantilevered section now is on this end (alot of thought how it could've stayed on the cabin RH side, as was my original plan, & to build a separate front "deck" > & link the two: but its too complicated for me). Please let me know if all is clear now? Thanks all- zoot.
-
@Declan52 all understood thanks. My old cam takes a charge-day to take a snap, & me drawing/ ages.. or I'd add a sketch as I go like Onoff. Is the idea of -two- cantilevered sections viable then? or is that asking for trouble.
-
@Onoff I think I've got to scrap the side walky addition + making a later structure in front/ I just haven't a clue how to design the two to join. Ok so instead: if I swizzle the 2x cantilevered beams FORWARD towards the house, to form the front deck area (so NOT protruding over twds the stream / cabin RH side, as was my orig idea). So one loooong beam will be sat upon two high-slope plinths (no pillars). And the other loooong beam will be sat on two stream-side plinths with pillars. Is there any confusion to understand what I'm suggesting?
-
Thanks for this & prior post- soaking up info. Got good weather so need to try get something done on the base today/ tmrw. Shoes here today. St Steel bar & fisher resin buying AM, & Irwin clamps (8mm bar/ nuts for shoes, 10mm etc for timber fixing). Use a sink plug cleaner for holes (similar brushy endy bit) & hoover. Ok I'm all set here. But the basic timber design, & plan of attack I'm not sorted on yet. I 1st need to find something to lift the topside beams off the plinths (Only 1" or so.. I just can't have the whole thing any higher).. then attatch the beam > to the plinth. Like a square of plastic or something. Is the best/ only(?) idea for my plan of attack.. to make the frame, with shoes on, then plonk down onto plinths > mark holes?? not sure if I can manage weight alone if so. And I've got figure out if my extra RH stream side walky cantilevered area is viable (a worthwhile addition surely ONLY IF I can make a separate/ afterbuilt/ additional/ later front deck area.. & the two could be linked to step from front deck >> onto side walky). Can anyone understand what I mean here? this is really holding me up as I've no idea if a separate/ afterbuild front deck area is even possible.
-
Yes deja-vu me too! As I've explained time & again why u-value is irrelevant to just draw 100mm block/ 50mm cavity/ 150mm TF on a plan. So what aren't you understanding here? I did not need precise u-value info to get the wall thickness as you say I do.. I just asked the builder "what wall thickness do you want me to put on the plan?" Was I asked to put this info on my plan? No. Was there any need to hijack my thread with such info when Ive explained clearly its n/a for what I've have been asked to do, by my builder? No. It is a Build Plan, & a simplified one, as asked by my builder, as I explained in #1. It is --not-- Full Plans as would be done by an architect with alot of detail such as u-value. So u-value is --not-- relevant, to me, for this job . Why on earth is this not being understood?
-
Hole dia is 8mm in the base. So I guess Im best sticking with this & not enlarging. Cleaning out the hole.. does it need a special brush, or can I improvise with something.. or even blow the concrete out (goggles on etc)?
-
@Onoff sorry.. is there a difference between a m10 'fixing' stud, & a m8 'resin' stud/ apart from the size?
-
Ah bugger. Ok understood.. but couldn't I use my brass stepped hole enlarger bit if I find the hole a tad small? I'll be getting the shoes thurs, & then was gonna get the stud & nuts, & drill bit from town to suit anyway.. so cheers for the info/ useful for my Depth. I'm going with fisher gubbins/ screwfix if they have it. A spanner will have to do to.
-
Ok stop the website everyone pay attention- Im going with 10mm bar & gubbins & nuts. I'll have to get more manly & tackle the angle grinder. How long each bar section into concrete?
-
@Onoff thanks for those. I have done some YT clips but didn't see these. Found one place for st steel rods, but its the gubbins stuff that worries me/ hardening in the tube (I couldn't figure out your post before re. this).. its expensive so if I mess up I'm stuffed. I also don't much like angle grinding metal let alone hack sawing up a m10 rod. How much stronger/ better is the steel rod method + resin than these thunderbolts? if I can drive th'bolts in (still not sure if they need a special socket attatchment to do up, or a std socket attatchment) I think its the preferable method.
-
? ok I'll try but I'm stressed. Look just going back to these thunderbolts- only a £few extra on the shoe brackets after all, so cheaper to go with these in fact. Is the idea with these to -not- use resin as well? & how do I do these flange-head hex heads up? (do they need a specialist tool attatchment thing?)
-
Does this 'threaded stud rod' stuff need to be anything specalist, or can I use m8 steel rod from my hardware store?
-
@Onoff ok so if I use 8mm bar (I dont have a 10mm masonry bit for m10) forgive me but what size hole to drill, if I'm filling with resin? I'll have to use the bar rod stuff if I use the resin.. its getting costly these 2 shoes & fixing them if thunderbolts used too @ over £50. Before I put brackets on Ive got to establish exactly where to put them. This is determined by the wood guage & design of the square (I cant cope with doing the side overhang bit- its too complicated for me) base above it, to coincide with the 2.3m square walls (@ their outer points). I cannot believe how complicated this is- I feel totally snowed under. Right, so if I'm just doing a square base 1) how do the beams attatch to the posts 2) exactly what dim should I go for 2.2, 2.3, 2.4? Once Ive got this square base I think it'll get easier- but I'm really stressed thinking how I'm going to manage to do this square.
-
@Declan52 so you suggest use these thunderbolts + resin? I understand the method (small step by step pics I've noted) but do I just ask for "resin"? mastic gun resin? or bolt resin?
-
Ok understood. I do have access to a grinder (chap's still here but collecting anytime). what about this resin though? is it specalist stuff, is the idea here use the bar/ nuts/ washers + resin?
-
@Onoff ok understand that, there seems to be some room for a spanner (but enough for a drill? doesn't look like it on the 6x6 shoes). But I'd need an angle grinder to cut the bar off.. or I saw through by hand & a tiny metal saw is only thing I have/ cant see that working. Before I buy these shoe things, I'm concerned about upward pressure (wind will want to lift cabin UP, & constantly too). I don't seem to have any actual fixings into the post bases with these clamps.. so I'm relying solely on squeeze/ clamped sidewards pressure.
-
@Onoff I can get the m8 threaded steel rod in town ok.. but I don't understand how it could fix A to B (with hex nuts? but they'll surely rust & need a long bit section to go right over rod, to get to nut to tighten.. if so). I'm a bit confused here- this is why 'JFDI' without careful thought is totally unwise. I wouldn't have a clue where I'm at at step1. Ok, how would anyone tighten these thunderbolts up? the shoe prevents a spanner, so you need to get to head from the top afaict.. but the adjacent shoe surely prevents this. A "bit" is mentioned in your link.. but no pic/ Ive no idea what it could be or what tool it attatches to.
-
But not so easy for me to find? there are thousands of different 'stainless steel studs'.. only a few thunderbolts, which seem a bit like those batten > wall screws that fit the bill to a T. The flange-hex top though.. does this need a special type of hex socket bit job? or is a std hex socket > drill driver the way?
-
@Onoff thanks for tips on screws. Are they really £10 for 4 tho? seems damn dear (on your galv shoe link.. seems they need a special bit too.. but your pic gold one above seems to be a std hex head).
-
@Onoff here's your galv 6x6 shoe link again.. https://www.tradecounteronline.co.uk/taurus-bolt-down-shoe-bolt-secure-hot-dip-galvanised-suit-post-size-150mm-6/?gclid=EAIaIQobChMIqZjQ69XV5AIVRLTtCh2QLAZhEAQYBCABEgJNvfD_BwE thunderbolts? sds bit?
-
I did see this Declan, but I can't see what the orange lines does RHS.. Did you mean extend the beam no.3 forwards (& therefore presumably no.4 forwards too) so having -two- cantilevered additions?
-
One with the purple lines?
-
This is exactly what I pictured from the off Dave. But if I did choose the overhang RHS.. then I couldn't have another overhang coming out forwards as well could I? I mean that's asking too much of my base surely. In which case I could only think of making a separate, later addition job, of a front deck area.. & somehow stretching it out twds the overhang RHS, & the two to meet. Somehow. But then my brain melts down.