


zoothorn
-
Posts
4747 -
Joined
-
Last visited
-
Days Won
3
Everything posted by zoothorn
-
Invaluable info already.. I had it already in mind to skip this carpet asap. Then start again! Ok so I'll take from your reply then that it is feasable, so will now brush up on YouTube clips & go from there. I'd think in principle surely, the vast majority of the work is getting the edges neat & 'tucked' correctly in: I think a tool is needed at least for this, & looks bloody costly watching this guy finish off this room with one. Thanks Peter, It would be great to hear from anyone whose done a carpet fit too. Zoot
-
Hi Peter, thanks for looking into that: no such place I'm afraid, we only have 2 fitters for the whole of Aber (& these 2 make massive salaries as a result.. adds to my anger). It was £450 November 2020, so if that was say £325 for the room + say £125 for the 3 steps leading down.. with alot of price hike since I'd think £500 min now. Maybe £550. Hence I can only consider doing it myself.
-
Thought of this, even looked into covering it all in nice used rugs.. cost more than £400. If I showed a pic you'd understand, but Im embarrassed to it's such a horribly pinky-beige. Makes me so angry.
-
Hi Kelvin, tried exactly this.. for 2 years you see. I've been kidding myself that it 'could' be the one I chose for too long. Now I've accepted it's not, each day subsequently it gets more & more aggrevating. Beige.. after so many years of rental places with it & white walls, student places etc etc.. the very last thing I wanted, was bloody beige (& I have white walls). I suspect he had opportunity of out of fashion beige at a knock-off price, & took me for a ride. Nothing on receipt/ invoice re. colour, type, anything to ID it. I feel so stupid- I need to take it on chin, put it behind me now & redo it.
-
This (living) carpet clip is useful, as it gives a good idea of the 3 shades. The RHS carpet is what I chose. The one I got instead, is similar in hue, to Les's bald head. (The LH carpet I actually rather like.. new one might be similar). Zoot
-
Hi there Peter, 3700x 3800.
-
Hi chaps, I've made a naiive error on my extension, final bit/ the carpet. Chap's put down the wrong carpet (& also the one I -specifically said- I didn't want too). Ineptitude, or pulled a fast one on me? I'll never know (latter i think). £450 wasted. I'm bloody angry at him, but also for not checking -before- I paid him. I asked to check, but he said he'd "lost the sample" & gave me the "daylight always looks lighter" spiel. Daftly, I trusted him & paid. It's dawned on me since tho, that my suspicion at the time was 100% correct. Bloody sod. Now, I cant afford £500 for a pro. But I have to redo it, as I hate it more each day & it's causing stress/ anger at him. I've got shafted L,R & centre since moving here by all manner of people. Gets me down tbh. Best I just crack on, lump it & redo it. So my question: is it feasable I could fit a carpet? Has anyone done it? The perimeter spiked trim is all there, & laying an underlay is surely easy enough (this one so thin I can feel the chipboard & my feet ache too, crap firmness/ little support). Also in my favour is 3 sides are dead-straight. One side tricky: wibbly old stone wall.. onto which the extension is built. Bed helpfully covers it mostly, this also in my favour. And 3 separate steps to carpet too.. trickiest bit. But the main thing is get rid of this damn floor carpet asap. Advice would be much appreciated. Thanks so much for reading, Zoot
-
Hi ProDave, I see what you mean/ the tubs should have a slight inward slope all around, even if the outer rim area has a 2cm flat bit for a door seal strip. Mine, is even worse being slightly sloped -towards- the hinge ( so the bath is on a tiny tilt, LHS cold tap therefore a fraction lower than RH hot one) which of course draws a but more water than usual twds my hinge area. I guess it's just the nature of 'budget' tubs which mine surely is.
-
@Susie Hi there thank you for your reply. Looks very snazzy that bath area. I can't quite see the shower screen though.. oddly not even on the site's diagram & details. I can only see the rail, & a small glass door section. Thing is, whatever proposed alternative, including curtain sheets, water will still innevitably sit on the top of the bath @ the taps area. Condensation can't be avoided ( my tiles are always super cold even in summer- just the stone house) clinging to the shower unit wall above bath taps > drips down > pools on the tub top. Slight slope ( can't change this) on the tub here.. & water collects & focuses on the fallible hinge area. The 'dam' lip addition, along the edge of the bath outside of the problem area, is a useful idea. I need to do some major waterproofing 1st. Much Food for thought- gratefully, zoot
-
Anyway chaps thanks, I don't think you can really help anymore than you have. These doors seem to just have a fallible design, so I need to think of options. I'll just redo it all, with this new strip, & go from there. I may get lucky. Grateful- zoot
-
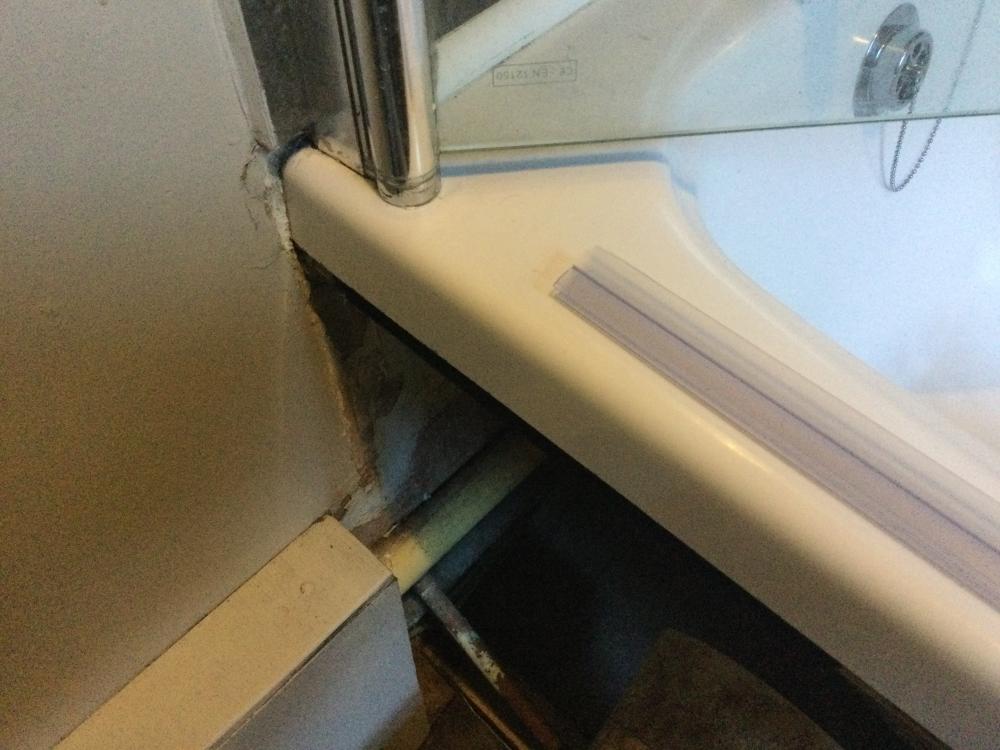
Hi Nick, actually the photo here was only regarding the seal strip, & which way round it goes. Im still guessing on this tbh/ there seems no consensus. The pic was taken -after- I have removed my silicone from the chrome section & cleaned this area. Then I plan to redo this silicone. I fitted the door. It sits flat upon the bath top. So prior to this, the silicone here was decent & no sign that the water was emerging from A) under this chrome section, & B) under the round chrome hinge base either. Because my silicone here was good, firm, & went all the way from wall, out along the chrome section, onward to the base of the round hinge base too, up to where my door opens to maximum ( the sink preventing it opening further). So the water has got through either/ &/or: over the top of my silicone barrier here at the chrome section, @ the join of the placcy strip to the door's round chrome hinge base, @ the placcy strip itself possibly being mishapen by the door opening & closing, over time, over the bath edge. I'm sure I've ruled out it escaping from behind bath to the wall & out somehow, at the (lowest part) of the chrome section (ie underneath it), & underneath the round chrome door hinge part.
-
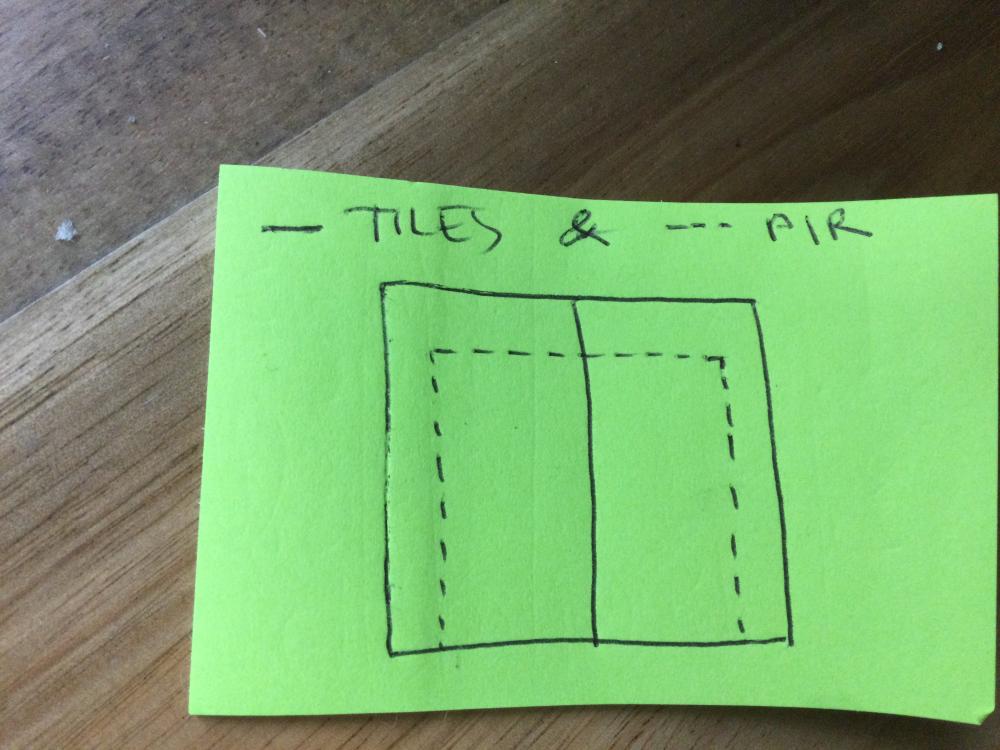
Hi GW. To be honest the sealing Ive done behind bath, vertical up outside of door as said, where the 3D drawing & yellow line is, all are solid & Im confident no water is getting past here. The bath is a little tilted, meaning one tap is slightly lower than other, & towards the door. This means that the water coming down the wall @ shower unit/ bath taps end.. which would occur even with a shower curtain.. is collecting at the door hinge. Now, it's possible the water is getting into hinge, & overflowing my outside silicone seal (yellow line area). I can't reset the bath- huge job, so I need to make this fallible corner as best I can get it. I think innevitably a little water might get by, whatever I do. Im just trying to rid this huge 1+ litre of water I find pooled on the lino after a shower. Maybe just go nuts with the clear silicone, just on the outside of this area. Then razorblade under hinge btm & force silicone in this tiny gap. Lastly fit (& cut/ shape) this new placcy seal strip super accurately to minimise the inneviatble tiny gap at the hinge end. Then a big grout sponge placed inside whist showering. That's all I think I can do.. bar replacing the door. But if a new one has the same basic design, Im in the same boat & £85 spent for zilch. And I can't think of any other basic door design, for my bath, would be suitable too. Thanks, zoot
-
Hi @Iceverge not sure if I've had a reply from you before too.. grateful for the ideas. I had actually put a big bead of silicone exactly where your 3D block is, & your yellow line/ here I have removed it to redo: but it was firm before, no failings here afaict. So it's he hinge, & forward of this/ the seal strip, which I think the leak happens. Your dam idea is good, but the water might only run along, & exit half way down the bath onto the floor tho. The curtain: you see the bath taps area will still get wet.. resulting in water @ this achilles heel hinge. Hmm. Not easy this. Thanks chaps.
-
Good Q GW. It has a vertical outside bead of silicone only- Im led to believe this is correct. I didn't think to silicone the base of the hinge to the tub top.. being such a flat bottom to it, & it sitting firmly on the bath.. but maybe water could be getting through under it. Such a tiny gap though, & I did have a silicone outside bead running horizontally from wall out to the hinge, to negate this possibility, which I was going to redo. I'll try a razorblade underneath the round hinge 1" diameter bottom, clean out & force in some silicone here. Failing that I cant see what else I could possibly do.
-
@saveasteading I get your point though.. these things are nigh on impossible. But what alternative situation could I have than a door screen I wonder with a bath, & a shower one end?
-
Im not selling the house SAS. That's going too far.
-
@BotusBuild Hi there, thanks for the reply- don't think I've had one from yourself before/ appreciated. Sorry my photo makes it seem like I'm more inept than I am. The new seal here is just resting, waiting to be fitted to the glass above. I need to establish which way round this slips onto it, first Q. It seems it's a 50/50 opinion which way round. I just cant think it logical to have the shorter fin outside, as then it serves no function-? I've cut it as best I can perfectly 90* so it butts up against the door hinge, with as minimal a gap as poss... but still there's a tiny gap. Afaict it's a flawed design as the force of door opening bends the big fin a bit, & over a short time this bend is stuck firm, meaning a gap develops at this join (you can barely detect without contorting yourself & to look with a magnifying glass). I'm not sure if ProDave was suggesting an alternate seal strip thing to mine-? Bloody thing Im sick of it, but seems there's no alternative door/ all will have the same inherrant issue surely. Thanks, zoot
-
A shower curtain won't help tho, if, there's water on the top of the bath behind taps ( which there always will be) which then hits this fallible hinge area, behind the curtain.
-
Hi there ProDave, but I haven't read any bad reviews tbh. If the seal that came with it when new, needs replacing, due to green mould that's impossible to remove, then I surely buy a same type, because it 'll be correct for it. I just need the same two-fins type, the correct glass dim, & the right 'drop'. Which I've done. Firstly I need to attach this. Logic seems to suggest if the short fin was outside.. it cannot be of any use, so this shorter fin must surely need to go on the inside/ bathside. But, both ways shown as correct online. Once fitted, I might have a better chance of establishing -where- the water is getting through. Trouble is if Im outside the door looking I can't just turn shower on, aim it twds this corner, as I have a 50% chance alot of water will just emerge. If Im inside shower & turn it on, I can't see at this exact area properly. If I had someone to help.. it'd be much easier.
-
-
Hi chaps, I have a small persistent problem, causing bigger longterm woes & damage. The shower screen seal area, particularly the hinge corner. I've got a new clear 16mm seal strip, with two fins one long one/ other shorter. Firstly- which way round? Long fin bath side, or short fin bath side? (Www info suggests both ways correct!). Secondly- I get an incredibly annoying leak at this area. It's help to ruin the lino, the bottom edge of the bath side section, & creates water ingress to the hardboard underneath the lino. It happens 50% of time I have a shower (leaving me perplexed), & about a good litre+ of water on my lino floor after a shower when it happens. Trouble is I just cannot establish -precisely- where the problem lies. So I can never resolve it. I lay down 2 big sponges on the inside of bath at this corner when I use the shower.. but the leak still happens even so. Driven me absolutely mad for 5 years this. Thanks, Zoot.
-
Hi chaps, hope y'all had a good Christmas break. @Onoff thanks for these photos added 22/12. I've yet to do this gap, because floor kinda ruined by the bathwater flood.. so needing weeks to dry out (hardboard mainly, which was put down under the lino/ a lino job done by pro 2 yrs ago). Lino was coming up in areas you see, due to the water ingress underneath. So I've lifted / rolled back, & aim to restick it back down onto hardboard once this is dry. Lino underside in a state needs prepping too. Urgh. Will jump back on & do the tub gap once lino down. Thanks, Zoot.
-
Hi Mike, thing is if I buy a sheet of this.. I have most of it unused. I know this stuff I used it behind my stove, because, it gets very hot here. There won't be alot of heat behind this leccy bar fire you see. You could put your hand behind easily enough. They dont emit too much heat behind, & they never use two bars, only one. So I dont need "optimum" material here.. just sufficient material. Could you please take a look at my reply above? One with a green sketch. Thanks, Zoot
-
Hi Chaps, sorry I lost track/ just prepping this job now. Thanks for reading & replies. Alas I can't get onto roof to pour anything down chimney. I think perhaps chimney itself (IE the vertical hole) might be blocked anyway (I can't feel a chimney draught.. seems only cavity draught). So I need to do this: Replace my temporary panel, with a better insulated one. If someone can simply advise on my idea here s follows: just whether this idea is decent enough. It might not be perfect, but I cannot do perfect. I just need it 1) to provide insulation at this gap, 2) to be safe enough. So: I have 75mm PIR to take up. I have adhesive. I have 2x large 10mm marble tiles ( or whatever marble effect modern stuff its made from). Idea: cut PIR to the 400 x 400 hole size. Glue two tiles onto it making a 500 x 500 tile area. Glue it to the front of fireplace. The additional tile area at the sides used as a lip, to fasten onto the existing fireplace front. I use intumescent fireproof silicone at the tile junction, & around perimeter, just to make it 'sealed'/ ie no possible way for the leccy bar fire in front (1" min gap away I ask them to put it, minimum) could ever get its heat to the PIR. Thanks, Zoot
-
Here is the mainroom stone 'shell' circa 1965. The far privvy is an addition ( long since gone). This gives a good idea of the 1 big'ish main room. Onto that far end, is my 1 story extension (80's? kitchen, WC). Onto above: this old roof gone, & a 1970's (?) extention added. Onto front: porch addition (80's?). Onto near 'dark' side: 2019 2-story extention, 1 room each. Zooter


