Duncan62
-
Posts
201 -
Joined
-
Last visited
Everything posted by Duncan62
-
That's a big number, congratulations, fantastic result. Our two layers of mesh cost less than 3k (Inc detached garage) so not a massive amount for us (in the grand scheme, 3k is obvs 3k tho!)
-
Take a look: https://www.concretecentre.com/Specification/Special-Concrete/self-compacting-concrete-(SCC).aspx Short video with very basic explanation.
-
Wish I'd known about fibre reinforced. The amount of mesh in my slab = considerable
-
It gives a easier level finish than traditional power floating I'm told. Keen for a level floor. Especially as it will be the final floor level + microcement at the end of the build.
-
Maybe a mistake. Will be using cement board as you say.
-
Awesome, thank you. Do you have any pictures of how you braced it please?
-
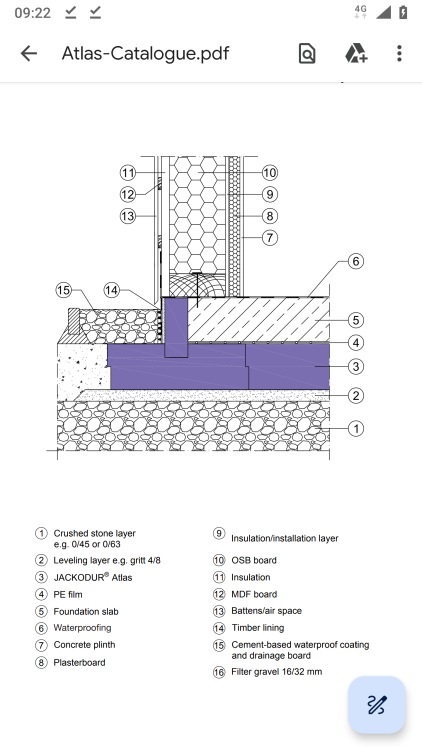
Neither. In our case the insulation forms the formwork with an upstand. Pic below. Our upstand is 200mm high and 200mm think, unlike the pic below.
-
Why is it more susceptible to blow outs? Will this affect us? we only have a 200mm slab with (Jackon) insulation making the form work. Thank you, in our case it's the ground work team we may use, suggesting it.
-
Any one had any experience with Self Compacting Concrete (SCC)? https://en.m.wikipedia.org/wiki/Self-consolidating_concrete https://www.breedongroup.com/products-and-services/gb/our-products/ready-mixed-concrete/self-compacting-concrete We have an insulated raft, with half the rebar in currently and are looking at options for the pour. Slab is ~100m2 at 200mm thick. One Suggestion is for SCC. It can be made to the correct strength spec, in our case C35. Apparently, it is likely to give a more level finish than traditional + power floating. It will also fill underneath our threshold insulation without voids at the edge, hopefully.
-
Looks like a nice job 👍
-
How thick is the screed layer you are laying?
-
In hindsight it appears a mistake that the PHI didn't trademark the term Passive House. Because this.
-
great, thanks, like this?: https://underfloortradesupplies.co.uk/product/komfort-16mm-x-100m-pert-al-pipe-5-layer-barrier-white-multi-layer-ufh-pipe/
-
What UFH pipe do people recommend for installation direct to mesh, 75mm below the surface with 200mm total depth of slab? PEX AL PEX or PERT AL PERT? 16mm as standard? and why?
-
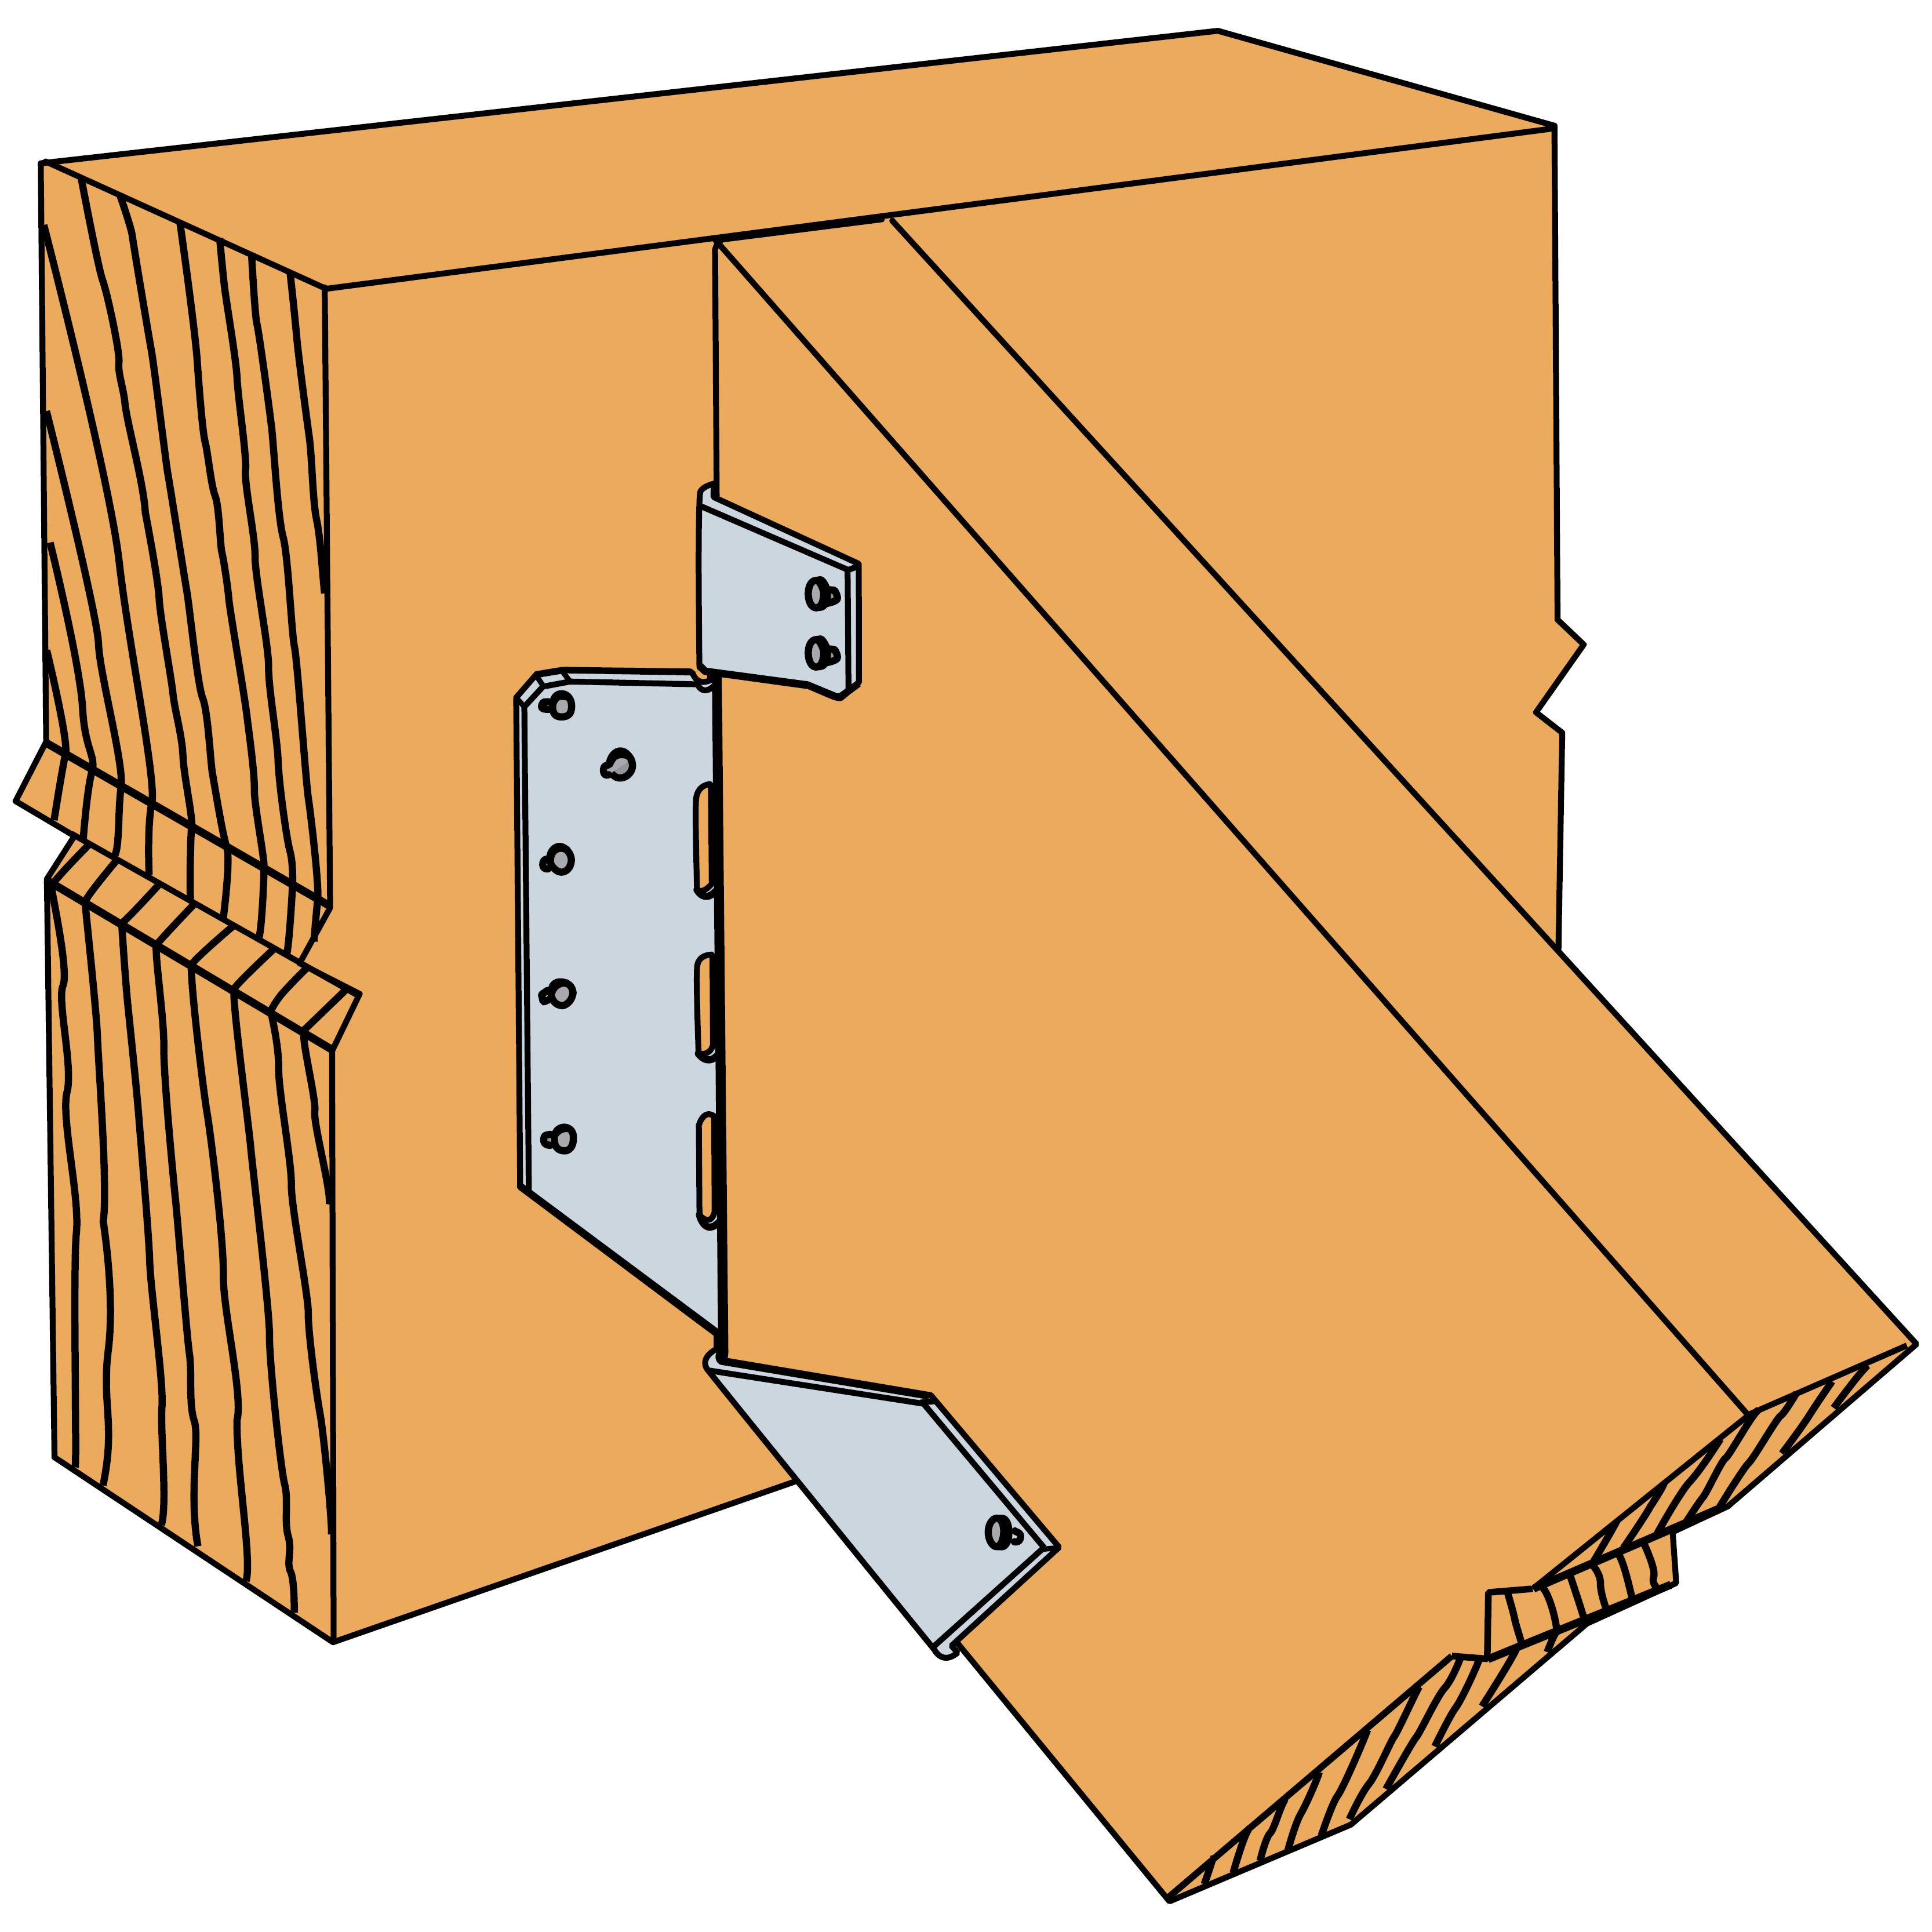
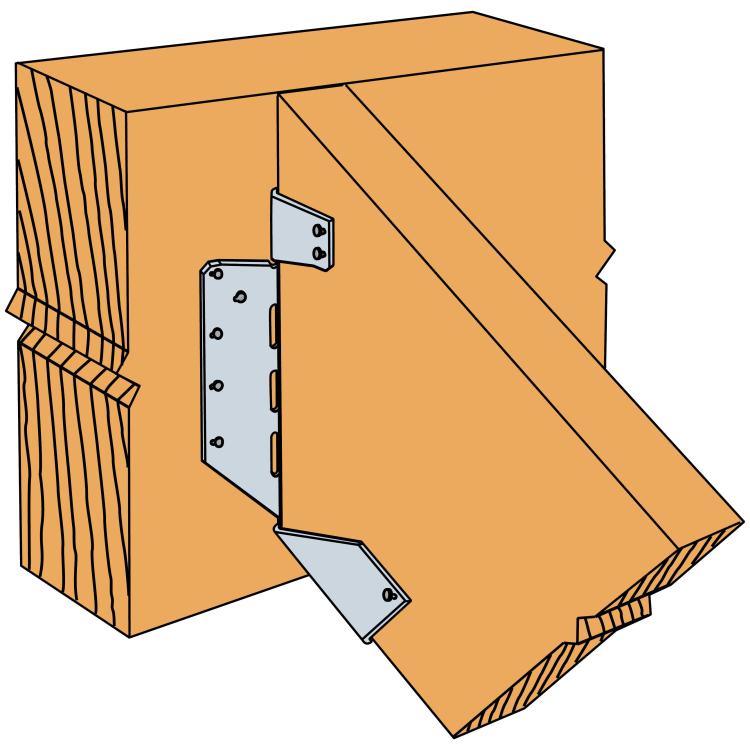
A connection made of wood will form far less of a thermal bridge than a metal one, whatever thickness wood is used. The concern is in the direction: inside the building to the outside of the building. You can hold onto the other end of even a small bit of wood in a fire. You cannot hold onto a small bit of metal in a fire. The heat transfers. Very efficiently.
-
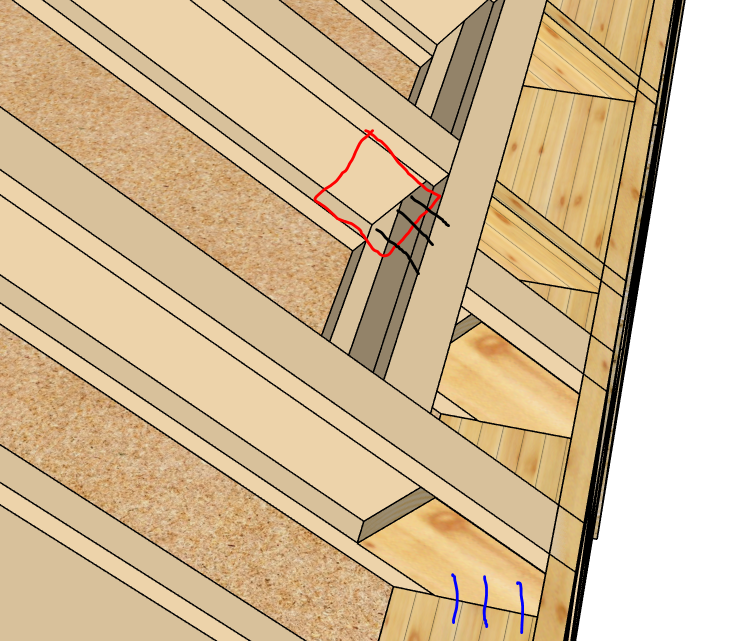
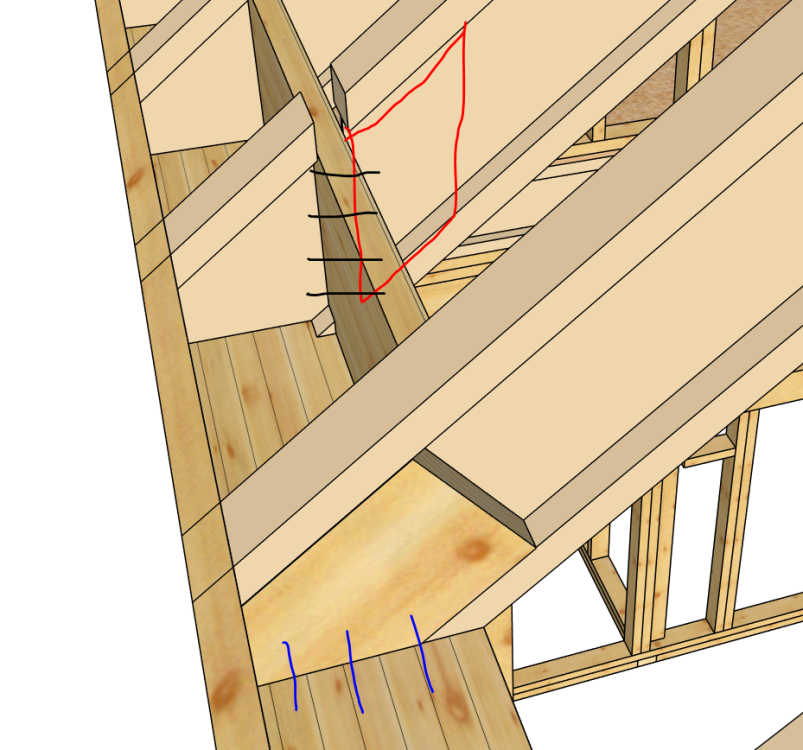
Insulation: blown cellulose/woodfibre The problem is that the metal hanger will span the I-Beam from inside the thermal envelope towards outside = thermal bridge. (THERM analysis would show as much) Hanger as below but inverted in my case. Also, as we're hanging an I-Beam the hanger would indeed span the whole section, not partially as shown on this solid rafter.
-
QUOTE: "that wouldn't provide a sufficient connection as we'd be relying on nails through a plywood web of the beam and also the fixings would be running parallel to the grain/laminate of the packer which could lead to the packer splitting. The rafter must be vertically supported and laterally restrained to effectively prevent the roof from dropping or spreading."
-
Could you please help me try to find a Thermal Bridge Free (TBF) connection detail? It's for roof rafters as they connect to a lintel above windows in both cases. I want to avoid metal hangers as these are a tremendous Thermal Bridge. I suggested packing out both sides of the I-Beam (red line) with wood and fastening together, then fastening to the lintel (black lines). SE said no. I'm more of a yes man.
-
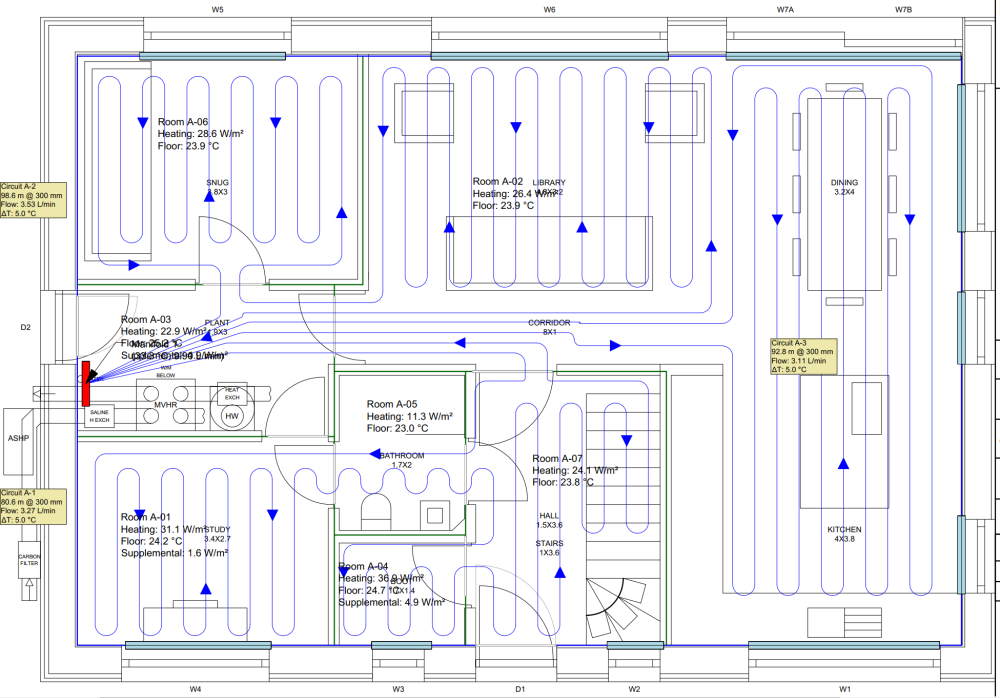
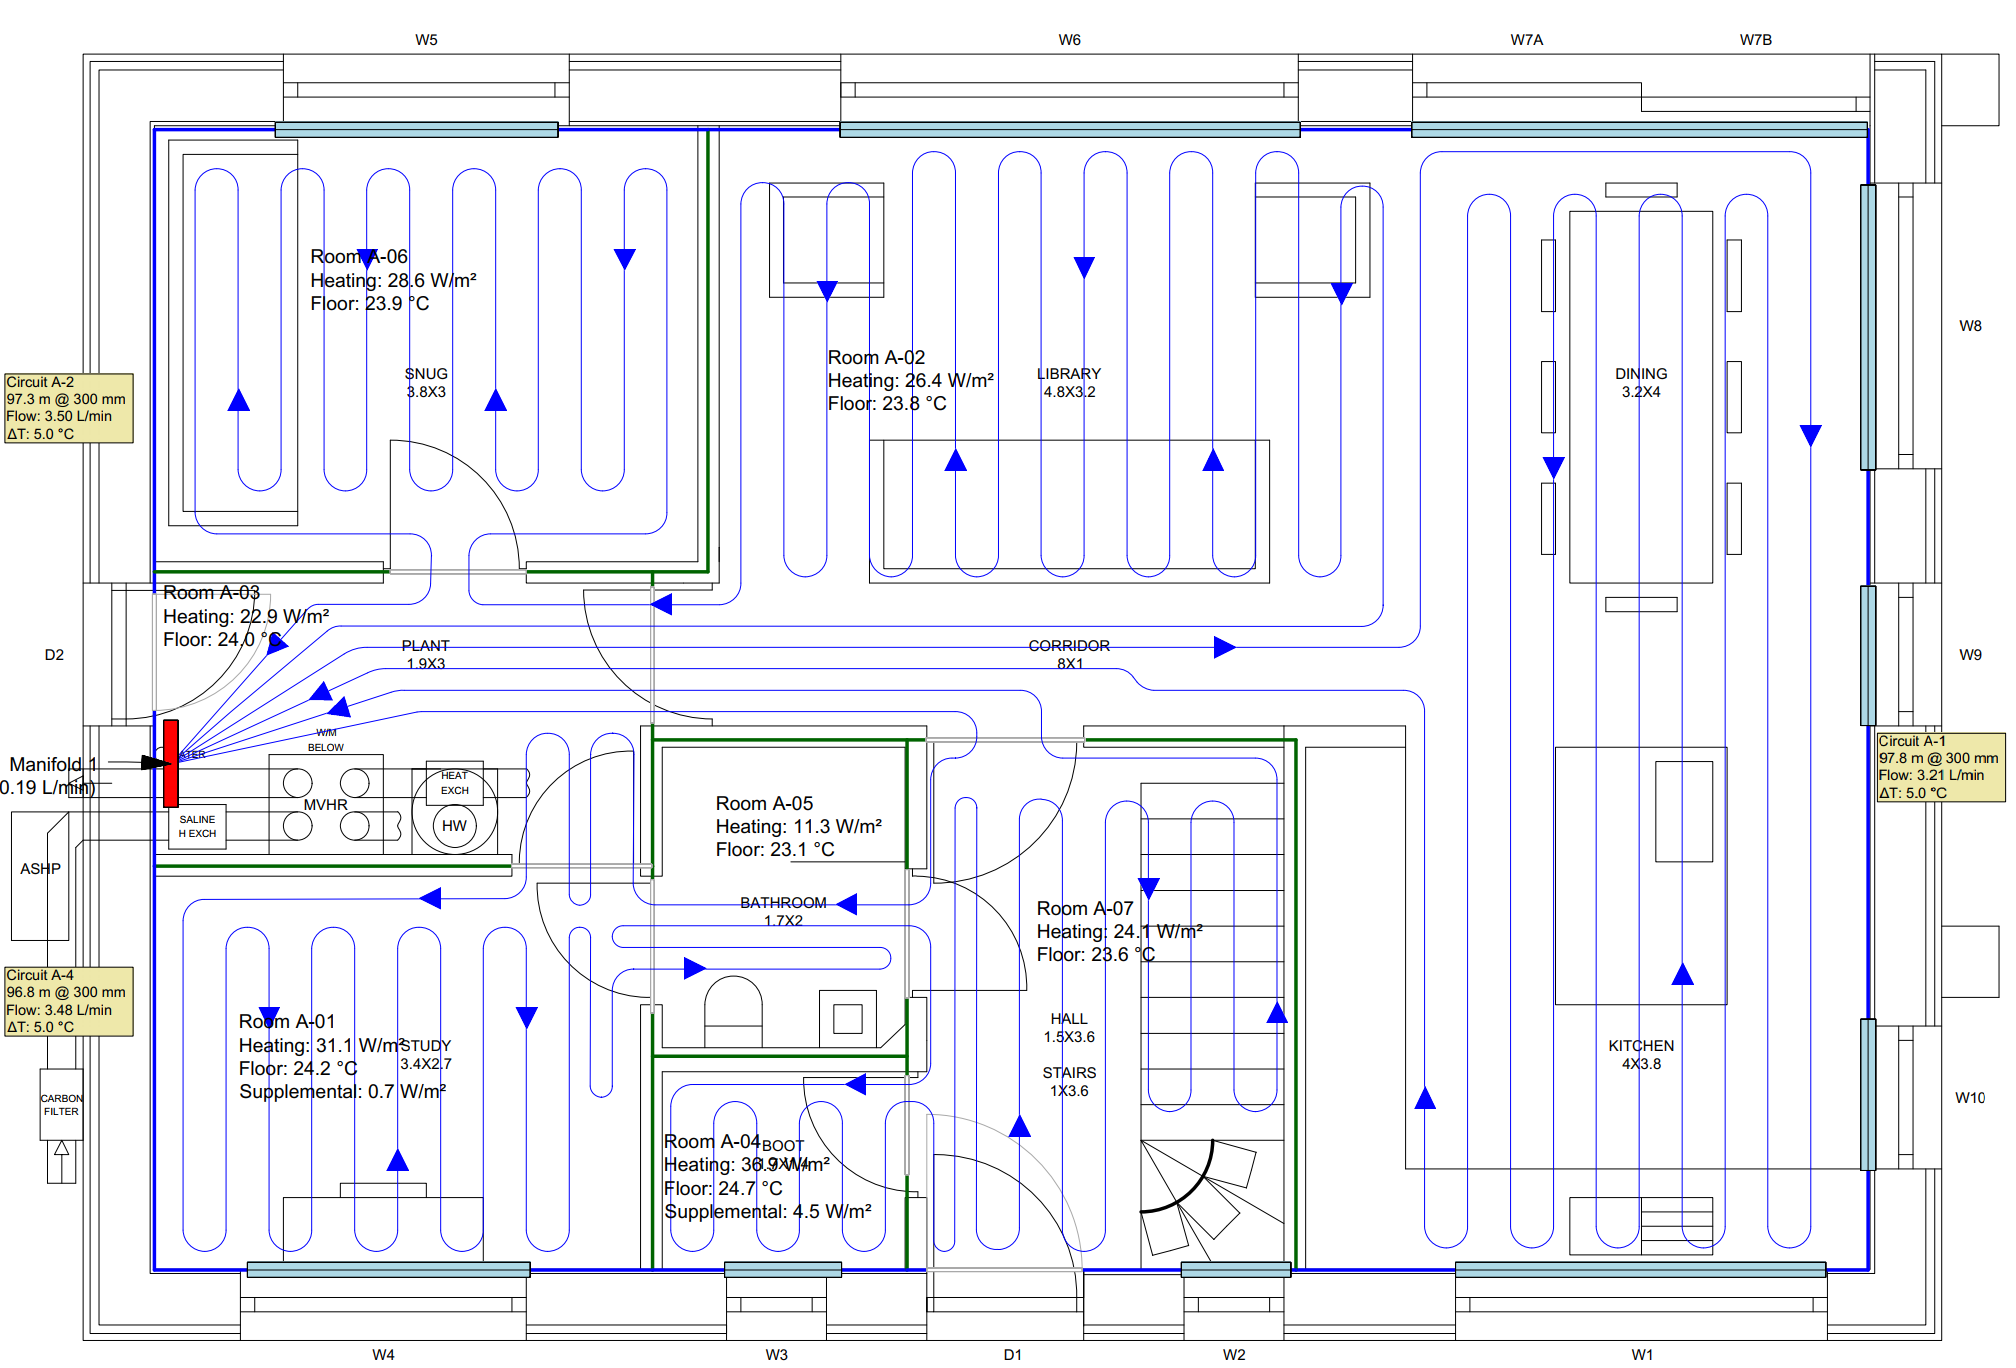
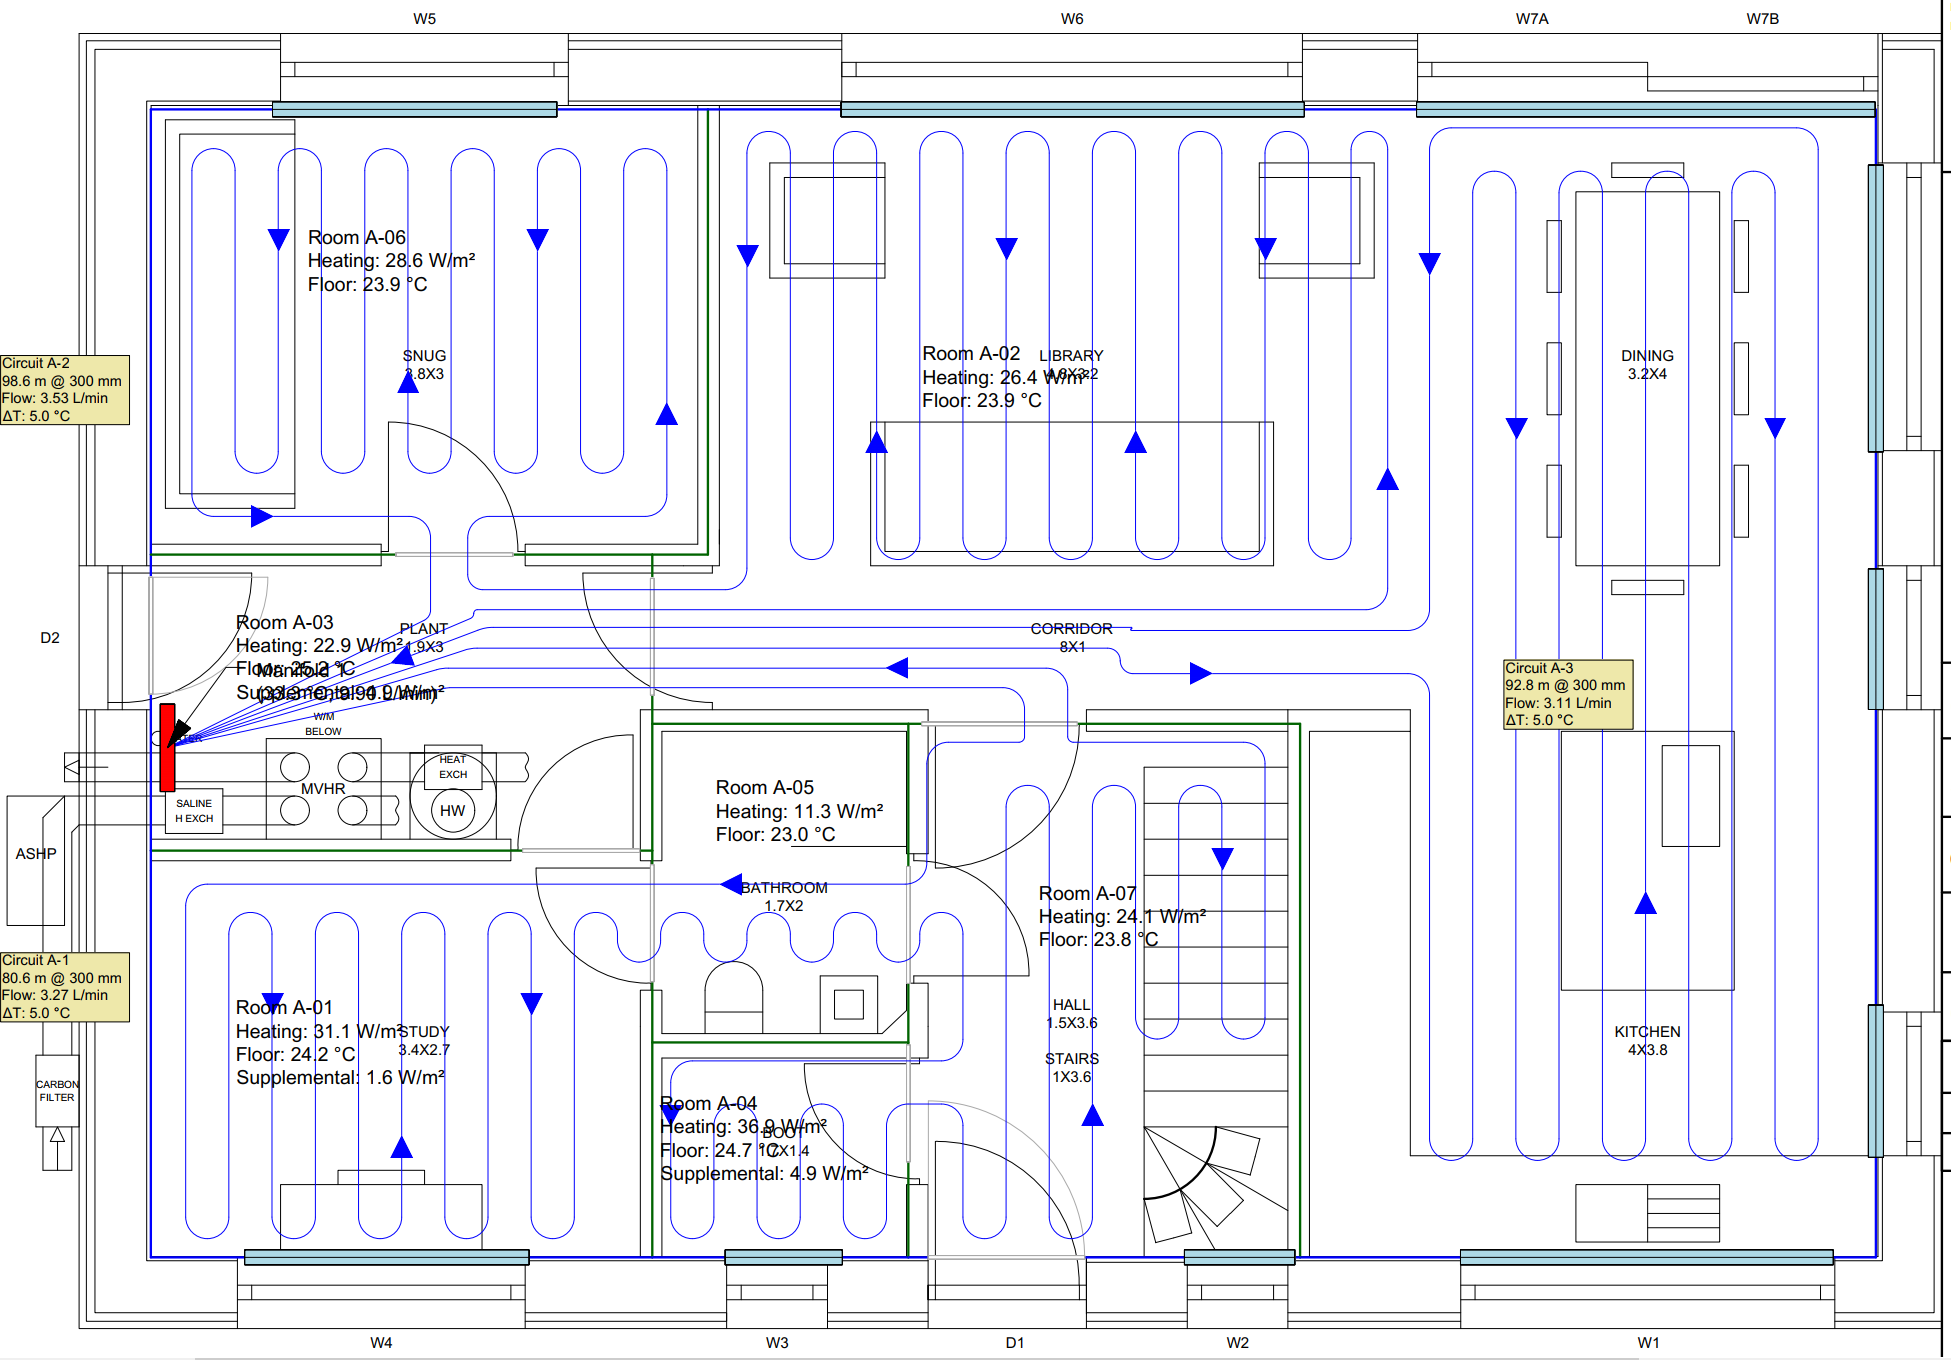
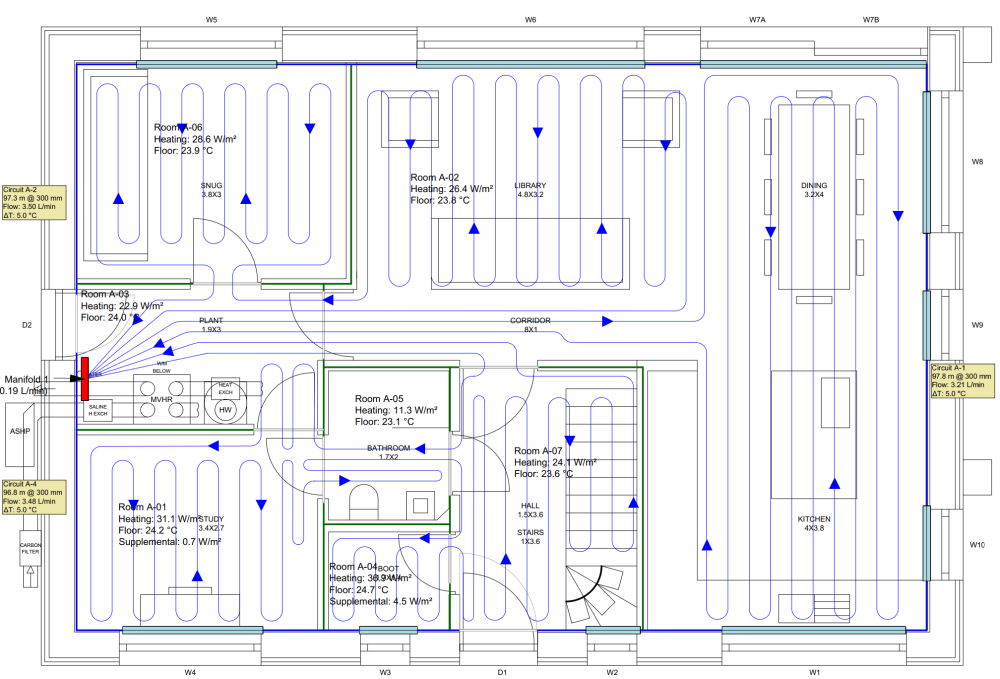
Thank you Terry: I plan to use the bottom side wall in the plant room which is 900mm wide. Enough for a 3x Out and 3x Return manifold + pump? Yours doesn't look too big?
-
Easy install after-the-fact if needed. I like it.
-
Update. Thank all. I have avoided under shower and kitchen cupboards (some of them) simply because I have 3 x 100m loops, which works nicely for buying and fitting. I shall not do serpentine as it looks (much) more difficult for this mortal to install - and looking over @TerryE posts, will make no difference in low flow temp situations.
-
This is a good point that I had thought of last night too. Installing at 200mm will nicely follow the mesh spacing. Might make instillation easier.
-
Hello, plant room is 1.9m x 3m
-
Roger, thanks. I may also put it under the shower tray in that case, greater area!
-
Hello, Beginner at loopcad but like to try, put me straight. Wall/Roof/Floor all ~U=0.11. Windows ~U=0.8 UFH loops to be laid and fixed atop the mesh in the insulated slab before the pour. I've tried to keep to 3 x 100m loops which will all operate on a single zone. Low temp batch heated over night by the ASHP. Top-up on coldest days in the afternoon. GF area ~110 sqm Annual Heating Demand is 1800kWh/a (11.4 kWh/sqm a) Heating load for house is circa 1.5kw (PHPP). Option to cool UFH water in the summer via ASHP.