
Susie
-
Posts
400 -
Joined
-
Last visited
-
Days Won
1
Everything posted by Susie
-

Converting a drystone wall to a mortared wall
Susie replied to sb1202's topic in Landscaping, Decking & Patios
If you have more stone available, ours came out of the knock down, you could rebuild as a Cornish Hedge. As a quick guide it’s two walls tapering inwards to each other with the gap in between each wall filled with soil and rubble, then grassed over, planted up or our original ones have trees now growing through the centre. Also look up Devon Bank (hedge) it’s similar but no stone you could adapt yours by rebuilding one side only and banking up the other side. -
To clarify Cornwall planning/conservation will not allow PVC windows in listed buildings even if very good looking like wood they want wooden frames or as original. Im hoping one day this will change but whilst we are building our new home we have no spare funds for our current home.
-
It would be wise to check with your local window supplier first. we looked into this for our windows and rational and heritage both offer windows that are in other listed buildings around the country. Our local supplier came out to quote and see which would most likely be accepted by the local council. It turned out neither, the supplier is in Devon we are 10 miles inside Cornwall, he said he had installed many alternative 2G and 3G windows in Devon but Cornwall would never approve them. Our converted barn was converted in 2000 from a disused and half falling down barn, we are part of a larger group of buildings (same curtilage) with the farm house being the reason we are listed. Our listing for all the barns mentions windows of 6 panes, nothing more architectural. The windows still need replacing but the funds are needed elsewhere. I’m hoping one day Cornwall council listings will change their mind.
-
I can recommend the lamb on heating grid @torre mentions it also acts as the slip membrane between insulation and screed. I also have the build hub UFH stapler if you want to borrow it. The stapler is passed member to member, I would pay for postage to you and you keep for the next user and post to them.

-
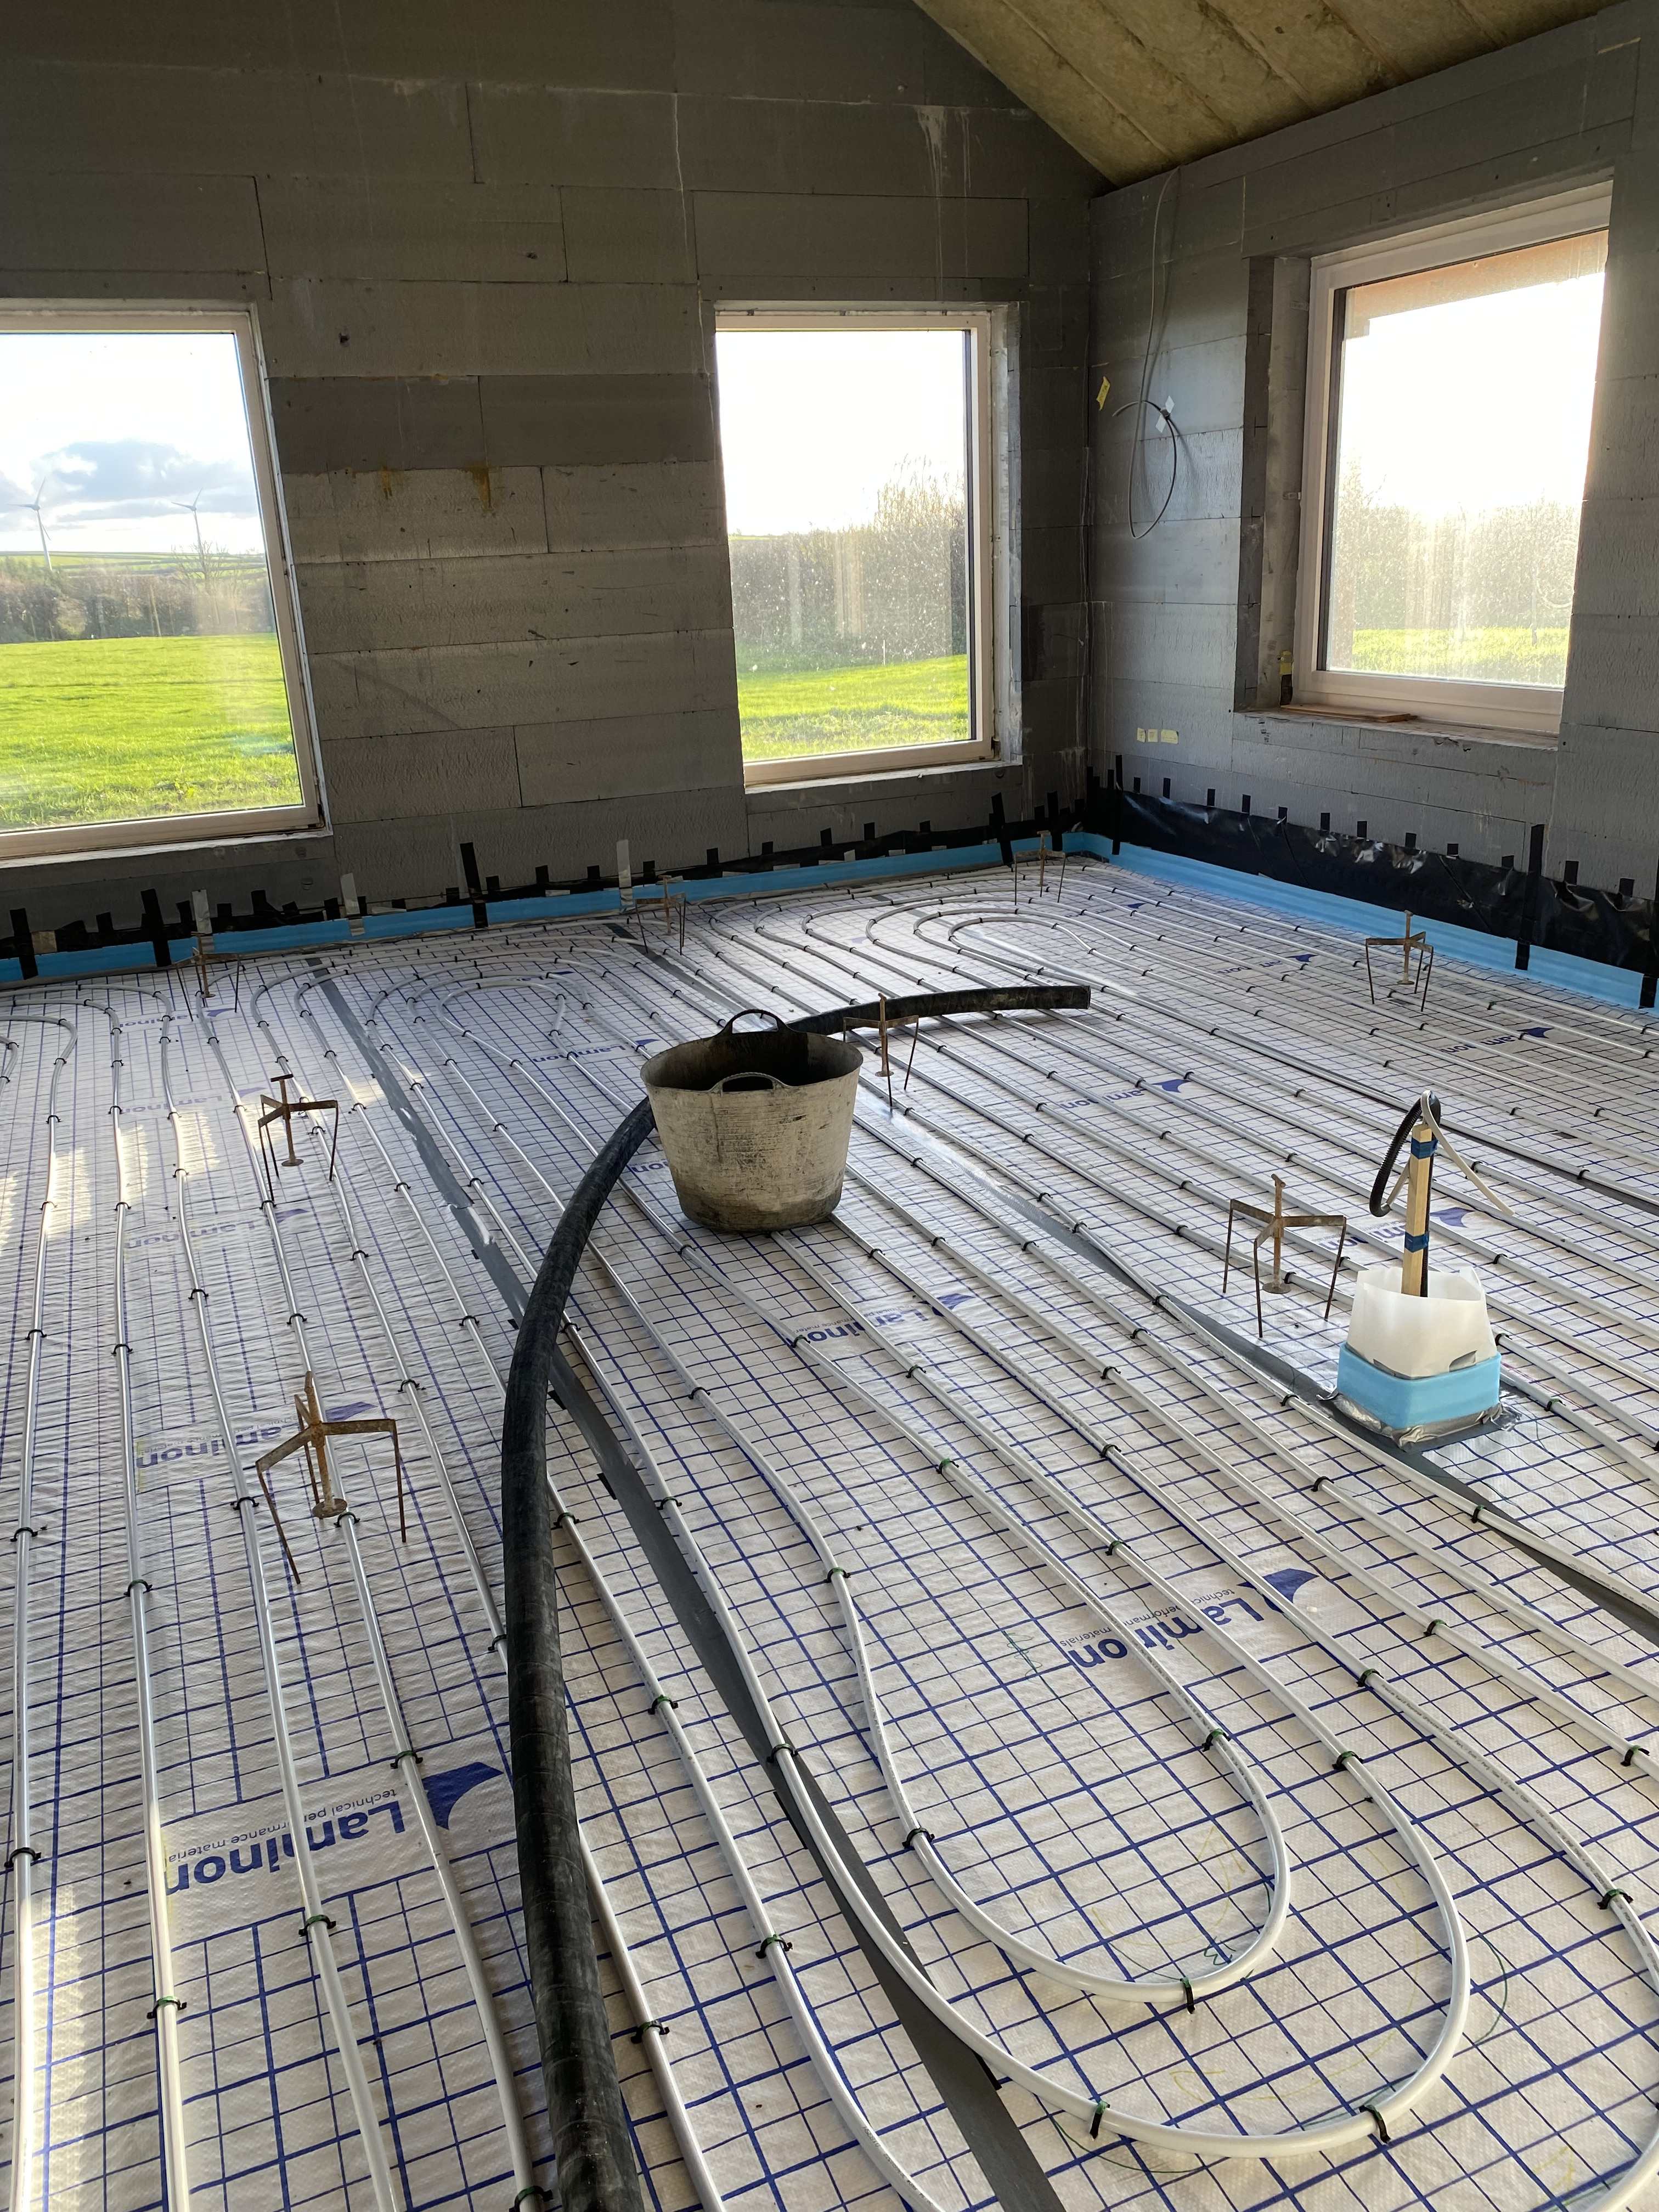
UFH and screed complete and the Plastering starts in the vaulted area.
Susie commented on Susie's blog entry in The Old Cow Shed
I’m glad it’s useful, you do need to remember we are a bungalow, we found the roof insulation and floor insulation to be obviously much more than a house with another floor but we did particularly want/need a bungalow. ICF is fairly expensive but again that was our choice. it’s also amazing how costs have increased in such a short time, we are just about to order our front door and the original quote from Norrsken is now more than double so we are looking elsewhere. -
Unvented hot water cylinder (electric)
Susie replied to AidanGee93's topic in Boilers & Hot Water Tanks
The two consumer units may be because in 1995 we were installing the radio time signal for Economy 7 (in the country as opposed to towns) and storage heaters etc were often put on the second CU. -
UFH and screed complete and the Plastering starts in the vaulted area.
Susie commented on Susie's blog entry in The Old Cow Shed
@DevonMade we put the ducts through the roof when tiling the roof. -
UFH and screed complete and the Plastering starts in the vaulted area.
Susie commented on Susie's blog entry in The Old Cow Shed
Hi @DevonMade We’re having a Willis water immersion system for the UFH you can research that on the forum and a conventional vented hot water cylinder heated on economy 7 or solar diversion. We can install both ourselves so no labour costs, parts can be replaced quickly and cheaply if required. The cylinder has a shower coil and a shower take off to keep our options open. It’s mostly going to be just 2 adults. We have found living here it’s a lot harder to find tradesmen (plumbers particularly) than back in Manchester. If you need one there is a wait so you can be without heat/DHW etc, if it’s summer the holiday let’s seem to get priority. The above answer I would understand not to be as the norm. MVHR we have chosen the Zehender Q350 with pre heater (frost protection) buying online and installing ourselves. This is one of the few things that has come down in price in the last 3 years since research started. I was going for a vent axia but have read on here about bearings being changed after a few years (5 years?) and the price change has pushed me to the Zehender it’s better spec and quieter. Good luck with your own build. -
UFH and screed complete and the Plastering starts in the vaulted area.
Susie posted a blog entry in The Old Cow Shed
Weeks 56 to 74 The UFH is laid and the screed is providing a lovely wobble free surface for the ladders and makes brushing up so much nicer. Our neighbour kindly lent us his scaffold tower so that we could insulate the vaulted ceiling in the open plan area which is approx 5m high. This has enabled me to finish insulating between the rafters with 140mm of Rockwool and I have PIR sheets to put up under the rafters. For cutting both the Rockwool and the PIR I created a few templates of different angles and had them ready for when my husband came to help pass them up to me. Once the Rockwool was finished we both took it in turns on the scaffold tower fitting the PIR. Having a vaulted ceiling in the openplan area and partially vaulted elsewhere will give us plenty of light and nice high ceilings but for now they are awkward to cut around to insulate and ensure the VCL is tight around the junctions. The time spent doing this will no doubt be forgotten once we move in and it is starting to feel closer. We marked out the kitchen island location and dining room table location to get first fix electic lighting located and measured for the kitchen units. For my birthday treat our daughter came to stay and dog sit our elderly Greyhound so that we could go shopping looking at kitchens. We spent almost 4 hours in Wren Exeter with Harvinder but we think we have ordered a lovely kitchen and pantry. Unfortunately our neighbour needed the scaffold tower back but said we could borrow it again as soon as he had finished with it. We then decided we should book in the plasterer as things were starting to come together, rather luckily for us our plasterer had just had a job cancel on him and when we spoke to him on a Thursday he said he could start next week either Tuesday or Wednesday. As we hadn’t finished insulating one side of the vaulted ceiling we said we couldn’t be ready that quick unless he wanted to quote for fitting the PIR and the VCL, which I had already purchased most of. We then spent the weekend and Monday getting first fix electrics in the kitchen and mocking up where the TV was going to get the electrics and room wall lighting ready. Things have therefore started to move on quicker than we expected, so we are hopeful of moving in by winter this year with a working kitchen, one bathroom and one bedroom finished at least. Kitchen design render. Testing TV and speaker location. Even with the plasterboard lifter its hard with 3 on the scaff and one on the lifter, so glad I'm not doing it. Taking time off the insulation has meant I can tidy the UFH expansion foam up in all the rooms and the trip hazards we kept ignoring at door room openings, whilst being on hand for the plasterers if they need more tape etc or have any questions. Once they have finished with the VCL membrane I might finish the VCL I started before we borrowed the scaffold tower or I could take a rest from the build and catch up on so many other things, even paint schemes maybe. I have caught up on the build paperwork this weekend. The total spend to date including the provisional kitchen figure of £15,000 which includes VAT, units, worktop, tiles and some appliances so not the reclaim amount. Total to date £238917 over 135m2 is £1770 m2 for a 3 bed, 2 bath, bungalow This is broken down as follows. General £4200 Carpentry £500 Kitchen £15100 Roof insulation, inc membrane and tapes etc £4500 First Fix Electrical £1230 First fix plumbing and partial bathroom costs (ongoing) £1430 UFH £900 Drainage and gutering £8540 Floor insulation inc tape and membranes £2670 Screed £2740 Cladding (over ordered but ideas are developing) £5690 Render £3090 Solar 7.5 KWp £8570 Roof £23300 Windows £20870 no front door yet. ICF Construction £119600 Pre build costs and fees etc £15830 The back of envelope guesstimate of future spend is £35k to finish apx £2k per m2- 8 comments
-
- 10
-

-
I taped mine up the walls and the studs. two layers of insulation with staggered overlaps then a thin slip sheet before the UFH. the slip sheet is also taped up the walls my dpm is taped up more so the slip sheet is also taped to this. can you get any insulation in the studs below screed level? Easier to put in first and gives something to tape onto. Then maybe some noggins for the plasterboard later. I presume you’re having UFH, all the layers you tape up the walls and studs should be neat and tight. This gives something for the expansion foam something to stick to in the studs where there would otherwise be nothing.
-
Floor slab insulation. Test my logic please?
Susie replied to saveasteading's topic in Barn Conversions
Still ongoing. Hope to put my last insulation order in soon. The points you get can be used across all the group sites but I haven’t purchased much more on the other sites. -
Floor slab insulation. Test my logic please?
Susie replied to saveasteading's topic in Barn Conversions
I have been buying my insulation from https://www.insulationsuperstore.co.uk/ I have had multiple deliveries from them, at least 10. I have purchased rock wool and PIR only once did the delivery come on a huge truck most came on a small van and the drivers were very friendly, delivered from SIG or Markovich, with good delivery communication. The Rockwool I purchased by the pallet, the PIR by the sheet mixing my order 80mm and 100mm and spending the minimum for free delivery which meant I was not stacking rooms full and risking damaging corners. I was often getting discount codes or used my account points to get money off never paid the full price. -
Things are all progressing well. You will be living in a nice warm house with a good shower well before me.
-
I have recently used both types of expansion foam with and without the skirt. I found the skirt, often yellow foam, only had one small strip of adhesive on it to stick to the walls and wasn’t a snug fit. I also had one without the skirt, blue, which had a full depth of adhesive on the rear that stuck really well to the walls and studs.
-
Welcome to the forum. There are quite a few of us building our home for later years. you sound like you have a lot of building experience to pass on.
-
Windows & Doors into ICF openings....
Susie replied to Mulberry View's topic in Insulated Concrete Formwork (ICF)
Norrsken measured my openings and we discussed our XPS ICF and it’s load bearing. The ICF company were happy with its capabilities but it was Norrsken who were more concerned about the installation whilst in progress. I’m not sure of the compressive strength of your ICF but it was where the packers go and point load whilst in the installation process. It is possible to push your thumb in our ICF and make a small indentation and as it’s not memory foam that small indent will stay there under the frame. Similarly the packers could push down in to ICF. Norrsken provided stokbord to sit the frames on. I EPDM before the stokbord and then taped the windows after. Were fairly coastal with high wind and rain and open to the countryside with no buildings buffering us. Windows have now been in a year I think and we’re not plastered so can still see the Icf and no water leaking in around windows. -
I have not used that one. The ones made up of two strips are good. By the time you have filled and sanded three times it will be solid. The paper actually ’soaks’ up the fill and that’s part of its bond and strength the metal strips take the knocks more but might have less bond as they can’t soak the fill the same. Looks like it has little perforations which is good. I know some prefer the paper tapes without the metal because the perforations allow good contact with the fill. If you are doing the filling yourself can you have a go with a sample piece and see which you like the best. It’s also handy to know where you can buy from when you run out, as you say online can be quick as can Wickes who sell Knauf and SF and TS. PM me if you want a small section of the paper tape with the two metal strips.
-
Correct Gullies / Traps / Hoppers for Rainwater System
Susie replied to MortarThePoint's topic in Rainwater, Guttering & SuDS
Are you concerned about leaves? I’ve used something like this. FLOPLAST PUSH-FIT DEBRIS GULLY 110MM (25121) My rainwater also goes to a soak away that has a bottle trap/bucket before it as well. I can’t say how good it all works as not been up long enough yet. -
Used these on my plant room, and happy with them to use again, would also consider using them for a vaulted ceiling to wall internal corner on my next room. It’s also dependent on the fill you do, how many fills and how many sands.
-
Sounds like it’s Utility company now so that’s good. Could be something in the deeds of neighbours but doesn’t sound like it matters any way. good luck on SUDs. You will probably have to dig a pit and prove you don’t drain away enough but your local BC may advise what others are doing locally.
-
Do you know how old the pipe is that runs through your garden? ’In England and Wales, private sewers and lateral drains became public on October 1, 2011. This legal change, enacted by the Water Industry (Schemes for Adoption of Private Sewers) Regulations 2011, automatically transferred the ownership of these privately-owned pipes to water and sewerage companies.’ if they are older than 2011 they are now considered to be public but the water board just don’t know they exist or the route they follow. Importantly if older than 2011 and they get a blockage then the water board unblock them as they are no longer private. if newer than 2011 they are private but will join the public sewers some where so you would need permission from the private owner most likely who ever is furthest up stream to join their sewer but also will possibly still need to notify water board as you are adding to the volume of water in their pipe unless it all goes to a private ditch or pond.
-
Consumer unit replaced. Certs needed?
Susie replied to BotusBuild's topic in Consumer Units, RCDs, MCBOs
You definitely should have received a certificate if you still have some of the details of who did the installation you can look them up on NICEIC if registered with them or other part P registration schemes eg ECA and if you find who they are registered with then you can contact the registration scheme who will organise it to be checked. All the registration schemes guarantee the work of the members that’s why the annual checking of the members is done. As Nod said when the annual checks are done it is often at least a full day of inspecting previous jobs and checking paperwork and insurance is in place. Being a qualified electrician getting the certifications from college etc is not the same as being registered with a part P scheme provider as your work or company work is continually checked. -
https://simplybamboo.co.uk https://www.bambooflooringcompany.com these are the big 2 companies, other flooring companies might have one or 2 bamboo plank options, eg Wickes has at least one double up on the free samples by getting delivered to multiple homes if necessary. They don’t hassle you afterwards. They also do skirting to match and door thresholds etc
-
Have you considered bamboo flooring, can be glued down or loose lay, UFH is ok, some are 2x harder than oak and can be sanded if necessary. Uniclic edges, non slip, and UV coating, warm under feet. we have a dog who loves to run up and down hallways, and do that stretching out of legs with toe nails ready to mark floor. Only had samples so far but seem good option for us.
-
Toilet into vent stack/Alternative to vent stack?
Susie replied to Del-inquent's topic in Waste & Sewerage
You can get external AAV https://www.floplast.co.uk/article/external-air-admittance-valves