Jump to content

The 4 phases from Rainwater to flushing the loo


Marvin

1199 views

We use 4 phases from rainwater to flushing the loo with it and they are:


  1. Collecting, separating and storing in bulk tank.
  2. Fine filtering and storing in barrel.
  3. filling the gravity tank in the loft
  4. Filling the cistern


This is not the only system that is possible but one that works with our property limitations.

This design and its controls take into account freezing conditions.

We use two 12V pumps run from batteries and PV.


Here is our system:

562440070_Rainwatersetupgenerallayout.thumb.jpg.7350244762ac140f5ee7b3a7bdbc096d.jpg


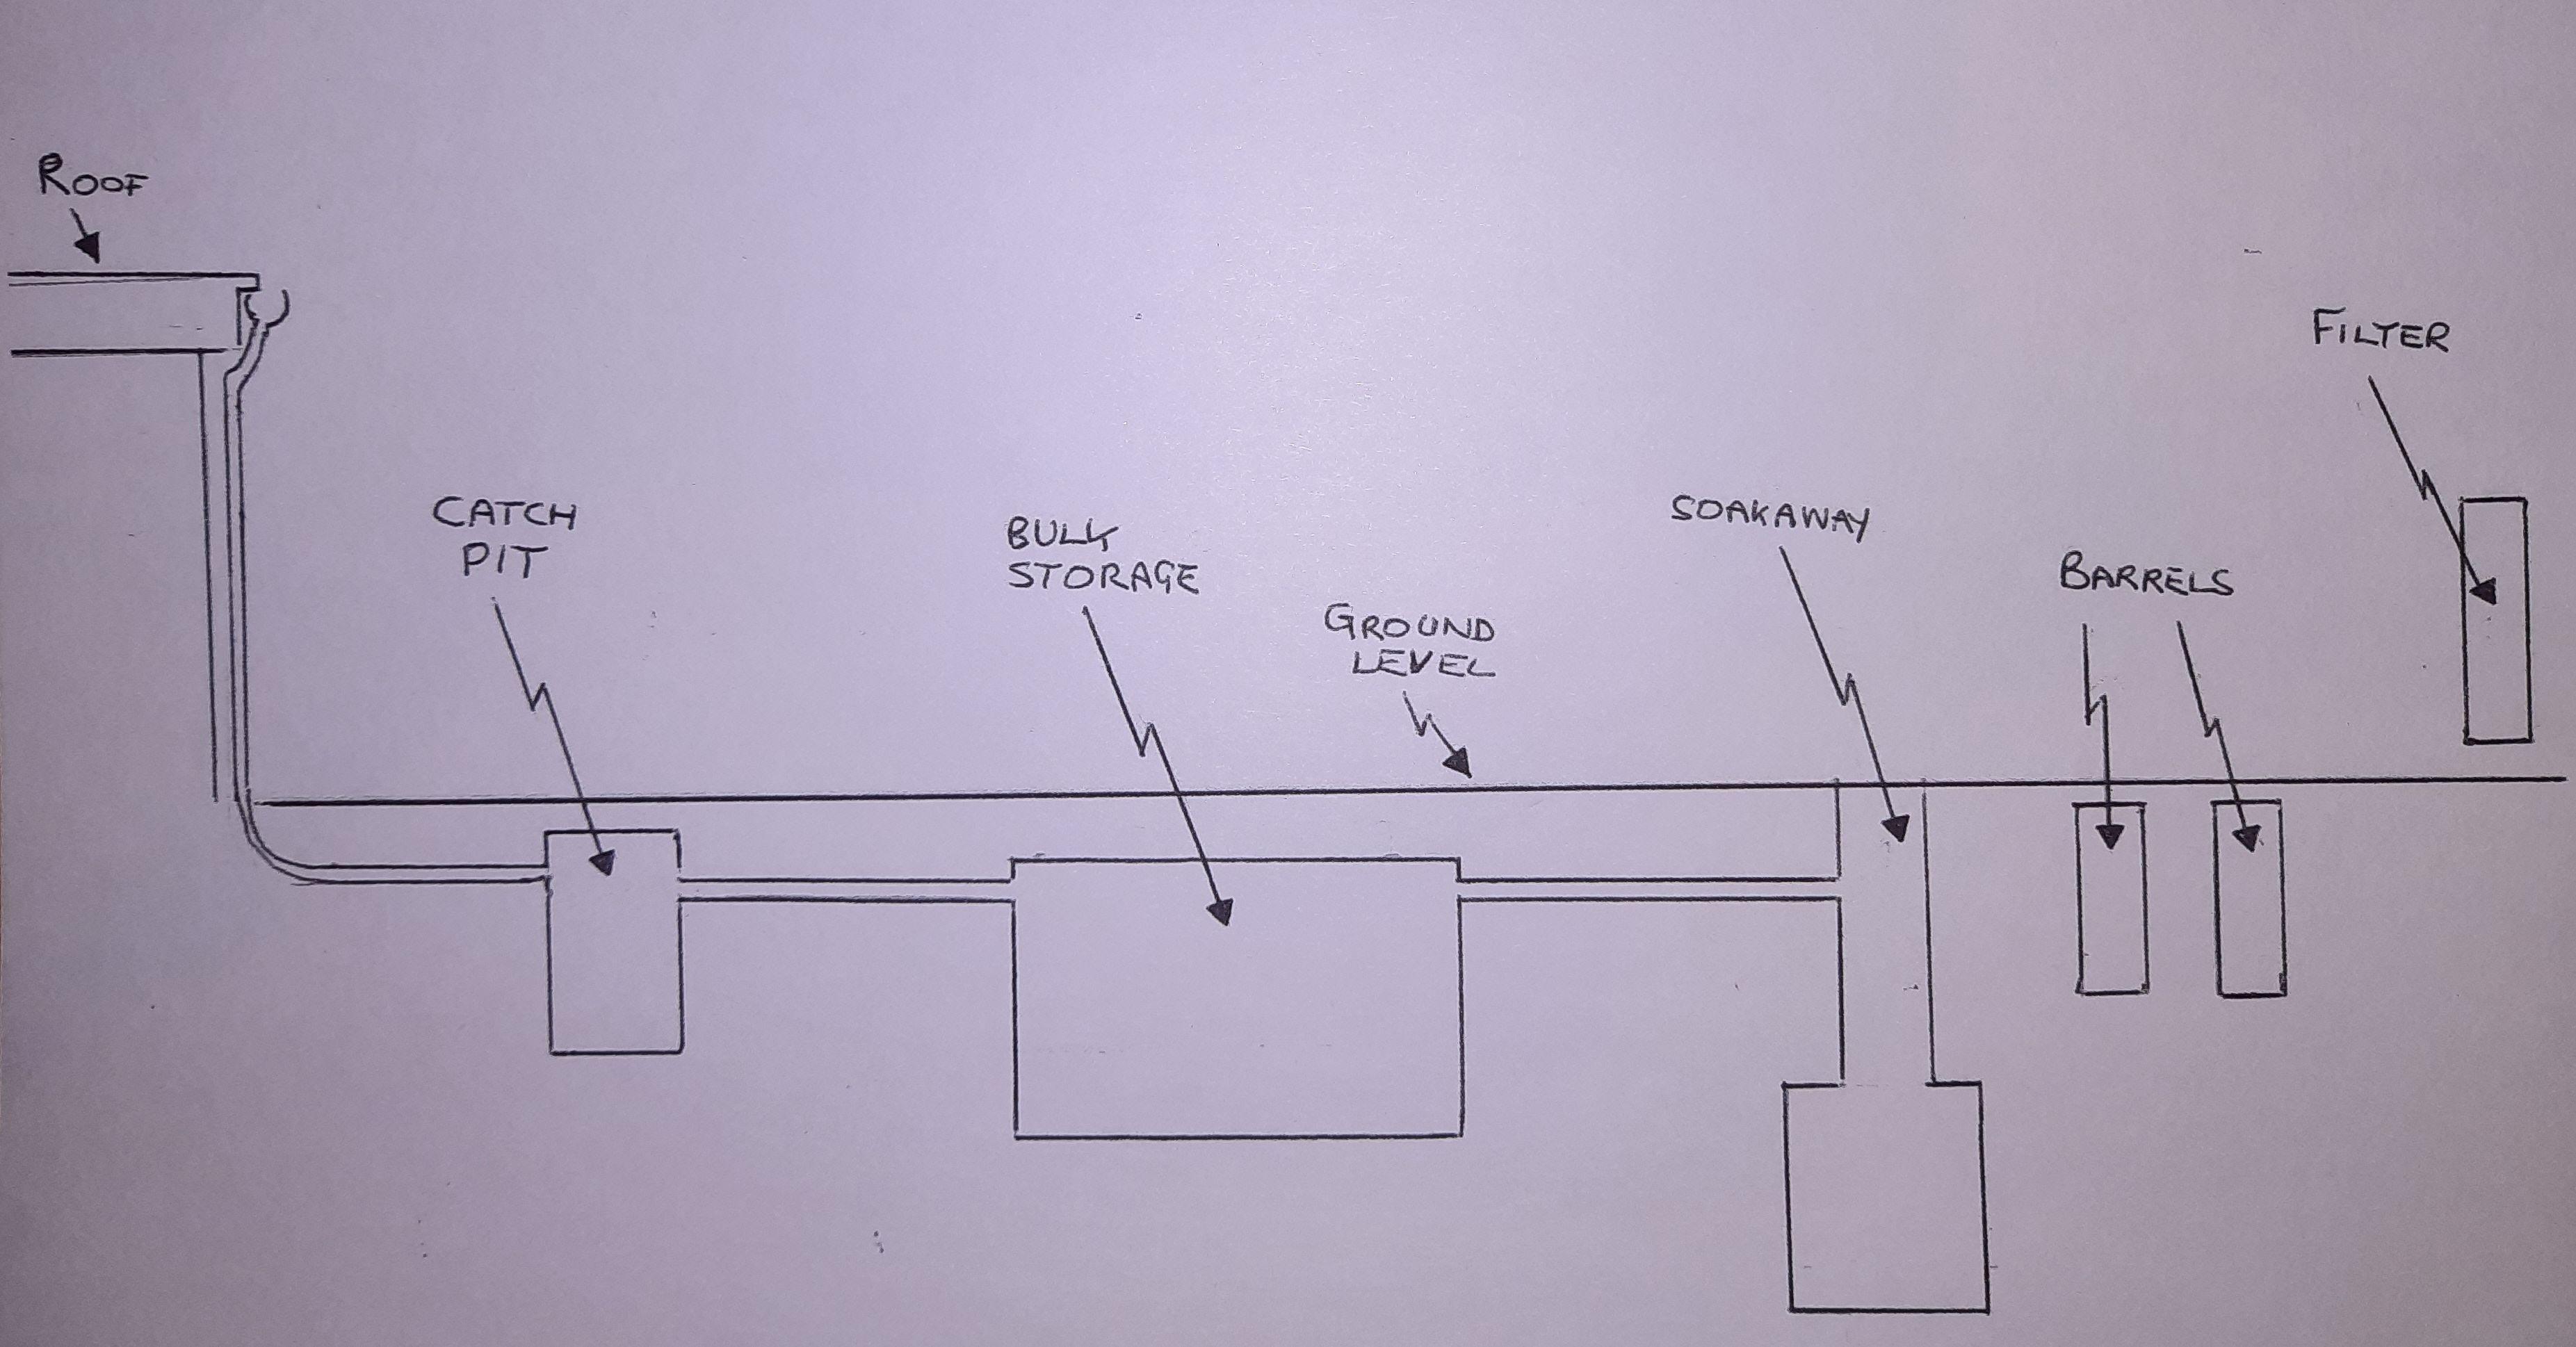
We were limited for space and you can use gravity to your advantage 


Here is the design of the catch pit:


Catchpit.thumb.jpg.1fdc3dc2877992038252f5c5ee044234.jpg


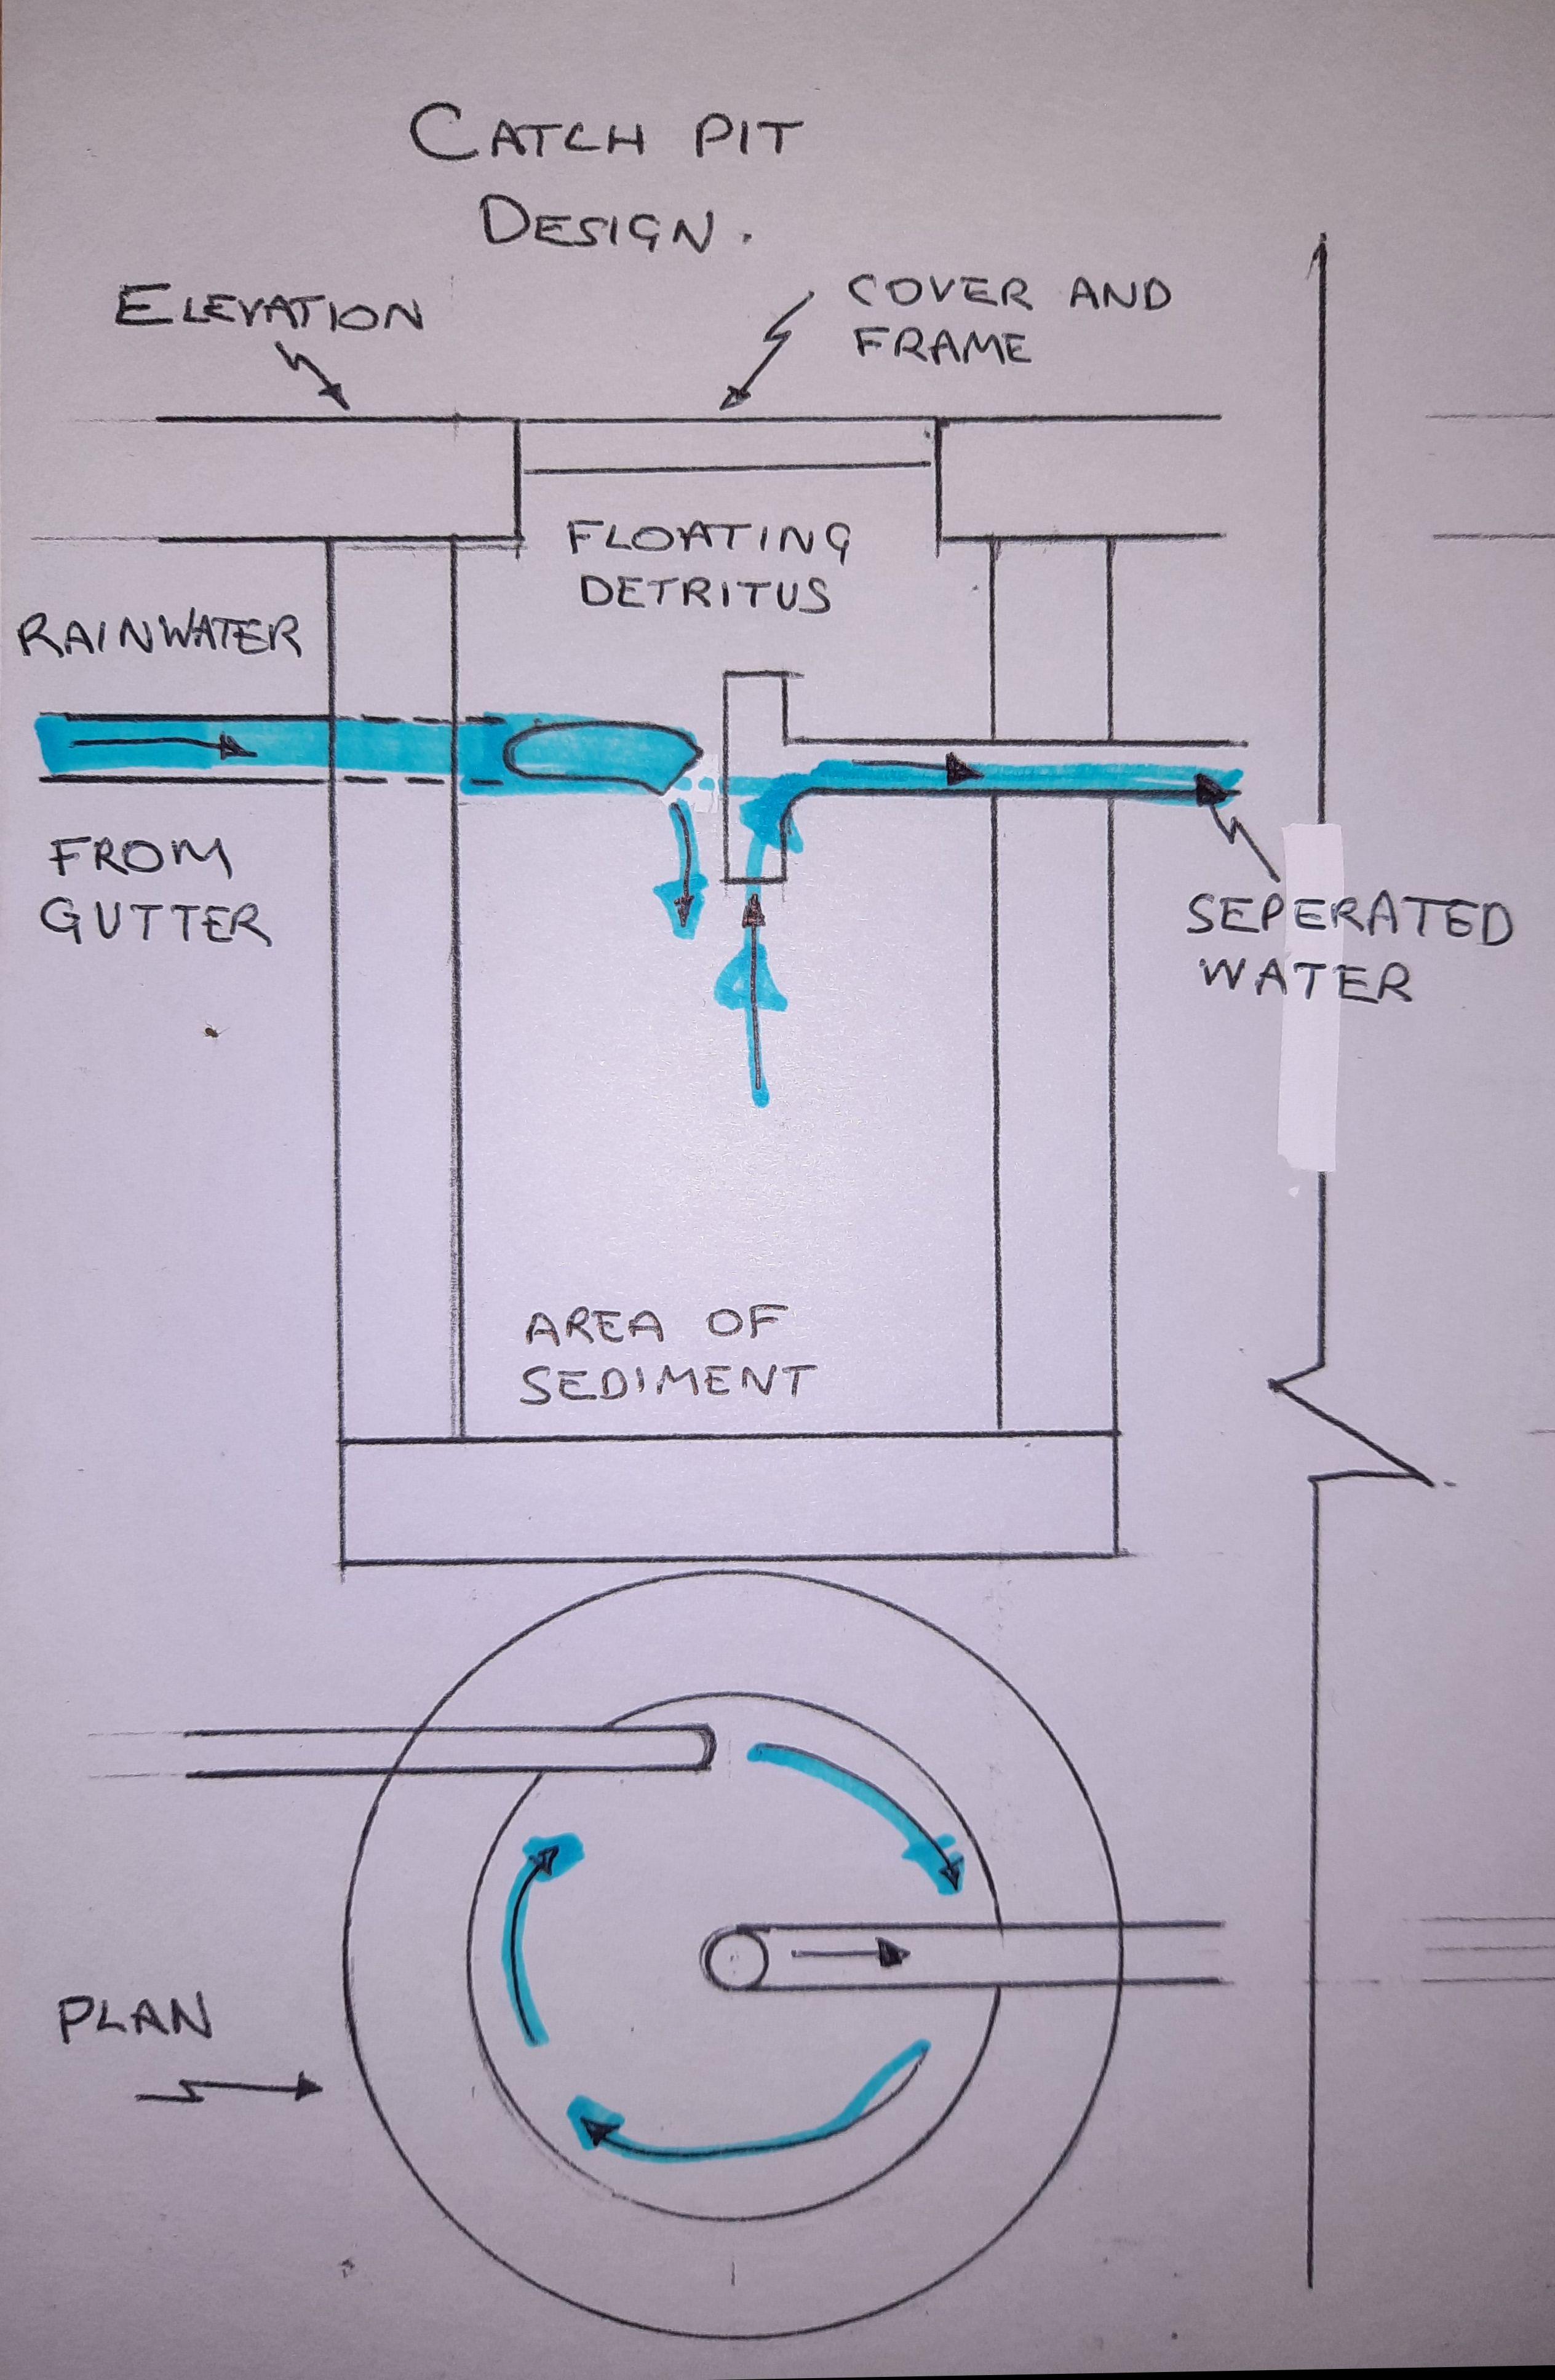
A circular chamber with a flat base side entry pipes angled to make the inflowing water circulate around the edges.

A Tee set vertically with the branch horizontal. 


Construction details could be concrete slab and engineering brick sides with manhole cover and frame like ours.


Needs to either be under the ground or drained before frosts if using a plastic tank.


Ours was 900 internal diameter, really the bigger the more sediment settles, but this is for about 200m2 catchment area. If your going for smaller 
I would go for as tall as deep as you can.


The separated water goes directly into your bulk storage ready for further filtering. 


Ours has just been cleaned out and I will take photos tomorrow.


M

Edited by Marvin
typo

  • Like 5

9 Comments


Recommended Comments

Pictures of our Catch pit:

1076953298_CP1.thumb.jpg.af15e3854f806cffa6b3b25229068b32.jpg

This is just our installation. You could use a plastic water butt, with the right pipe entries, by the side of the downpipe but remember to protect against frost.  Note that the inlets are at the normal water level to avoid water dropping too far and agitating the sediment at the bottom.


Lift the lid and...


CP3.thumb.jpg.f16e7fa364ca3cc3b3c6364ccfe70807.jpg

Central branch fitting inlets both angled. Please not the chamber is empty and would normally have water full to the bottom of the outlet pipe.


The catch pit works entirely by gravity.  The size of the pipes has to be able to take the potential amount of water coming from the source. No use using a 32mm pipe if your supply is a 75mm down pipe!!!


Different angle:

CP4.thumb.jpg.323882db765e56e1f4bef5345c634355.jpg

You can see by the black tidemark on the left hand pipe the normal level of the water.


The position of our catch pit is basically along an uninterrupted pipe between the down pipe and the soakaway. This ensures that any rainwater will pass through the catch pit and then the store before entering the soakaway. Unlike water butt fillers that you usually see attached to down pipes, once full, the store continues to receive fresh water and the excess goes into the soakaway.   

CP5.jpg

Link to comment

Diagram of the bulk water store design:


1792486210_Mainstore.thumb.jpg.b9c88482adf2611113b10ce4bc793486.jpg


Our store is below ground. I actually used a pond liner and soakaway crates below the patio. Here's looking down the access hole:

409262982_Store1.thumb.jpg.877898aee92634df9f8c8056deea63a8.jpg 


Make sure the pump you need is capable of getting down the hole! The pump will need to be determined by the flow rate and head of water required.


Missed on my diagram of the tank is the fine filter tank overflow pipe which goes FROM the filter down to the bulk tank. This was needed to let the air out of the head of the fine filter tank and also to let water back into the bulk tank if it is being pumped up faster than the filter can filter it.


Link to comment

What was the reason for using soakaway crates and liner instead of a tank?

And any details for the fine filter you are using / where is this located?

Edited by Jenki
Link to comment

Crates and liner for the shape, also crates designed to withstand side pressures.

We had limited room. (Shape low and wide)

 Fine filter next thing to post.

  • Thanks 1
Link to comment

Collecting, separating


Very nice design. I would just suggest 2 tiny improvements, which are possibly not necessary or worth doing as retrofit.

1. break the rwp run through a gully with grating, to catch the bigger stuff that comes off the roof. Much easier and safer at ground level then a grille in the gutter. Also reduces the occasions for cleaning the catch pit.

2. Close the top of the T, in case any detritus drops through there. Just laying a tile or brick on it would do.

  • Thanks 1
Link to comment
51 minutes ago, saveasteading said:

Collecting, separating


Very nice design. I would just suggest 2 tiny improvements, which are possibly not necessary or worth doing as retrofit.

1. break the rwp run through a gully with grating, to catch the bigger stuff that comes off the roof. Much easier and safer at ground level then a grille in the gutter.

Most stuff off the roof goes through gratings in 2 places and what is left is dead moss and bird poo. However, you are right that a gully with a grating at ground level would be better. The pipe layout between the properties make this choice not possible, but still a good idea (anyone who is considering setting something up!). 

51 minutes ago, saveasteading said:


Also reduces the occasions for cleaning the catch pit. Yup! Right again. 


51 minutes ago, saveasteading said:

2. Close the top of the T, in case any detritus drops through there. Just laying a tile or brick on it would do.

Good idea. I didn't want to seal it off because of the chance of syphoning. Now I will have to lift the lid again....😧


Thanks for your thoughts.


M

Link to comment

Fine filtering basics:


https://www.cdc.gov/healthywater/global/household-water-treatment/sand-filtration.html


Here is my adaption:


filter.thumb.jpg.6c34545ebdf0fc475281b942b020b3cf.jpg


So the pump pumps up to the top of the filter. The water drips through the diffuser (The bottom inch of a bucket with holes in it in my case) and runs through the barrel to the bottom pipe grid. The filling is a graded very fine sand (I used block kiln dried paving sand, then sharp sand, then grit, then sieved 20mm down stone into bigger and bigger layers until starting around the pipe grid with 20mm stones.


The levels of all of the pipes in relation to the power of the main store pump, how fast it flows, and how fast the water passes through the filter bed is all critical.


If the main store pump pumps the water in quicker than the filter will let it pass it will travel out the vent at the top. As it rises up the vent pipe more pressure is put on the filter to let the water pass and this may resolve the problem. However high up I installed a Tee which allows any excess to return to the main store via the overflows from the barrels.


I brought the water level low so it was in the sand to try and stop the plastic barrel from splitting in a frost. 


The bottom pipe needs to rise so water is held in the sand.


Most of the pipework I used is actually overflow pipe including the pipe grid, but the delivery pipe from the main store pump is plastic pipe.


The barrel I used:

https://www.diy.com/departments/ward-100l-slimline-water-butt/679230_BQ.prd?ds_rl=1272379&ds_rl=1272409&ds_rl=1272379&gclid=Cj0KCQjwlemWBhDUARIsAFp1rLUXvi2blwts9pdQr41OGdw5rsl3w2dI2rdvcebgBOq0ri9rHPDhGhEaAj82EALw_wcB&gclsrc=aw.ds&storeId=1163


1425125393_sand2.thumb.jpg.7679c5e460dde90e0efa4ca07f3bc72b.jpg


Pipes all over the place...1628457657_sand3.thumb.jpg.7698ff5d3dc396dd6b73fd3c890d9145.jpg


2066228830_Sand5.thumb.jpg.5cd0945191f33e5a760a990abeb43fdd.jpg730256772_sand4.thumb.jpg.172af1336b7b3728751148d92a564fdb.jpg


In order to get the pipes right I played with the levels by putting a really tall pipe as a vent and looked to see how high the water went. Secondly I reduced the amount of sand used which had no adverse effects.


Once started the first water was brown but after about a week it went clear.


My filter is also connected at the top to a water butt overflow so during the winter the excess water flows through the sand filter over fills the barrels and overflows into the main store to run into the soakaway when too much. I think this constant trickle through the winter is what has kept the system so well.


Good luck.


M


  • Like 1
Link to comment

Your initial separating tank is using a vortex so this may not be relevant but the common way to design the inlet pipe going into a tank is it extend vertically down to near the bottom of the tank and terminate with a U-bend, forming a so-called 'calmed inlet'. This causes less stirring up and keeps the top surface layer, where bacteria and floaty things you don't want congregate most, as well as the bottom sediment from being disturbed.

Edited by Hastings
  • Thanks 1
Link to comment

Hi @Hastings


Thanks.


Definitely an improvement on my design which I will add on next summer. In my design the supply pipes enter below the water level in the catch-pit and are angled to swirl the rubbish to the sides with the draw off in the centre. 


Next summer I hope to vacuum out the bottom of the main storage tank to see what's in there.

Link to comment

Create an account or sign in to comment

You need to be a member in order to leave a comment

Create an account

Sign up for a new account in our community. It's easy!

Register a new account

Sign in

Already have an account? Sign in here.

Sign In Now
×
×
  • Create New...