Jump to content
  • entries
    17
  • comments
    113
  • views
    4574

If you like it then you should have put a roof on it


Crofter

2855 views

I had the offer of some help from a neighbour so decided to crack on with the roof sheets. These are corrugated sheets 4x1m and in the thicker 0.7mm spec, so fairly heavy and awkward things to handle. I did get the first sheet up and fixed by myself but am not daft enough to turn down an offer of help when it appears!


When I bought the roofing, I had recently read @ProDave's less than glowing review of Jewsons' plastic headed roofing screws, so made a point of asking what would be supplied. The guy at the BM was adamant that everybody these days prefers the plastic headed stuff, quicker to install, no caps to come loose, just a question of getting the right bit to drive them in with. He even did a straw poll of the people in the shop at the time...


Anyway, how do the screws work in real life? They certainly do not self drive, not by a long shot. And so far I have stripped the heads off two of them, although in both cases I was able to back the screw off and remove it using pliers. So it seems you need a decent hole punched in the  sheet, which slows down installation somewhat.


Getting the sheets up on the roof wasn't too hard once I figured out a method- I built a 'stretcher' to hold each sheet, and this is then run up a pair of wooden guide rails onto the roof. Doing the last sheet will be a bit tricky as we will have to pull the 'stretcher' out from under it, instead of moving the sheet to the side as we have been doing so far.


In other news, the hole for the flue is now made- a bit daunting cutting a whopping great hole in the roof!  I'll write another blog post about that as part of the stove installation,

image.jpg

  • Like 3

11 Comments


Recommended Comments

What I did with mine, was stack them all together, and mark out and drill pilot holes through all the sheets in one go in the stack.  That also helped to get all the screws in line.


NOTE I found a variation in length between the sheets of up to 10mm. So I made sure all the bottom edges lined up and the variation in length would be hidden under the ridge cap.


I used mole grips to tighten any screws that stripped their plastic heads before they were fully home.


You will have "fun" fitting the ridge piece. The only way I found was sit astride the roof and work my way along it drilling and fixing as I went.
 

Link to comment

Very trusing of you to pre drill all the holes!

I figured that I wouldn't want to drill without using a punch first, and if I was doing that I might as well bash it a few more times and make the hole that way. I could tell it was time to call it a day when it took 20 blows to knock the punch through though... it had taken five to start with...


The ridge is certainly going to be interesting... 

Link to comment

For what it's worth I used self tapping screws with washers on my vertical wavy tin.

You soon learn the trick of starting at the very top of the crest and going easy on the last few revolutions.

Self tapper blasts through the metal...then bites on the batten..then, slowly slowly or you will either trash the washer or worse bend the wriggly tin.

On the roof (using caps) it's much the same....slow down for the last few turns and the lid will snap on perfecto

BTW the self tappers I got from screwfix were as good as a new HSS drill bit!

Edited by Tennentslager
Link to comment

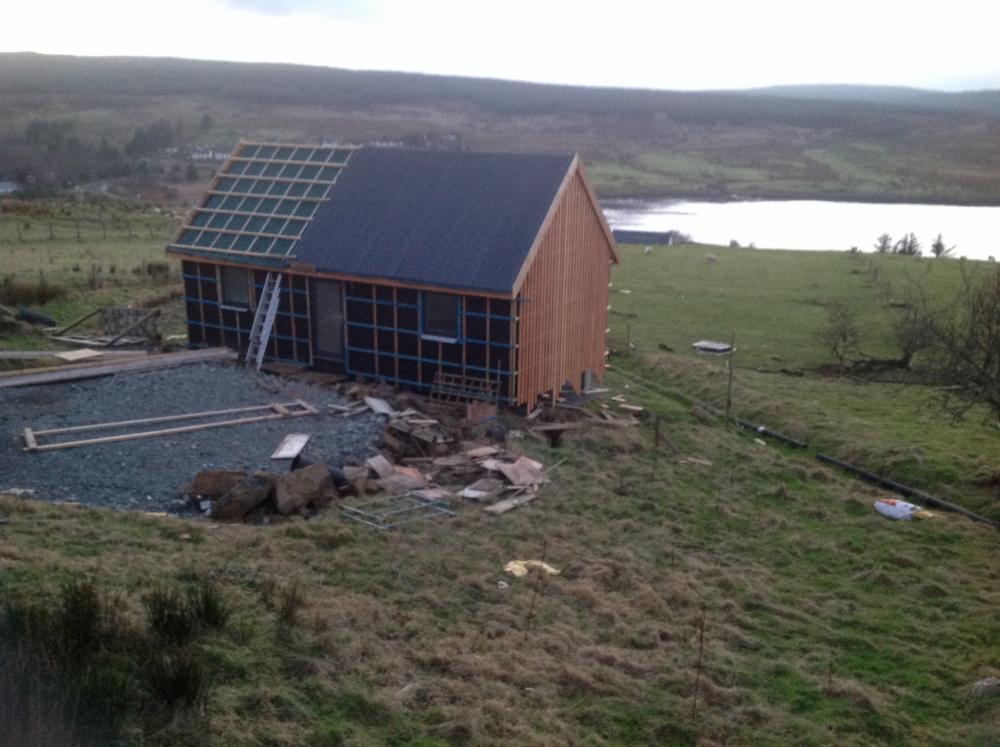
Slow going on your own and with no scaffolding... but that the hardest side done! Just need to finish the easy side now...


image.jpg

  • Like 3
Link to comment

Ok so I am no Ed Graves but here's a wee clip... now I just have to work out how to work at this speed without the aid of a timelapse app!


Link to comment

The bit I want to know is HOW did you fix the last sheet on each side, with no nice roof to stand on, and no scaffold up the gable end?  45 degree steel roof panels are to steep and slippery to stand on?  I fixed my "last sheet" standing on the scaffold.


Also how are you going to fit the ridge piece? I sat astride the roof, shuffling along as I screwed it in. That would be a bit hairy without the satisfaction of some scaffold to catch you if you slipped off, and without scaffold to get on and off at the ends.


Fair game for doing it all on your own.
 

Link to comment

Well for starters you need a nice calm day. The wind got up too much today so I still have the final piece to do.

On the side that I have finished, I used a hook made from an offcut of metal strapping, tied to a length of rope which looped around a batten. This could- with some padding to protect the sheet- be hooked onto the bottom edge of the sheet and take its weight, allowing me to draw out the trolley underneath. Then a long stick to prop up the bottom edge of the sheet so I could duck in underneath and remove the two wooden rails. This was the dodgiest bit of all since the sheet is only supported by a hook and a stick, and resting on the ridge. One gust of wind would bring the whole thing down :o


Then a case of putting in all the fixings I could reach, by standing on a ladder at the eaves or one propped against the gable. The final out of reach fixings I had to do by slinging a rope over the ridge and climbing down it.


Do I deserve a beer tonight??

Link to comment

I can see the headline. "Skye man decapitated by roofing sheet that came unhooked"  You deserve a beer (I think I need a beer after reading that) A roof ladder would be safer than a rope and a sling.


Reminds me of my "put a ladder down a well and climb down" episode and how I was told off afterwards about how dangerous that was (not to mention the extension lead and electric drill I took with me)
 

  • Like 1
Link to comment

Create an account or sign in to comment

You need to be a member in order to leave a comment

Create an account

Sign up for a new account in our community. It's easy!

Register a new account

Sign in

Already have an account? Sign in here.

Sign In Now
×
×
  • Create New...