Fraser Lamont
-
Posts
34 -
Joined
-
Last visited
Everything posted by Fraser Lamont
-
Hi, thanks for your reply. I haven't heard it act the same way when the DHW cycle is on, will check this out though when I can. Usually it happens on the Rad Heating, and usually for about half a minute. It only does it for extended periods of time if there is a greater difference between the required temp from NEST (21) and the actual temp of the house (23). I don't have a 'cooling unit' with my system - should the 'indoor zone' on the controller be on 'cool & heat' or 'heat only'? My installer left the system on the 'cool & heat' setting. I think the installer just left everything on the default settings, back up heat is switched off and twice throughout the winter, I ran out of hot water. Should I have the back-up heat on? Many Thanks!
-
Here's a link to YOUTUBE https://youtu.be/OO3Y82QilH0
-
and here's a video of the system running. Say the temp in the house is 23, I increase the temp on the NEST up to 24 to bring the system on, then lower it to say, 21, to turn it off, the bigger the difference between the required temp (in this case 21 on the NEST Controller), the actual temp in the house (in this case 23) - the longer the increase in speed/noise occurs in the pumps. That's why I'm wondering if the SAMSUNG GEN 6 setting for 'INDOOR ZONE' should be 'HEAT ONLY' instead of 'HEAT & COOL'. I tried using the 'HEAT ONLY' but I didn't restart the Controller, it behaved in the same way. There is only 1 zone in the house, all radiator valves are manual and open. JOULE (UK) told me there are actuators instead of of a 3-way valve and the actuators stay in the final position of what was last running (DHW/RAD). The Tech at JOULE wasn't sure if the pumps were cycling for something to do with the Heat Exchanger in the External Unit. Link to video where the pump speed and noise increases for a longer time where there was a bigger difference between required Heat (21) and actual temp (23) https://www.glenhaultin.co.uk/off-and-on.mp4
-
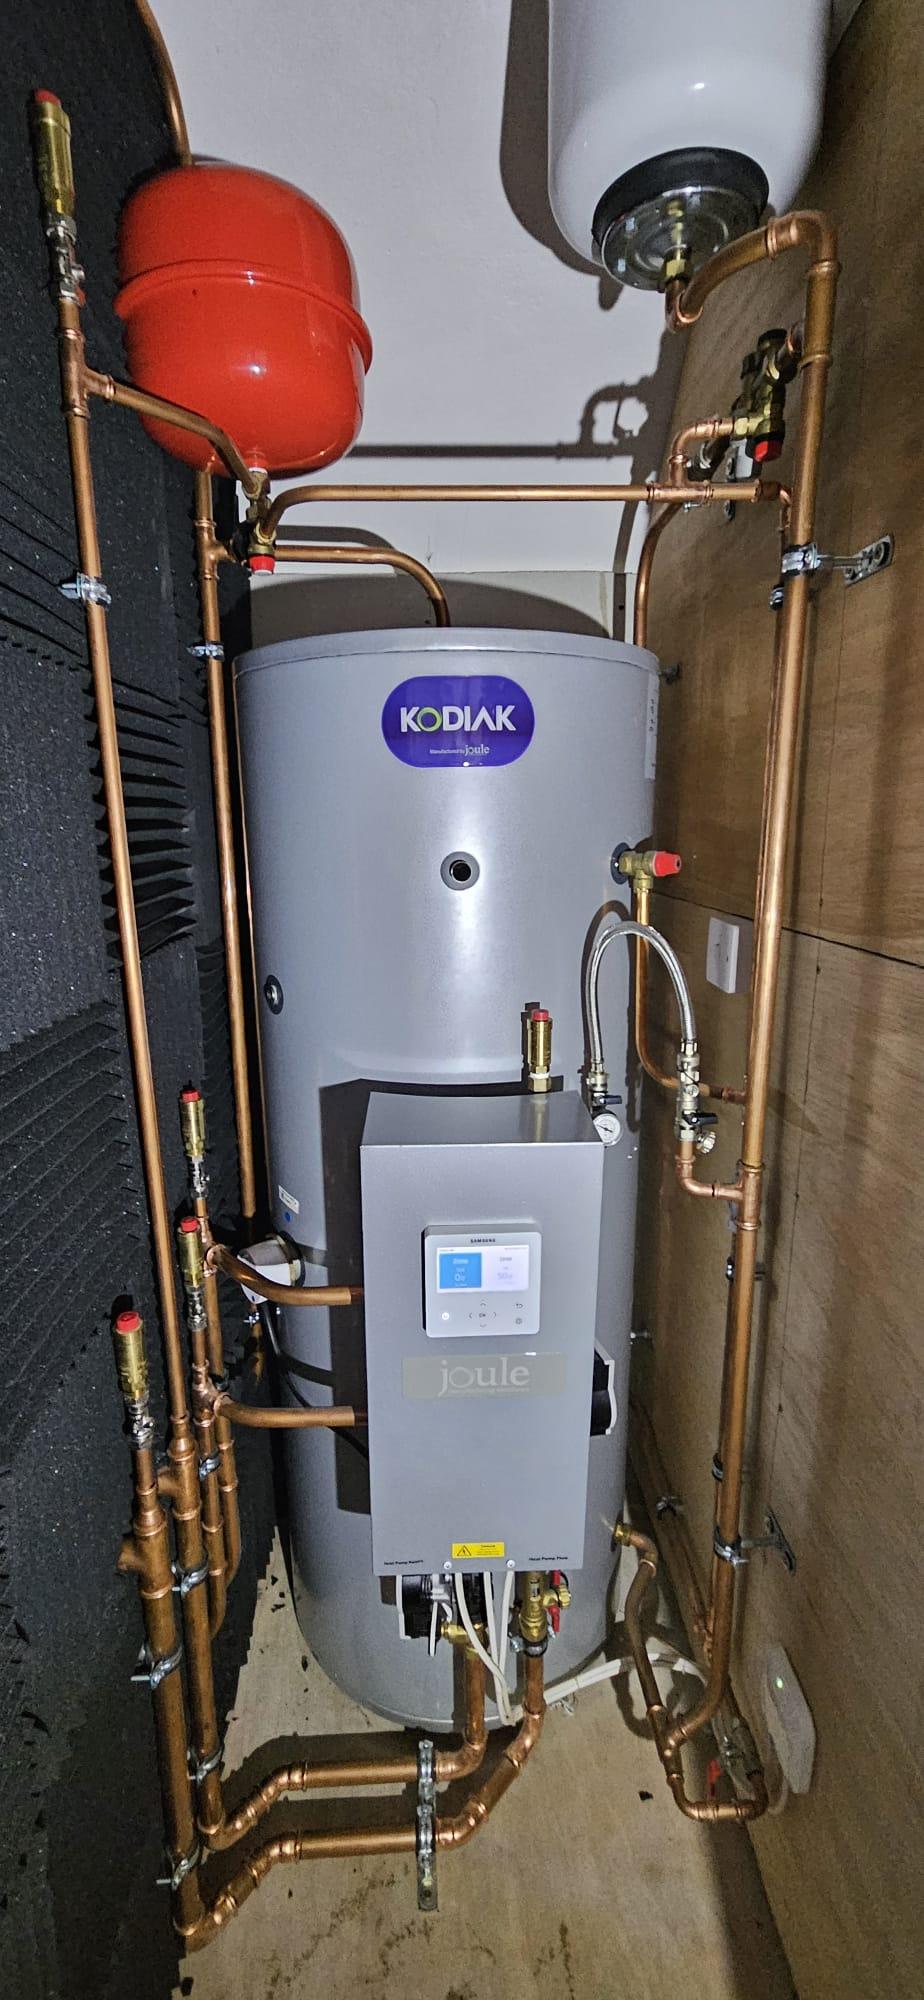
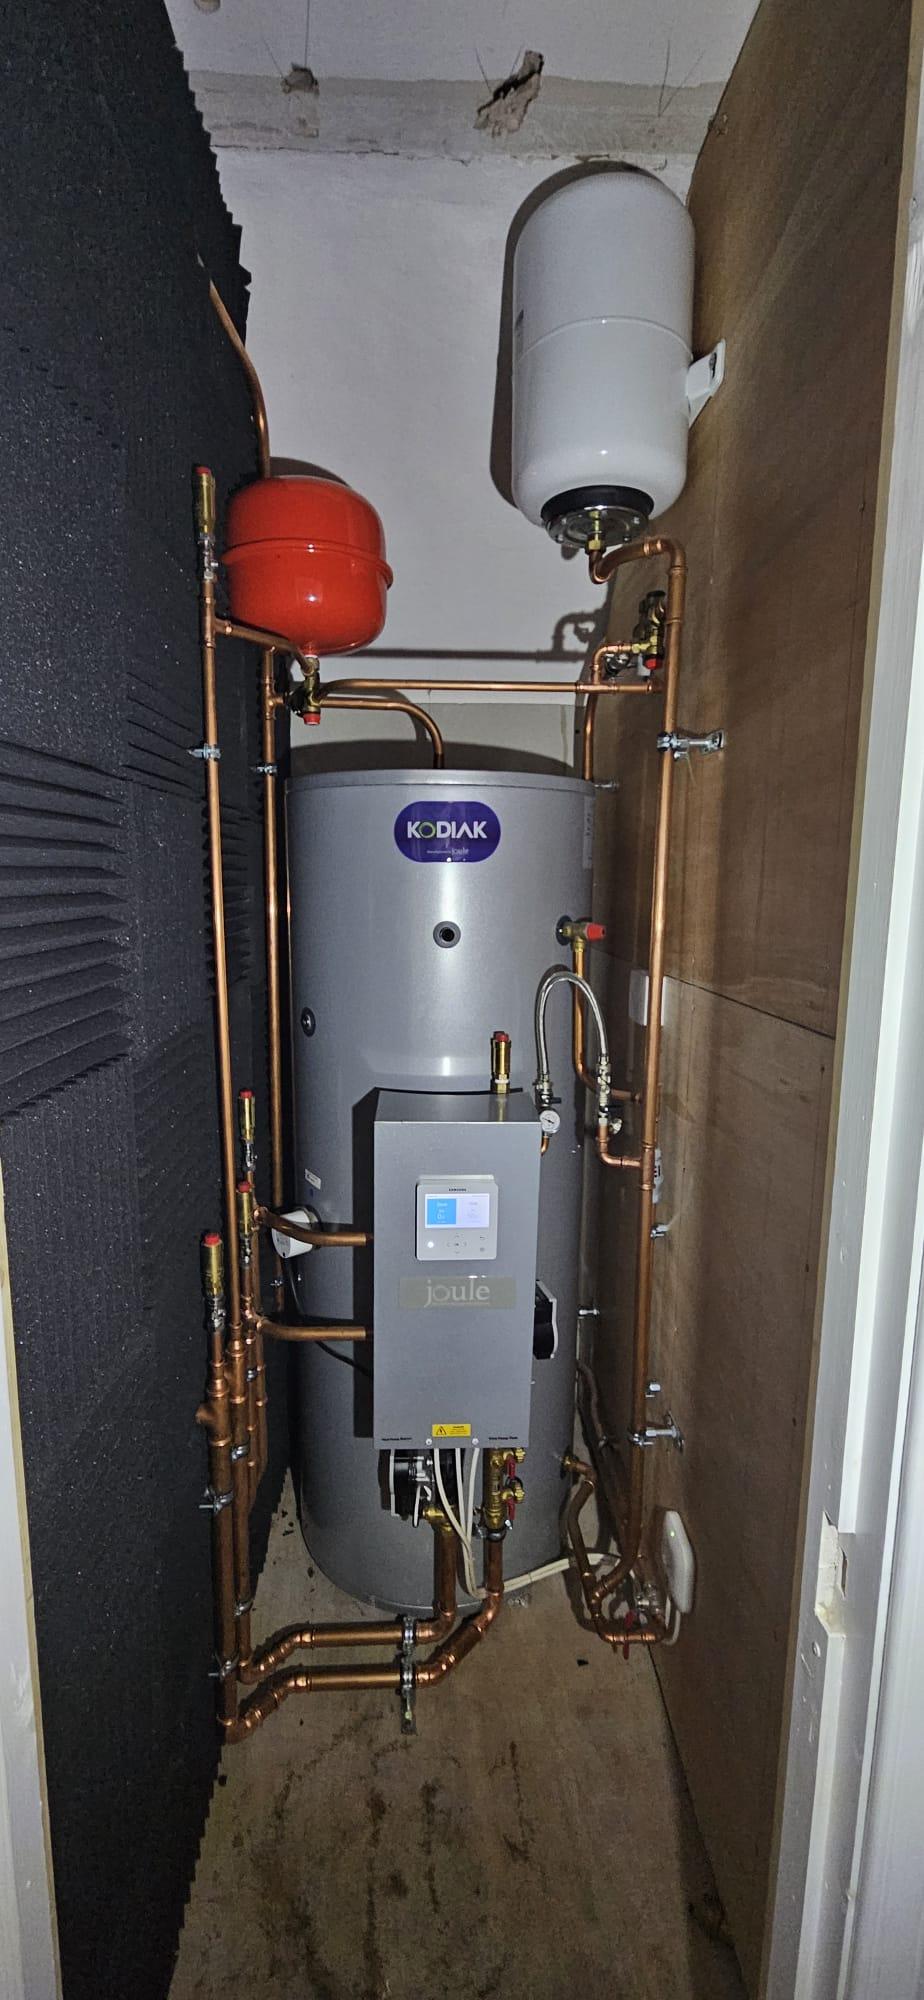
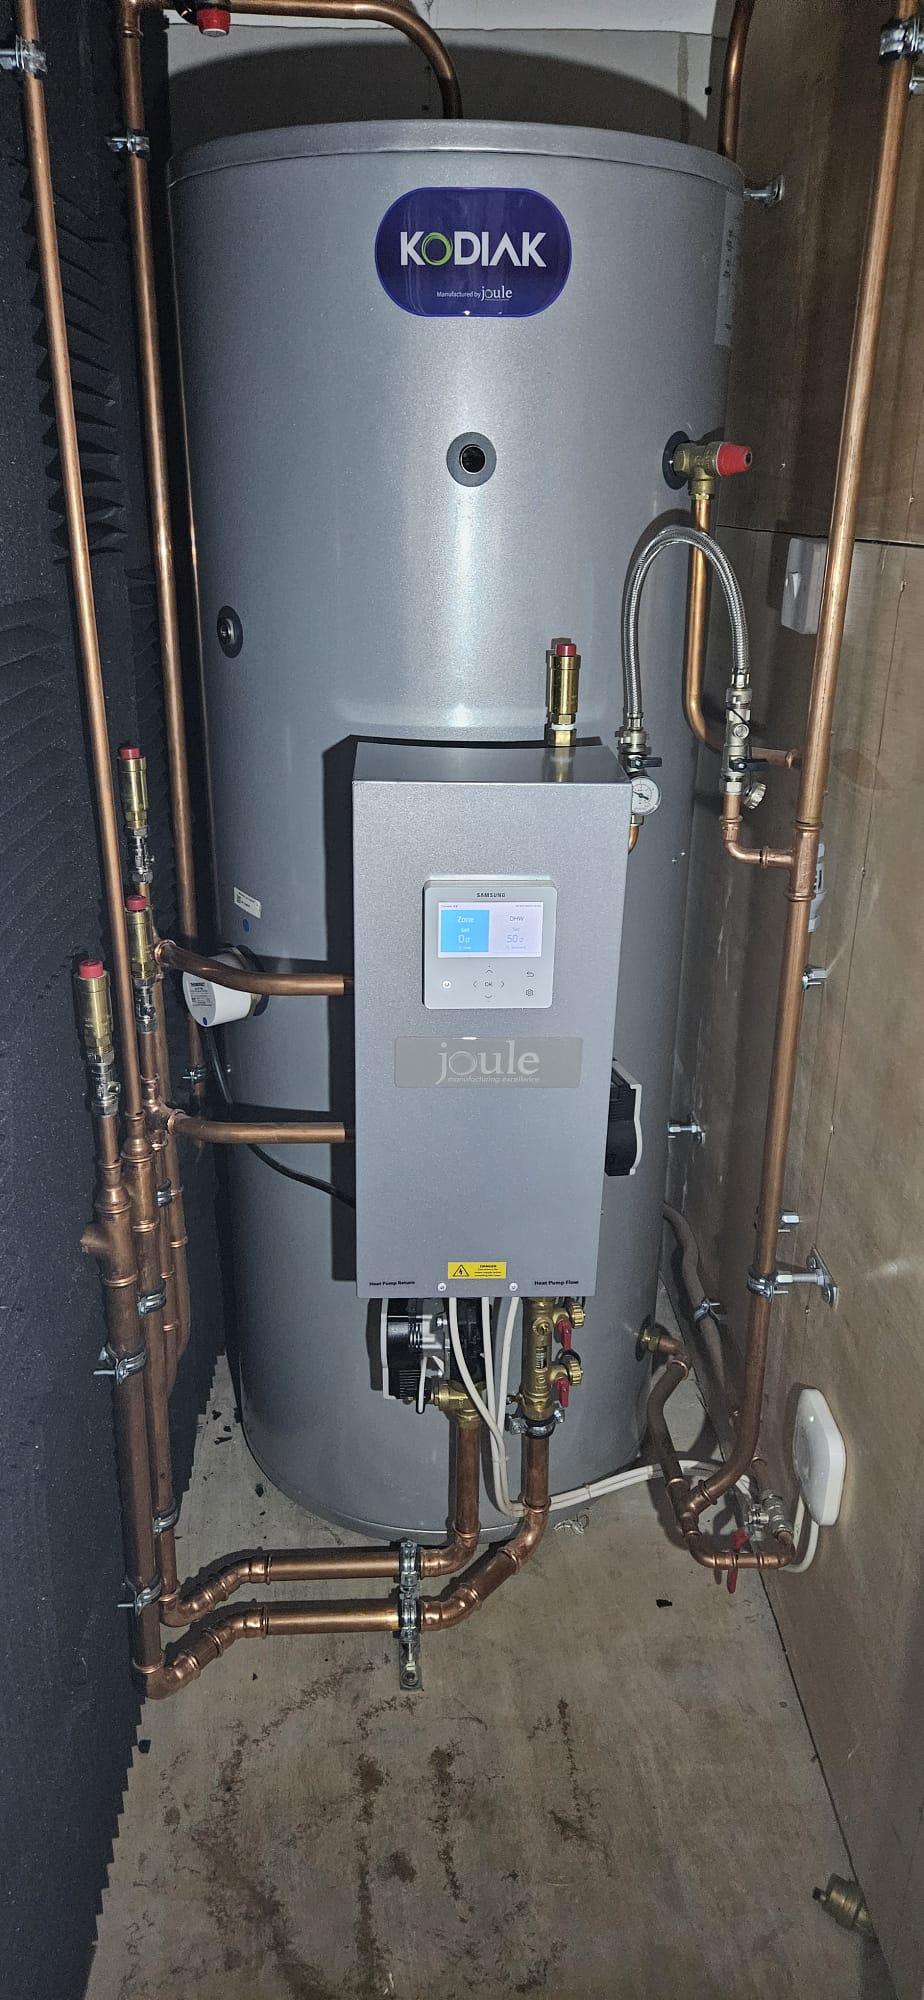
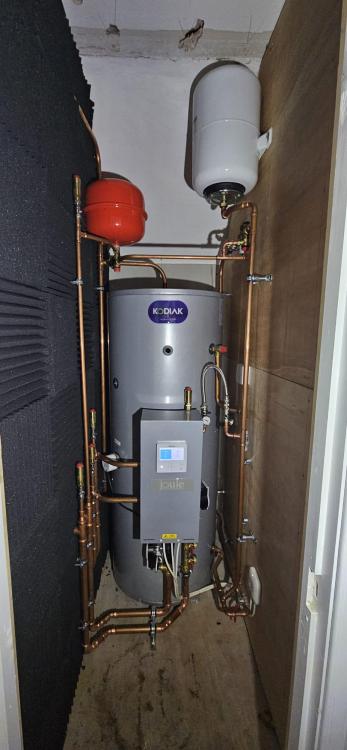
Hi, thanks for your reply, here's the indoor system photo's


-
Hi, I phoned JOULE, they told me the system uses actuators instead of a 3 way valve, and these stay in the last position when the system finishes whatever cycle it's on. I have just plain manual TRV's which are always open. The NEST only controls one zone on the controller, just 1 circuit on the heating system. The settings on the WILO-PARA circulation pumps are a bit confusing. The pumps can be set as 'constant' or 'variable' speeds. They are set at 'constant' speed but the speed definitely increases just before the heating turns off. It's very strange.
-
Sorry, forgot to mention, there are no other valves on my system other than what is included with the JOULE Pre Plumbed Cylinder. Thanks
-
Thank you for your reply. I have got photographs of the 2 pumps, the flow and the return. I thought the settings were on CONSTANT SPEED and the correct CURVE (III). The noise is definitely from the Pumps speed increasing - this happens when the thermostat temperature has been reached and the heating is turning off. The noise of the pumps doubles as the speed increases. Can this be from an external (SAMSUNG GEN6 Controller) sending another signal to the pumps? I went through some of the settings, the installer obviously didn't. I only have heating, no AIRCON with the system - should my Controller be set to HEAT ONLY? The setting on the machine just now is HEAT & COOLING. I changed it to HEAT ONLY and activated the heating, then turned it off and the pumps still increased the speed/noise. Should I restart the Controller if I change that setting, if so, how? Another thing. Twice during the winter I ran out of Hot Water. I checked the machine and the setting for BACKUP HEAT was turned off. I have another property with a GSHP and the default setting for that is on (6kw), so I'm confused why I'd run out of Hot Water with the ASHP. Is that the correct setting for the electric water heater to help boost the hot water when it's very cold? Many Thanks


-
Hi, thanks for your reply. I put the video online, using my own website as the host. There's a problem with the video - but the sound is there. This was captured at a distance of approx 1000mm using a phone camera. The sound in the video has already increased considerably by the time I started filming it. Link is www.glenhaultin.co.uk/noise.mp4
-
Thanks for your reply. Don't think there are any zone valves on the system. I understand this machine uses actuators instead of a 3 port valve, the Tech guy from Joule told me whatever state the machine shuts down, it stays like that, ie, no default setting. So if the rad heating closes down, it stays on that setting, it doesn't change for domestic hot water until that's required. It's a strange one
-
Hi folks, I have a problem with a SAMSUNG GEN6 Controller. The Cylinder was provided by JOULE (UK) with a SAMSUNG GEN 6 Control. There are 2 WILO pumps connected for flow/return to the external 12kw unit. Once the rad heating is finished, for approx 20 - 30 secs, it sound like a jet is about to take off. The noise increases from what I can only imagine is the pumps before clicking then turns off. I have used the NEST controller, increased the temp to bring on the rad heating, then turned it back down. Every time the rad heat turns off - the pump noise increases again for about half a minute before turning off. I phoned the supplier technical, sent them a video and they have never heard of this - just wondering if anyone here has. The guy did say, it might be sending a blast of liquid through to the external unit for the heat exchanger - I can't understand for what though. Many thanks
-
yes, the cavity is ventilated.
-
Hi, anyone have any links to good u value calculators? Tried some from PIR manufacturers - unfortunately not all options are listed. I'm renovating a house and the spec seems stricter in Scotland than elsewhere regarding u-values for new builds, refurbishments, extensions etc. Building Control have specified my walls to be within this spec which is 0.22. The house is built with double block, outer leaf rendered 15>20mm, dense block. There is a 75mm cavity with inner leaf dense block. The entire structure will have a certain value before I add the insulation etc. I will be going down the route of installing PIR directly onto the inner face of inner leaf, taping then battening and dry lining the walls (warm batten). I'm looking for a calculator which will allow me to enter all these details if there is one out there. I have been looking at 100mm PIR but if I can reduce this even a wee bit, I'd be delighted. No biggie if I can't. Thanks
-
it is a temporary measure, however I'll be reinstating the load bearer once the slab is down. The top of the slab will be level with the dwarf walls which gives me about 150-160mm, enough for 100mm PIR, underfloor heating and a screed - the floor will be approx the same level as it is now. I've bolted the new joists (150 x 47) at 600mm centres, I will be firing nails in at 400 centres to keep everything knitted together. The span is a few mm over 3600, I guess I'm hoping the paired joists will be ok at that distance. To be honest, the upstairs has been used for decades with no obvious problems. If I have to add new joists in between I'll have to go down the route of 75x175 or similar, any higher and the upstairs gable window would look daft.
-
No, I'm doing that anyway (removing the central load bearer), to get the ground floor done. Problem I have is the load bearer sits on doubled up Ground floor Joists, the load bearer is approx 50mm offset from the dwarf wall. I have to remove the load bearer to get the floor joists out. I would have been able to sort all of this in situ if the load bearer was not offset - by cutting the floor joists and packing between the dwarf and the load bearer but I don't have that option. Once the ground floor void is filled and with a new slab at dwarf wall level, the load bearer will be put back up again
-
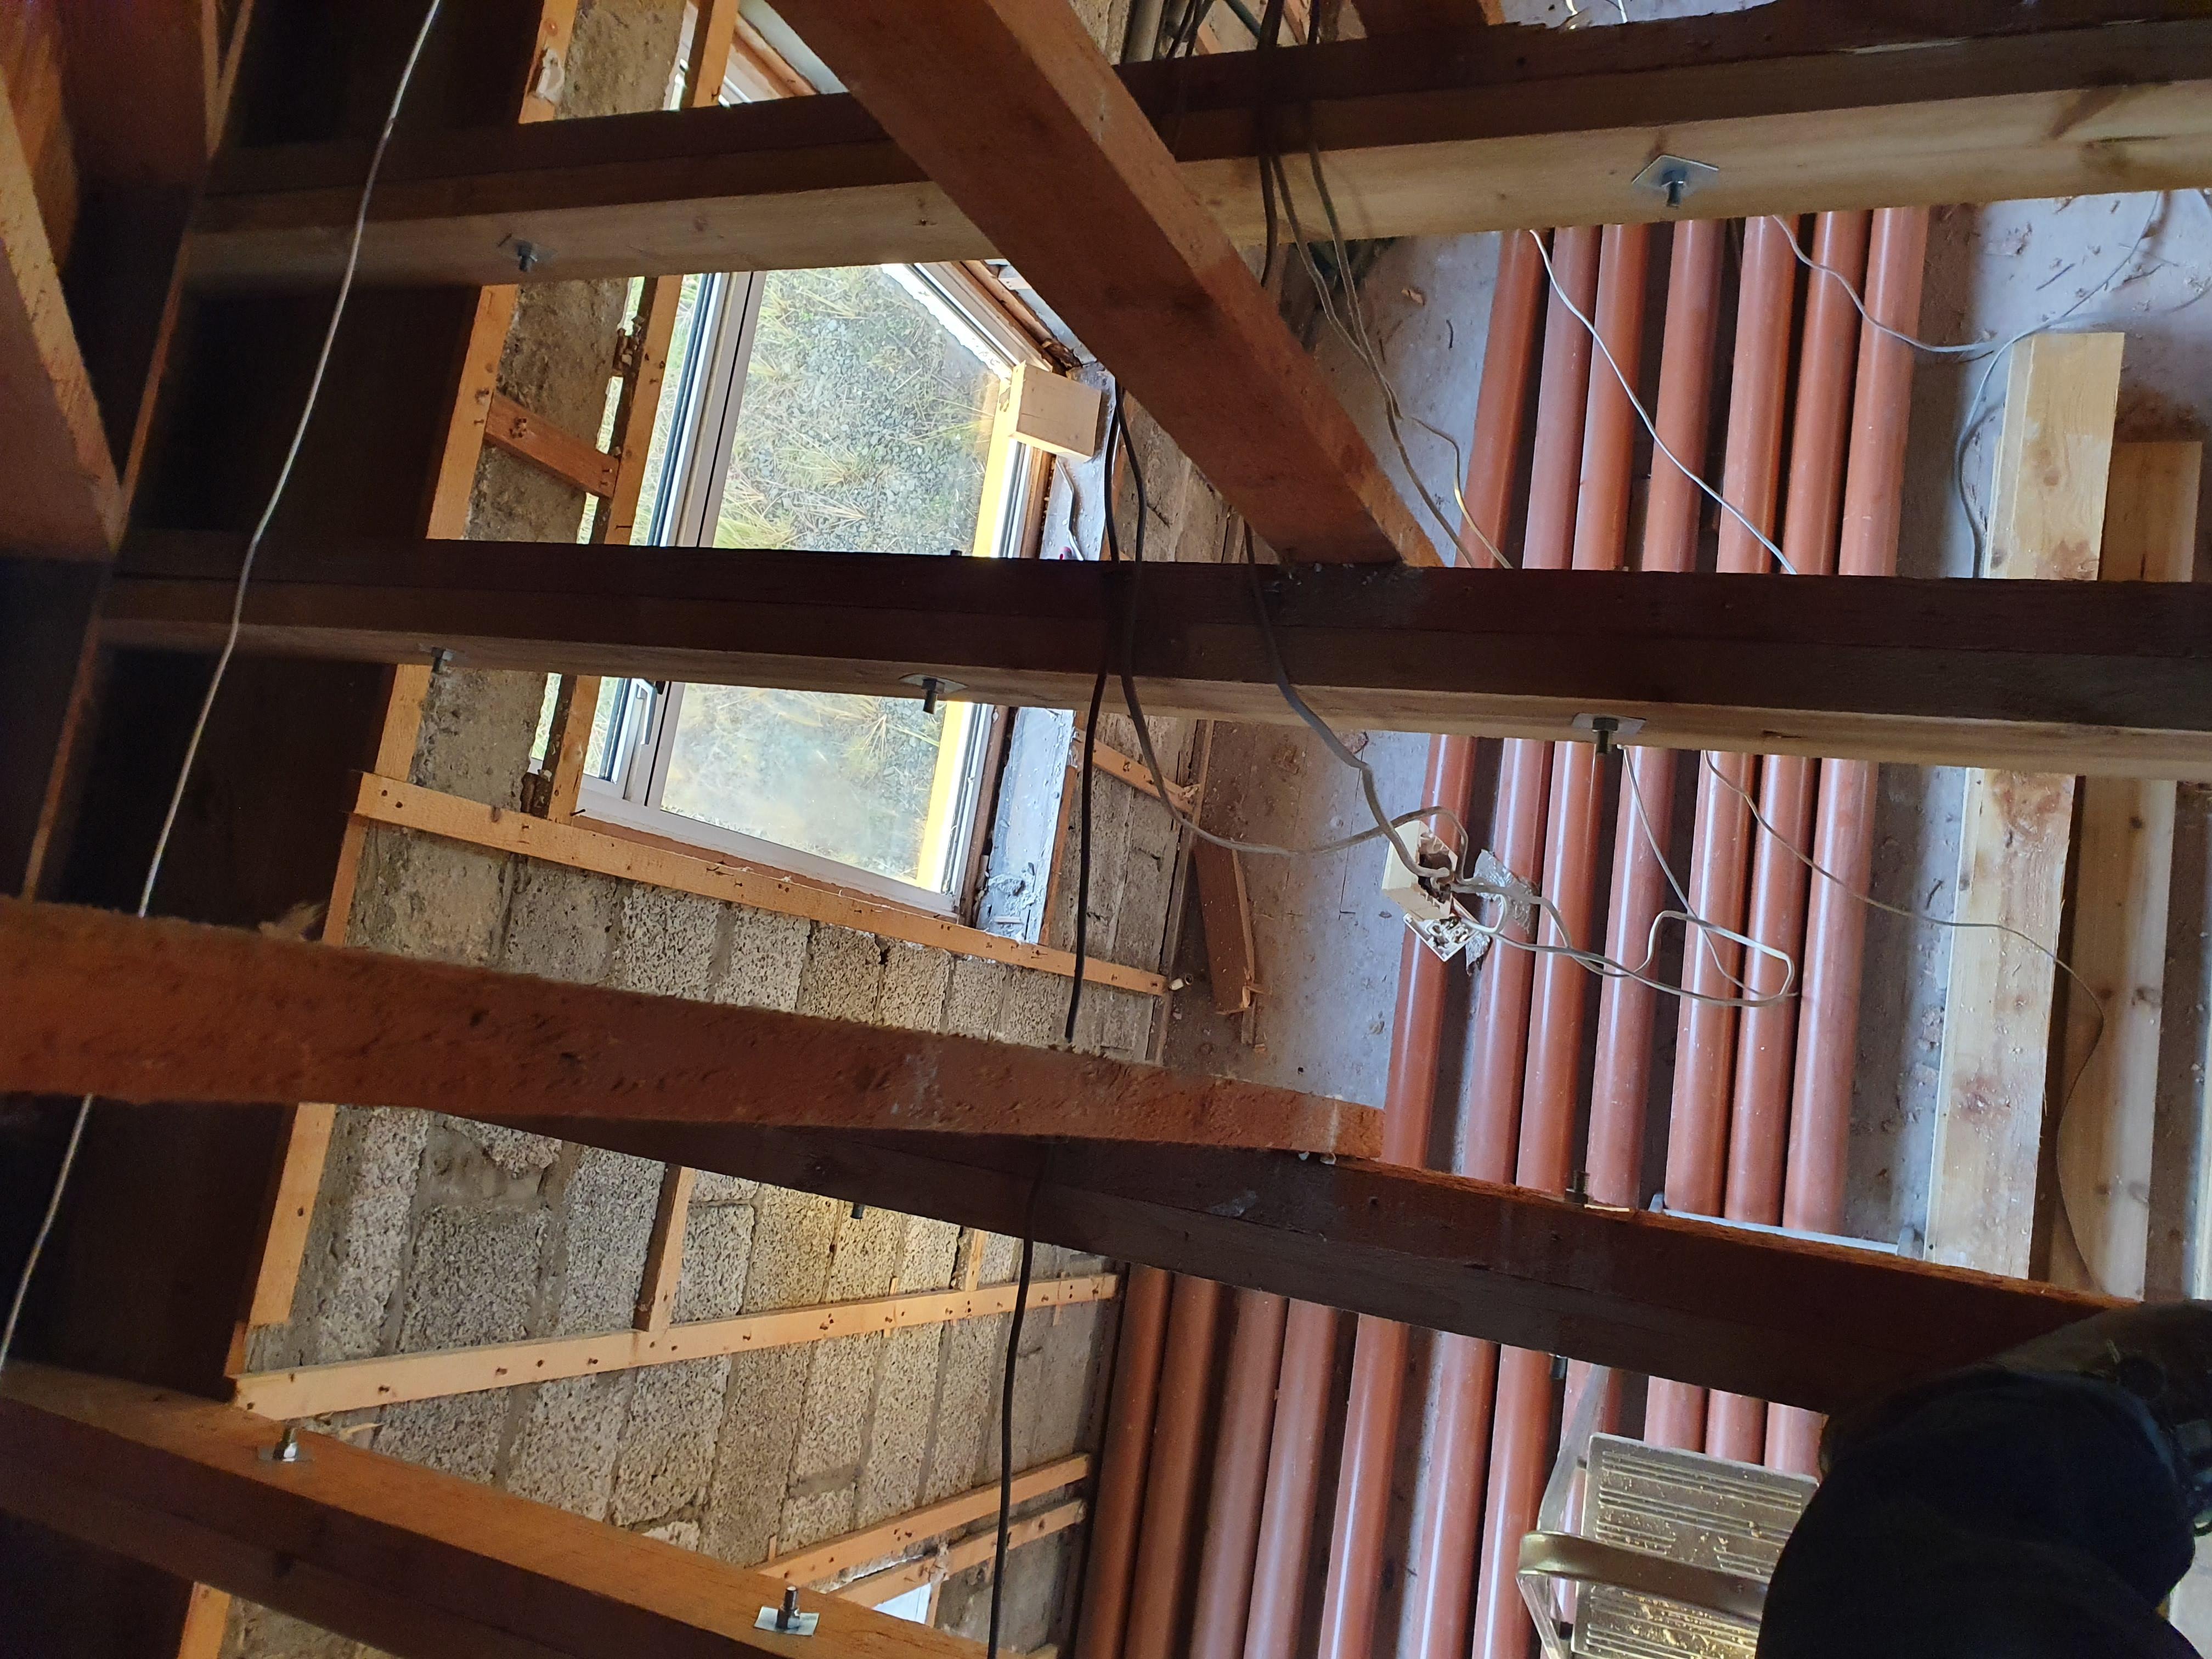
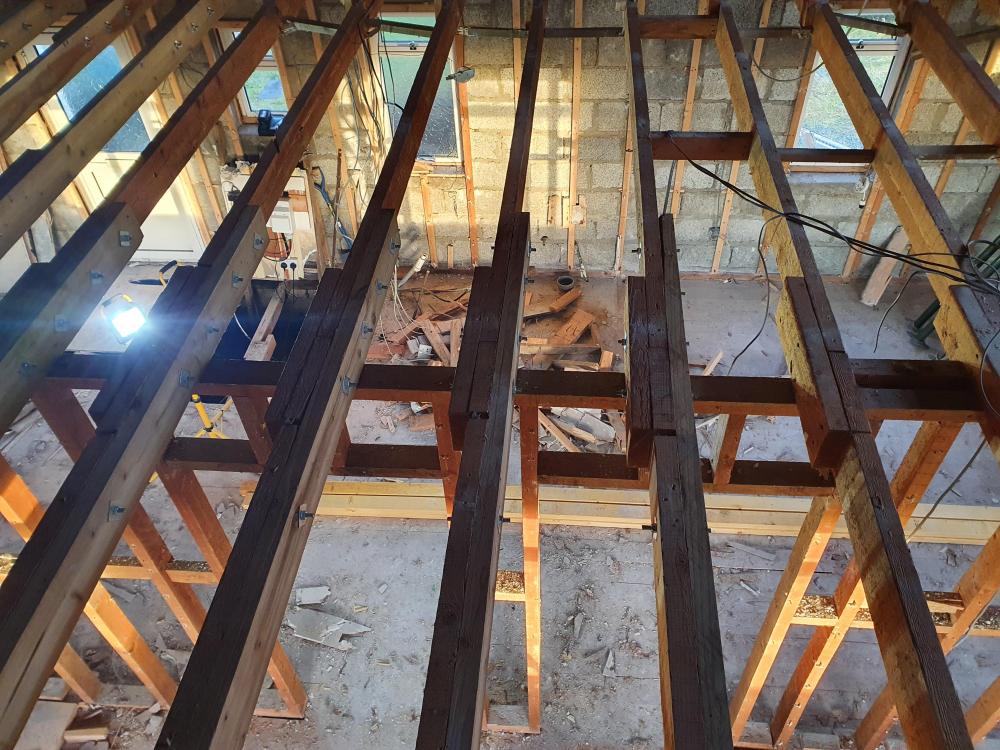
hardly any. Timber from the 70's seems a lot harder than the stuff we get now. Here's an image of the front half of the house, from front wall to load bearer. I bolted through the original joist connector pieces, the bolts are approx 200mm spacing over the load bearer, then 600mm for the remainder of the span. This is the image I sent to my engineer and he is satisfied with it.
-
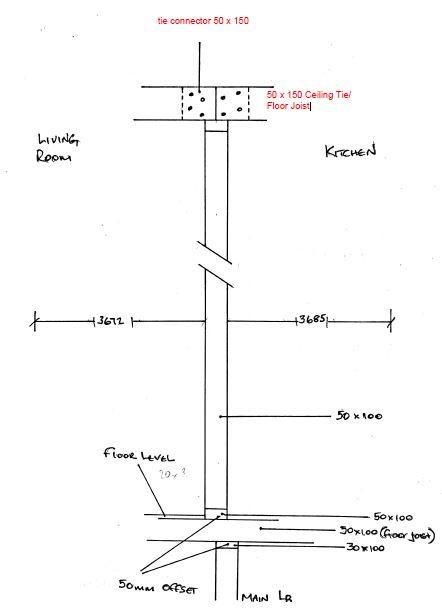
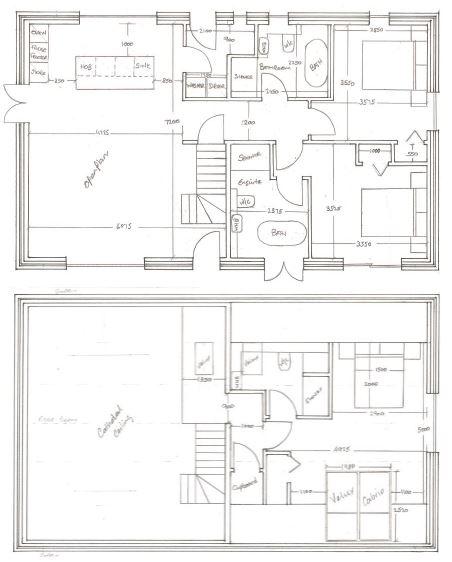
Thanks for your response. I'm after advice on whether it's worth going with 47x150's bolted at 600mm centres to original 50x150's (not glued) plus nailed at 400 centres (alternating) or whether I should add deeper joists in between the original joists - any new joists would just have to sit on top of the walls and be nailed directly to top plates. Here's a wee sketch of the floor plans, top plan is Ground Floor. The ensuite door wall on the bottom plan is directly above the central load bearer. The left hand side of the house I'm not concerned with, I'm building a structure at halfway and at the Gable end to carry a Glulam at the ridge which will carry new 10x2 rafters.
-
Hello i have an issue with a renovation project. I have a house to renovate, 1.5 storey. The upstairs was, shall we say - unofficial. Building control don't care, the house is nearly 50 years old and I believe B/C only have 20 years of enforcement on a particular property. Since the house came like this, it has Grandfather rights, even though I have a Building Warrant to 'Cathedral Ceiling' half the house. The entire house is being renovated. My current issue is the First Floor Joists - these are 2"x 6". The house is double block, there is a load bearing wall running the length of the house (12.5m from internal gable to gable) and the internal width of the house is approximately 7.4m. There is an open span of approximately 3.65m on either side of the 100mm wide load bearing timber wall. The block walls, as typically of Highland Houses of the time, must have had a concrete pour done at the top of the walls to create what is essentially a ring beam. The wall including cavity width is approximately 275mm, there is a 30mm thick top plate fixed to the inner block leaf (hardwood - looks like mahogany) and the ceiling ties are fixed to that. There is a board fixed to the ceiling ties running down the length of the house and the rafters are fixed through this board into the top of ceiling ties/first floor joists (looks like it does the exact same job as a ridge board - only keeps everything in line). I have sistered half the ties with 47 x 150 (on one side of the load bearer), bolted at 600mm centres using M12 Threaded Rod and Square Washers with Nyloc Nuts. My Engineer seems happy with this, but what if I want to add deeper joists like 175 x 75? The reason I have sistered the joists right now - I will be collapsing the load bearer to fill in the underfloor void on the ground floor, adding around 80 ton of hard core, slab, rebuild load bearer then insulate and screed over underfloor heating. The span of the new timber I have kept at 4.8m to overlap the load bearer and the ceiling tie join above the load bearer and bolted it all the way to it's end. Main problem I have is deeper floor joists if fitted between existing ties - how can these be fitted to existing top plate? I can't fix hangers because between existing ties there are only voids. Picture attached for clarity. Do I fix timber between all current ties with brackets and then fit new joists to them or is it just as well to continue with the sistering of 47 x 150 to the original 50 x 150 - and what is anyone's thoughts on the sistered joists? There is going to be 1 large bedroom in the upstairs space with an ensuite shower room (abs plastic shower tray, not stone), there will be a fitted wardrobe and another cupboard. Basically, there will still be less weight on the floor than there has been for most of the last 40 odd years, there was 3 or 4 rooms in the upstairs space until I stripped the house over the last few weeks. Thank You

-
Check Reveals -v- Insulation -v- New Windows
Fraser Lamont replied to Fraser Lamont's topic in Windows & Glazing
Not quite, but you do know what you're talking about - my other house built in 2010 is Timber Frame, windows arrived fixed to fire stops, windows then partly sat on the timber frame and fire stop battens fixed to the cavity side face of kit panels, when the block work went up the outer reveals were rendered up to the windows. Issue I have is on my other house, it's a mid 70's house - its double block built. I have totally gutted the house, I know the windows have to be replaced from the inside but I'm a bit stuck. The top and side reveals look as though they are at least 50mm larger on the inner leaf (quite possible 50mm - 80mm). Walls are made up of 100mm Concrete Block with a 75 - 90mm Cavity. You're correct about the windows which were replaced about 30 years ago - they look as if they were bodged, and they are EVEREST Windows. I want to use best practice with regards insulation and window fixing. If I use cavity closers (would need to be single flange to fit to the edge of the inner block leaf with other side butting up to inner face of outer block leaf - so check reveal closers) but that won't solve the issue where the brackets from the windows could be a couple of inches away from the edge of the inner block leaf. If I use PIR to close the cavity - butt that up to inner face of external leaf and run it like a reveal to the inside edge of the inner leaf, would I just need some sort of packing/standoff for the window straps/brackets to get good purchase on the edge of the inner leaf? Will be using NORDAN windows which are heavier than the Aluminium EVEREST windows in there at the moment and heavier than uPVC windows. Is Compacfoam designed to fill this gap as well as be used as a spacer between window and internal leaf reveal? Can a bracket fixing go through Compacfoam then into block work? My image roughly shows the gap between window strap/bracket and inner reveal. Speaking to NORDAN, they don't like people bending window brackets to fit. To add to that, though I'd want at least 25-30mm of window frame to be sealed against inner face of outer block leaf (at Top and Sides), NORDAN windows don't have a very deep frame from frame edge to the edge of the opening sash therefore they recommend using all inward opening sash's which may ruin the design. The outer reveal may prevent an outward opening sash to operate if I have 25-30mm of the frame (top and each side) hidden behind the outer leaf block. With such a shallow outer frame, it appears that NORDAN windows are designed to be fixed to the outer leaf wall. It's a nightmare!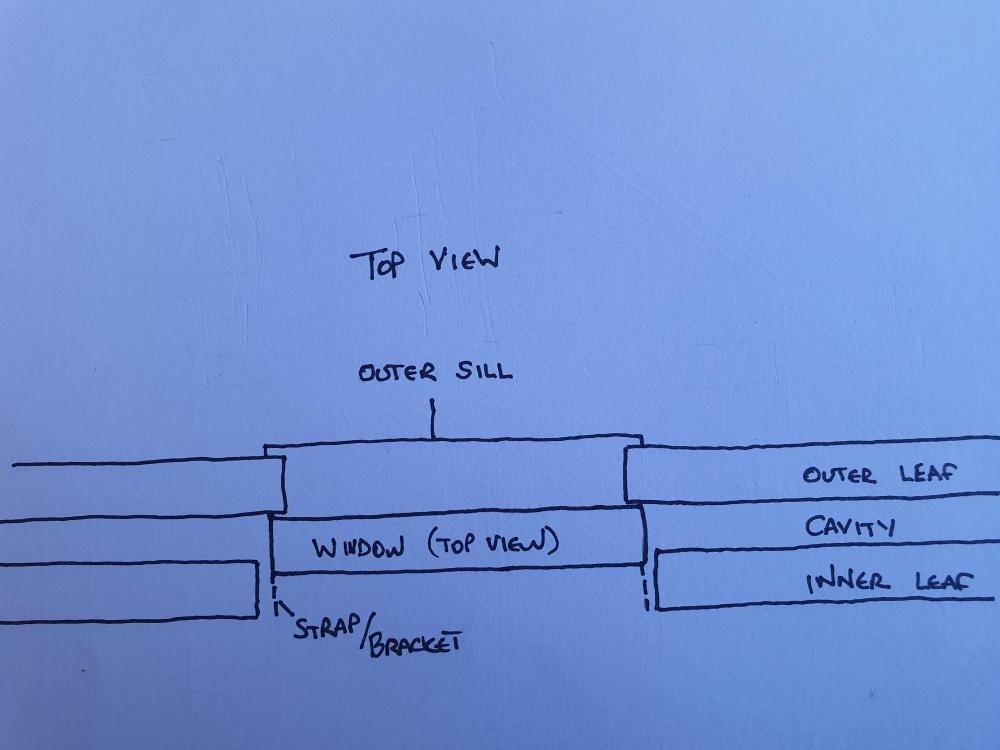
-
Hi, I'm currently renovating a house on Skye, typically in Scotland, the window recesses have check reveals. I'm looking at getting Nordan Alu-Clad Windows. Problem - there are check reveals. I want to get rid of the old timber in the recesses, the house built mid 70's I think the original Windows (long gone) attempted (badly) to close the cavities. I want to install the new windows the way the house was originally built - front face of window frame tight up to inner face of external block leaf. Problem would arise where window fixing straps/brackets are used. They'd either have to be bent a lot to reach the checked reveal thereby making it difficult to install Insulation on the reveal, or could I pack out the inner reveal with something like compacfoam and fix the brackets/straps through that and into the edge of the inner block leaf. We get some wild weather now an then so like the Windows to be recessed nicely. If I can use something like compacfoam, could I continue it into the Cavity to the inner face of the outer block leaf in order to close the cavity? Or do I make a timber frame to fit the inner block leaf window recess, fix that into the reveal then fix Windows to that? So many different ways of doing this, I'd really appreciate input as to what's the best course of action. TIA
-
GSHP, Buffer tank and UFH
Fraser Lamont replied to Fraser Lamont's topic in Ground Source Heat Pumps (GSHP)
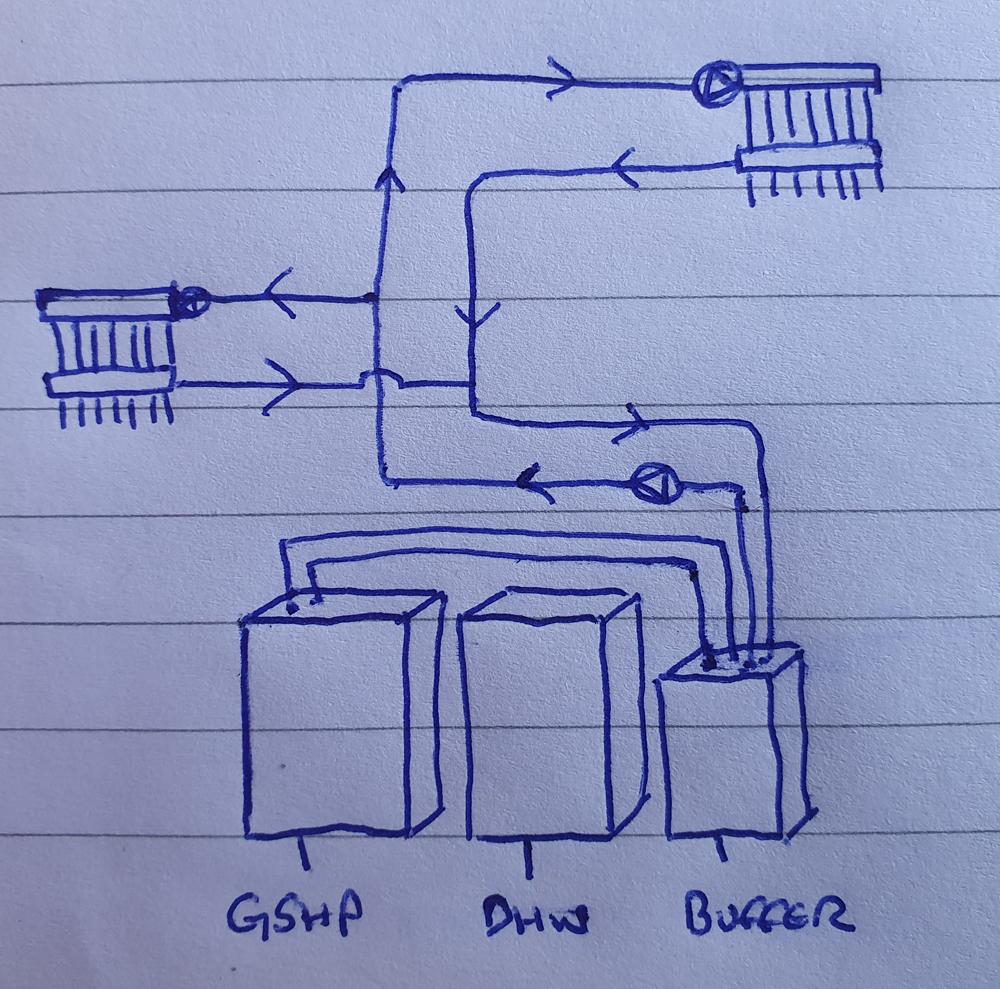
@Nickfromwales It's my last drawing which is a bit crude, the system was designed for me almost 15 years ago for my self build house (Ice Energy). I wasn't accurate regarding the manifolds which look daisy chained but they're not. A fairer representation of my heating circuit is like this
-
GSHP, Buffer tank and UFH
Fraser Lamont replied to Fraser Lamont's topic in Ground Source Heat Pumps (GSHP)
Return Temp. Today for example, when the return water goes down to 34c, the ground Source Heat Pump starts the heating cycle and keeps going until the return hits 39c. The water temperature being sent out from the GSHP is approximately mid 40c to increase the temperature within all the underfloor heating loops. I'm on the Isle of Skye, Highlands, and it was so cold last night that my car door was frozen shut. Water temp leaving the heat pump to UFH never goes above mid to high 40's and every room is 21-22c. A decent enough size house with 4 x bathrooms, hit with all sorts of weather (coastal), I love the system - only problem is retrofitting upgrades not always easy, it was designed purely for economics (running costs) by the company I bought it from. Care should be taken to include comfort but this system is nearly 15 years old now, installed it when I built my house -
GSHP, Buffer tank and UFH
Fraser Lamont replied to Fraser Lamont's topic in Ground Source Heat Pumps (GSHP)
No, temperature to underfloor manifolds varies between 28c and 40c max throughout the year -
Thanks so much.
-
GSHP, Buffer tank and UFH
Fraser Lamont replied to Fraser Lamont's topic in Ground Source Heat Pumps (GSHP)
@Nickfromwales could a bypass between flow and return on one of the manifolds work, as above?