


LSB
-
Posts
963 -
Joined
-
Last visited
-
Days Won
1
Everything posted by LSB
-

Wet weather, BC, SE, Drawings, cost and more wet weather
LSB commented on LSB's blog entry in Little Stud Barn
the rest of the floors aren't like this, this bit of the barn was like an 'add-on' and is an independent structure with its own roof. We are building this first to then use as storage as the rest of the barn is where we store things at the moment. thanks for your help -
Wet weather, BC, SE, Drawings, cost and more wet weather
LSB commented on LSB's blog entry in Little Stud Barn
I don't have the updated whole slab drawings, our SE just sent us through what I've posted, a bit bigger, but no more details. The rest was left as the original without the shear links. You are right about the spacers, we do have those, just didn't mention. Thanks re the vibration, we will do that and not add any water. The barn is on our land which we've owned for 30+ years and was used for storage of tractors, hay etc. so was never on the open market There are times when I wish we hadn't bothered 🙂 -
Wet weather, BC, SE, Drawings, cost and more wet weather
LSB commented on LSB's blog entry in Little Stud Barn
First time DIY self building and my fault to be honest. Hubby knows how to build, but not really how to read plans, he's used to be told, do this, do that and then do the other. Plans are down to me and I've been so busy at work that I didn't stop long enough to even think. Not again, I've spent this time going over everything again to check, double check and then do it again. This wall was also supposed to be under-pinned, but when we took out the floor as per the plans the walls turned out to not be attached to the existing foundation and after one fell down it became clear that this bit of the build needed to be done from scratch. This also necessitated involving the LPA as the existing plans were for single skin and EWI not a cavity wall, which is why there wasn't enough bearing space. The other option given us by SE was to put in secondary foundation inside what we had poured, but then that had to be attached with horizontal rebar and vertical mesh as well as the existing mesh. So, knocking down the cavity wall up to damp proof was a much easier option. The shear links are attached with metal ties, bit like cable ties, but metal in the middle of each mesh, so that side is 100mm so shear links are also 100mm. There are also 'foam' expansion sheets around the wall at 20mm thick to allow for any movement of the slab / mesh. Barn conversions are definitely much more tricky than new builds. -
Wet weather, BC, SE, Drawings, cost and more wet weather
LSB commented on LSB's blog entry in Little Stud Barn
there was, but at least for that we had huge amounts of crushed concrete. I felt more sorry for hubby having dug it out by hand in the first place. -
Wet weather, BC, SE, Drawings, cost and more wet weather
LSB posted a blog entry in Little Stud Barn
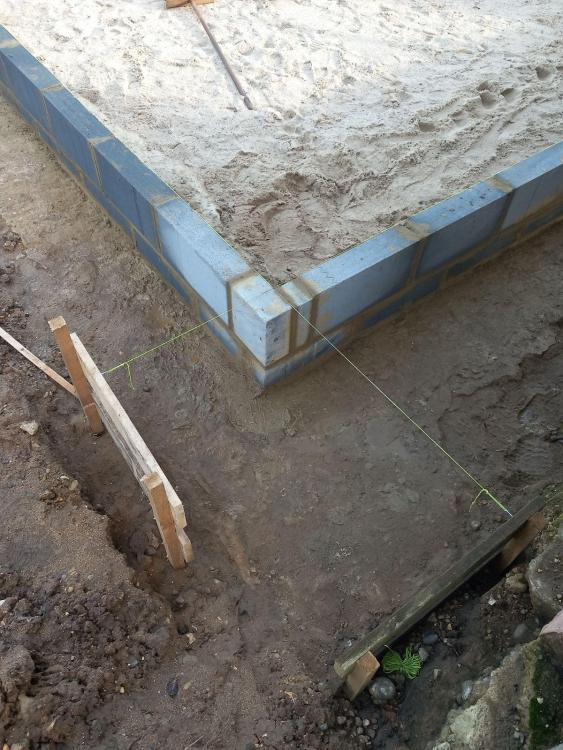
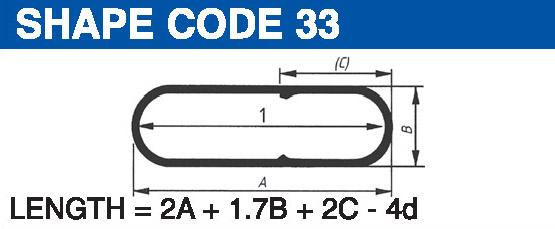
Our tale of delays and woe is competing even with @pocster for time taken From Oct - Dec progress has one again been delayed by weather, flooding, cold and in all honesty a bit of incompetence on our part meaning we are further back than when we started. This period started well enough with the trenches for foundation filled ready to start building walls. After digging down and down to the required depth (or so we thought) we started to place the cellcore ready for the mesh / concrete. Most of this had to be done by hand as we somehow managed to build the walls before digging deep enough for the hardcore and blinding and couldn't reach lots of it with the digger. The cellcore and mesh were laid Then this hit - storm babett our road and the site were totally flooded and the work from the previous day ruined After waiting for it all to dry enough BC came out and said wrong, wrong, wrong. We had mis-read our plans and somehow forgotten to suspend our suspended floor and to add even more woe we hadn't left enough bearing space on the foundations for the mesh to sit on. Cue 4 weeks of SE, BC and the associated costs. To be fair they were both really helpful at trying to sort out what was our mess with the least upheaval to us. Then partially fill the hand dug hole, thankfully only one room not the whole house and having crushed 104 tons of concrete hardcore isn't in short supply. In the end we had to knock down what we'd built and get agreement from SE & BC that we could use Shear Links between the mesh sheets and have any overhang of 150 instead of 200. I hadn't even heard of Shear Links so sourcing them was fun as neither had any of the main BM's. there are also many different shapes, we needed shape 33, like a paperclip So, amended drawings, shear links, time and everything else leads, once again, to more cost and more time. It's also rained so much in the last few months that any progress was hampered. We are still not back to where we were, the blinding needs whacking again so the cellcore can be put down again, the mesh needs placing again with the shear links, the walls need rebuilding to DPM and BC needs to inspect. Then we will be back to where we were 2 months ago. One day, I'm hoping to do a blog entry where everything is wonderful 🙂 More in a couple of months. -
the issue with the size is that it's a barn conversion, these particular walls were not usable. When we dug out the floors to start to underpin, the existing walls were not attached to the ground so had to be replaced. But, we had to use exactly the same dimensions so for once we can't blame the architect. What should have been done was a bit more measuring in advance to make sure that the blocks didn't end up like this in the last corner. But, can this be left for this level and the rest done correctly or does it need removing and redoing. Be assured, all the rest of the levels with be built corners first as it should be.
-
Does this look okay HID is worried that the small parts of blocks at this corner may not be man enough to sustain the next level. For context this is DPM level and will be entirely internal, the external wall to be built next. TIA
-
We are converting a barn and about Aug this year a car drove in and it turned out to be the planners. He was doing the rounds of all the local barn conversions to check. He was happy with us as he could see the old walls and what we were doing, but he told us that there were 3 people who had lost their planning because when he did his random visit there was no existing barn there and they had obviously knocked down and started from scratch. 2 others lost their planning because they hadn't started in time. So, go for planning for what you want to do, but as others have said don't do anything until a rebuild is approved so that you have a fall back option of renovation.
-
Expected Intrusive Phase 2 "Geo and Contamination" Survey Costs?
LSB replied to waylanderUK's topic in Surveyors & Architects
JP Chicks in Ipswich, quite commercial so not cheap, but very efficient. -
Expected Intrusive Phase 2 "Geo and Contamination" Survey Costs?
LSB replied to waylanderUK's topic in Surveyors & Architects
no mining in Suffolk, no hills, but was an old pig farm so looking for methane. This was done by the SE. -
Expected Intrusive Phase 2 "Geo and Contamination" Survey Costs?
LSB replied to waylanderUK's topic in Surveyors & Architects
we had one done in 2021 and it cost circa 6k. Some just dug and taken away, 3 monitored for 3 months for anything bubbling through. There was nothing otherwise it would have been remedial works next. This was a condition post planning, the phase 1 was a desk study. -
Hi, we went thru the B705 v B785 a while ago, the SE just didn't update this bit of drawing. They also provided full details of the mesh and Shear Links, I just didn't know what they did, so I was trying to educate myself. They have designed the mesh to go in a particular direction, basically side to side, although it is only the sides that take the weight all 4 sides have the rebar on top. The conversion has 3 sizes of rebar in different areas, underpinning in shallow foundations and secondary foundations where they don't think there is enough bearing size for the rebar. All in all quite complex drawings, not helped in the least by them making typo mistakes like B705 when I'm trying to get best price. Thanks for you help.
-
why 4 layers, what are you building
-
Still getting a big bogged down on our suspended floor. Our SE drawings were fine, until we started to clear to underpin an existing single skin wall only to find it wasn't attached to the ground so was not viable. So, after all the hoops that involved getting permission to replace some unstable walls, which appeared stable on the initial class Q conversion survey. We then continued in our merry way and dug out, trench approved, and poured foundation. BCO came out as he wanted to check our mesh suspension and then insisted that we had new SE drawings to cater for cavity walls. Some cost and lots of time later we have the drawings as requested. All fine except he's included shear links. More back and forth as these seem to be unusual, we eventually got the code H33 and have found them. Apparently the H10 in the drawing just means bumpy steel. Right, my question, what do these actually do and what does 100mm cts mean. I guess they sit 90 degrees out from the wall partly on top of the foundation and partly within the mesh. This is for a single storey barn conversion, not the rebuild of Luton Airport carpark Any info greatly received.

-
Early days in starting our barn conversion journey
LSB replied to fluffnstuff's topic in Introduce Yourself
welcome to EA, if you are in East Suffolk, be warned, planning is vicious, just ask a few people on here who have appliced there -
Early days in starting our barn conversion journey
LSB replied to fluffnstuff's topic in Introduce Yourself
hello and welcome, look forward to learning more about your plans. where abouts are you located in the country, north, south, east or west -
we have a reinforced 200mm concrete slab with 2 level of mesh. The cellcore goes 'in the hole' sitting on top of packed hardcore and blinding sand. The mesh then sits on the foundation trench (all 4 sides) with castles to keep the layers apart and the concrete poured on top. The bearing is 200mm with the cavity wall outside it, foundation is 700 wide. We then have 200mm insulation with screed on top, so total floor depth is 550mm, so very deep. We have a DPM above the slab and below the insulation with a VSL above the insulation below the screed (with UFH). this was all specified by our structural engineer, over engineered according to our BCO for a single storey property, but as that's the spec he says we must have it. so, it's not tied in as such, but when the slab is poured it will adher to the foundation.
-
I wouldn't think you want DPM under cellcore, the whole point of it is to crush if the ground heaves. We have cellcore and in the recent weather we flooded and if the DPM had been under the cellcore then it would have become a swimming pool with no where for the water to go to. In fact we have the DPM over the slab and Cellcore with the insulation and screed on top. Where is your floor insulation going. out cellcore sits inside the foundation with the suspended reinforced slab resting on the foundation. But, ours is a whole house, maybe a garage is different.
-
Still under discussion apparently, but unlikely to be implemented any time soon, unless it is going to win them the election, and in reality it doesn't affect enough people so don't hold your breath
-
Self build affordability in a higher interest rate world.
LSB replied to gavztheouch's topic in Costing & Estimating
or, we saved about 75% of the expected build cost before and also do build as you earn for the rest. At least that way we get to live in our house, which although old and cold is paid for totally and is more comfortable than a static. We have been lucky with inheritance from both sides of the family to get this amount. We also have a mortgage at 1.34% where I make the minimum payments with the rest saved at a higher interest rate. When my fixed rate ends in 4 yrs then I'll pay it off. HID is building it DIY and is therefore slower than we can spend, so higher interest rates is good for us. We have been somewhat shot in the foot by rising material costs, but it took us many years to get planning to convert our barn so we couldn't start any earlier and DIY was always our plan. -
it's interesting that you can possibly do something different from SE recommendations, our BC checks everything we do against the SE drawings to make sure we comply, and we are single storey. That said we always specified 3.6 internal, although as they are not particularly good for some things we are using 7.3 for walls where we want to hang things, such as the kitchen. We have 150 full fill cavity.
-
Self build affordability in a higher interest rate world.
LSB replied to gavztheouch's topic in Costing & Estimating
prime farmland is 20k acre, not 10k and that's productive land with no chance of building, any parcel of land that farmers don't want is more than that even as amenity / small-holder land just because 'they don't make it any more' That's in East Anglia and I can't imagine it's much less anywhere that farming can still be profitable. -
we have a 1.5 ton digger and a 2 ton dumper. dumper very old and only about £600, digger lots more money, circa 11k with VAT as ex hire. But both have been extremely useful and I will miss them just for moving things. The thing for us is that we are DIY building and doing everything ourselves so if you are having contractors then they will probably provide their own equipment. Digger is doing all our trenches as well as moving approx. 200 ton of concrete to be crushed and digging out the floors by 500mm. We did look at cheaper ones (5k), but they were generally pretty knackered so we decided to pay more for a decent one knowing we can sell and recoup the cost when we don't need it. Both the above have been reliable mechanically , some maintenance, replaced a track on the digger and the tyres on the dumper, just because there were some better ones at the local farm auction for £60, then sold the old ones for £50. Both looked after by us, kept under cover and regularly checked for oil and pipes with oil change once per year. Alan, if you are interested in buying then look at Cheffins monthly auction at Ely, very good source of building / farm machinery and commission charges are much lower than Clarke & Simpson. Of course there is delivery, but Shipley is the best for that.
-
the first trenches we dug we pure sand, these had some sand and some clay at the south end, nearest to the rest of the build. We have had some 'collapse' on sides and particularly corners. The strings lines were after some issues on the first stretch we did where we ended up not quite level when we go up high so wanted to do the whole thing.
-
So, about to order the mesh and I realised that I need concrete spacers. Do we have to use specialised ones or can we split some blocks to make our own, just another thought about trying to save costs. We were provided with about 80 broken 7.3n blocks (since replaced) but wondered if we could make some spaces out of those as the ones we've been quoted for £8 each. We have 2 layers, so first one needs to be 50mm up and then another 100mm above that.


