MortarThePoint
-
Posts
2198 -
Joined
-
Last visited
Everything posted by MortarThePoint
-
That's right, we certainly have an eye for detail on the things we are aware of. Just to double check, I am just using standard Cloth Duct Tape to tape my edges of the 125um membrane to the perimeter insulation skirt and any joints. I presume that's OK. I am planning to use a liquid screed (either anhydrite of cement based).
-
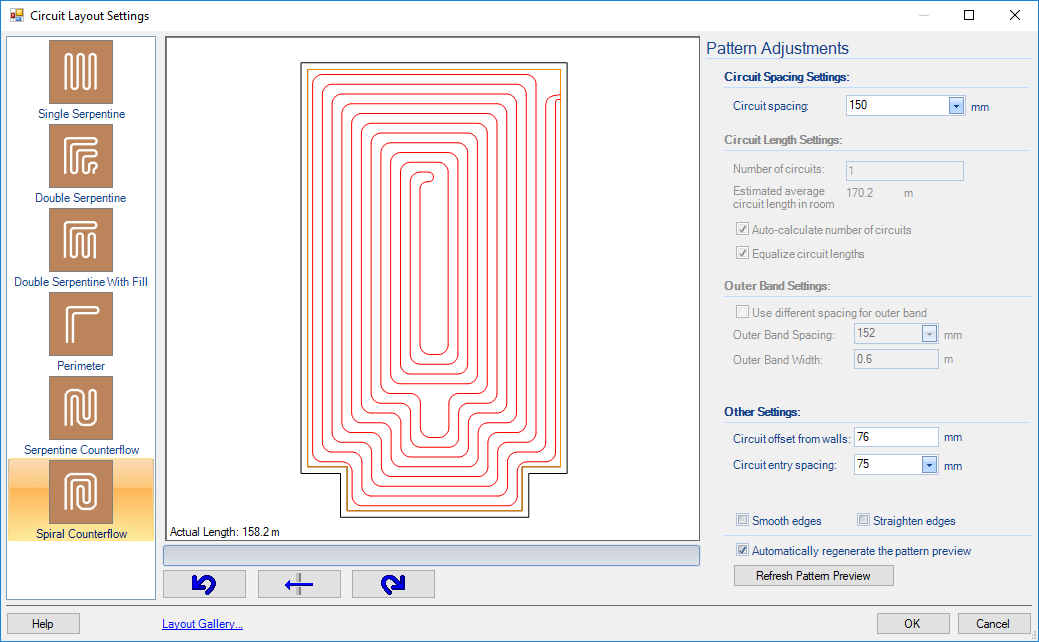
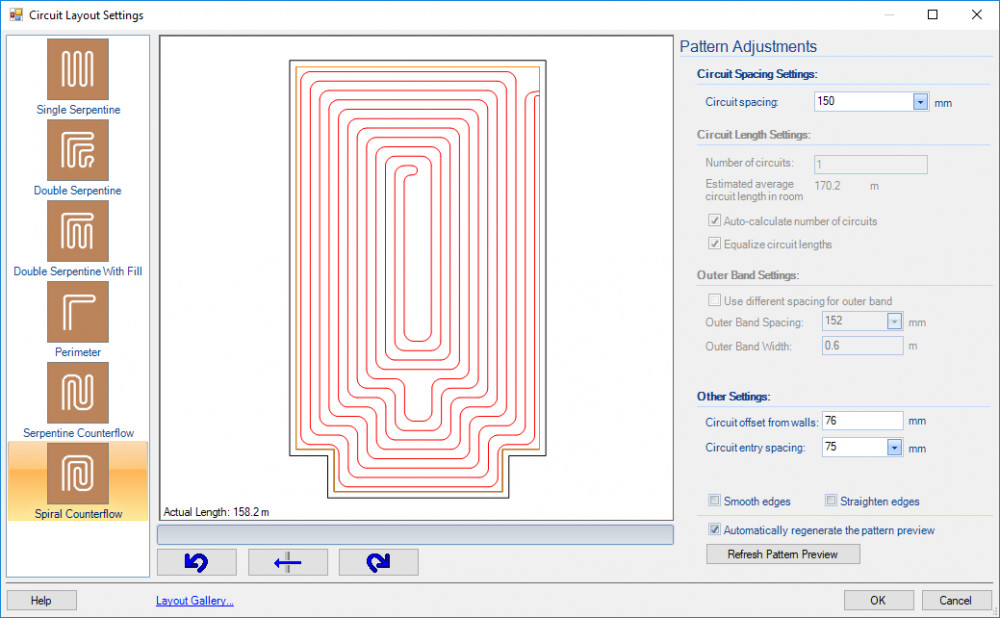
Wunda have done an excellent spiral design, so clearly either use different software or a particularly diligent designer.
-
Partitions: Timbers studs Vs Metal C studs
MortarThePoint replied to MortarThePoint's topic in General Construction Issues
If you want to fully nerd out on all of this you can check out IR761: https://www.jhbrandt.net/wp-content/uploads/2014/11/ir761.pdf A lot of the other sources of information for timber vs metal frame is subject to conflict of interest as the plasterboard manufacturers produce metal frames. I'm no saying they tell porkies, but there may be a configuration missing. Page 21 (not sheet, page) of IR761 has "Wood studs – 1 layer gypsum board" - STC 34 (90mm studs) Page 28 of IR761 has "Steel studs studs – 1 layer gypsum board" - STC 36 (these are 65mm studs though) Looking through the document can turn in to an amazing game of spot the difference (e.g. page 28 vs page 29) I don't readily see timber studs at 610mm c/c. Basically it looks like if you start from 65mm steel studs at 406 c/c with 13mm plasterboard each side giving around STC 35: Changing 406 c/c to 610 c/c adds about 5 Changing 65mm MF to 90mm MF adds about 5 Changing 13mm to 16mm plasterboard adds about 5 Doubling up plasterboard adds about 5 Adding resilient channel one side adds about 7 (not shown with 610 c/c studs though??) It definitely looks like you can have the insulation too dense (page 46 vs 40)! Some highlights: Page 89: 610 c/c, 90 steel studs, 16mm plasterboard lower density insulation STC 50. Page 93: 610 c/c, 65 steel studs, 13mm plasterboard (double on one side) lower density insulation STC 51. Page 120: 610 c/c, 90 steel studs, 16mm plasterboard (+13mm on one side) lower density insulation STC 55. Page 124: 610 c/c, 65 steel studs. two layers of 13mm plasterboard each side, lower density insulation STC 55. Page 245: 406 c/c, 90 steel studs, two layers of 13mm plasterboard each side, low/medium density insulation STC 60. Page 350: Double timber wall, 610c/c, double layers of 16mm plasterboard, lower density insulation STC 69. Good below 125Hz (e.g. 26.7 @ 50Hz) It's much harder to achieve good performance at lower frequencies (<125Hz). Of interest: Music: Spectrograms are a useful way of seeing the frequency distribution (and as an aside are good for AI like Alexa), Country music may be the worst in more ways than one as it turns out [link]. 'Subs' and 'Kick' are likely to be the most challenging [link] [another link] Snoring: "The fundamental snoring sound frequencies of the tonsil, tongue base, and larynx were approximately 330 Hz, 1000 Hz, and 652 Hz, respectively" [link] Farts: "The data show that most farts predominantly have power in sound frequencies between 200 and 400 Hz" [link ?] Films: Psycho (shrill music and women screaming) probably easier to cope with (if you're not watching it) than Jurassic Park, keep it down T-rex! The insulation side of it is really interesting. Rockwool would have you believe in the acoustic benefits of their denser insulation which doesn't fit the data. Insulation G1 is good and has a density of around 12kg/m3 and air resistivity of ~4000 mks rayls/m (whatever they are). -
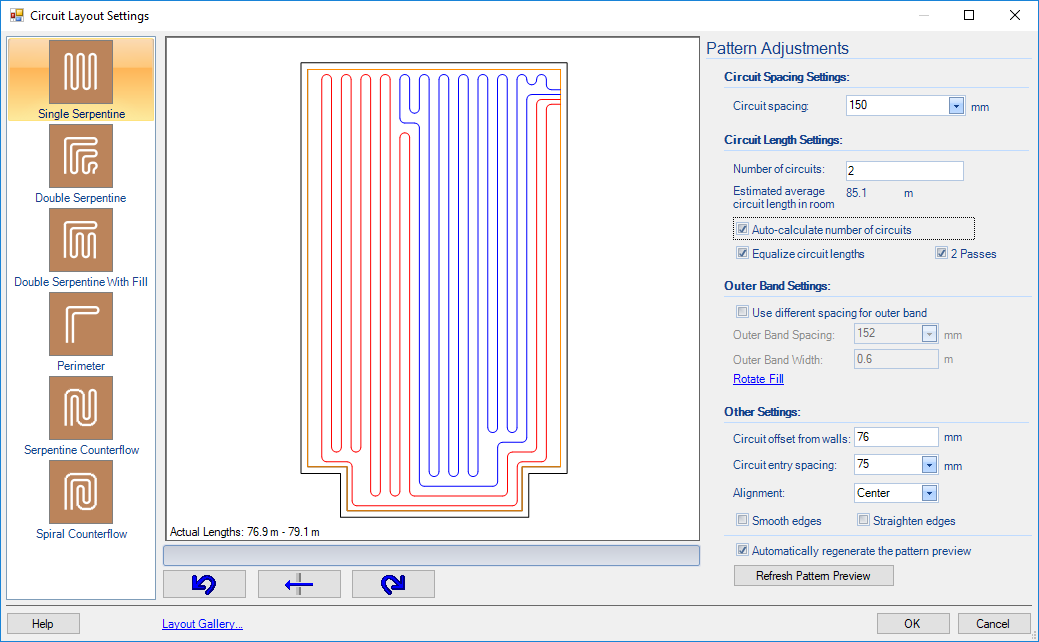
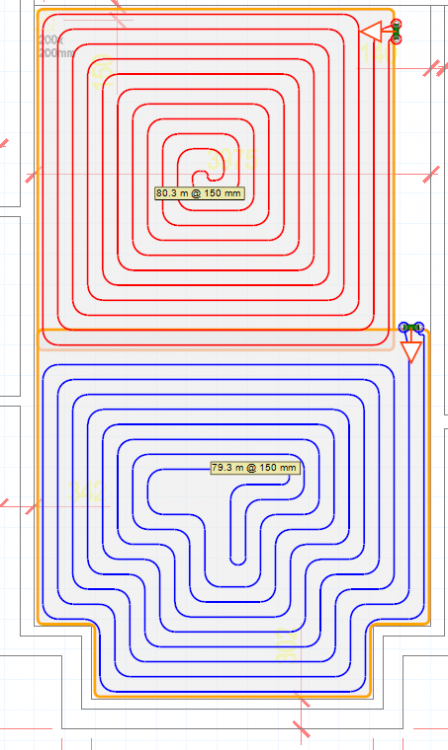
Playing with LoopCAD and the "Spiral Counterflow" circuit layout setting. It only uses one circuit, whereas for the "Single Serpentine" it allows you to set how many and for the first room I am designing it defaults to 2. That's a nuisance as I'll have to manually divide each room that has more than one circuit and hope to get the areas balanced. Not too bad (see third image) though need to factor in the feed from the door (adds about 2*3m) as It doesn't work to have a narrow pan handle on the area. I haven't balanced the lengths very well below as, once I have added the feeds, they will be about 86m and 92m. That's not too bad, balanced to within 10%.

-
Staples are cheap as chips. Not chips of wood coated in glue and squished together to form OSB3 though, they're really expensive.
-
Castellated panels aren't cheap of course. About 6x as expensive as clip track. Are you figuring the trays will protect the insulation from the screed and therefore no need for the polythene. That may be a risky assumption, what do others think?
-
Crazy Rafter Roll insulation cost
MortarThePoint replied to MortarThePoint's topic in Heat Insulation
If you've ever been in any doubt, I do make this stuff up as I go along ? I do think it's useful though. There's a window with a U-value of 1.2 and an area of 1m2. "£3 per U per m2 per year". That window is costing me £3.60 of lost heat per year. Windows are a bad example as they can create drafts as they are so heat leaky. How much heat lost through that bit of loft. U-value of 0.11 area of 15m2. "£3 per U per m2 per year". That loft is costing me 0.11*15*3=£4.95 of lost heat per year. -
Crazy Rafter Roll insulation cost
MortarThePoint replied to MortarThePoint's topic in Heat Insulation
For my scenario* I can multiply a surface's U value by £2.85 and it will give me the annual cost of heat lost. Example, U=0.13 --> 0.13*£2.85 = £0.37 p.a./m2. Or dU = 0.01 --> 0.01*£2.85 = 3p p.a./m2 Quite handy for me to remember "£3 per U per m2 per year" [I know there's no such thing as 'a U' but it's a way of remembering it] 183days * 24h/day * 13K * £0.05/kWh = £2.85 [careful swapping between kW and W of course] * My scenario is dT = 13 Celsius, 6 months and an ASHP with adjusted COP of 300%. -
Crazy Rafter Roll insulation cost
MortarThePoint replied to MortarThePoint's topic in Heat Insulation
I didn't realise how cheap Gas is and that makes the number lower still. It seems Gas costs around £0.03/kWh [1] so that marginal rate becomes closer to 2p p.a./m2 saving. Prices can change of course, but that would need a whole lot of change. https://www.ukpower.co.uk/home_energy/tariffs-per-unit-kwh I secretly hope someone points out I've missed a factor of 10 or something because spending an extra £5/m2 to improve the U-value by 0.01W/m2K is so far from being financially sensible (payback >150 years). Even knowing this, I find myself irresistibly drawn to improving U-values. Even the embodied carbon side of increased insulation is very debateable with decades of payback time, but that's another story. -
Crazy Rafter Roll insulation cost
MortarThePoint replied to MortarThePoint's topic in Heat Insulation
That's right. The raw maths is: Heat Flow Q = U*A*dT Heat Loss E_heat = time*average_heat_flow = (days*24hours/day) * U * A * (Average_dT) For me average dT across 6 month 'heating season' is 13K (i.e. 13 Celsius) --> E_heat = (183days/yr * 24hours/day) * 0.13W/m2K * 1m2 * 13K = 7422Wh/yr = 7.4kWh/yr per m2. That is heat energy, to understand what I'll pay, I need to know how much heat costs me. Using an ASHP with a COP of 300% (reasonable) and an electricity rate of £0.15/kWh electricity, I can calculated that heat costs £0.15 / 300% = £0.05/kWh heat. 7.4kWh * £0.05/kWh = £0.37/yr per m2. It's all linear with U so to work out differences you can just scale that figure, so if the difference is 0.01 then the cost difference is (0.01 / 0.13) = 1/13 of £0.37/yr /m2. When I work this sort of thing out I keep thinking I am making a mistake, but it's how it works (at least for marginally changes on a good base figure). -
Crazy Rafter Roll insulation cost
MortarThePoint replied to MortarThePoint's topic in Heat Insulation
Don' want to draw too much attention to this consideration as I know people's priorities are many and varied. In part it was a note for my own consideration of the pros and cons. Anyway, I made a mistake in the first sentence as it was supposed to be "Improving a U=0.13 area by 0.01 saves approximately 3p/m2/yr with an air source heat pump." The mistake is obvious looking at the next sentence, but I wanted to correct that. so: Improving a U=0.13 area by 0.01 saves approximately 3p/m2/yr with an air source heat pump. [dT=13C, U=0.13, 6mo-->7.4kWh/m2, E=£0.05/kWh --> £0.37p.a./m2] -
Crazy Rafter Roll insulation cost
MortarThePoint replied to MortarThePoint's topic in Heat Insulation
2no. 100mm Omnifit Slab 35? That make up should be good and warm. R_ins=9.0. Is that targeting U=0.14? -
Crazy Rafter Roll insulation cost
MortarThePoint replied to MortarThePoint's topic in Heat Insulation
I have 222mm rafters and need to leave an approx. 50mm air gap so was planning to use 175mm of insulation between the rafters and 75mm under the rafters (all Mineral wool). Here are some example build ups: 75+100+75mm Rafter Roll 32, R=7.81 cost £35.75/m2 90+90mm FrameTherm 32 and 75mm Rockwool 38, R=5.63+1.97=7.6 cost £21.09/m2 [NB: RockWool not Formaldehyde free] 180+70mm Rockwool Flexi 35/38, R=5.14+1.84=6.98 cost £12.23/m2 [NB: RockWool not Formaldehyde free] 90+90+90mm OmniFit Slab 35, R=7.71 cost £12.15/m2 90+90mm OmniFit Slab 35 and 75mm DriTherm 32, R=5.14+2.34=7.48 cost ~£14/m2 90+90mm OmniFit Slab 35 and 60mm PavaTherm 38, R=5.14+1.58=6.72 cost ~£16.50/m2 90+90mm OmniFit Slab 35 and 50mm EcoTherm PIR 22, R=5.14+2.27=7.41 cost ~£14.60/m2 120+50mm EcoTherm PIR 22, R=7.73 cost ~£22/m2 If I were to do it again I would 100% use counter battens outside the roofing membrane and fill the rafters. Improving a U=1.3 area by 0.1 saves approximately 3p/m2/yr with an air source heat pump. [dT=13C, U=0.13, 6mo-->7.4kWh/m2, E=£0.05/kWh --> £0.37p.a./m2] -
For the garage, BG FireLine MR was hard to source so I went with GTEC Fire MR from abcdepot. The 15mm GTEC product has the advantage of being 2400 sheets rather than 3000mm. Whilst sourcing that I got confirmation from BG and Siniat (GTEC) that their standard moisture resistant plasterboard can be considered in the same way as their standard WallBoard when it comes to fire considerations, in theory. Untested though, but those statements were suffice for my BCO.
-
Duraline does appear to be available despite the BG website indicating otherwise at some point. Duraline: "Designed to provide enhanced sound, fire and impact resistance" 15mm only, 13.9kg/m2, TE only, 1200 x 2400/300 So almost as high area density as Soundbloc F (14.1kg/m2) but adds impact resistance. I've been quoted 1.2% cheaper than Soundbloc F. (~£14+VAT/sheet). As such, pit probably makes a better choice for walls though consider Habito instead for fixability. What to use under rafters in an attic is interesting as you probably want some impact protection, but ideally not the weight.
-
Anyone used Tradeline or Libra Resilient Bars or MF?
MortarThePoint replied to MortarThePoint's topic in Sound Insulation
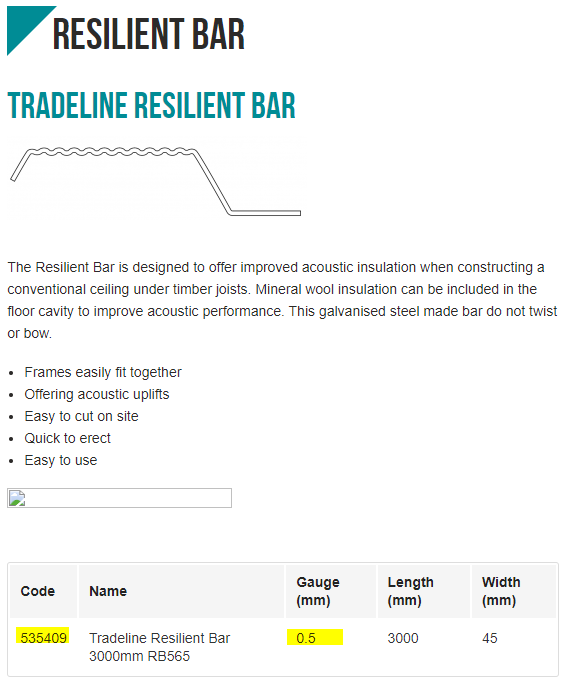
Ordered the TradeLine one at £2.35 per 3m length which is cheaper than 100x22 timber -
Anyone used Tradeline or Libra Resilient Bars or MF?
MortarThePoint replied to MortarThePoint's topic in Sound Insulation
On paper it's the other way round. TradeLine claim 0.5mm gauge and BG claim 0.45mm. Probably the joys of tolerances at play though which means the TradeLine is the thinner as you say. <rant>'Tolerances' is one of the great deceptions of the construction sector as far as I am concerned. Most other lines of work the nominal is what the manufacturer tries to achieve so sits in the middle of the distribution (mean) and the tolerance sets the width of the tails either side. In construction supplies, many seem to treat it that as long as X% are within nominal +/- the tolerance, they can reduce the mean to save money. Hence 100mm blocks actually being 96mm etc. It's a con in my eyes.</rant> British Gypsum: TradeLine: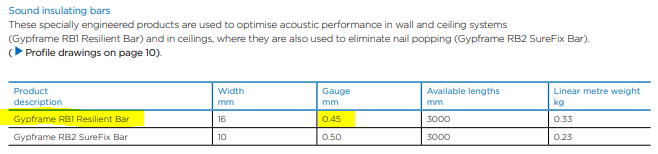
-
Anyone used Tradeline or Libra Resilient Bars or MF?
MortarThePoint replied to MortarThePoint's topic in Sound Insulation
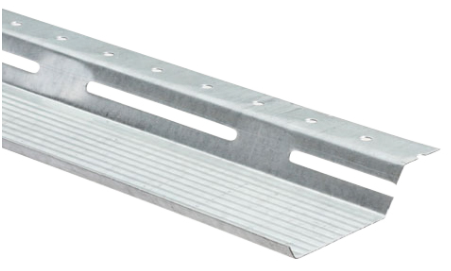
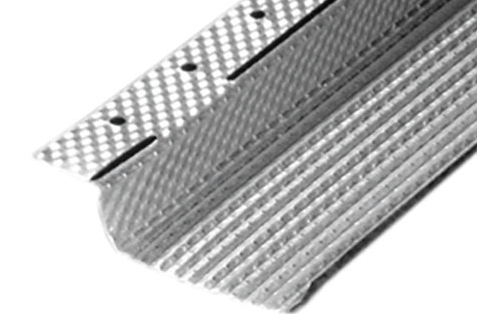
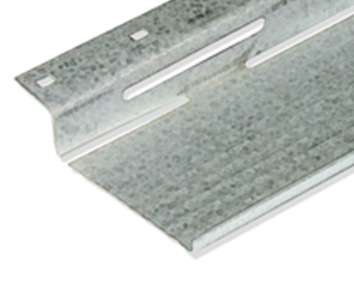
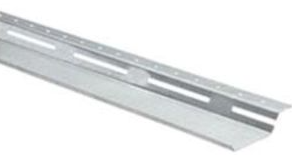
I like the look of the Tradeline ones -
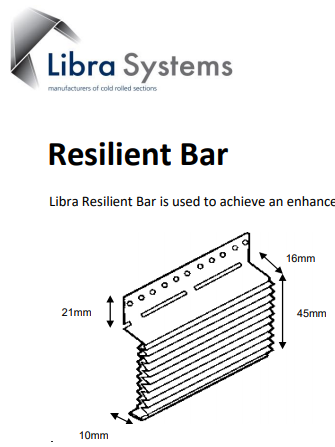
British-Gypsum and GTEC resilient bars are about twice the price of lesser brands like Tradeline/Libra/Speedline/Phoenix. thickness and dimensions seem the same, so is that just the price of branding at play. I should imagine its all the same isn't it? I prefer the look of bars that have the acoustic holes away from the fold, but given the fact that both premium (BG) and budget (Libra) have holes on folds it doesn't seem an issue. Knauf double up and do both. SpeedLine: TradeLine(secondary source? Siniat GTEC: Gypframe: Knauf:

-
Looks comprehensive. What was the airtight paint you used?
-
Poly bead (e.g. Ecobead) cavity wall insulation with Cavalok cavity closers. Mineral wool (Knauf) at rafter level. Mineral wool (Knauf) at ceiling level and any flat roof bits.
-
At the skirting junction and the ceiling cavity, should I think about some form of sealing paint or put some wet plaster on at an early stage in those areas?
-
A type of spray foam like this?
-
Hopefully resolved by the Compraband, but I expect I may have to use a sticky membrane too. Something like Tescon Profil though difficult to appreciate how much better that is than duct tape. A lot easier to fit with the backing paper.
-
A bit confused, isn't that what air tightness is all about, stopping warm air leaving and cold air entering? All the airtightness measures would mean that air is only coming in and out where intended, through the ventilation system. Taking the rafter insulation as an example, the plan is a ventilated cavity above mineral wool insulation and then a VCL. Air fro outside will get on to the insulation, but hopefully not through or around the insulation to the warm side. Brick and block walls. Hopefully that makes airtightness in that area as simple as wet plaster onto the blockwork walls.