Thorfun
-
Posts
4889 -
Joined
-
Last visited
-
Days Won
36
Everything posted by Thorfun
-
I'm in the hands of the timber frame company for this Dave. afaik, it has to go in now to be a safe working platform for them to fit the first floor walls and then the roof. I wasn't given an option to just loose fit OSB until watertight but as I don't want to be fitting the floor decking myself I have to follow the build schedule as laid down by the TF company. I don't currently know what the floor decking is but it is arriving tomorrow so I can take a look and see what it is and see if it has a coating on it already. I guess that once I know the exact floor decking I can make a more informed decision but let's do a 'what if'. if the decking has to be fitted now and if it's not got it's own coating to withstand a certain exposure to weather would 2mm Correx sheets do the job for 5 or 6 weeks until the roofing slates are done?
-
Hi all, our TF house floor joists and floor decking is going in next week and once finished it'll be another 5 or 6 weeks before the roof is finished and as we move through October and in to November I'm wondering if the statement on the floor joist drawings of "Protect installed flooring from mechanical and water damage" is just them covering their backsides or if it is really prudent to do so? for about £200 I can get enough Correx to cover the floor decking from water damage should the heavens open (and they probably will) but is that a waste of money and time to fit it? how long have others left their floor decking open to the elements without seeing warping or excessive damage from water ingress?
-
In my mind there will be battens for a service void and the plasterboard will fix to that. So the real question is how to fin the battens through the PIR and in to the rafters? and to answer that please see the previous answer ?♂️
-
I’ve not thought that far ahead!!
-
interesting that the air tight membrane is going behind the 60mm PIR. I was planning on filling the rafters with mineral wool, then putting 80mm PIR and THEN adding the VCL. that way any off-gassing from the PIR is all behind the air tight membrane and not off-gassing in to the house. crazy paranoia or sensible?
-
Enhabit could do PHPP for me but said it has limitations in that it's whole house rather than room by room. Also, I'd already paid the other company for the thermal modelling and SAP report so the cooling demand wasn't as much as getting Enhabit to do a whole new thermal/cooling/phpp modelling. in for a penny, in for a pound as they say! I'll see what they say in response to my snotty email.
-
we went to the HBR show at the London Excel last weekend and we were asked to show our Covid passes before entering the center. we even saw people kicking up a fuss for not having one on them. gave us a bit of peace of mind, but we kept our masks on throughout anyway.
-
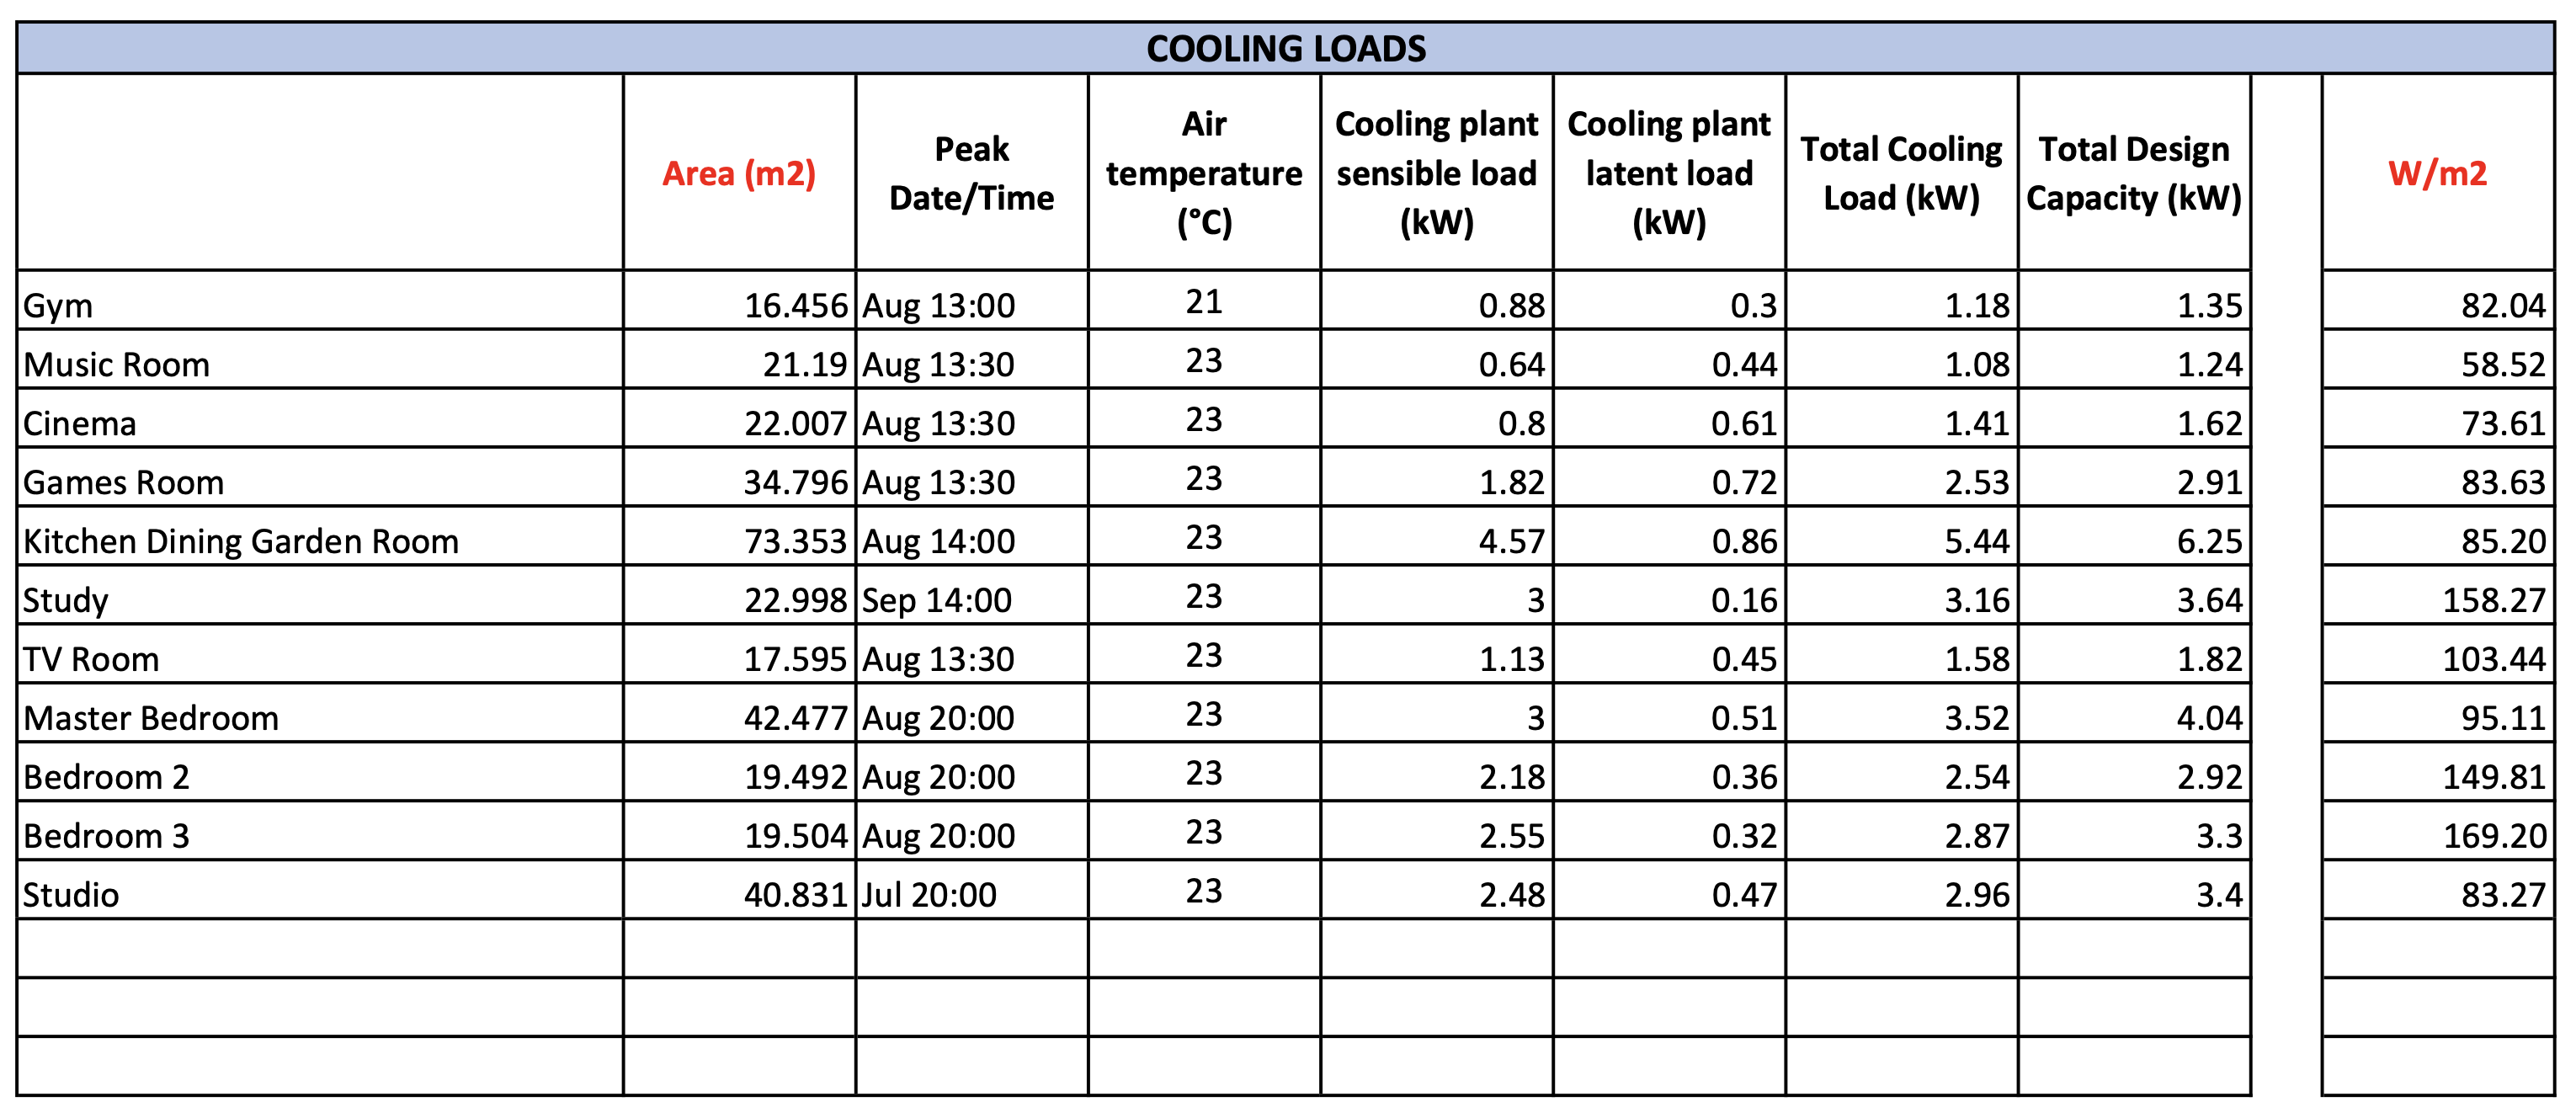
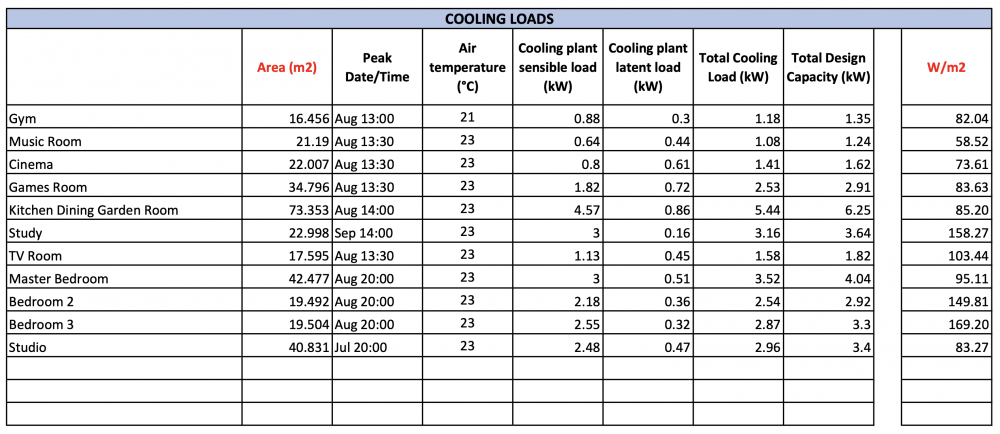
they didn't give any details at all! (this wasn't Enhabit btw). the report was a couple of tables with no explanation of how the model was achieved etc and I have sent them an email asking for details and telling them how unhappy I am with their 'report'. one table seems to allude to them using occupancy and equipment to determine the cooling demand. no mention of blinds, MVHR or anything else. really think I wasted my money on this one but will see what they respond with when they get back to work tomorrow.
-
yeah, that's what I thought. makes me think they didn't take any of our solar gain mitigation strategies into consideration. in fact, I think I've literally thrown money down the toilet for that cooling demand report.
-
I received my cooling modelling back @Dan F and this is what it says: I only got it late on Friday so didn't get a chance to ask questions as it looks like it doesn't take the shading of the external blinds in to consideration but I'll ask that on Monday. just seems quite a high cooling load. anyone got any comments on this? (probably should start my own thread on this subject but ho-hum)
-
Since the basement was finished at the end of June things seem to have been dragging on for ages but we are finally out of the ground and ready for the timber frame. It has taken 13 weeks and we had delays with materials that held things up but when I look back at the photos from the basement being finished to where we are now it is amazing how much has been done and we’re very excited about the timber frame going up next week. When the groundworkers came back post-basement they started by insulating the basement walls externally with 200mm of EPS 100 and then backfilling with clean crushed as per the structural engineers specifications. Then they started digging the foundations for the ‘arms’ of the building as I call them and you’ll see why from some later photos as the main building looks like the body with 2 x arms coming off it. These are a garden room (that links to the kitchen/diner) and the utility room and garage. These are designed as insulated slabs with 300mm EPS underneath which you can see in the photos. Here we see I had to put some Perinsul blocks in, thank you to @ToughButterCup for getting them to me. While that was happening the brickie was also on-site building the internal walls for the basement. We have a 3m ceiling height in the basement so we had to get scaffolding in to build them safely which was another expense I hadn’t planned for (beginners naivety) but something that had to be done. It was around this time that I purchased a DJI Mini-2 drone. It is brilliant and has given us a whole new perspective on the build. Here are a few videos from before the slab pours (please excuse the auto-added cheesy music that DJI added). And some photos of the slab pours. I also put in some VCL between the basement and ground floor as a Tony tray. Once the slabs were poured we move on to the block and beam flooring. This caused the biggest issue with getting materials as the company the groundworkers were using moved their lead times from 15 days to 6 - 8 weeks which would’ve put us stupidly behind schedule. So I sourced some beams from a local builders merchant and paid the beamers to cut them to size on site rather than waiting for the correct sizes to be fabricated and delivered. It was pretty stressful to say the least. But what made it worse is that I decided a while ago to move from precast hollow core slabs to block and beam but no one along the way told me that the beams couldn’t take the load of the walls above like the hollow core could and, by chance, during my conversations with the block and beam company designing it I found out that I had to put supporting steels on top of the basement walls to take those load bearing walls from above ground. Back to the structural engineer to get those designed and then fabricated and installed. And then the beamers tell us that they won’t do the work without a complete fall arrest system across the entire basement 600mm down from the top of the basement walls. Back to the scaffolders to come and put that up at yet another expense (although the safety of the contractors is important to us so I didn’t grumble too much!) and we were finally ready for the block and beam to be installed. So what turned out to be the decision to save a few £k by moving to block and beam has in the end cost me a lot more due to the extra work involved. Oh well, you live and you learn. Anyway, the day came for the beamers to install it and they were a smash and grab outfit but that is, apparently, what all block and beamers are like. They just turn up and smash it out and leave without any due care and attention. To say they were miffed that they couldn’t do that on our build due to the steels on the basement wall is an understatement and comments like ‘if I’d known there were steels I wouldn’t have taken the job’ and ‘I’m losing money of this job’ really filled me with confidence. And if I ever do this again I will probably do the block and beam myself as, although hard work, it’s not complicated and I would’ve done a much better job. Anyway, it was done and they left and we could get on with laying the coursing blocks for the sole plates to sit on. This is where I insisted on precision and I spent a lot of time out there with the brickie assisting with setting out to make sure everything was spot on for the sole plates and checking that the levels throughout were within 5mm - 10mm across the building. It was time consuming but I think the accuracy will pay off in the end. While that was happening and with the timber frame imminent the scaffolders came and put up the required 2 lifts around the entire building and by 5pm the Friday before the frame was due it was all finished and we were ready……or so we thought. The timber frame ended up being delayed by 4 days due to the chippies testing positive for Covid-19 (the first time we have been directly impacted (not including the material shortage etc) by Covid) and during that 4 day delay the contract manager attended site and noticed that the garage (which is 120mm below the main house) had it’s coursing blocks below the main house. After a quick email exchange it was pointed out to me that I’d misread the plans and that those blocks, and the sole plates, need to be at the same level throughout so I needed to raise the coursing blocks by 120mm in the garage by the end of the following day. The groundworkers have moved on and I couldn’t get anyone to do it so I knocked up some pug, borrowed a disc cutter, bought myself a trowel and got laying. I’ve never laid blocks before but I did spend a lot of time watching and helping the brickie so I had a good idea as to what to do. I started after work on Wednesday (sole plates due to be fitted Friday) and finished half of it well after dark and then got up early the next day to finish the rest off. And it worked! Level and straight (ish) and still standing the next day. Phew! And this is where we’re at right now. Timber frame ground floor wall panels are due next Tuesday so we should really start to see things happening rapidly now and within 4 weeks our superstructure will be up. But that will be the subject of my next blog. Here’s a time-lapse video of this part of the build. I had to speed up the footage x10 and each day is about 4s long so things happen at quite a speed but it’s amazing to look back and see what has been done these last 13 weeks. Thanks again for reading and I hope you’re enjoying this journey as much as we are. Until next time…
- 6 comments
-
- 14
-

-
yeah, like I said it could've been another company as it was quite a while ago and my memory is pants. they've said the Ecodan isn't reversible but, as you say, others have done so by switching a dip switch so I do know it's possible. I'll try and find the manual that says how to do it and go back to Enhabit. it might be that changing the dip switch isn't supported in the UK by Mitsubishi and so they might not be able to do it but what an individual does to their system post-install is another matter. but I will have the conversation with them. I'm still waiting for our cooling demand calculations to come back (will chase the company up today about it) and once I have that figure I can make a more informed decision about it all. Comfopost is still an option if the demand is low enough.
-
I thought someone here has shown that the rules changed in 2017 for cooling and RHI? can't remember who or on which thread though but I remember reading it somewhere!
-
it's interesting that they suggested UFH cooling for your cooling needs. I'm pretty sure I talked about that with them (or it may have been another company I can't remember now!) and they said it's not allowed. now I know that's not true and I was thinking of just doing it myself post-installation but if they've designed that for you then I will just ask them again. What ASHP do you have? they've said that the Ecodans aren't reversible and so if I wanted to use the ASHP for cooling using fan coils then I'd need to 'upgrade' to a Daikin.
-
I spoke to Enhabit about our cooling requirements and we are having the cooling modelling done (awaiting the results). we can use fan coils and it's something they would design but they say it complicates things and they've recommended keeping it simple and having the cooling as a separate system. plus the fan coils they've suggested aren't amazingly cheap and it's something that I just don't have time to play with as there's too much else to do. We are indeed having external blinds on the FF (and many GF) windows and we think our cooling requirements will be very low but we both can't sleep if it's too hot and if we can have an 'invisible' ducted AC system in the bedrooms for the occasional use we both think that it's a price worth paying. The AC company we've spoken to are happy to simply first fix for AC now and then we can just live in the house and see if we even need it and then if we do second fix the AC units with minimal disruption if we can't find the funds in the budget to fit it now. There are many options I'm finding with self-building and you have to, at some point, just make a decision and stick with it otherwise you could end up going around in circles. There's no reason why an AC cooling system can't be controlled from Loxone and so we can have a centrally managed temperature controlling system that can deal with hot and cold weather and whatever climate change throws at us, albeit for a price. I'm having to choose my battles with the build and decide which to attack myself and which to delegate out, and cooling is one of those I'm delegating.
-
I haven't had the ufh designed yet so can't answer this ? how would I find this out? the spec sheet on the units don't seem to mention it. https://library.mitsubishielectric.co.uk/pdf/book/Ecodan_PUZ-WM85VAA_Monobloc_Air_Source_Heat_Pump_Product_Information_Sheet#page-1-2
-
yep. the FF can be heated by the AC units if required. The basement we have not actually decided on a heat source nor if we will need one. I guess that's another reason why the 8.5kW unit would be better so we have the option to put wet UFH in the basement should we require it. 300l. they've suggested a 25l buffer tank
-
I can't see it being many. we're based in the South East so winter temps don't usually get too low for too long. the drop in CoP is interesting. it looks from the spec sheets that at A-7/W35 the 8.5kW unit is the least efficient. but doing the maths to calculate what that reduced CoP means in actual costs especially when we're planning a 10kWp PV array and the payback period for the extra £500-odd increase to the 11kW unit is beyond me.


-
this is an interesting thread for me as we're finalising our ASHP size and have a few options! I'll start with a bit of background. we have a basement, ground and 3 bedrooms on the first floor. at the moment the plan is to only heat the ground floor using wet UFH. the FF will have electric UFH and towel radiators in the en-suites and we have decided to use split/ducted AC units for cooling on the FF so can use that for supplementary heating if required. our M&E guys have worked out that we should have a 11kW ASHP but that is based on all 3 floors having heating requirements. here's my output from @Jeremy Harris's spreadsheet: that is based on 1 ACH which is the most I'm hoping for so, fingers crossed, the actual figures will be less. So I can see from that output that 6kW ASHP is too little and an 8.5kW ASHP might be pushing it a bit in the coldest days and I can understand why they suggested a 11kW unit. But, after further discussions with them and with the fact that only the GF will be wet UFH they have said that my heating requirements for the GF is only 3.6kW and so we could potentially only require a 6kW unit. Although, as we've no idea how the house will actually perform and we may need heating in the basement I'm a bit concerned that the 6kW unit doesn't give us any potential expansion if we need it in the future. As such, I am thinking of simply going for the 8.5kW Ecodan unit. seems to be the sweet spot and will easily cope with our initial demands but also gives us a 'buffer' should our heating requirements change over the years. From a cost perspective there's approx £500 difference between each unit. What are other's thoughts on our situation and which heat pump size would you recommend?

-
welcome. there's lots of information on here so use the search function and you should find what you need!
-
I can't comment on the effectiveness of either systems but we are going through this decision at the moment and we have decided to use a separate A/C system (ducted and split unit mixture) around the house. it is a much more expensive solution but less complicated as the ASHP isn't performing multiple functions. Plus we can use the A/C on the first floor as supplementary heating if required as we're not having UFH in the bedrooms. obviously, this is a personal choice for each project and we have, at least, decided to simply first fix all the pipework we could require for the A/C system and then if budget allows fit straight away otherwise we will live in the house for a couple of years and see how it performs and if we need cooling we can add the A/C units at a later date. it all comes down to your modelled cooling requirements and whether the ASHP can provide that level of cooling in the end and even a well calculated model can't guarantee the results as far as I can see and so simply preparing for the worst seems the most prudent solution for us.
-
Cold bridge created by groundworker mistake...how to resolve?
Thorfun replied to Thorfun's topic in Timber Frame
pretty much what the groundworker said too. -
Cold bridge created by groundworker mistake...how to resolve?
Thorfun replied to Thorfun's topic in Timber Frame
yeah, that was my option 3. and I was thinking of wrapping the whole building up to sole plate level with some EPS anyway so it would be the same here too. -
Cold bridge created by groundworker mistake...how to resolve?
Thorfun replied to Thorfun's topic in Timber Frame
hmm.....that might be a fantastic idea. I'll have to have a look at the plans and consider how it will look from the outside and then speak to the timber frame company (assuming it's not too late to make that sort of change!) and see. but it's a damn good idea, thanks. just mentioned it to the lovely other half and she pointed out that it will change the pitch of the roof on the porch. but still worth the conversation with the TF company.
-
Cold bridge created by groundworker mistake...how to resolve?
Thorfun replied to Thorfun's topic in Timber Frame
thanks but there's just not time to take it all out and redo it. scaffolding is being put up, coursing blocks are being laid and timber frame is coming Monday for erection.