


Nick Laslett
-
Posts
687 -
Joined
-
Last visited
-
Days Won
1
Everything posted by Nick Laslett
-
Some useful posts in this thread: And here.
-
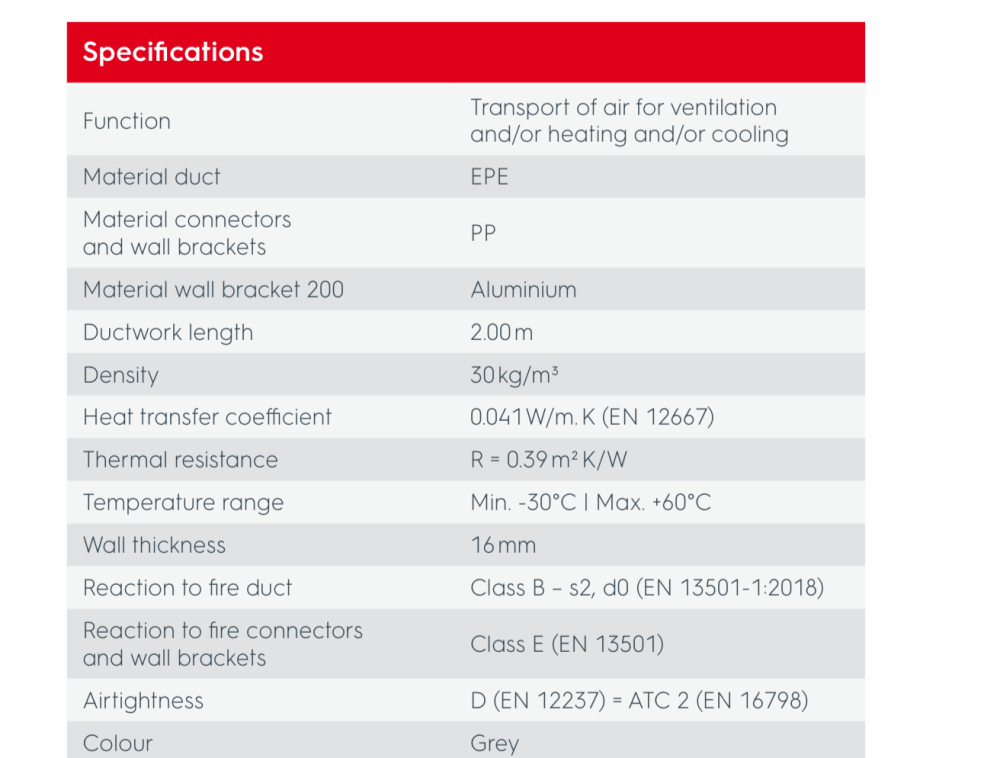
I am a little surprised by the thermal performance of the Ubbink insulated ducts. Is this the Aerofoam product? Thermal Spec is 0.041W/m.K The Zehnder insulated ducts were too big for my plant room, but I did buy a 1 metre length. Their U-value is 0.035W/m.K What was the outside temp when you took the photo? 0°C? The insulation on the filter box is great. I’ve used 32mm armaflex with steel spiral ducting, I hope that performs. System still not commissioned, so will have to wait to get a similar thermal image.
-
Here a some of my fermacell bookmarks from when I was doing my original research. https://roselea.co.uk/2022/09/16/fermacell-and-plasterboards-arrives/ http://drubbard.blogspot.com/2015/05/boarding-walls-first-floor.html http://drubbard.blogspot.com/2016/02/jointing-walls-and-ceilings.html https://victorianhouseproject.blogspot.com/2016/01/fermacell-gypsum-fibre-boards-and-where.html
-
@Great_scot_selfbuild, I loved using fermacell. But I knew I was going to do this part of the build myself. You are much better paying for professionals to do the dry lining and then get a plaster skim. If you don’t like how flimsy plasterboard is, just get the dry liners to put up OSB first. Like all good project management decisions, you can possibly save money going down the DIY route, but it will just take a lot more time.
-
Two useful videos here for anybody interested in more details on the Zehnder condensate requirements.
-
ICF Window Render Reveal
Nick Laslett replied to WiltshireLink's topic in Insulated Concrete Formwork (ICF)
These two threads might be of interest. These beads do come in a few different colours. https://likov.com/ps2-flex-colour-2d-window-reveal-bead-with-protective-lip-g177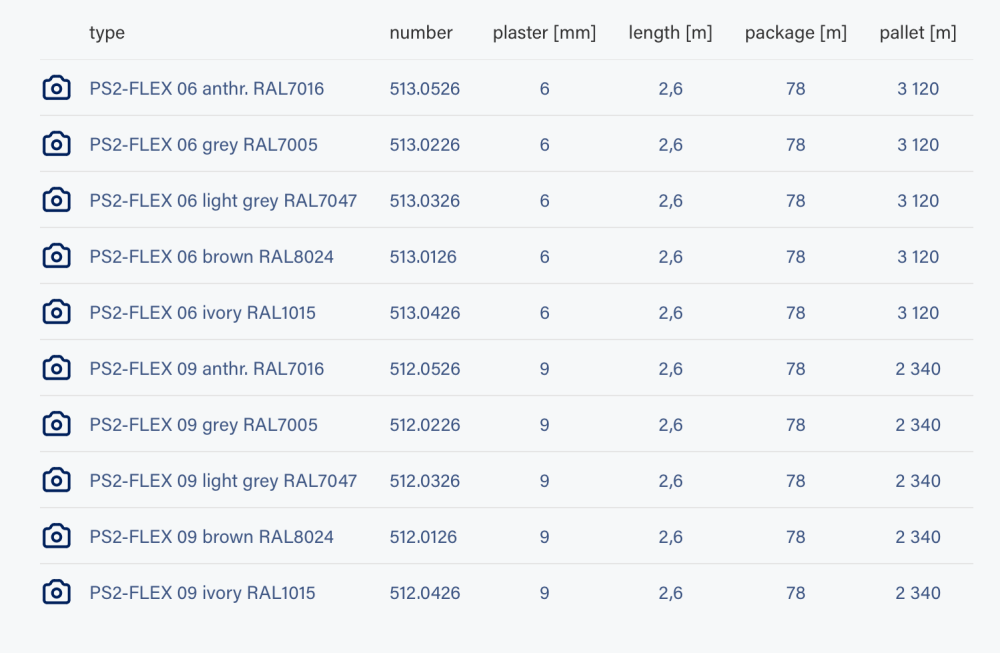
-
Floor slab insulation. Test my logic please?
Nick Laslett replied to saveasteading's topic in Barn Conversions
I believe that the graphite EPS not only has slightly better U-value, but also reflects more heat back at the source. Which I don’t think u-value measures but I might be mistaken. BASF Neopor is the stuff used in my ICF blocks. -
Rebuilding after demolishing question
Nick Laslett replied to dustyb's topic in General Self Build & DIY Discussion
If price is your primary concern. Take a look at this channel doing an ICF Ecobrix build. https://www.youtube.com/@TurningRosemountUpsideDown -
Recommend a thermometer gun thing.
Nick Laslett replied to Russell griffiths's topic in General Self Build & DIY Discussion
Definitely a difficult subject area to navigate. Loads of misinformation and dirty tactics from manufacturers. This is a very good forum for discussions about thermal Imaging cameras. https://www.eevblog.com/forum/thermal-imaging/ This shop is good place for info and comparisons, not sure if they still supply the UK. https://eleshop.eu/inspection/thermal-imaging-cameras.html I bought the Hikmicro B10, £299 on Amazon. https://www.amazon.co.uk/HIKMICRO-Resolution-Measurement-4°F-1022°F-Temperature/dp/B09FTFHTPR -
Triple glazed Vs double glazed patio doors
Nick Laslett replied to flanagaj's topic in Doors & Door Frames
@Benpointer, this looks like a great product. Amazing U-values are possible, but the glazing units just get thicker and the frames even more so. These are 54mm thick glass units, with 94.5mm thick frames, you could fill with krypton and get even lower u-values. My wife would throw a fit if I had suggested frames this big. I did look at C.U.in glass which adds a plastic sheet in between the 2 panes of a DGU cavity and gets a window pane U-value of 0.4 for a 32mm thick unit. Not sure what the catch is? But they don’t seem very popular. My wife wanted glazing bars, which don’t work with C.U.in. https://crystalunits.com/c-u-in-triple-glazed-glass/ @craig, do you have any experience with C.U.in glass units? Another factor that is not too common in England, but seems quite normal in Scotland and Ireland, is check reveals. We have these as part of our ICF blocks, so it adds 25mm of insulation to any window frame. We didn’t bother with detailed PSI calculations for this thermal bridge, but as our frames are only 58mm high, the 25mm overlap of the check reveal provides a lot of insulation. https://www.facebook.com/thekirranefamilydiaries/videos/these-are-the-thermohouseltd-reveal-blocks-for-the-windows-and-doors-i-will-make/1065230795004305/ -
How do you install Compriband _under_ windows?
Nick Laslett replied to Alan Ambrose's topic in Windows & Glazing
For what it is worth, OB1 Clear is intended for exterior purposes if you need a clear version of this type of adhesive. https://ob1original.com/uk/wp-content/uploads/2025/10/OB1-Multi-Surface-Construction-Sealant-Adhesive_Silver_Clear_TDS-1.pdf -
How do you install Compriband _under_ windows?
Nick Laslett replied to Alan Ambrose's topic in Windows & Glazing
For me that was the joy of self building. Never having installed windows, I thought compriband was great. Followed the YouTube video, what is not to like. Here is my playlist of many window install videos. https://youtube.com/playlist?list=PLMqBydLyN5jH5KYILUMXeVpz3dljZLrPE&si=zTzode7Uz_pSIjb5 -
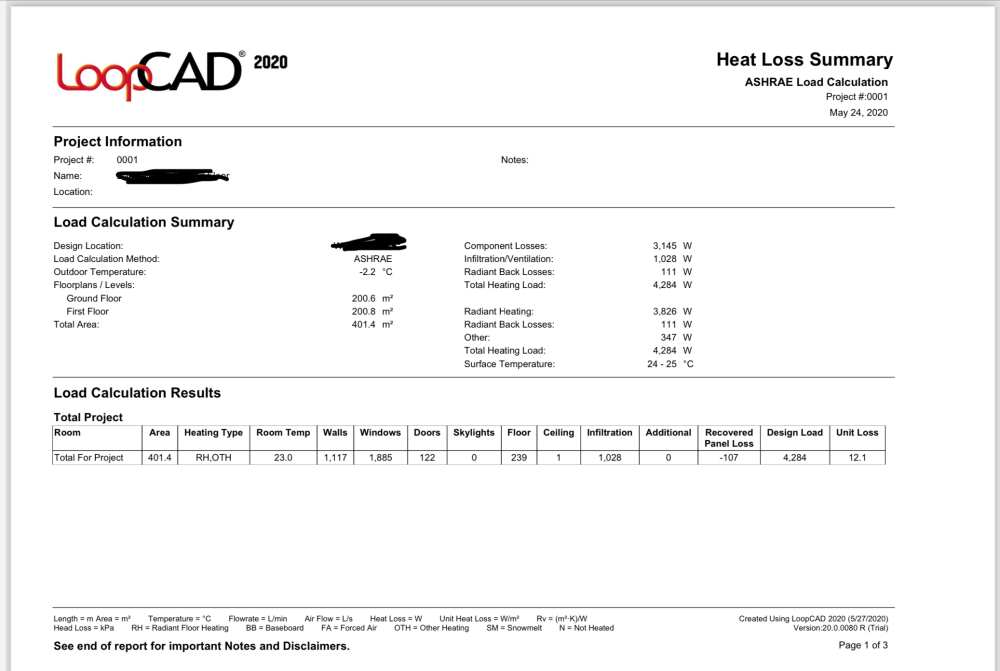
@Great_scot_selfbuild, something not quite right with the LoopCAD inputs. Ask for the Heat Loss Summary Report, that will include target room temp. I have attached mine as an example. Do you know the design outside temp? My flow temp today with a 1°C outside temp, is 28°C. Room temp is 18.4°C. In my original LoopCAD design, I had target room temp of 23°C, which had a flow temp of 30°C, with a floor temp of 25°C. Looking at the attached report, the floor temp is consistent with mine, but the flow temp is 46°C. What is stopping the heat getting out of the floor? Maybe they forgot to add the insulation under the floor in LoopCAD. The Heat Loss Summary report will show the heat loss through walls, windows and floor.
-
Triple glazed Vs double glazed patio doors
Nick Laslett replied to flanagaj's topic in Doors & Door Frames
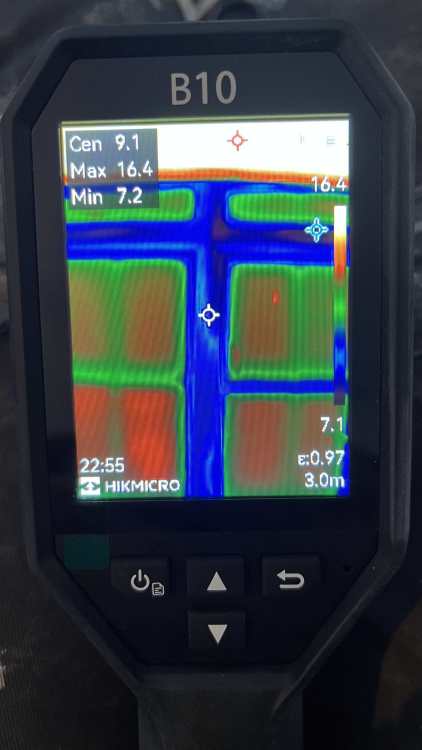
Good day for a test. (Did this about 95min ago) Outside temp according to the ASHP is 2°C. House Internal air temp is 18.4°C Here is a photo from my thermal imaging camera. The window pane glass is at 12°C, look at the heat outline of my body showing the reflected heat, which is 15.1°C. The frame is at 9.1°C.
-
Triple glazed Vs double glazed patio doors
Nick Laslett replied to flanagaj's topic in Doors & Door Frames
I have to go against the grain here and say that the frames are the main thing to think about. A 26.8mm DGU, with 6.8mm-16mm-4mm glass, filled with krypton gas will give you a window pane u-value of 1.0. The two different thickness of glass give the improved sound reduction. The soft-coated, low-emissivity (low-e) coating makes the glass reflect back into the room a sizeable amount of body heat which stops the glass from feeling cold to the body. If you can afford frames thicker than 28mm, then triple glazing can be brilliant, but to outperform a 2G unit the gap needs to be a minimum of 12mm. A 32mm TGU will give you a U-value of 0.8, you need to go to 44mm for a U-value of 0.6. For frames, you want something with the latest generation thermal break, like aerogel or PURe. SWMBO wanted Crittal style windows, so we have 2011 era Smarts Alitherm frames, with 1.0 U-value glass. The whole window unit u-value is 1.3. This is all due to the frames ancient tech polyamide thermal break. Remember the glazing unit only has a 25 year lifespan, max. Then all the gas has leaked out, the seals have gone and there is no vacuum. Then the unit needs to be replaced. -
How do you install Compriband _under_ windows?
Nick Laslett replied to Alan Ambrose's topic in Windows & Glazing
Here is how I did my windows. -
Fixing aligment of holes for handles.
Nick Laslett replied to paro's topic in Kitchen Units & Worktops
@paro, I use the toothpick with wood glue trick to adjust screw holes. Here is CharlieDIY demonstrating it with matches. -
metal framed cupboard and dropped ceiling
Nick Laslett replied to Thorfun's topic in General Joinery
Great job. I really enjoyed all the metal framing I did on my place. We had drop ceiling on the ground and first floor. I also had metal frame stud walls and needed two access hatches for AAV access. -
That must be a newish policy, I have a 4G data sim from O2 in a router at my site. Been using it for 5 years. No voice calls ever made. Maybe this is for 5G sims. It is a TP Link sim router. Seems fine. Powered connection improves 4G reception. The Wi-Fi signal is adequate.
-
Insufficient flow rate for Samsung ashp
Nick Laslett replied to Simon Brooke's topic in Underfloor Heating
I put one of these Intatec flow balancing valves on each of my manifolds on the basis of watching this heat geek install video. This maybe an unnecessary addition, but I wanted a way to control the flow rate at manifold level. Specifically because the upstairs manifold loops need restricting in heating season, but to be fully open for cooling. https://www.intatec.co.uk/product/flow-balancing-valve/ Not really that relevant to the topic at hand, but I just remembered it, so thought it would do no harm posting it here. This link should go to the specific timestamp at 10 min mark of the HeatGeek install. If Adam and Roger both thought it was worth including in the edit of the video, it can’t be too superfluous!
-
Sense check for ASHP & UFH design
Nick Laslett replied to timhowes's topic in Air Source Heat Pumps (ASHP)
I agree that the Panasonic’s Aquarea website and brochures are a bit of a mess. They also seem keen on various bundles that complicate the situation. I think the newer “L” series is finally available standalone. If you are happy with R32 coolant then the “J” series monoblock is what you want. T-cap is for very low outside temps. 5kW, 7kW, 9kW are all the same single fan machine: WH-MDC—J3E5, 05,07,09 in place of the two dashes. The Secon Renewables website is the best place to look at the various Panasonic ASHPs offering. https://www.seconrenewables.com/panasonic-heat-pumps-266-c.asp -
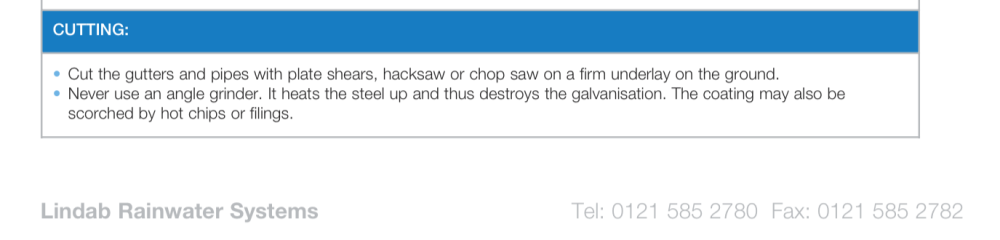
Robin Clevett has a Lindab guttering install video on Skill Builder. If you fall down the rabbit hole far enough, you can find Lindab documentation that informs that you can use a metal chop saw for cutting the material. http://publications.lindab.com/UK/rainline-brochure/?Page=2&page=46 Even the product sheet for the downpipe mentions chop saws. https://www.lindabprofile.co.uk/wp-content/uploads/2021/06/Lindab-Downpipe-SROR-Data-Sheet.pdf Obviously a hacksaw is the simplest method. They also have touch-up paint for the cut edges and drill holes, how necessary this is, is anyone’s guess.

-
One of the YouTuber’s I follow, actually posted a pitched warm roof video today.
- 15 replies
-
- 1
-

-
- standing seam roof
- pitched roof
- (and 1 more)
-
MVHR drone
Nick Laslett replied to Mattg4321's topic in Mechanical Ventilation with Heat Recovery (MVHR)
@Mattg4321, thank you for reporting back with your update. It is so important people do this. I’m glad you found a solution. -
Did the weekly Legionnaires thing get mentioned yet?


