SilverShadow
-
Posts
185 -
Joined
-
Last visited
Everything posted by SilverShadow
-
Many thanks 😁 Alas i don't have any pics to hand, but i'll try and get some soon It's basically a Upvc door to an outbuilding, about 10-15mm above concrete slabs outside & a solid concrete floor inside the outbuilding. The only way to fit floor insulation/board inside the outbuilding is to lift the door frame 40-50mm & fit something weather proof between the frame and concrete floor
-
I did consider timber, but around the doorway is bound to be damp for large periods of time (as it's exposed to the elements) - so i really want something weatherproof that won't rot. It really needs minimal to no water absorption, so it doesn't invade into the flooring of the outbuilding
-
Hey Joe - i need to raise the existing door frame about 40 or 50mm (so the door is high enough to open while allowing for floor insulation/boards for an outbuilding). So essentially i need something to fill the void it leaves. There'll be no load on this (other than door, which the frame will be screwed into the wall anyway) It'll be a trip hazard, but that's inevitable i'm afraid. All i'm after is something the width of the frame, about 40mm thick and say 70-80mm wide to fill the void
-
Thanks guys I was considering cutting blocks via angle grinder to this, but was intrigued by my mates idea. I'll have a look to see what blocks /slips there are around 40mm thick - but the only concrete ones i've seen were too wide As i need it around 70mm width, then i could chop the concrete every 70mm to make smaller blocks and lay those. Way more preferable than trying to cut 70mm along the whole length 👍 On saying that, i've seen some recycled plastic edging that might do also do the trick, if i can find the right size
-
Hey all, Bit of a random one, but hopefully one or more of your guys might be in the know 😁 I'm looking to fill a small gap under a upvc door frame (between the concrete floor and base of the frame). I was struggling to find something suitable of the right dimensions. A mate of mine suggested doing a 'concrete-pour' & making my own beam. After i'd stopped chuckling & picked myself off the floor, i realised he was serious, and so wondered what you guys thought to his plan. Don't have exact measurements to hand, but lets assume about 850mm long x 75mm wide x 50mm depth Has anyone made their own beam before? I was thinking of creating a wooden-frame cast & lining it If lining the frame what would be the best option, so it doesn't stick (my friend suggestion oiling the wood)? What mix of sand/cement/aggregate would you guys suggest? It's not taking any real structural load, just needs to be reasonably weatherpoof (with some water seal applied afterwards) Would you use any rebar? I wasn't sure whether to add 1 or 2 6mm bars - more for helping with it's longevity, than for support Many thanks for your time, all - be great to hear how you'd approach this undertaking BR Shadow
-
Hi again, folks Firstly, apologies if this is already well trodden paths. I'm sure something as generic as this probably gets resurrected more times than a boybands career! 😁 However, if not then please read on... We'd be looking to have our home's cavity walls insulated, and after your guys high level advice/experiences. I have some basic questions, but please feel free to add anything you feel of value 👍 The house walls are outer brick/inner block. I'm not sure of the cavity gap/condition, but for the purposes of this convo: lets assume it's suitable for any approach.... My questions are: What is your preferred insulation material(s)? - i've heard good things about EPS and foam (tho both have pros and cons). I'm leaning towards EPS (due to cost), but happy to find out more What to look for with companies providing the service - plenty have reasonable reviews on Checkatrade/etc, but some are likely better than others. So are there any accreditations/memberships to really look out for? Quoting for cost - dumb question (my specialty 🤪), but costs i've read online are by m2. I assume the reputable companies factor in window/doors into their quote, and don't just crudely estimate based on rough wall dimension? (i'm not sure if this is a good yardstick to measure if estimates are realistic tho? 🤔) Guarantees - am i right in thinking all work guarantees (some i've seen are 25 yrs) should be insurance backed? GBIS - does anyone know if GBIS companies are any better/worse than anyone else? I've occasionally seen online non-funded jobs (eg: private) are sometimes completed badly Anything else - eg: building regs signoff, that may be required? Many thanks as always for your sage suggestions Shadow
-
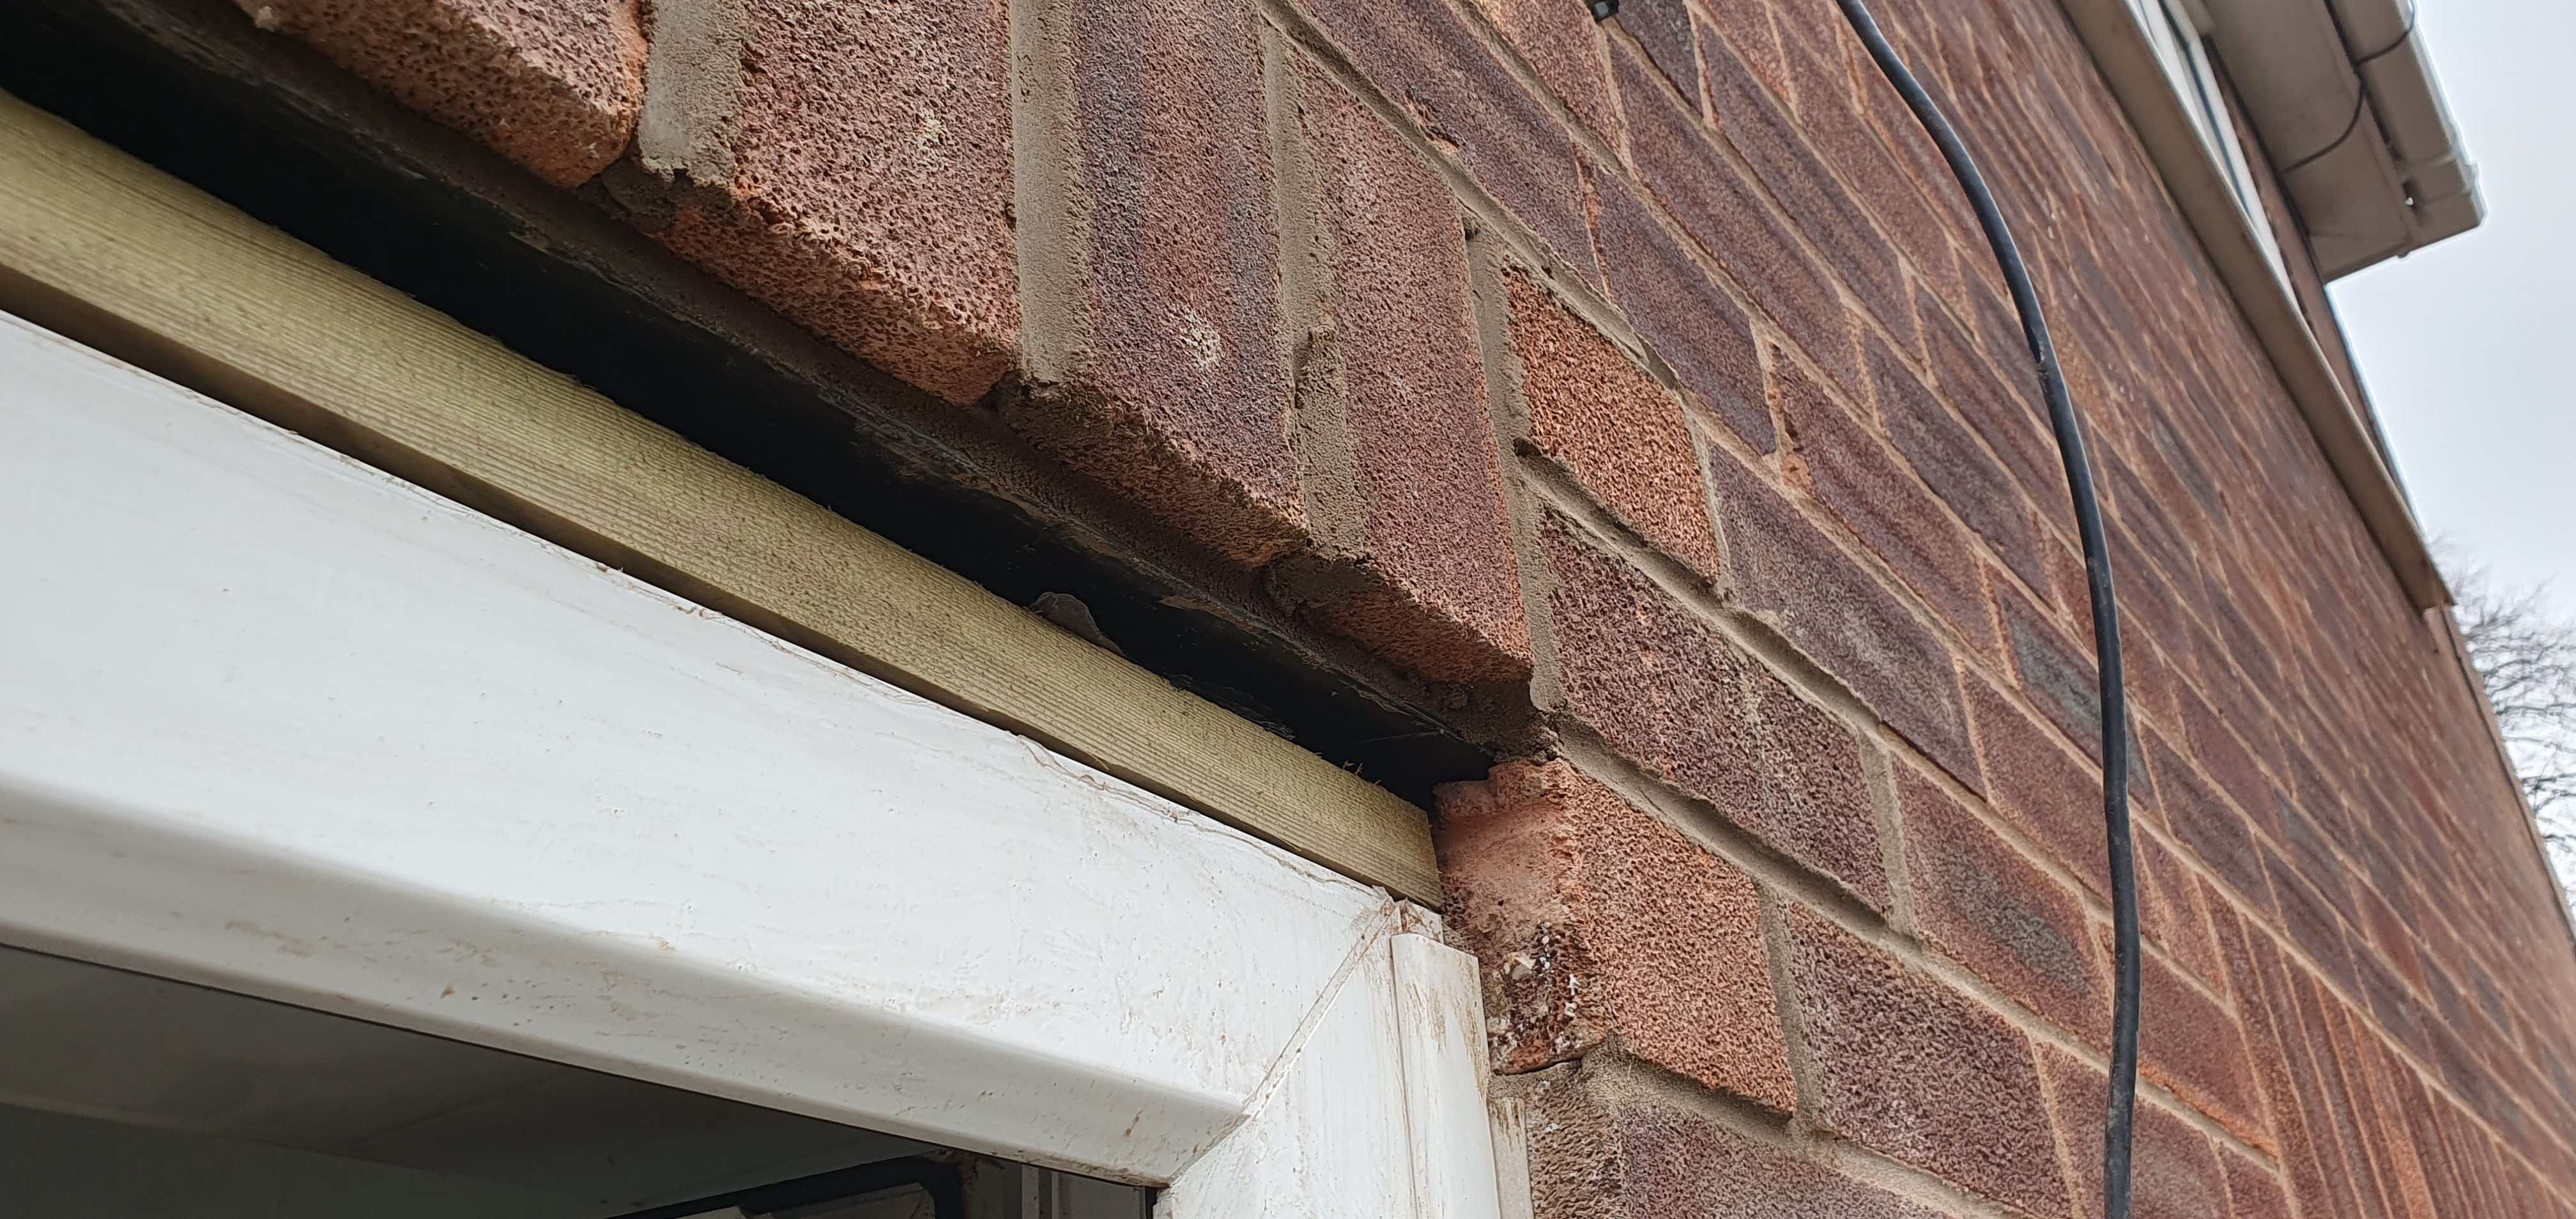
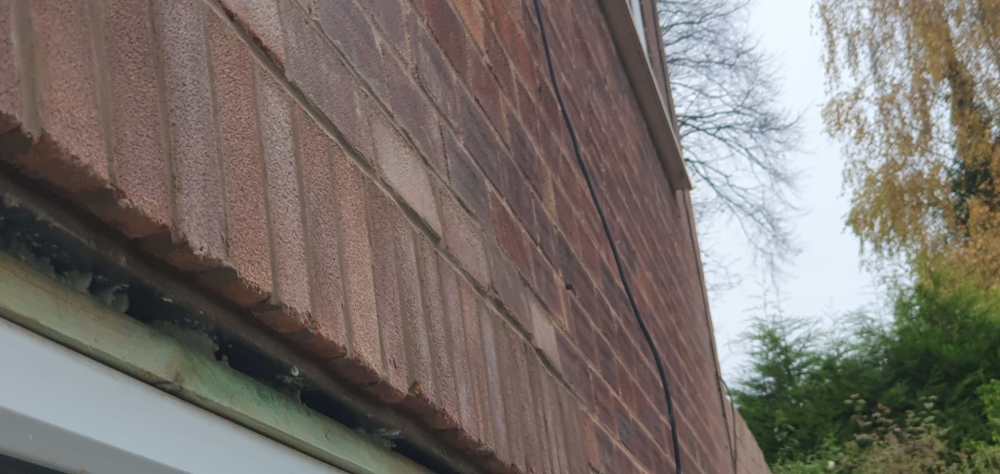
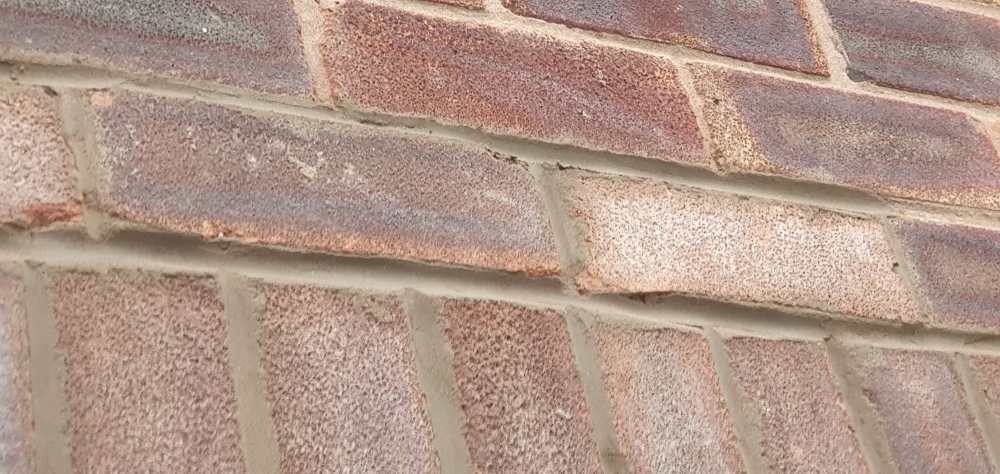
Hey guys Firstly, apologies, as this is duplicating a thread I posted earlier. But i've also posted in here, as it's brickwork related We've recently had a lintel installed above a window & I'm a bit underwhelmed by the workmanship, tbh Taking other aspects aside, would you expect the replaced bricks to be fairly flush (steel L lintel installed into a cavity wall)? It seems quite uneven imo (replaced bricks protruding out as a bulge by up to 6 or 7mm in places, as shown by the mortar in pic 2). I suspect the builder rushed and didn't take time to align anything. But likewise dunno if this can be typical when fitting lintels... Would you guys expect the finish to be more flush & even? Apologies again - I've posted as I'm in a quandary about calling the builder back before paying Many thanks for your time as always Shadow


-
Brickwork after steel lintel installation
SilverShadow replied to SilverShadow's topic in RSJs, Lintels & Steelwork
Thanks Russell - as regards the 1st points I'm not sure. All I know is it looked like a steel L lintel, which had a black protective paint layer to it I'm also thinking the lintel wasn't a perfect fit, possibly due to the steelwork protruding from the inner concrete block 🤔 Bricks are slightly bigger 73mm ones, but that shouldn't matter, tbh. I'm not sure how far back the lintel should be set. But it seems to be around 15mm back from the face (see pic) I'd have thought this would be enough depth recess to reset the bricks in line with the existing wall? 🤷♂️
-
Hey guys, Sounds like a bit of a daft question, but is it fairly common to have slight brick face protrusion after relaying brickwork to fit in an L shaped steel lintel? I've enclosed some pics, which don't really do it justice. It's something we can live with, but the perfectionist makes me think the lintel wasn't set deep enough?? 🤔 If it helps, the wall is cavity - outer Brickwork, inner concrete block. I did notice what looked like steel ties/anchors protruding from the inner block into the cavity, so I guess these may have limited how far back they could recess the lintel Thought I'd mention while the work is still in progress, in case it's something we should ask to be remedied Many thanks as always Mark
-
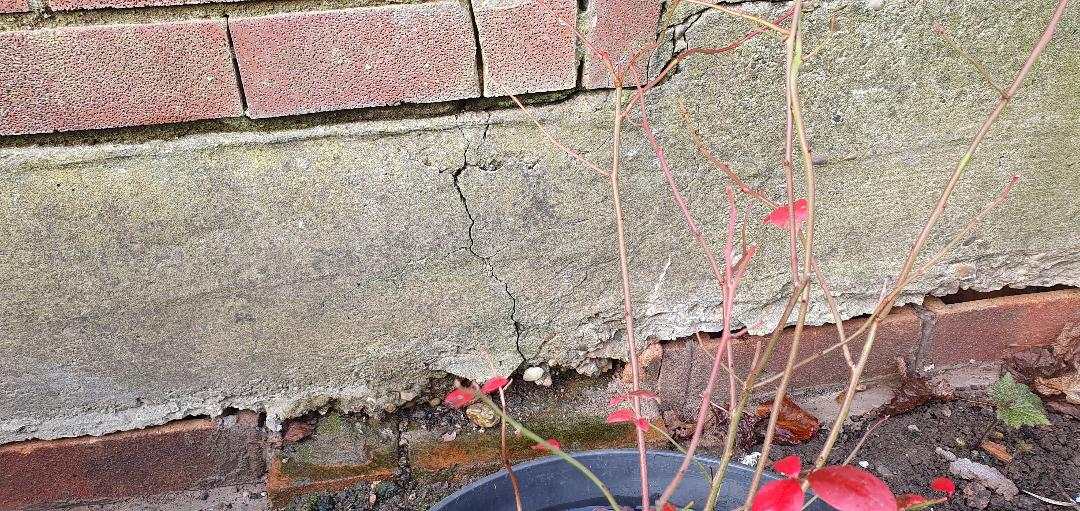
Hey all, Been a few weeks since i last posted, so thought it was about time I recently noticed a few cracks in one of the concrete beams below our rear garden pathway. Tbh, it's probably been there for quite a while - but once seen it's one of those things you can't un-see. It's something i plan to monitor over time.... However, if the need arises to fix this, then i'd really appreciate your advice on this, please. A little bit of info which might be useful to you guys: the cracks are part of a load bearing concrete beam, which certainly seems in general good repair. It's exposed to the elements, so any repairs would need to stand up to rain, frost and shine Questions: What would you recommend to use please? (assuming you guys probably recommend some sort of filler, of course!) - feel free to list any products you've used Would you angle-grind a shallow trench in the concrete to improve application of any filler? Am i right in thinking there are some fillers that also offer some level of structural benefit? Many thanks for your time as always Shadow

-
Boundary retaining wall failure
SilverShadow replied to SilverShadow's topic in Party Wall & Property Legal Issues
Hey Dave - it was probably me 😅👍 I'd posted about it a while back, but it was probably a bit too badly worded. Thankfully, i've got some fantastic advice on here now though 👍 -
Boundary retaining wall failure
SilverShadow replied to SilverShadow's topic in Party Wall & Property Legal Issues
Great response again, mate! Yeah, i think gravel in the backfill is what he suggested. I'm not sure, but i don't think the guy can get a mini-digger down there - the neighbours side is down some steps and no more than 1m wide. So if anything he'd probably use one our side for the top section, and then hand-dig the rest out Looking at a few websites - it reckons up to £300/m2 for this type of wall. So it's likely it'll be circa £4k or more for a 10m * 1.3m high - in which case it can definitely wait! -
Boundary retaining wall failure
SilverShadow replied to SilverShadow's topic in Party Wall & Property Legal Issues
Thanks J90 - if anything, we thought leaving the cracks there might be slightly useful, as make-do drainage outlets. I guess as we've recently moved in & just seen these whacking-great crack/the amount of soil being propped up, then we panicked a bit. The neighbour said these cracks have been slowly growing the past 20 years (tho accelerated slightly the past few years) It may be something we put off for now. But likewise great to get this feedback & determine the risk/urgency a little better -
Boundary retaining wall failure
SilverShadow replied to SilverShadow's topic in Party Wall & Property Legal Issues
Ps guys - we had a builder around the other day (just for advice, for now) His thoughts were: This wall was doomed to fail, due to: No drainage in the brickwork to allow water to escape The hollow block (he thinks) probably doesn't have adequate concrete/reinforcement His suggestion would be: Rebuild a similar replacement wall (hollow block), from foundations upwards Ensure that all hollow blocks are filled with concrete Plenty of drainage holes at regular intervals (the water would just drain out onto neightbours pathway - would this have any legal/building regs ramifications?) Adequate gravel in backfill, to allow proper drainage (i guess this would probably mitigate much of the above bullet point concerns) He mentioned something about Rebar - which i assume is the steel reinforcement our side? He also said the concrete & steel our side would be fine, as the weight of the soil above would help anchor everything down & keep it all rigid He didn't think the work was big/complex enough to warrant a structural engineers assessment Apologies if some of this is a bit vague - it's not my forte, so something i could only take mental note of at the time Cheers Shadow -
Boundary retaining wall failure
SilverShadow replied to SilverShadow's topic in Party Wall & Property Legal Issues
Hey John - good questions I believe it's (most likely) our wall, as we're on the higher side & so it's retaining our land from encroaching on theirs. Looking at the title plan, it seems to be the boundary wall, and photo above would confirm this i'd imagine. Our land plot does seem to imply the ground was raised to make a level surface, which again suggests it'll be our duty to maintain. Ours is the newer house too (can't be sure, but it seems like it was rebuilt over an old house foundation) -
Boundary retaining wall failure
SilverShadow replied to SilverShadow's topic in Party Wall & Property Legal Issues
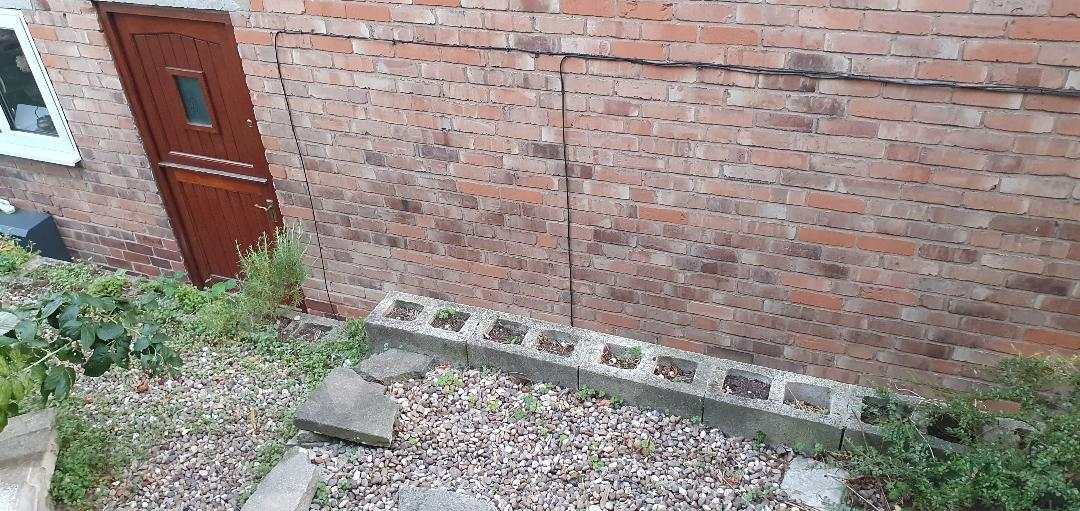
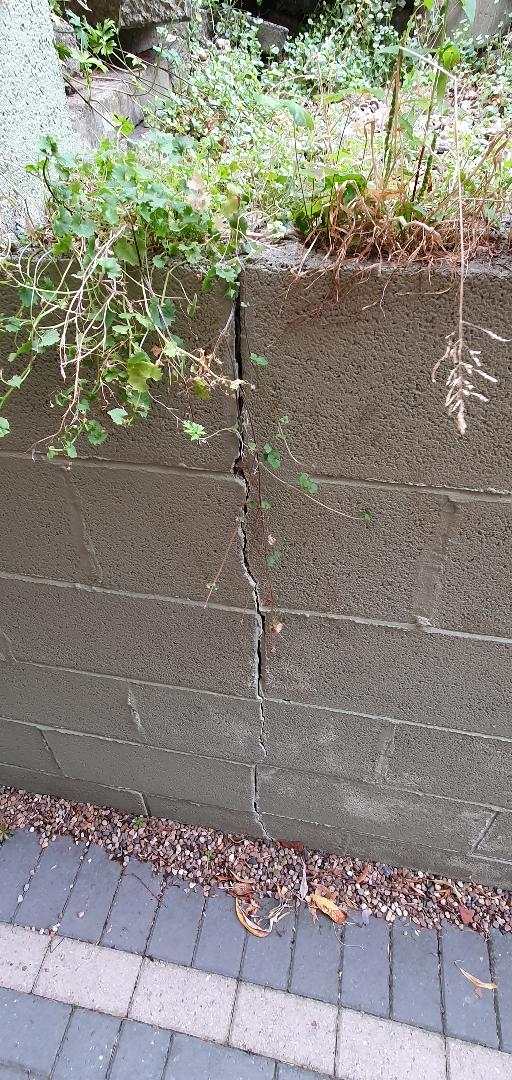
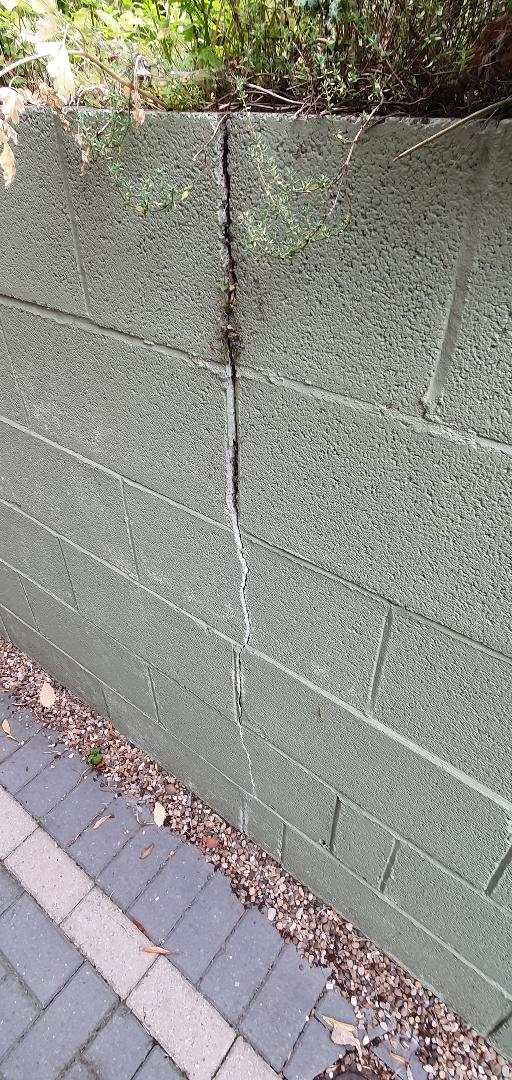
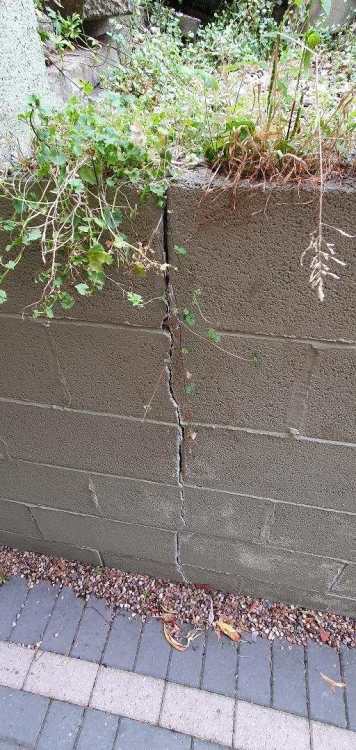
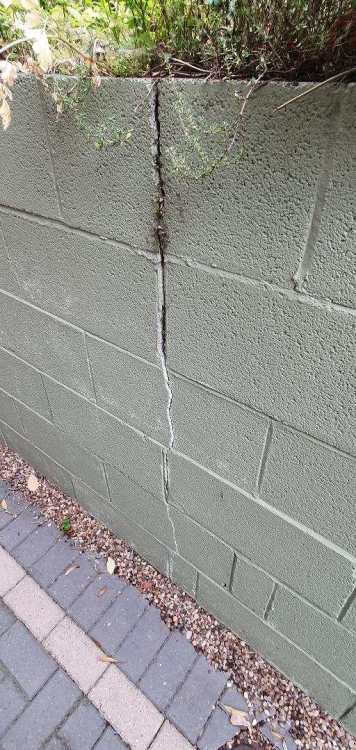
Hey J90 - at the moment it's only leaning by about 5-10mm max, at the top. Tbh, it may be something we keep an eye on and potentially do later. But it's still good to get advice and impressions from the off There's no expansion joints i can see, or draining holes either. So it would make sense that years of excess water/frosts have eventually taken their toll on it. We'll need to add some sort of drainage on whatever solution we end up with, to ensure no further issues like this. However, the water will drain directly onto the neighbours pathway (unless we add some sort of 'guttering' or drainage on our side of the wall foundations?) I've enclosed pics of the wall in it's current state Wall 1 & 2 pics - cracks up to 1.4m high wall3 pic - view from our side down, showing retaining boundary wall & neighbours pathway
-
Boundary retaining wall failure
SilverShadow replied to SilverShadow's topic in Party Wall & Property Legal Issues
In response to Gus's comments earlier: a double check of the plans/register confirm there is no mention of ownership of the retaining boundary wall. Looking on various legal sites, it seems as though the responsibility lies with the owner who's land it being retained in place. Given that, then i think the onus is on us to maintain this -
Boundary retaining wall failure
SilverShadow replied to SilverShadow's topic in Party Wall & Property Legal Issues
Many thanks, Gus. That was a very excellent & detailed response, which explains the soil mechanics aspect brilliantly 😁 I will have another scan of the deeds, in case it's something I've missed. Looking at the house from the street, the retaining wall is on the right hand side of the property. I'm not sure, but think there's some unspoken rule that left-side boundaries would usually be our responsibility? I could always ask our conveyancer- hopefully they could clarify without it costing much 🤞 The wall itself is fairly sturdy, but I noticed it has no drainage outlets, so I imagine the trapped water from excess rain & frosts have caused the swell over time, as you mentioned As a side note, does anyone recommend a type of wall construction (materials & design)? Additionally, is this something we should ask a structural engineer's advice on, or just trust a builder with retaining wall experience? Many thanks again Shadow -
Hey all - another day, another quandary that I'd appreciate your guys awesome advice on please 😁 We recently moved into a house on a hill, and the boundary wall adjacent to the neighbouring property is also a retaining wall (approx 10m long and up to 1.5m high). Our property is the higher of the 2, so essentially the retaining wall keeps our land from spilling into theirs We introduced ourselves to the neighbours of this boundary (who seem a decent bunch) & they mentioned the wall has 2 big cracks in it. We'd like to ensure this is fixed, but realise it'll be costly (maybe £3k, maybe more???). Fixing it ensures no land slippage our side & keeps them from worrying The neighbours said our old owners built the wall, which suggests it's our responsibility. However, I've checked our deeds & there's no indication its our responsibility to maintain In some ways were happy to pay for fixing it ourselves. But likewise, this might then imply its our responsibility, when it may be shared. Especially when maintaining it in the future We'd ideally like to share the responsibility/cost with the neighbour, but don't want to suggest it if we're likely liable for it Does anyone have advice on what we could check & go from here please? Many thanks for your time as always 😁 Shadow
-
Great advice too - thanks Alan 😁 I was considering surface mount cables, but would prefer the neater look of them tucked away in the void. However, it'll really come down to how fiddly that is, so it's definitely one to consider when i get into it. I'll take a look at the Philips square LED lights for the ceiling - definitely worth a shout (the existing ones in there currently work for now) Thankfully the door/windows are already double glazed (upvc i'm fairly sure), which for sure could probably do with updating. However, money is fairly tight with just moving in to our house, so i don't think £2k or more on those would meet my budgetary remit (i could always do them later i guess) I'd love to keep the log burner, but i agree it'll be a lot of hassle to make it compliant - so likely it'll have to go. Thanks for the tip about the J Harris spready - this is definitely getting into the advanced side of things (which i may need). But it seems to be aimed more at satisfying building regs, rather than just a bog standard conversion, would you say? 🤔
-
Nice advice! 😁 From what i can remember, the cable runs around the top of the walls/ceiling, and drops down from there to each socket. If i cap redundant sockets, i probably want to trim back towards the ceiling (or remove the wire from each junction box, if possible). That way there is no danger of hitting a power line if anyone drills into the plasterboard 😅
-
Ahh, many thanks again buddy 😁 So, make the PIR one continuous layer all the way around and have the trunking in the PIR/plasterboard void 👍 I guess the tubular trunking could be held by plenty of tape to attach them to the PIR, rather than using more screws through the PIR (the easy fit knockout boxes should hold the outlet firmly to the plasterboard to prevent cable movement in the void). Plus, with a continuous layer of PIR, i probably wont need very much insulation foam i guess 🤔 Regarding sockets - yeah, the outbuilding was an old workshop, so has a double outlet every 2 metres around the internal perimeter. I guess i could cap 'every other/2 out 3' into boxes in the void, and only have the occasional outlet presented through the plasterboard for use. I probably also want to think about how i'm going to cap off the old burner chimney. Maybe keep the chimney on the outside (as its well sealed against the monocouche, and cut it down on the inside/fill with a couple of layers of PIR, cut to fit the vent profile (then PIR board over it) 👍
-
Incidentally, i was going to use these as my tape (for joining PIR & around screws/fixings) and fixings - obviously i'd need something like 125mm or more fixings for attaching the battens: https://www.screwfix.com/p/diall-insulation-board-tape-silver-45m-x-50mm/4806V?tc=KC4&gad_source=1&gclid=EAIaIQobChMIi5OtkKnviAMVapFQBh0nhAOoEAQYASABEgJxRPD_BwE&gclsrc=aw.ds https://www.screwfix.com/p/timco-insulation-fixings-110mm-x-8mm-100-pack/405KF?tc=KC4&gad_source=1&gclid=EAIaIQobChMIlLaenKnviAMVmKRQBh3HrzE9EAQYASABEgJol_D_BwE&gclsrc=aw.ds
-
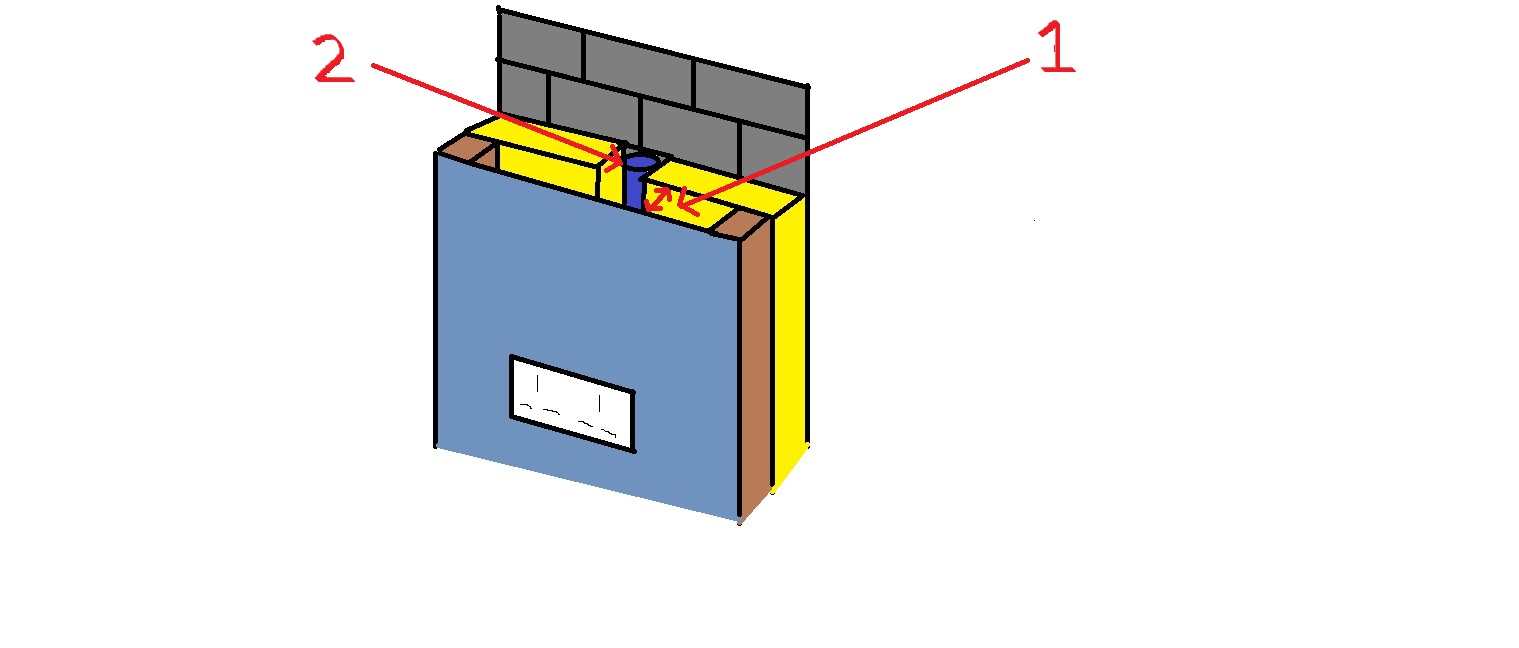
Thanks again, Elite - some top tips in there 😁 In response to your response 😉 I think i'll go use fixings for the PIR and tape over - this way they're easier to remove, if i ever need to get in there later at some point for whatever reason Roger, roger - i think i'll do 75mm PIR minimum. With the electric heaters and it being in a sheltered spot, it should suffice Mechanical fixings sound best - i've read that taping around all 4 side of the batten where the screw fixings go through should minimise vapour escaping Great shout with the fast fix boxes - i would prefer this to needing extra wood behind the box to fix it in place I've made a quick sketch of what (i think) your solution will look like, below: breezeblock > PIR > batten gap > plasterboard Item 1 - batten gap between PIR and plasterboard. Using screws through PIR to fix batten, and wrapping tape around batten at points where screw goes through Item 2 - electrical trunking, with foam and and taping required. Screws for fixing PIR will be taped over Seems like a great approach for me to implement - much obliged 🍻

-
Sounds great, Canski 😁 Think using continuous PIR/foam/tape, then battens on top (for void), then plasterboard (as elite suggests) would be fairly straightforward. I've heard folks talk about leaving a gap at the bottom just above the floor - i presume this is is slide the floor PIR underneath? The devil's always in the detail with this sort of thing...