larry
-
Posts
169 -
Joined
-
Last visited
Everything posted by larry
-
Hydrated and Hydraulic Lime Renders, without cement
larry replied to larry's topic in Plastering & Rendering
Just to say, we are only doing the front of our house... I'd be very happy to donate the rear for your laboratory!!!! 😅 -
Hydrated and Hydraulic Lime Renders, without cement
larry replied to larry's topic in Plastering & Rendering
I'll PM you! -
Hydrated and Hydraulic Lime Renders, without cement
larry replied to larry's topic in Plastering & Rendering
I think this is also a key observation. Might as well put a layer of cling film on the wall.... -
Hydrated and Hydraulic Lime Renders, without cement
larry replied to larry's topic in Plastering & Rendering
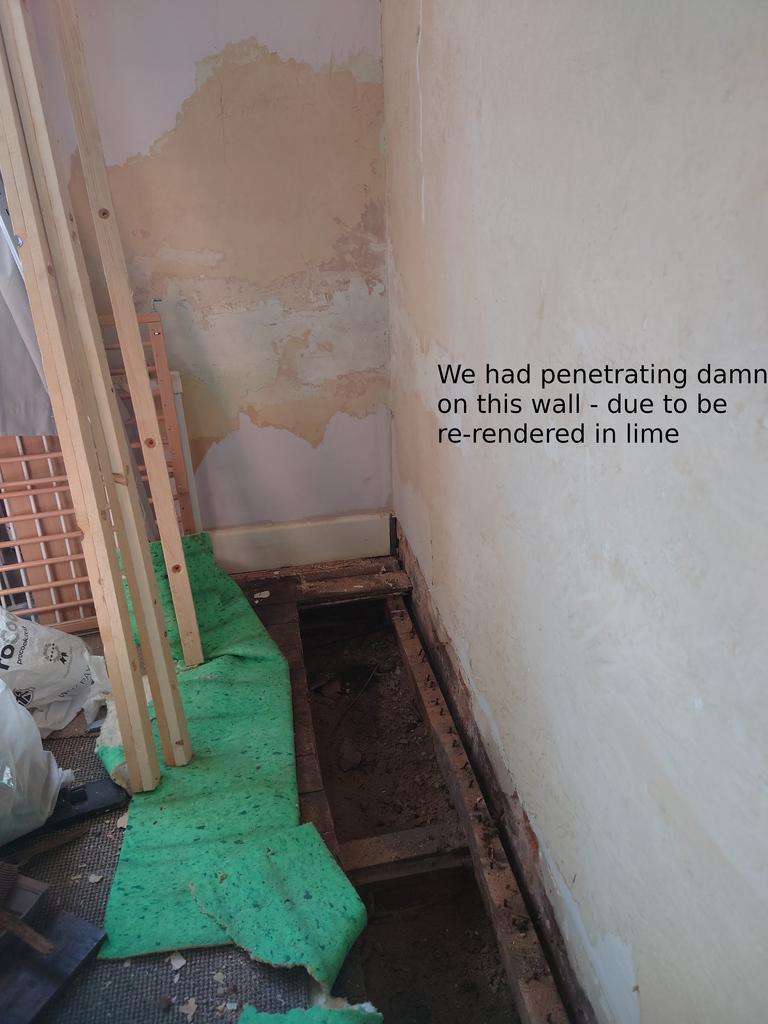
I've used Tikkurilla paints internally who publish SD values and are reasonably priced. Yes, I'd you look at Google steet view for my house in 2009 it is brown unpainted sand/cement, which I reckon was possibly nearly 100 years old. In 2016ish it was painted with homebase masonry paint (I know this as owner left the spare tub in the shed). In 2022 we then had penetrating damp with lots of cracks on render and spalled bricks underneath. -
Hydrated and Hydraulic Lime Renders, without cement
larry replied to larry's topic in Plastering & Rendering
Thanks @SteamyTea. I'm with you. From my own reading I think you are right that cement does not render (sorry) the plaster unbreathable. However the other properties of lime (flexibility and hygroscopicity) have been highlighted to me as also desirable. The cracks in our old cement render certainly convince me that the flexibility is desirable. I also suspect the standard masonry paint the last owner piled over the top didn't help. maybe then a hydrated lime + sand render that never sets will offer the ultimate in flexibility!! I'll look at that paper 🙂 -
Hydrated and Hydraulic Lime Renders, without cement
larry replied to larry's topic in Plastering & Rendering
I think @nod was referring to hydrated lime + sand without cement. Thank you. The same thought had crossed my mind also. Pragmatically, though, I think I'm using this chap. Scaffolding is going up literally as I type and I think he can render, which frankly is more than I can do. Remember though he was anticipating putting this up without cement and had implied that this would take a longer time than with cement, so the 'it takes a bit longer' I think might be fine. The additional care is perhaps something I can help with also e.g. happy to keep it wet. There are clearly a few different views both here and only as to the merits of putty vs NHL, though it sounds like both are 'accepted' approaches. Sand wise - no idea - just plastering sand from builder's merchants. How can I tell if it's too fine? I guess I'm left with a bit of confusion though - don't use hydrated lime + sand as it won't set at all, vs. it will set eventually, by carbonation,; don't use NHL as it's too strong so use lime putty (which also will set by carbonation) vs NHL is fine (as I can say both seem to be approaches that you can find a legitimate source for). Which makes me think if there is a logic to using non-hydraulic hydrated lime + sand only.... the information gap I have is how this would behave differently to lime putty (also non hydraulic lime) in practice. Goodness before the internet I would haven't even queried this and we'd have just been done with it. Makes me think, are there houses out there where people have had hydrated lime + sand only and actually it has set/been completely fine. Thanks for bearing with me and helping me unpick my logic! -
Hydrated and Hydraulic Lime Renders, without cement
larry replied to larry's topic in Plastering & Rendering
Solid brick. Pretty soft bricks though many of which are spalled. This is interesting. I don't think he's planning to make a putty from it though. Re curing strength, presumably is that why you'd use e.g. NHL 2 not 3.5 on a soft wall? Nod, thanks. Yes, 6:1:1 is what is listed on the TDS. Having been told multiple times to avoid cement, and having our previous s&c render fail, this is what I want to avoid. What happens to "sand lime" if not under cover! In a fairly dry part of country if it makes a difference. Could it be done as a base coat with an NHL top coat or is that mixing apples and oranges? Pics from previous jobs look OK. -
Hello, I think I have done enough research to have answered my own question but I want to check I'm not going mad. Renderer is coming Monday to start work on rendering our solid wall house. We decided we'd go with a lime render for flexibility and breathability. The old sand cement render caused problems. We had a long chat with the renderer about this and agreed that we'd use lime. Today we've had a delivery from the builders merchants with two tonne bags of plastering sand and quite a few bags of Hanson Hydrated lime. On the TDS this specifically states "As hydrated lime is non-hydraulic, it is not suitable for use in mortars and renders without a Portland cement being present". We've agreed - no cement. So I spoke to him and asked if there'd been a mixup as I was expecting hydraulic lime. He indicated no, it's the stuff he's used many times before, and would mix hydrated lime with sand to form the render. He's done this several times before. What I read online tells me that if this will set it will take ages to set, and either he needs to add cement (which I don't want) or we need to use a hydraulic lime render. My current plan is to try to find somewhere that supplies NHL and get this Monday and present as a fait accomplai (which might be harder than I anticipate) My question is, am I missing something - is a hydrated lime render mixed with sand, no cement, something that is acceptable in any world? Will it set? Will it last? Thank for advice as ever PS - why do these sorts of things always seem to happen?? Finding myself in the 'well I'm not a real tradesperson but I'm sure this can't be right' is becoming an uncomfortably familiar feeling
-
Rate my sub-floor!! (and can you help me insulate it?!)
larry replied to larry's topic in Heat Insulation
I look forward to hearing what you find underneath! Ours are the same, ie. Uneven spacing but to be honest having now lifted a few boards the bigger issue is that joists are really not in great condition. Ones near the wall in particular are pretty damp and some joists clearly have had wood worm also. Incredibly they aren't fixed to the wall at all, only resting on the piers (which are crumbling) but about 40 nails per joist keeping everything in place. Tried lifting out boards, no dice so just cutting everything up with a circular saw. I have added one of the telescopic vents and still plan to add another. Then rip everything out, replace joists with treated CLS and fit 22mm ply on top (after insulating of course). Will use a similar approach to you but will use rockwool as I already have it. May put Flexi wood fibre closest to the wall, though to try to help keep on top of moisture. -
Rate my sub-floor!! (and can you help me insulate it?!)
larry replied to larry's topic in Heat Insulation
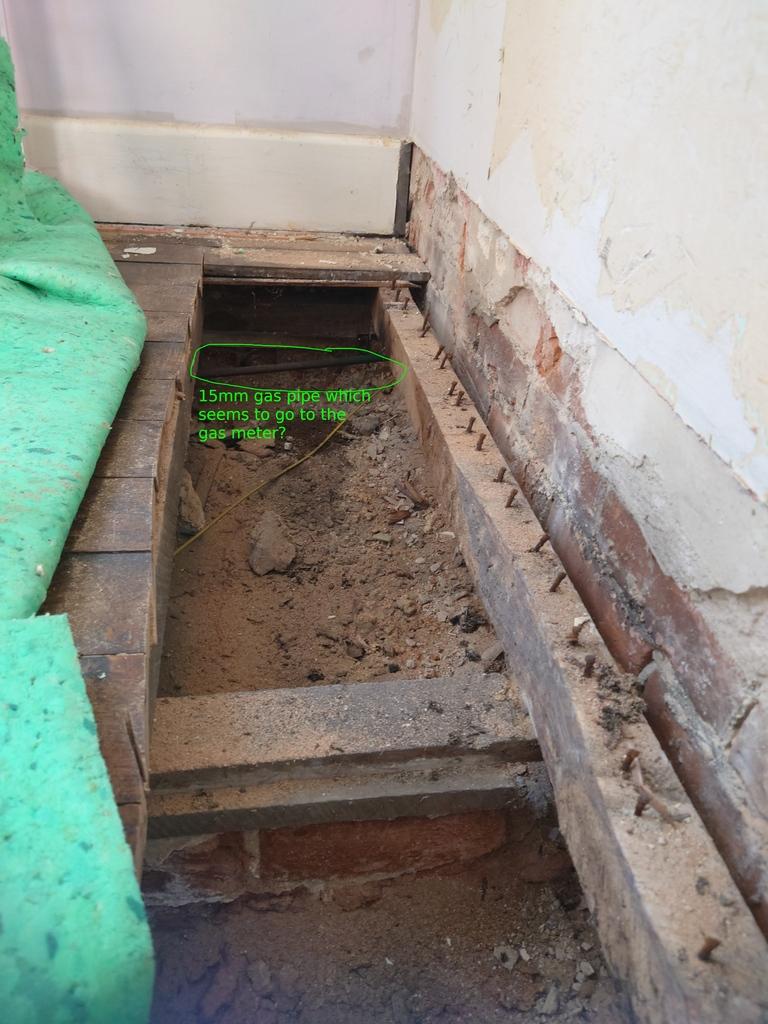
@IGP thank you - that's perfect. Let me know how you get on with yours! @Nickfromwales thanks... Mystery now solved. It wasn't really a mystery, a bit of digging and I found a cut off 15mm pipe underneath the gas meter. The pipe to boiler (now only gas appliance) is now in 22mm so all good there. -
Rate my sub-floor!! (and can you help me insulate it?!)
larry replied to larry's topic in Heat Insulation
Nice! Thanks for pointing me to that. I'd seen the website already which had convinced me to avoid using celotex for starters.... What size joists do you have?? -
Rate my sub-floor!! (and can you help me insulate it?!)
larry replied to larry's topic in Heat Insulation
Ah, awesome idea. Need to read up how you'd install them. Presumably the telescope bit goes alongside the inside of the wall (or you remove bricks to keep it level with the wall?) and not though the cavity itself (this bit of wall does have a cavity, its a dwarf cavity wall approx 800mm high with a 50mm cavity) -
Rate my sub-floor!! (and can you help me insulate it?!)
larry replied to larry's topic in Heat Insulation
Thanks so much Nick. I think that's what I needed to know. Looking at meter you're right it probably isn't the same pipe - the connection at supply looks at least 22mm. No branches off the output pipe from meter either (the one that was there was capped by the GSR person who last serviced our boiler). I don't know *what* it is yet but I'll do some digging today to try and identify and won't touch it until I'm sure it isn't a bodge supply line that goes up to 22mm.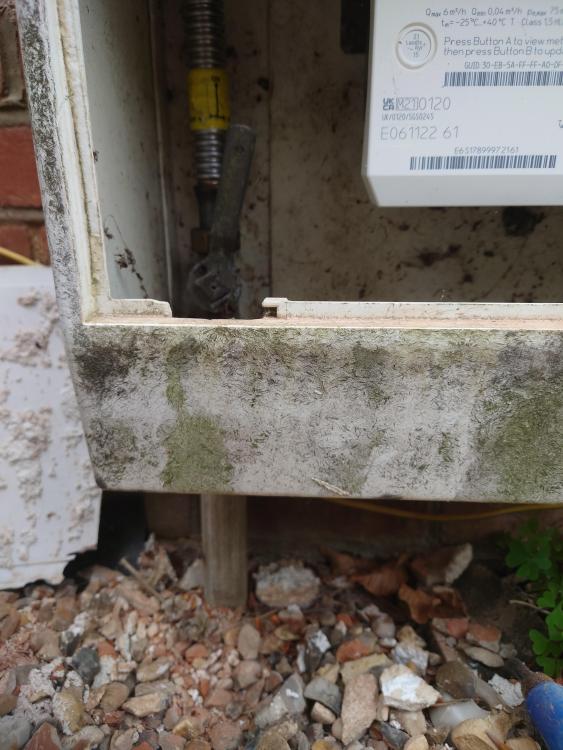
-
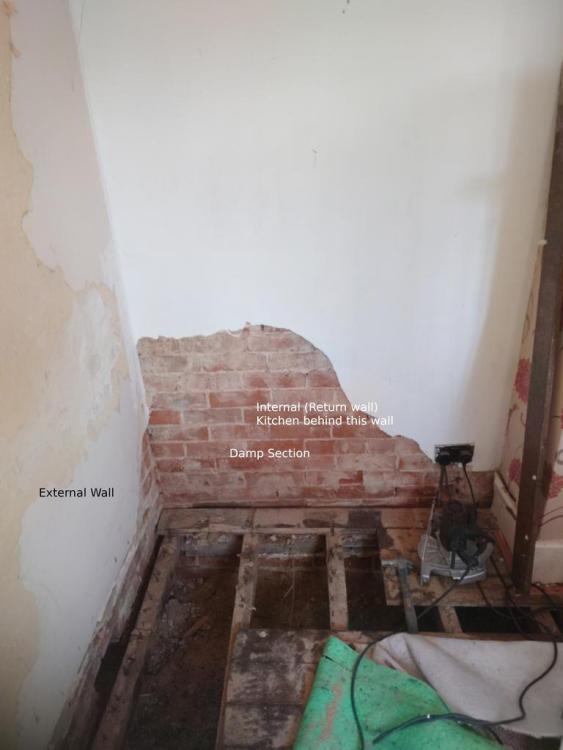
Hi everybody, I hope as ever I can get some good advice here. I've been working through the upstairs of our house doing wood fibre insulation on our walls and it's all gone well. Progress is slow but I have two rooms basically complete now. Today marks Day 1 of trying to tackle the downstairs... The plan was to do the walls with a parge coat, battens, wood fibre boards and then the floor with Rookwool sitting on some kind of membrane between the joists. I've already got the Rockwool so keen to use it. Floorboards are 100 year old lovely items that have been hacked away in quite a few places (not by me until today) but are tongue and groove and absolute 🤬's to get off. I was anticipating having to cut them up and then put down a new floor (was thinking 24mm ply, same thickness approx, but happy to take suggestions). Just so you know what you are looking at in the pics: there are two external walls and one internal return wall which divides this room from the kitchen. The internal wall is the one with the circular saw next to it. Now I can see the subfloor I have a few observations: 1. Damp. The side return wall (the one with the socket and circular saw plugged in) was definitely damp and lime plaster blown. Hacked off the blown bits and I'm sure bricks will dry out now -the bit above this looks dry. My best guess is that this wall is not sitting on a DPC (the external wall is, this is an internal wall and has upstairs floor joists sitting on it so imagined it would be a 9" thick wall, I'm a little preturbed to see the bricks are stacked as though it might be a single skin). The external wall was nothing like as damp. Is a reasonable hypothesis that lacking a DPC it's just sucked up moisture from the ground which then hasn't been able to escape (lots of paint and paper both sides??)?? - There is a drain the other side of the wall, so that may not be helping, but again I would have imagined the external wall would have been worse (it seems reasonably OK). I know the drains themselves are in good condition. 2. Ventilation - how to get more. I've got one ventilation grate on this side of the room (there's one more diagnoally opposite - and that's it for this room). Though I notice the top of the grate is level with the top of the floorboards. No wonder it was blowing a gale into the room. Any suggestions for how I might easily (?) get more ventilation to the subfloor - it looks like on the long external wall the bit under the DPC is a concrete block. I could get a French drain outside this wall to allow me to get some ventilation lower down e.g. through the concrete block - though I'm a little worried about whether that will even be possible (I can access a core drill readily) or stupid (avoiding house falling down being the primary concern). Do you normally put ventilation holes above or below DPC or does it not matter? 3. Ventilation grate - how on earth to deal with this with insulation? Given its location am I good to just bring down wood fibre insulation from the wall in front of the grate? 4. Joists. These are 3x2 joists and so a bit more puny than I was imagining. They're also loosly sitting on top of the mini 'walls' in the middle of the room. Is it worth replacing them or upgrading to something more substantial - if so what?? 5. Gas pipe? - There are two pipes in the pics, one is cut off which is a supply to a disused fireplace. One is in the corner of the room, a 15mm pipe, and goes to where (roughly) our gas meter is. Is there any possibility this is supplying the gas meter? 6. Is my plan for solving this on the right lines? Would you do it differently (and why?). Any tips for getting the floorboards up? And what am I missing/not seeing? (and am I completely bonkers? I'm hoping to get this done over summer but basically have one day most weekends to do this and evenings - the Ukranian lady who was using the room for a time is now home but I'm worried she might want to come back for winter!!)

-
quote Roof replacement and insulation install
larry replied to Matt89's topic in Roofing, Tiling & Slating
This sounds like a very good plan... One advantage of crossing the insulation like this is that it's actually really hard to fit PIR between rafters/joists in any case, at least not without creating a lot of gaps. Of course you can foam them in... Though In our case I paid somebody to put PIR between the timbers outside of our bay window. Was curious why I didn't notice much difference,but this year hacked the plaster off internally and noticed a 0.5-1cm gap all the way round the boards. £60k is a lot of money, and warrants getting several people to quote who may all suggest somewhat different methods. You might as well get some PV up there while you're at it though....!! -
Viessmann Vitodens 200-w - initial impressions
larry replied to larry's topic in Boilers & Hot Water Tanks
Ok, update after second full winter - all still absolutely perfect. Very happy. -
It's not just the render. It's the paint, at least that's my theory. We had a 1920s house, solid brick with sand cement render. Fairly sure it's original. In 2009 Google Street view shows our house brown coloured i.e. Unpainted render. In 2016 previous owner had painted it with homebase standard masonry paint. 2022 and we have penetrating damp. All render knocked back off and after going around the houses with various quotes and options I've finally found somebody who will do it in lime at a reasonable price. My theory is the paint basically becomes a layer of cling film. Our problem is the brickwork underneath is horrid (spalled), I guess as water has found its way past the failed render, soaked up into the soft bricks with no way back out (thanks to the paint) and then in winter frozen, popping the front of the brick off with it. No expertise here but a combination of what I've read and observed and deduction...! Inside house now much dryer with render off and only solid brick wall
-
Q-Bot Retrofit ground floor insulation
larry replied to Archer's topic in Environmental Materials & Construction Methods
Also looking at this. Anybody actually used them yet? -
I'd be a fan if I didn't hate ladders
-
This was a thread I started: In the end I vented it externally through the solid wall and and blocked up the internal opening. It's now got wood fibre insulation fixed to the whole wall and I'm in the process of making a hash of the lime plaster finish over the top Key question though - is the chimney capped at the top - and if so with what? If somebody's just stuck a slate over the top (for instance) then ventilation at the bottom won't make a big deal of difference - you might need to vent to the loft as well (or I guess externally, further up the chimney to keep air flow). And - is it dry in its present state? If it's a downstairs room and you've got suspended floors I guess you could also vent through the subfloor but I suspect there are risks doing this and would defer to others' advice. If you vent externally remember to drill the holes slighly angled to avoid rainwater running in to the chimney. I made my ventilation with a few 25mm holes and then fitted of these wedged in through those holes https://www.manthorpebp.co.uk/wall-floor-ventilation/weep-vents/refurbishment-weep-vent-2 (terracotta ones though on a brick backing so they aren't very visible).
-
Just to update where I got to with this... So you can at least have a laugh... Two rendering companies out to quote... Mid sized companies... One quite back work out at nearly £200/sq m (for a Vimark breathable mono render). And that was with me chipping off the old render. And another came out to see it and hasn't quoted... Despite a couple of nudges. I've got a few more leads before I give up and have a go myself (which essentially is the story of my entry into DIY...)!! What am I doing wrong? Not the first time I've had sky high quotes. Is it me? Do I just look like a walking cash machine? Or is it actually it standard business practice to offer sky high quotes in the hope 10% say yes? Feel like I'm asking for dating advice!!
-
-
Scrape some into a pot and try to grow some tomatoes in it?! Does it look like the soil in the garden? Random idea but could you do one of those soil tests compare pH levels etc. Random thought. There were lazy trades even in the 1920s... It's a small area right? And it would have been dark so that would have limited growth? I mean literally no idea but if it quacks like a duck...
-
What's the first? Combi drill? Hammer? Maybe we could do a desert islands discs of tools 🙂 I haven't got an angle grinder in my tool box yet... Sort of used it as a yardstick for 'out of my competency area' and always been too scared. How would it change my life? Now I want one!
-
Another thought, just how deep are those battens? I wonder how much insulation you'll actually be able to get in there in any case. Another product I came across was diathonite evolution, again not used it but it is also IIRC 0.04 w/mk so comparable to wood fibre/glass fibre etc as a render or plaster, so could go outside and poss may be easier than proper EWI depending on your setup??