Olf
-
Posts
315 -
Joined
-
Last visited
Everything posted by Olf
-
I like the idea of bonded insulation, found https://www.xtratherm.com/products/sr-pr/ that gives me 100mm phenolic, and seems to be rougly the same price as K108+plasterboard (even with offcuts), saving on hassle of mounting 2 layers separately. That's what I'm worried about: that contrary to what makes sense, shmbo won't let me play with the board hoist (oh she hated it so much last time), especially that this time the celings aren't that bad and skimming alone would be enough...
-
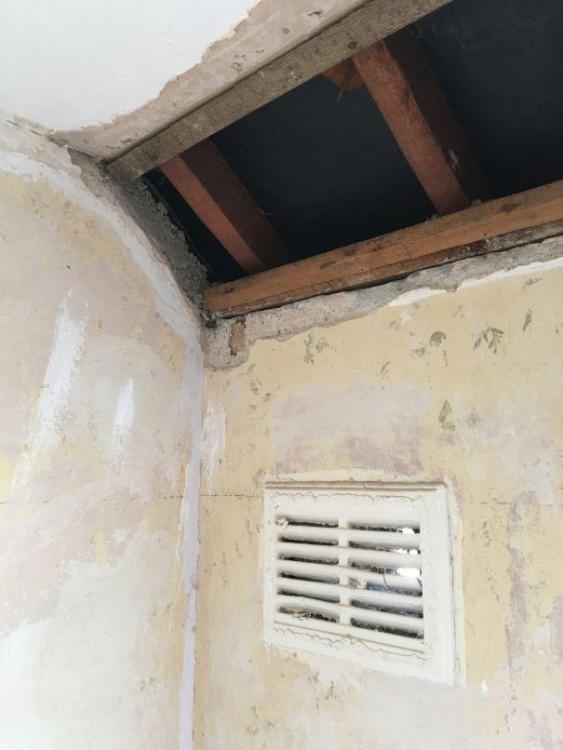
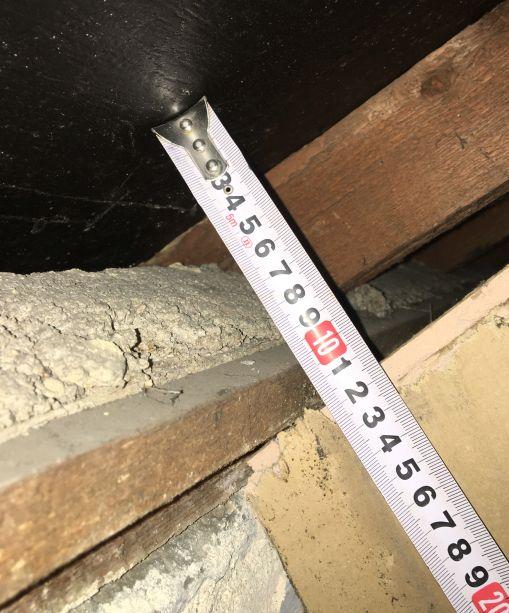
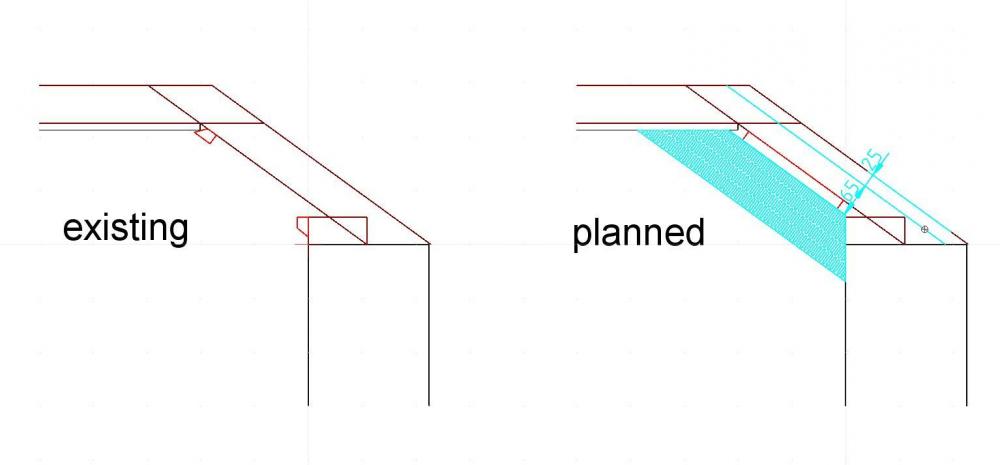
First of all - what is the proper name of this feature, where a wall morphes into a ceiling due to roof height restriction? Anyway - this is the photo of the current state once the only element separating inside and roof space (a single layer of plasterboard) has been removed: So the said plasterboard was held by chamfered battens - my plan would be to remove them and attach to rafter to space out, so the insulation board would not have to be trimmed in a weird way to fit between the wall plate and rafter, but rather go against the wall. In picture something like that: The blue object with weird hatching (one doesn't get the right tools with free cad software...) is 100mm K108 (or equivalent) phenolic board: at 450mm standard width this board should only need chamfering to fit wall/ceiling, where 1200mm PIR board cut in half and then butchered would produce so much waste, that in this case phenolic happens to be cheaper - and protrudes less into the room. 25mm from the top of the rafter (surface of the felt) would be a ventilation tray, the remaining 65mm space filled with Thermofloc - I'm planning to use it on the ceiling (70mm between joists, then 9mm osb to support, then up - to 400mm in total), so it would probably spill in the void anyway. A layer of plasterboard would be placed directly on the phenolic board. The walls are concrete, so for airtightness I'm planning to sandwich a layer of membrane between the insulation board and the plasterboard and tape it to the wall. I'm assuming the walls are airtight enough (concrete + plaster): the vent seen ot the first photo - an original feature, present in each room - must be there for a reason. Ultimately MVHR will take their role, hence the trouble of sealing. Not sure yet what to do at the ceiling: whether to stick membrane to existing ceiling and board over, or go over to the loft and lay it there Questions: - hand laid Thermofloc comes with 'it is designed to install by hand in horizontal spaces' clause - but as its blown brother lives happily inside vertical walls, what problems could I potentially expect from stuffing it into this sloped void? Has anybody done that before? - any ideas how to attach the new plasterboard? Loking at the drawings my best chance it to screw at an angle into the wall plate and roof joists. Easier would be to go into the rafters, but I'm worried about the edges sagging. - can anyone point me to loong ventilation tray - for this I'd need something at least of 1m. Or should I simply stagger 2 or 3 standard ones for required length, just making sure that air channels align? - any recommendations for airtight tape that seals well to old, rough concrete? Or how to prepare the concrete so the tape binds better?
-
I might have subconsciously had at the back of my mind scaremongering of the need to rewire socket circuit - but those might have worked with much higher loads and could see benefits. I agree that for lights, especially since the advent of LEDs, there is little current so no degradation due to heat. Another aspect I took as a silent assumption were use of separate lights in one room (2 or 3 gang, all those I are singles) - but that can now be solved with smart lights, controlled separately even if fed off 1 supply. Thanks for saving me work! +1 to you and ProDave for highlighting future proofing - and indeed the existing light switches are usually in the right places for their function, so blanking plates will serve well as a mounting pad.
-
We moved in and we're making our way through learning all the surprises. For some weird reason in all the bedrooms lights are not in the centre of the ceiling, when looking from the top the wiring is messy too and all in old red/black colours - so qualified for replacement. As the bedrooms would benefit from dimmers and mood illumination we're thinking of going 'smart' lights throughout, but they generally have wireless switches (battery powered) or can be operated by an app.So my plan would be to have a small box with MCBs to have an option to switch off each circuit if needed, but then run the wire directly to the light fitting. That would save me chasing the walls to extract old cables and put new ones (or run them in parallel). But is there maybe some regulation that requires physical switch to be in or near a room?
-
Decentralised MVHR
Olf replied to MrSniff's topic in Mechanical Ventilation with Heat Recovery (MVHR)
Well I've got completion day set now, so I know when I'll be able to check what my options (joists directions, wall drilling etc) really are. I think that will be a dealbreaker: considering (as it stands now) I'd need 2 units, if laying ducts will not be that tough after all, then total cost may match 1 decent device with its ducting. I would still like to have better control on delivery to non-occupied rooms and bathrooms boost, I've been looking at different duct dampers, with iris ones (like http://www.ajs-vent.co.uk/files/Iris Damper Range - Full Speciication.pdf) looking promising, especially motorized version. Anybody having experience with those? As for the efficiency I learnt a bit here https://www.paulheatrecovery.co.uk/products/methods-of-calculating-the-heat-recovery-efficiency/ - but I'm not totally shocked -
Decentralised MVHR
Olf replied to MrSniff's topic in Mechanical Ventilation with Heat Recovery (MVHR)
I'm after the same, although from different perspectives: refurbishment and extension limitations as well as operation. As for the latter, I don't like consequences of centralized system: - when one bathroom needs boost, all have it - so it gets 1/3 of total flow (we have 3 bathrooms) , whereas it could have been 80%+, if the flow in other could be kept unchanged - resulting in shorter purge time. - with typical layout (living room + kitchen downstairs, bedrooms upstairs) either of the floors is being served pretty much half of total time only (downstairs-day, upstairs-night), so it would do with 'trickle' when not occupied As for the former, it is tough to retrofit ducting, if building wasn't designed with them in mind - having more localized 'zones' can be a lifesaver. With possible added bonus of no need for balancing. But I'm struggling to find hardware that could do the job For the planned kitchen/diner extension I need something small, as I won't be able to connect the existing building to it (maybe at a stretch I could punch through the wall and include living room). The solutions I'm considering at the moment are: https://www.vent-axia.com/range/hr100rrs price ~ £250, flow up to 18 l/s, efficiency up to 70% https://www.blauberg.co.uk/en/blauberg-komfort-ultra-d105-a-single-room-heat-recovery-unit price ~£300 , flow up to 29 l/s, efficiency up to 72% http://www.fansandspares.co.uk/assets/shop/datasheets/1389189023_VTC_LOW_E(1)_UNIT.pdf price £650, flow up to 45 l/s, efficiency up to 95% https://www.nuaire.co.uk/residential/heat-recovery-mvhr/mrxbox95ab-wm1 price ~£720 , flow up to 35 l/s, efficiency up to 85% Considering that it will serve kitchen/diner, so will boost only occasionally when cooking, should I be concerned about efficiency? Or - thinking about refurb and refitting in the main building (80 sqm, last 2 devices could do that) - should effciency be high on my list, or treat it rather as a bonus? -
Reading the forum it seems to me that the conclusion is that cellulose filled panels offer the best insulation, providing low U and long decrement delay, with thickness being the biggest drawback. Well for my extension that is not an issue, but as it is going to be built along the boundary line on one side, and with restricted access to the back making lifting the panels a no-no, it fells like I'm stuck with brick and block. I thought I could go wild with cavity width (say, 300mm), but now I got this crazy idea that the opposite could be done: to go with 100mm filled cavity (pretty much to satisfy minimum BR requirements) and add internal layer filled with cellulose. Cost wise there is one more structure to erect, but being non-load bearing I should do with 600mm stud spacing, only 2 1/2 walls to add (2 sides + garden facing half being glass, 4th side existing house wall), boards go quicker than bricks and blocks and, all is diy-able. Insulation cost seems to be roughly comparable. But the gain would better temperature stability inside, so maybe luxury worth having at not a lot extra spending? One thing that worries me in such hybrid is location of dew point: it would be brought towards the inside of the wall, meaning likely happening at the block layer. How bad is it? Or maybe if the inner layer is thick enough, the whole brick&block structure would be 'outside'? Anything else I'm missing? Has anybody tried something similar (eg renovation with internal insulation, being the same in principle)?
-
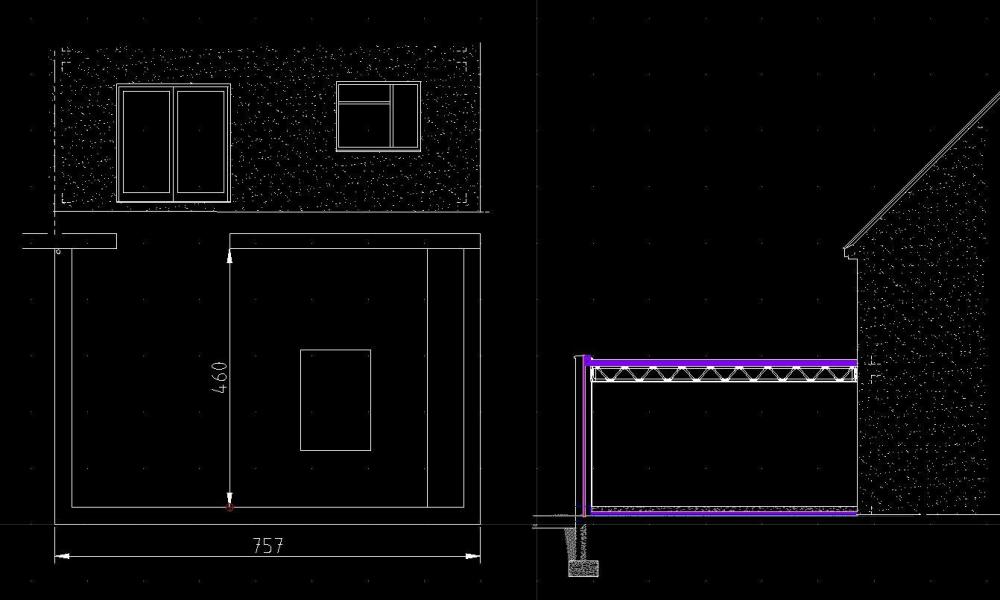
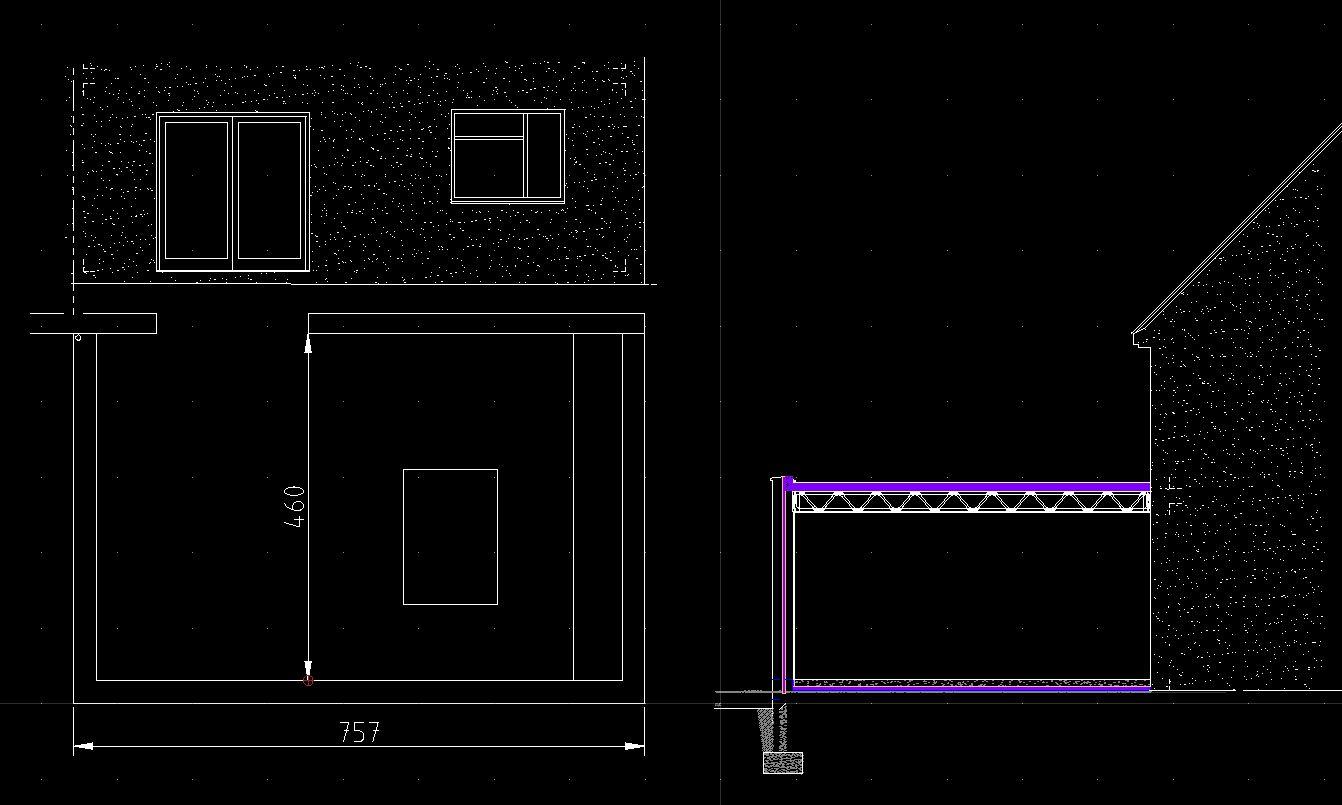
Hello All, After weeks of going through the forum content time to surface out Hopefullly in a few weeks I'll move to a place in Oxfordshire that needs renovating (that I should be ok with), but also extending - to contain new kitchen/diner. As the extension will be the first structure I'll be involved in building of, expect some newbie questions. The original building itself is a semi-detached that seems to be Laing Easiform type (in-situ concrete walls with cavity) what I assume brings its own challenges. I would like the outcome to become more energy effcient and thus more comfortable and eco-friendly house (but I'm not a warrior, can't quite afford that). I'll try to keep my questions in relevant sections, but to give you a primer: - one of the walls is on the boundry: is brick&block the only method that can be used without gaing access to neighbour garden? - assuming I am limited on this side, can I build in different technology on the other side? - as the existing building will be clad in EWI, am I better off having the side of the extension wall flush with existing wall and put EWI on both (effectively incorporating EWI in extension wall design) or design the extension wall so it sticks out, but after adding EWI to the existing wall they'll end up more or less flush? - on extension attached to a brick wall a cavity tray would be inserted: in this case, with concrete wall, am I right that after adding EWI its external face (render) will become water barrier and that should be connected with new flat roof surface A picture paints a thousand words: partial view of the back wall of the building, top view of the extension, sketch of a cross section.