CJO
-
Posts
9 -
Joined
-
Last visited
Everything posted by CJO
-
Apologies for the delay and thank you for very quick responses to my questions. @Redbeard thank you for explaining the rule of thumb, I had a small read about it was initially thought it was about the amount of rafter covered not relative to thevR values of insulation used (I'm not fibbing when I say I had a small read on it). I am now looking at woodfibre sarking boards following @SimonD suggestion, they seem to also provided a very good vapour permeable substrate. @Iceverge I was on the understanding I need a nice strong vapour control layer internally and all materials leading up through the roof ideally need to be more permeable than that... until we reach the standing seem roof. @Nickfromwales a quick bit of maths has the rafters working out to be around 3500mm. They will be butted up to an I beam ridge that will be packed out with timber. Roof pitch is 40 degrees. Please have a good nose through the drawings, our architect is good but hasn't provided us with true detailing. Our SE drawings a more accurate and informative. I look forward to any more insights you can provide. 24066-R01 - Structural Calculation Report 240925 (dragged) 5.pdf 01923-HBA-DR-1008_BR02_Proposed Section AA copy.pdf 01923-HBA-DR-1012_BR02_Window Junction Details copy.pdf
-
After some advice and experiences from those on this forum website regarding our potential Non Ventilated Warm Roof. I have spent an evening/afternoon reading previous threads about this subject matter and that has raised a couple of questions. Our internal roof pitches will all be open plan (vaulted) and our house will be an upside down layout. Our architect and SE have specified the following build up from inside to out. 12.5mm plasterboard Service void Vapour control layer 9.5mm sheathing board 125mm Rafter 75 PIR insulation between 100mm on top 18mm sarking board Standing seam metal work roof. My partner and I have increased our expectation of our self build and want to make it achieve passive elements. I’m thinking… 12.5mm plasterboard Service void Vapour control layer 9.5mm sheathing board 125mm Rafter Cellulose infill for sound and insulation 100mm PIR on top 22mm OSB Tyvek Metal Underlay Standing seam metal work roof. Potentially have an extra 50mm deep rafters to play with as the SE downsized the Architects spec… Reading the previous threads regarding noise and condensation risks has got the grey matter questioning methods. I have read a lot of Du Ponts website regarding roof build ups, watched Roofer Steve on YouTube explaining vapour control layers and also looked at VM Zincs information regarding build ups. Our doesn’t sound impossible. Is there a concern infilling our rafters would result in needing deeper rafters? Look forward to reading any responses.👍🏻
-
Rebuilding after demolishing question
CJO replied to dustyb's topic in General Self Build & DIY Discussion
@dustyb My partner and I were in exactly the same situation. We are the ones from the channel mentioned above. We’ve given ourselves a realistic time scale to help both budget and build quality. We are using Ecobrix which is a Woodcrete ICF. It works out at around £11 a block… I think. Which sounds pricey but I feel the block has many advantages to the self builder. Our structural steelwork thats made of rebar and concealed in the block can all be constructed ourselves and has the ability to create many aspects, one of which in our case is a 1 meter cantilever. All the rebar for our build only came to £700, and there’s some nice thick long stuff in there. It’s much cheaper than your typical I beam steel work. Your drives on why to build it yourself are similar to ours, we know there’s a lot we can have a crack at and do well ourselves to save paying someone else though…. We know our limitations and getting a company in to build and pour our slab was money well spent. I do not agree with the comment regarding an ICF pour requiring lots of labour (it may do for an EPS ICF) but our Woodcrete ones from Ecobrix performed brilliantly, though we did go full belts and braces on the shoring up but that’s easily done by screwing OSB directly to the blocks. We had more people than needed in the end (just incase it went Pete Tong). Our build is only small, the first pour was 9.5m3 and would have been done in a morning if the concrete wagons arrived when they said they would. The pour came to just shy of £3000. We have only done one pour so far, fingers crossed we weren’t just lucky!😅 We are also not planning on doing this again or moving… unless we are 90 and in a box.🤞🏼 -
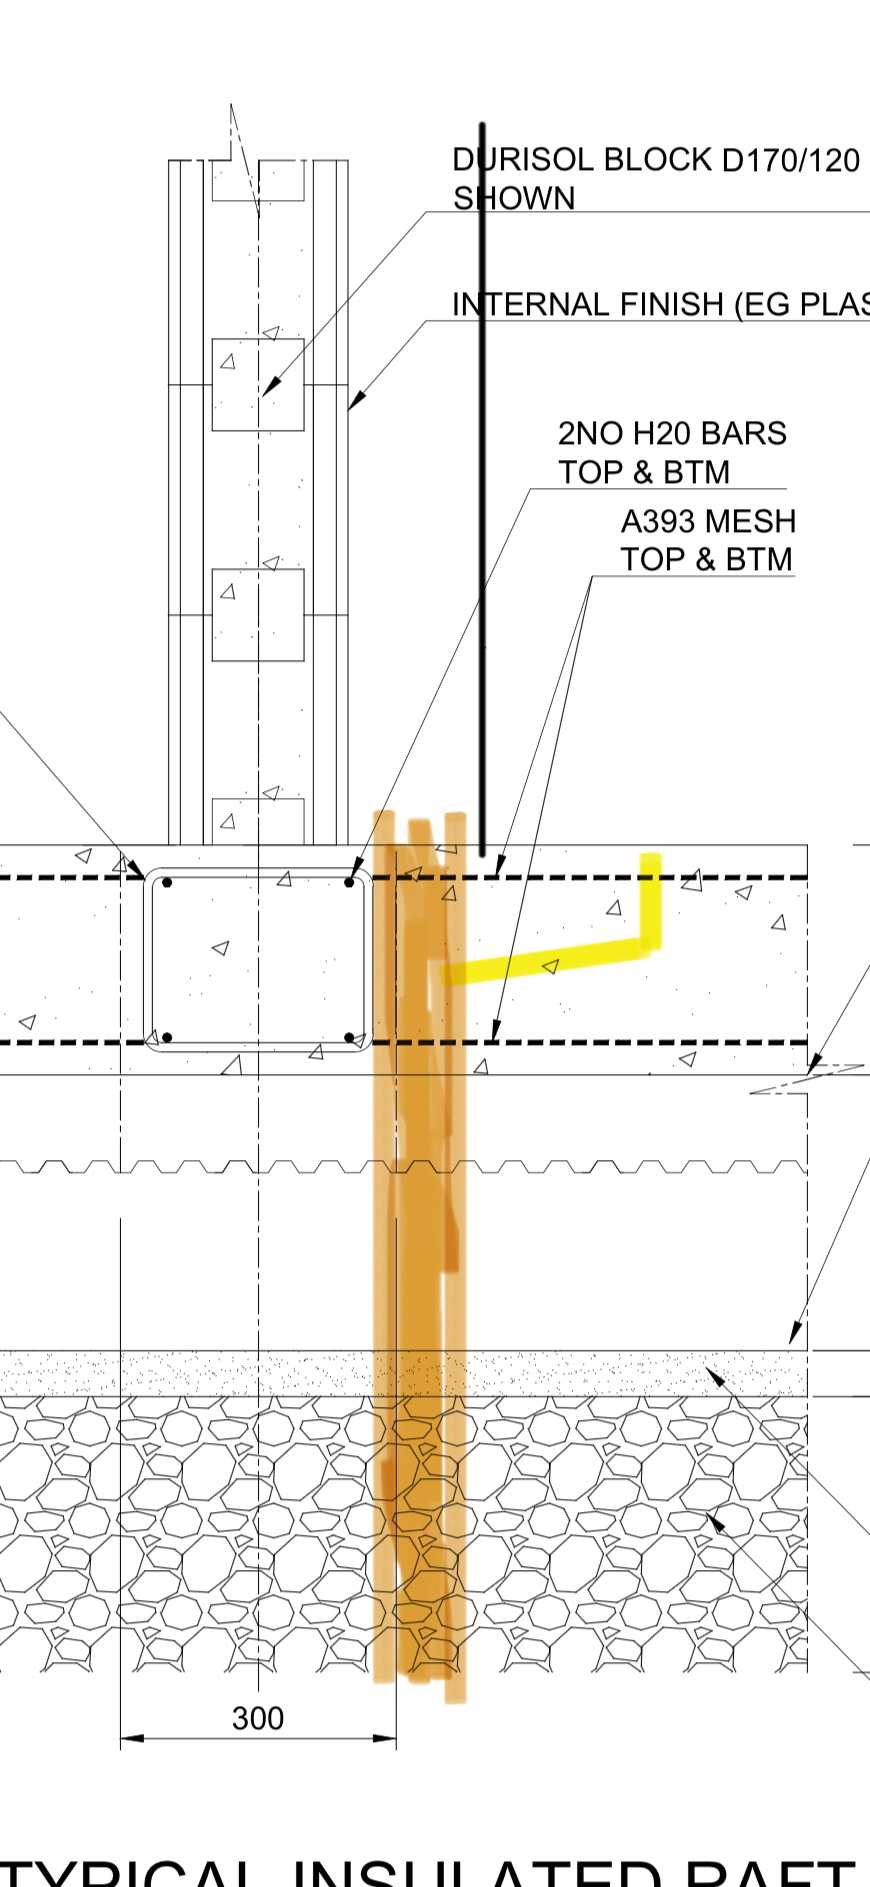
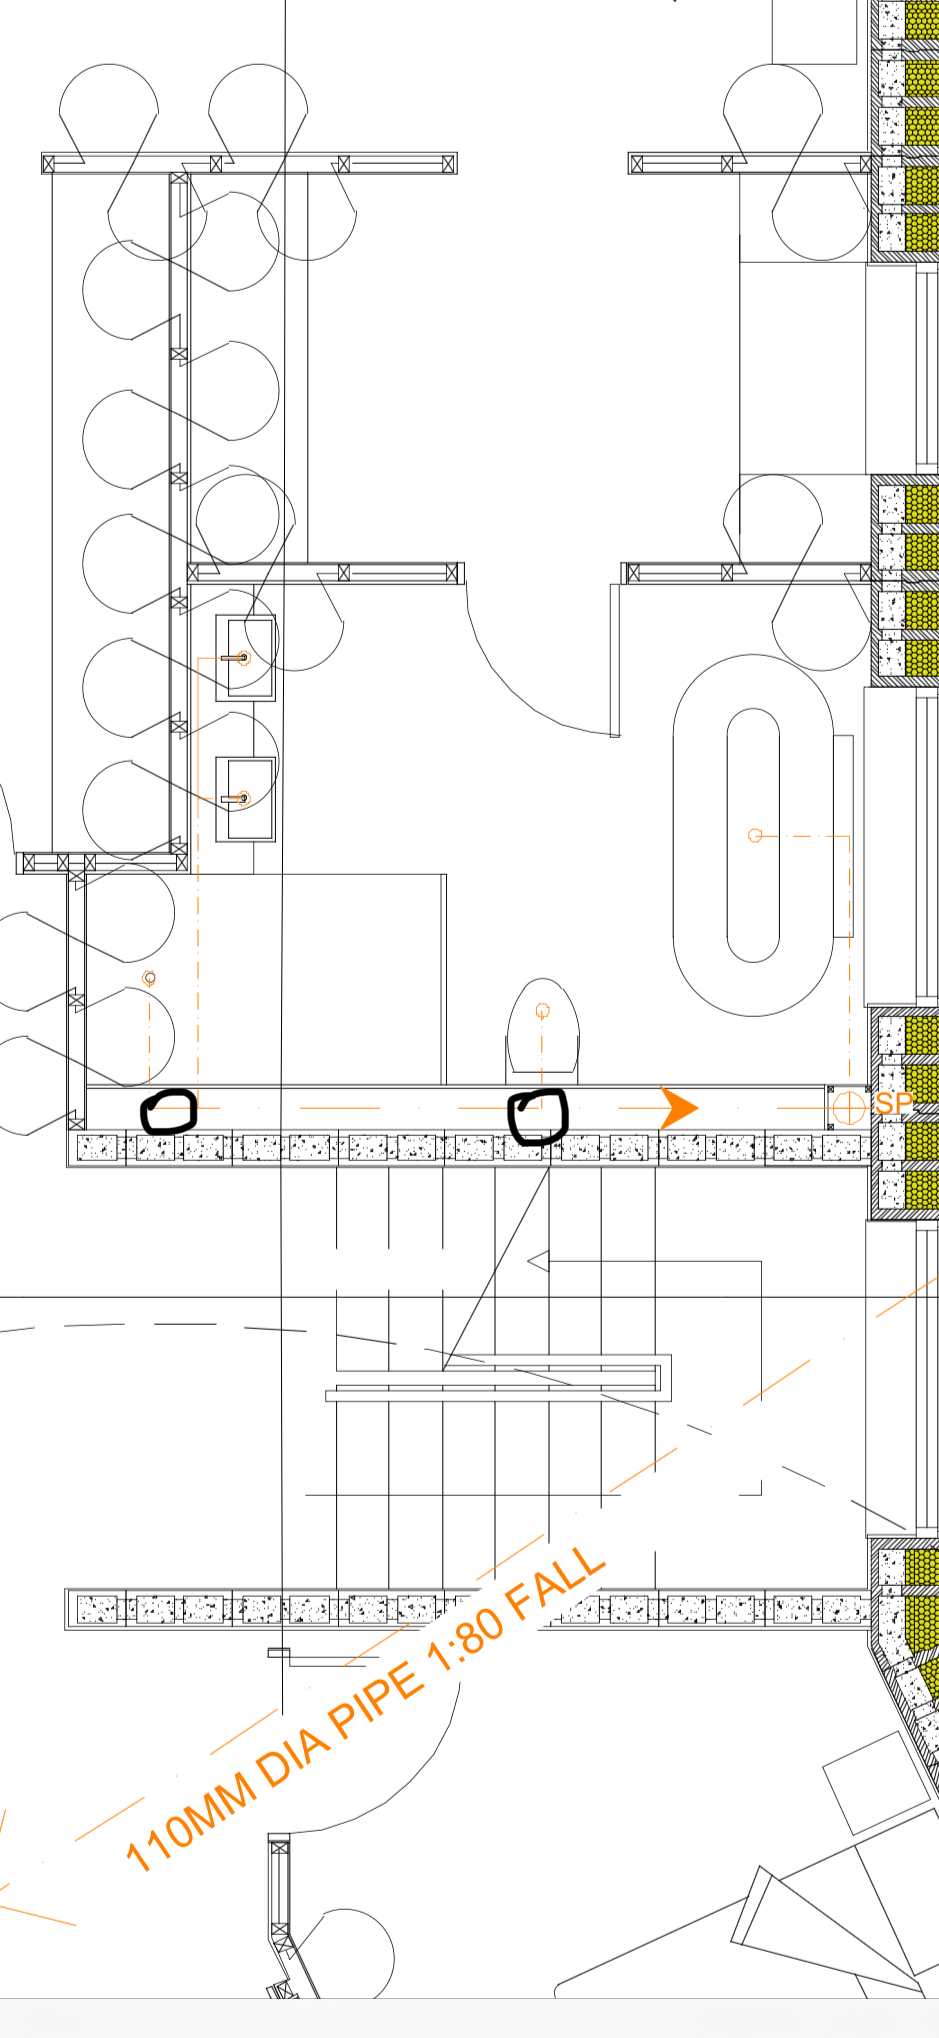
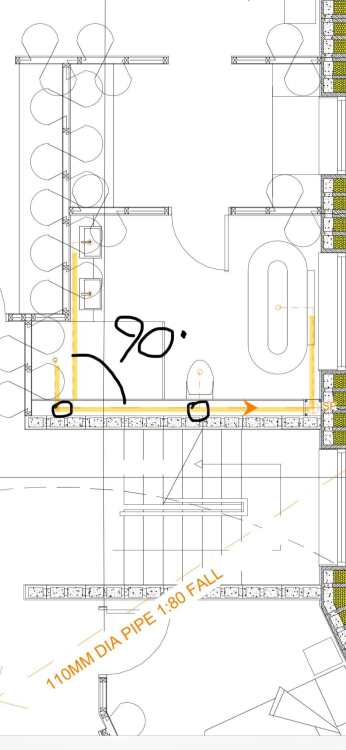
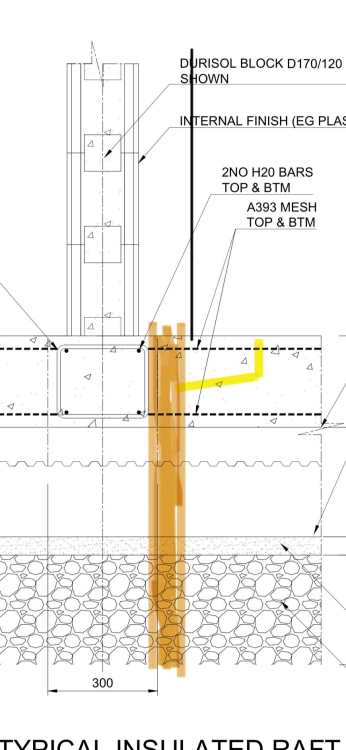
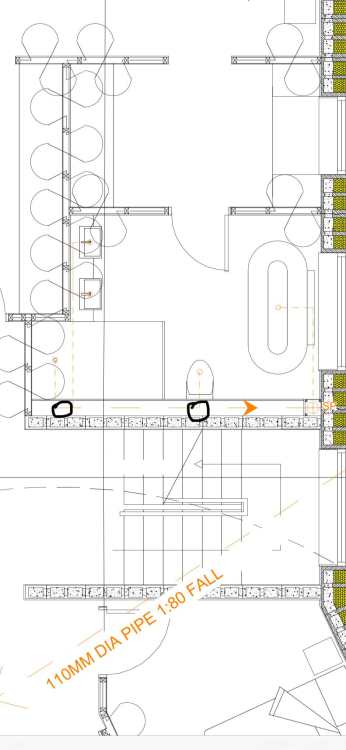
Is that what you mean @Nickfromwales? Slightly annoying if so as this design was done for us by our SE. Thank you for confirming about pipe diameter and fittings. I was concerned about slow draining/gurgling shower and basins. There will be two layers of A393 mesh. My understanding is to shutter the shower area on top of the upper A393 layer? and to shutter around the shower was between the two layers to provide a little movement if required?
-
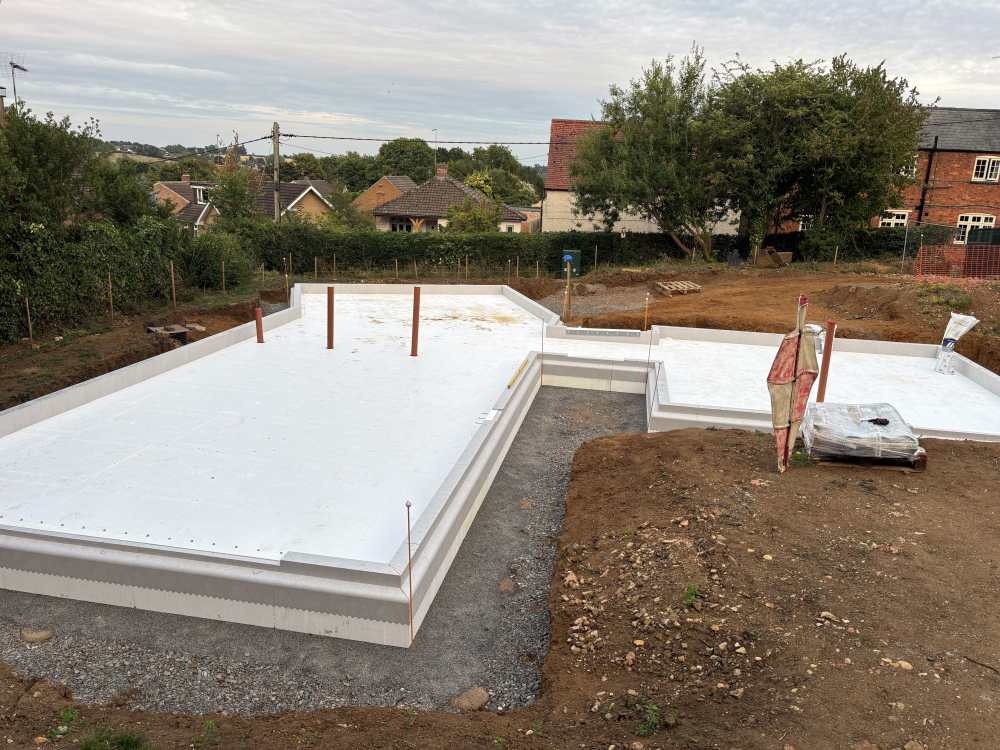
Alright Everyone, We have installed our IsoQuick insulated raft and need to start planning plumbing for the… Showers Basins Bath There is 110mm waste stacks coming up from the sub base ready to be tapped into. I understand I’ll be using 50mm pipe to allow for better flow but what do I need to do for the bath and shower ‘traps’ that will be in the concrete slab (250mm thick). We have allowed for a 20mm floor covering on top. Shower tray is low profile. Black circles indicate additional stacks. Rebar is being installed by professionals on the 11th, so I need to get my arse in gear!😅 Any help is greatly appreciated!
-
@Nick Laslett We haven’t watched it, but that will be a viewing tonight. Thank you. Ellie and I are in no rush on our build so will definitely be keeping wall size down to a minimum before a pour. Also after our training day we found out a 5mm wood screw can help you out massively in between webbings. I think people underestimate the weight concrete has, after shifting 3.5m3 of concrete by hand for our drive it’s opened our eyes and we have since made the decision to get professionals in to pour the slab!😅 @JohnMo that sounds promising for us if you just followed the manual👍🏻
-
Hello mjc55, Fantastic, what stage are you at? We have attended our training day and put our order in. Hoping to start raising walls up by mid September.
-
Morning Gus, Not quite sure how we’ve managed to get your knickers in a twist. We are certainly not taking advantage of the BuildHub Ethos. We haven’t asked for followers, likes, subscriptions, go fund me pages or anything of the sort. To make money from YouTube you need to be posting a video almost every week and those videos need to be of good quality editorially wise. If you were to view our page and videos it would be clear to see that our efforts are put more towards the build than the filming in the effort to make money from YouTube (U tube). I really wasn’t telling fibs about my monotonous drone. I mentioned that we are filming our build as it’s so much easier to see a process happening rather than reading about it, our experiences may help the self builder, as we’ve watched many videos that have helped us. We have also found our build method/type is still quite new and uncommon in the UK, so someone thinking of pursuing a build of this type can watch a video on a case study of it all. It’s also documenting it for ourselves to look back on in 50yrs time when we’ve probably started forgetting the reason why we went upstairs for. Not quite sure about ‘getting into bother and back ending it’ but I’m sure you mean well by it. We have a Structural Engineer on board, Build Inspector, Architect and professional trades where we know our own limitations. But thank you for providing us with your day rate in the hope to attract business from anyone on here who is paying more for their Structral engineer. I’m sure the admins of BuildHub would have removed my comment if they thought it was not in the ethos of the site. As I said in my introductory comment, I am here to pick the brains of those in the know and hopefully provide insight if I can… nothing more, nothing less.
-
Hello all, We are a couple in our thirties who enjoy long walks on the beach and looking for someone to share it with...ooops wrong forum! We are in our thirties and we were lucky enough to purchase a dilapidated 1950's bungalow which sits on a decent plot. We had no idea what we were going to do with the bungalow but it soon became apparent that trying to 'renovate' it was going to be a waste of money as the 1950's construction methods had not survived the passing of time. The bungalow shall be replaced with a modest two storey dwelling with an upside down layout. Planning permission came with its challenges some of these included, a neighbour who on the night our appliacation was live on the planning portal spent the evening canvassing around the village trying to gain objection members, our parish council at first was wary of our intentions, we also had a planning officer who at first glance dismissed our proposal and then more challenges and bumps we faced were caused by our neighbour. So far we have succeeded in them all. (But we do stay on the right side of the rules, too chicken to risk it). Building with Ecobrix formally known as durisol, we are using an Isoquick raft foundation. So far, Ellie and I have knocked the bungalow down ourselves, recycling most of the hardcore for future use by having it crushed, dug the foundations and laid the sub-base ready for the Isoquick to be laid on the 28/7. Living in a static caravan on site and at the moment 18months in... loving it! We have been filming our progress and loading it to Youtube, if you are struggling to fall asleep at night I couldn't recommend listening to my monotonous drone enough! Our channel is called Turning Rosemount Upside Down. Looking forward to picking peoples brains and would love to be able to offer support from our experience also. Chris and Ellie