phatboy
-
Posts
168 -
Joined
-
Last visited
Everything posted by phatboy
-
Hi all, We have MHRV (As I fitted a few years back), and as part of our current extension, we are having a bigger kitchen. The boss has decided on a ceiling mount extractor: https://www.neff-home.com/uk/productlist/extractor-hoods/ceiling-installation/integrated-ceiling-hoods/I94CAQ6N0B For our MHRV to work properly, we need to pair it with a recirculation kit, which is big and ugly: https://www.neff-home.com/uk/supportdetail/product/Z52JXC1W1(00) What have others done for recirculation with this type of extractor? Are there other brands of recirculation filter that are smaller and less ugly? Don't really want horrible grill on our nice drop-ceiling above the island! Many thanks Tim
-
Matching decking and cladding OR using decking as cladding?
phatboy replied to phatboy's topic in General Construction Issues
Thanks all, great advice. After a drive around all the local stockists, we are likely to go with completely different deck to cladding.... takes a proper look to re-assess everything, we find. Of course the wife has expensive taste, and wants Millboard Board & Batten cladding! https://millboard.co.uk/cladding/board-batten Fortunately we don't need a lot. We won't go with Millboard decking, as we need quite a bit and I want to save my spare kidney until I need it. But there are loads more decking options than cladding it seems. Any more pics of peoples projects for inspiration would be great -
Hi all, Wasn't sure quite where to put this thread, as it's not strictly decking. I am looking to fit a deck but have matching vertical cladding so they can meet each other neatly ande seem almost continuous. For the cladding, I suspect we want tongue and groove for water resistance? I am struggling... nobody offers such a combination that I can find. We are looking at composite ideally. If we were to use decking as cladding, I am not sure about the gaps between the boards, as it may show up the grey housewrap underneath, and make it easy for things to live behind the boards. Is this a valid concern? Many thanks!
-
Yes, found all the spec. https://www.unionfoam.it/en/p/eurobatex/ Compared to a full box of Armaflex, it's still 1/4 the price. Compared to the rate I can get at local merchants, its 1/8 of the price! As I'm in Jersey I need to pay about £50 to have the freight forwarded from the UK dock, but still, with a few other bits I need (Hep2O stuff), it still seems to make sense. Hopefully someone has used it before, and can share an experience. In the mean time, I'll try to compare it with Armaflex spec.
-
They have it in 19mm, too: https://www.plumbingsuperstore.co.uk/product/eurobatex-split-pipe-insulation-2m-lengths-19mm-thick--full-box-quantity-15mm-x-19mm-x-2m-eurobatex-splitbox-qty-39pe15192s.html I am plumbing the house with manifolds, so there is a lot of pipework. I'm a little suspicious that it's so cheap, to be honest! And I'd rather not pay out for the Armaflex, if possible.
-
Hi all, Plumbing SuperStore offer Eurobatex pipe insulation, which looks to be the same sort of stuff as Armaflex.... but costs 1/4 of the amount!? Has anyone had any experience with this insulation, good or bad? For the price, I'd just buy a full box of 13mm thick, and if I don't use some, never mind! https://www.plumbingsuperstore.co.uk/product/eurobatex-tube-pipe-insulation-2m-lengths-13mm-thick-full-box-quantity-p29126.html Many thanks Tim
-
That is of some help yes, thank you. As I want vertical cladding I think I need to fit timber between the insulation boards to the wall vertically, to a few mm thicker than the insulation, then some horizontal battens over to mount the cladding to. If we use cladding with gaps, we will use some composite decking battens, as they are weatherproof and black. Or as @Wumpus mentioned, board over the insulation and fix through, but then I'd need vertical then horizontal battens, so it's getting a bit thick then!
-
Hi @LSB, What did you do with this in the end? I have 1 wall which will be clad over K5 EWI, and I am as lost as you were in this thread! Thanks Tim
-
Waterproofing a timber area under a window in a block build
phatboy replied to phatboy's topic in General Construction Issues
Covered in 60mm Kingspan K5, and rendered. So there is no additional need to damp proof, and relying on the render coats should be sufficient? Cheers Tim -
Interesting... I don't suppose you have any photos, or a construction detail do you? I am wondering if I did that up to the boundary, Building Control would be concerned about its fire rating?
-
Sorry for the lengthy Title, not sure how best to word it.... We are building in block on flat, with external insulation. In 1 area, we are fitting a window, but will stud out below it, so that if in the future we want to convert it into some French doors, we can. Any tips on how best to damp proof this? Or, if I am planning to externally insulate across this bit too, do I even need to bother? Thanks Tim
-
Hi all, On our extension project, 1 wall is to have some kind of cladding over the EWI (The rest will be rendered). We already have the Kingspan K5 boards for the job. I'm struggling to find a good detail on how to deal with the clad wall. Should the boards be fixed as usual, and then a sort of Tyvek be fixed, then cladding battens? Or should I have the boards base-coated, then battens? I'm a bit lost to be honest, and the internet, so far, hasn't had much to offer. Thanks! Tim
-
I eventually went for a Wundu kit. It arrived quickly, was well priced, had a good branded pump, and generally seems to be a great kit.
-
Closing space between roof joists at solar overhang
phatboy replied to phatboy's topic in Heat Insulation
Excellent @JohnMo, I will do basically the same. Thanks for all the help -
Closing space between roof joists at solar overhang
phatboy replied to phatboy's topic in Heat Insulation
Thanks all, I'll go with cutting and pushing the insulation all the way up, then foam it well, and also silicone it after it's rendered. Thanks for the help :) -
Closing space between roof joists at solar overhang
phatboy replied to phatboy's topic in Heat Insulation
Well that gap currently goes into what will be the ceiling void. Thanks, I wonder if there is benefit to doing separate insulation, or just letting the EWI boards all the way to the top? It won't be a closed soffit, it will be some kind of cement cladding, Millboard etc Thanks, nice that someone else would do what I was thinking! Just wondering if the seasonal changes will open gaps between the timber and insulation..... -
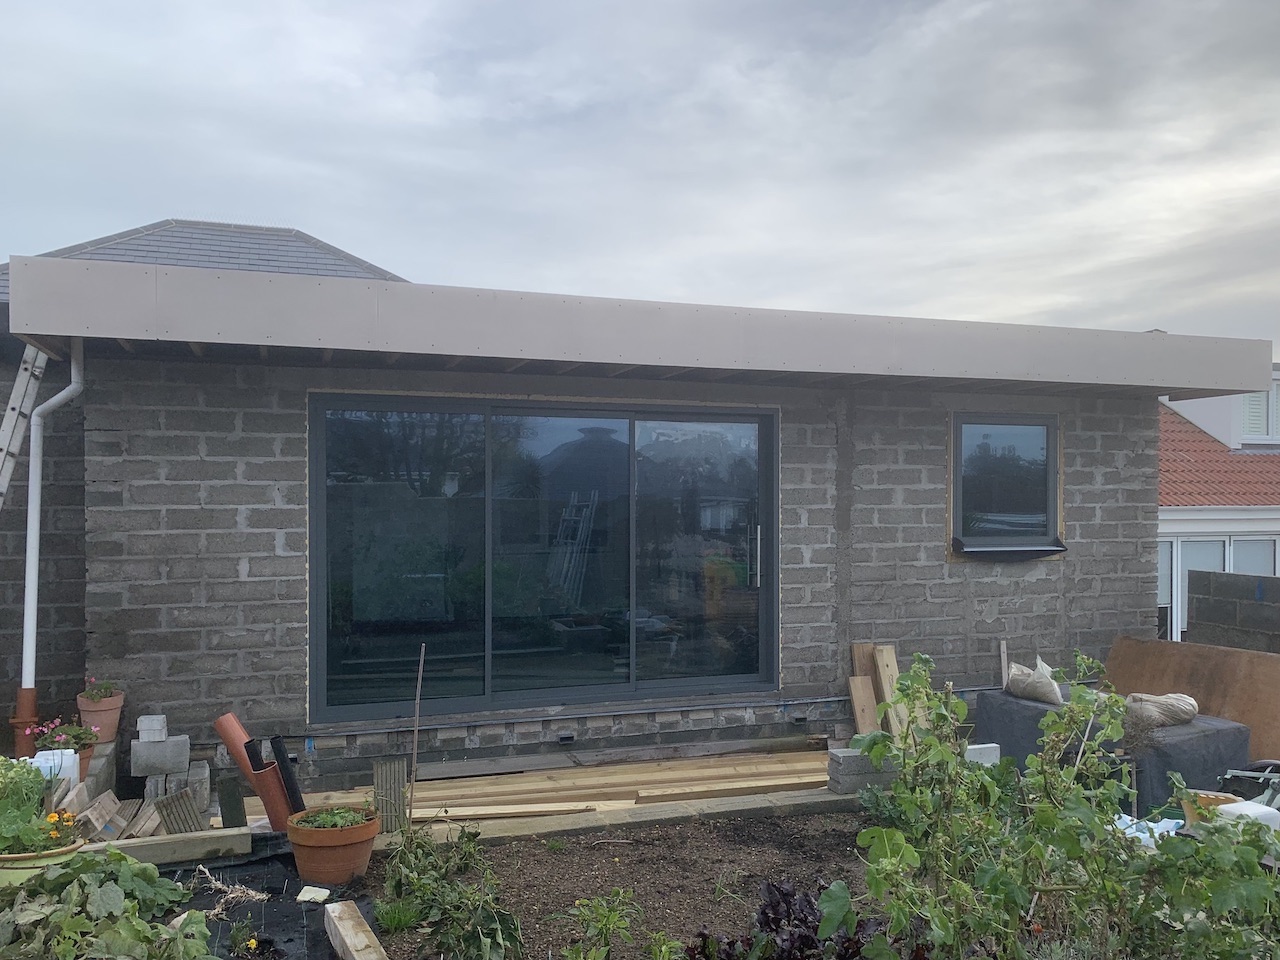
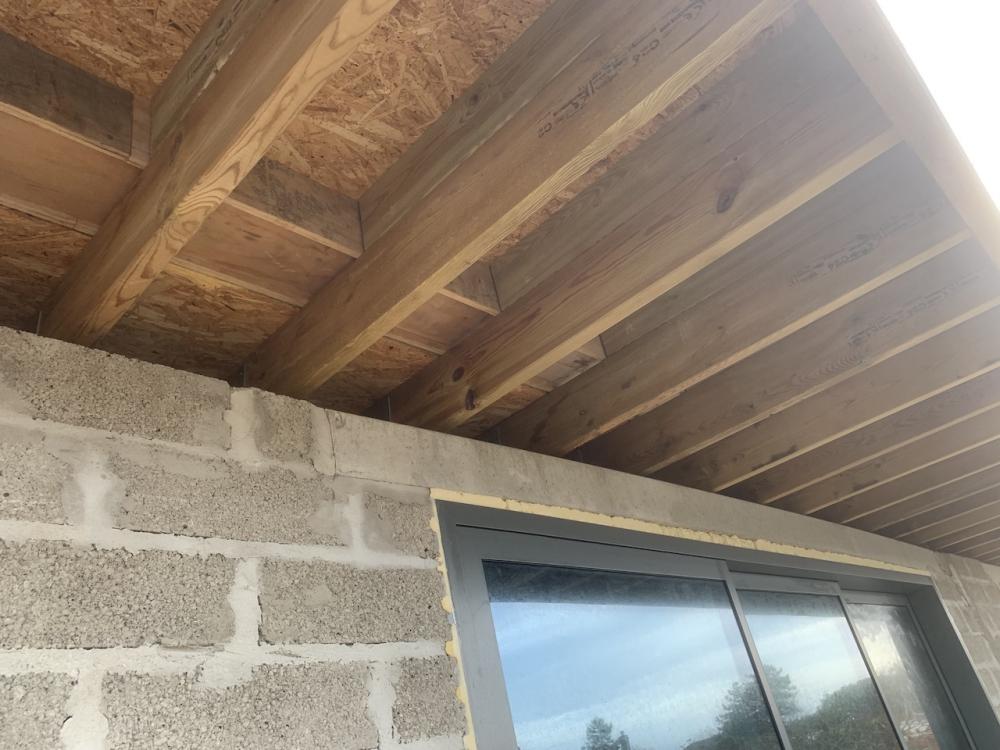
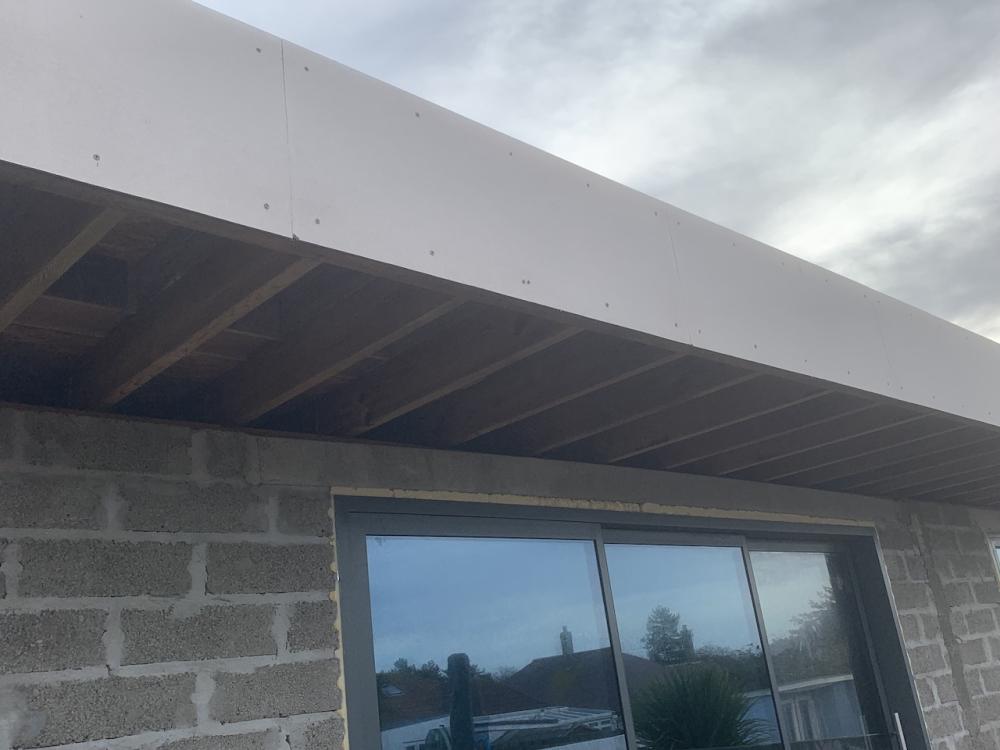
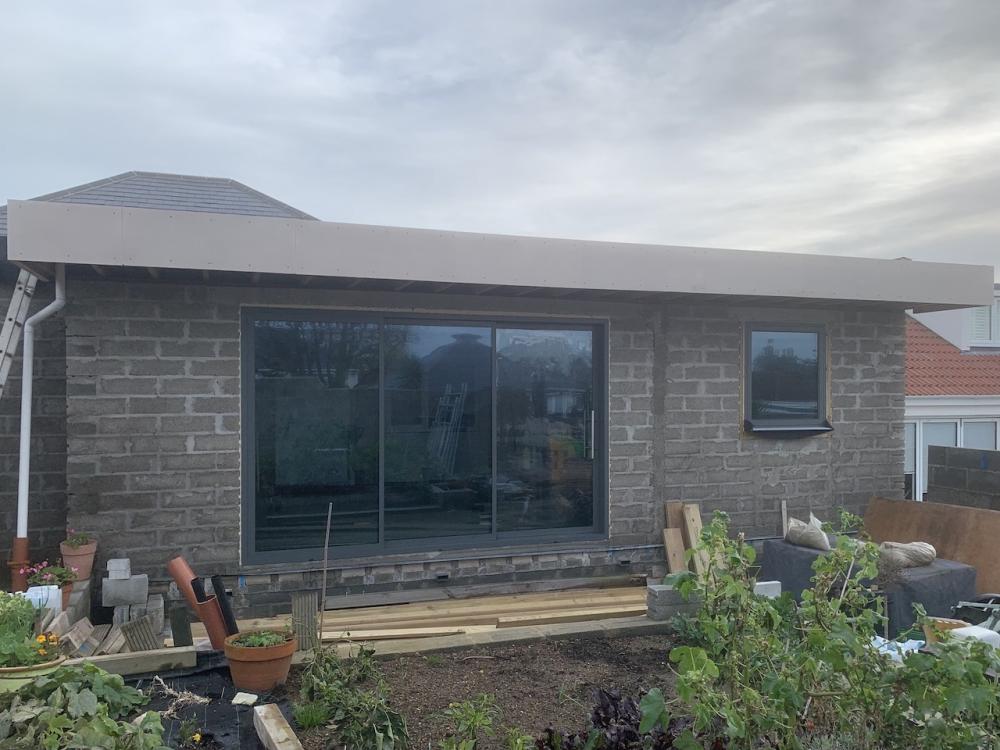
Hi all, Sorry for the long confusing topic name. I'm hoping for a little expertise on a design detail. The extension I am part way through building has the flat roof overhanging the building by 1m on the south side. It will all be externally insulated (no cavity), and the overhang will be clad on the underside and down the wall. It is likely to be cladding with gaps. This leaves me unsure how I will close between the joists above the walls, so that the inside is airtight and remains a warm roof. Will cutting the EWI boards tight around the joists and foaming, then rendering be enough? I worry it may end up with gaps as the seasons change? Not really sure what other options I have. Please see photos to clarify what I'm trying to do. Thanks!
-
So I finally completed this today, with no drama. We did spend 2 hours pulling the sawdust and some small rubble out of the joints, as they were full in some areas. Then vacuumed the area, and then again with a narrow nozzle over the joints. Filled 3 vacuum bags. Used a mix of sharp sand and building sand, and probably somewhere between 3:1 and 4:1 with cement, and a little plasticiser. First batch was too sloppy, no consistency at all - half of it is likely on the subfloor. The rest went a lot better, got it to the consistency of loose muffin mixture, and then with a hard brushing it all went and filled the gaps. Lessons: - When you've wet the floor on an area, wet it again (Even when the ambient temperature is about 12 degrees). - If it seems a bit too hard to go in, spray a bit of water on the grout to go in, and brush it a bit more. - Going over it again with the broom about 20 minutes after filling seems to clear any excess from the top surface, but it is bloody hard work! All together, it took 2 of us about 90 minutes to do 60 square metres. I did all the mixing and wetting, and my dad did most of the sweeping. Sweeping it everywhere took longer than I had imagined. Thanks for all the guidance... another job ticked off!
-
Lovely, that's what I was hoping to hear! Interesting that you can wet it first..... never heard of that!
-
Hi all, Due to spraining an ankle and the dreaded COVID, I didn't manage to get the EDPM onto the roof in the glorious summer we had, and will hopefully be doing it this weekend. After the ankle injury, I was able to get someone to lay plastic sheeting over the entire flat roof (Ply, insulation, OSB, timbers all in situ), but I have seen that water has found its way under, and also condensation under the various scaffold boards holding it all down. I'm fitting a Hertalan EDPM, with water based adhesive. If the wood is 'a bit' wet, will that be OK? I plan to uncover it all Saturday morning, to allow it to dry off as best I can and get some extra screws in where the ply has cupped a bit. But I need to get the whole lot covered properly the same day, before the bloody rain returns! Will I be OK? Thanks
-
Thanks @Canski , did it go well? Did you first go around with the cement/water slurry in a watering can? I can see that it looks like fairly hard work.... lots of gear to push around the place! I'll be getting to mine over winter, now the roofs (mostly) on. Thanks for the pic! Tim
-
There were hardly any doubles to be honest..... just at a couple of ends where there wasn't space for a block, and a quadruple for a wall to sit on. I was going to clean out all of the sawdust and demolition muck that's basically filled up the joints between blocks and beams, so I could get a proper fill of slurry in there.... is this not necessary?
-
I already filled in my doubles, used a 1:3:6 mix with 10mm chippings, seemed to go well. Yes please, let me know how you go. And pics also would be helpful! This self building lark sometimes throws up challenges with the simplest things! I am now regretting not grouting it before building the walls and roof..... was trying to avoid the floor pooling, but will now have a days work clearing out the joints with an old screwdriver and hoover....
-
Great thanks. Blocks are tight together, but because of the profile of the beams, the gap between beam and block is a few mm at the top. So seems like a cement slurry will get in between the blocks, and then s+c mix will fill the block/beam gaps. I've got 80m2 to do, but no idea how much cement ill need!
-
Sorry to revive an old thread, but it's right on topic. I see above a suggestion of just grouting with cement and water.... id not heard of that before. I was thinking of 4:1 sand cement, with a lot of water and plasticiser. Ill be doing it as soon as the weather cools down a little! Any advice appreciated, it seems this job can be easy, or a complete nightmare!?