MJNewton
-
Posts
1354 -
Joined
-
Last visited
-
Days Won
1
Everything posted by MJNewton
-
That looks like a beast of a tool; will see how I get on with my 'normal' tools first. Regarding mole grips I never seem to have much joy with them (limited grip). I wondered if maybe my grips are just of poor quality but I seem to recall they are the genuine article. Or could just be user error... It is reassuring to have heard so many suggestions, and not one person (yet!) say that they won't come out (or not without ripping half the surrounding timber out with them!).
-
I do have one but thank you anyway. Will definitely try with a chisel to start things off. Edit: And, yes, I might add blockers just for peace of mind.
-
The instructions/diagrams don't show it being done... Was it the holes that gave you that thought? If so, they are triangular and I think in Simpson-speak that means they're for something else rather than driving a nail through...
-
There's actually two - the other being on the other side. It however is screwed in as, whilst not as good from a strength perspective, there was no room to swing a hammer as it's the last joist in the run so sits around 10cm from the wall running parrallel to it. They went in with a right-angled screwdriver so should come out the same way! Thanks everyone for the suggestions. I'll start with a bit of prying (autocorrect quite rightly suggested praying!) or a chisel, a forked mini wrecking bar, pincers and a claw hammer before either investing in another tool or chanting 'off with their heads!'.
-
I haven't tried anything yet beyond standing underneath it admiring the problem! I've intentionally delayed the job until the weekend to avoid adding another hasty mistake on top of the first! That's a good call about maybe prying the plate itself to help get them moving, even just to give me a bit more purchase on the heads with whatever tools I can lay may hands on.
-
Grrr... As seems to happen all too often for me, I was a bit hasty with the placement of something and now want to move it. In this case it is a Simpson I-Joists hole support like the following: As per this stock photo I have fitted it towards the end of an I-joist to allow me to safely cut a large hole in the webbing (for a 75mm semi-rigid duct to pass through). I now wish to move it a few inches along (haven't cut the hole yet) and hence need to remove the 30mm square twist nails which took some force to get in and I fear will take considerably more to get out! My if-all-else-fails fallback assumption was to grind the heads off (with a Dremel or angle grinder if need be) and leave the shanks in place but I am wondering if I've got any hope of removal without resorting to this. Is this doable?
-

Silestone worktops from DIY Kitchens (or elsewhere?)
MJNewton replied to MJNewton's topic in Kitchen Units & Worktops
Just heard back from Natural Stone Surfaces in Derbyshire as I sent a quote request to them. My layout plan had the DIY Kitchens URL on it, which they spotted, and they advised [...] Edit: I won't paraphrase; here's what they said verbatim: Nice to hear such honesty! -
Silestone worktops from DIY Kitchens (or elsewhere?)
MJNewton replied to MJNewton's topic in Kitchen Units & Worktops
That's great to hear - thank you. If only the route to every purchase went like this! (Integrated dishwashers being my latest nightmare - I don't think I've found a single one that is anywhere near universally praised, but perhaps I am just not looking high enough up the cost scale) -
Silestone worktops from DIY Kitchens (or elsewhere?)
MJNewton replied to MJNewton's topic in Kitchen Units & Worktops
Thanks - that's really helpful. I think we'll end up with some light (we're on Classic White at the moment thanks to a sample we were sent). Our house renovation/remodelling has been bewildering with the number of choices and decisions required, and the kitchen is obviously no exception. I was dreading having to settle on a specific worktop (material in particular) but I don't think I've heard a bad word said about Silestone. Sure, we'll be spending far more than I thought we would (but far less overall given how competitive DIY Kitchens seem to be for the units/doors) but as things stand I am taking the worktop costs as being 'reassuringly expensive' if you know what I mean! -
Silestone worktops from DIY Kitchens (or elsewhere?)
MJNewton replied to MJNewton's topic in Kitchen Units & Worktops
Thanks Jeremy, I did think you'd had a Silestone worktop installed (pleased with it?). I got a quote for comparison (from a place in Bath) and found it to be around 10% above that for DIY Kitchens and I've just read of someone else (on another forum) finding similar so it made me think maybe the DIY Kitchens markup isn't that great at all. The same person said he believed that DIY Kitchens use Natural Stone Surfaces in Derbyshire for the whole of the UK (they were in Scotland) and so I suppose if the business is all going one way it may mean there's no need for a big markup if the quantities are fuelling the profit instead. I will give New Forest Stone a call based on your recommendation, and whilst I am not necessarily looking for the cheapest I do want to be confident that I am not unnecessarily paying over the odds if I were to stick with DIY Kitchens for convenience. -
Given the near ubiquitous recommendation for DIY Kitchens I have been busy planning our new kitchen layout with their online planner[1] which is automatically providing a seemingly-reasonable quote for the supply and fit of some Silestone quartz composite worktops that we like the look of. I understand that the worktops will be measured, templated and cut once our base units are already in however I was wondering if there are any benefits (or indeed drawbacks?) of us sourcing the worktops elsewhere e.g. enabling us to leave the decision about exact colour, thickness etc until after our units are in (and the room will have been plastered and painted by then), and perhaps even cost savings too? Perhaps DIY Kitchens would allow me to do that anyway given that the measuring/installation fee is separate to the unit delivery charge. What have others done? And if you have had a Silestone worktop through DIY Kitchens did they sub-contract it out to a local fabricator? In case anyone wants to make a personal recommendation I am based in North Wiltshire [1] The online planner has incidentally been great - hardly any units spinning themselves the wrong way or preventing me from sliding them into gaps that I know are big enough. Or at least it was until yesterday when it no longer seems able to 3D render my model (shows a black screen halfway through). I called them and it seems like a known issue but a frustrating one as the 3D view has been really helpful even if it is not quite as aesthetically inspiring as other outlet’s kitchen planning tools. Has anyone else seen this before and had it fixed? (They are looking into it for me now)
-
Thank you both. As mentioned I'll leave it to chance as to what I'll get, but will be doing so better informed. It's looking most likely that they'll be sliding (I'm at the lower end of the cost spectrum ryder72 ?)
-
Thanks Ryder72; fixed hinges did seem to me to be the obvious preferred choice but I suppose cabinet doors - particularly large ones for a fridge/freezer - really are quite heavy. Perhaps I won't factor it in to my choice and just go with whatever happens to come on my preferred appliance. Whilst I am a big fan of soft-close hinges I don't mind it being absent from the sliding hinge type as I don't imagine a fridge/freezer would slam in quite the same way as a normal cupboard.
-
Here's a pic that illustrates better:
-
Which hinges? The ones on the linked unit? They are for use with a sliding hinge appliance - the fridge/freezer comes with a kit to link the fridge/freezers doors with the unit doors so when you open the unit doors they open the fridge/freezer too. For a fixed hinge appliance you remove the unit hinges and attach the doors straight to the appliance.
-
There is plenty of information online describing what the difference is between fixed hinges (door carried by the appliance) and sliding hinges (door carried by the carcass) for integrated fridge/freezers but I haven't come across any discussion of pros and cons of each. Can anyone shed any light? For what it's worth, the unit I'll be using will be this one from DIY Kitchens.
-
Running power to a kitchen island
MJNewton replied to MJNewton's topic in Electrics - Kitchen & Bathroom
What did you cut the channel with? A chaser? I thought about hiring one, or even buying a cheap one for a one-off job then selling it on, but wondered how good the dust extraction was on them vs stitch drilling with a shop vac held adjacent (this'd obviously take longer but I don't mind that for a one-off). Also, what type of cable did you use? Re sizing, 2.5mm will definitely be sufficient here as the island size and location does not lend itself to siting of a hob. -
I am in the middle of designing a new kitchen and am toying with the idea of running power to an island for a socket (and, possible, in-cupboard lighting). The floor is, I believe, suspended beam and block with a (100mm?) screed over the top. Does that sound typical of a 2007-built estate build? I expect I would have surface mount junctions under the island and the nearest run of wall cupboards and will require a buried cable length of around 1.5m. What are my options for running this cable e.g. how to cut the channel (ease, minimum dust etc), what to put in it (armoured cable? unprotected cable inside conduit etc?) and whatever else I might not have thought of? For what it's worth, our intended floor covering will be engineered wood. Any help/suggestions would be welcome!
-
To loft or not to loft?
MJNewton replied to Barnacles's topic in Mechanical Ventilation with Heat Recovery (MVHR)
If you do opt to insulate the unit (I think they tend to be fairly well insulated already though?) then rather than have to build an enclosure I imagine an easy way to do it would be to silicone panels of PIR board on to the main faces on the unit? You'd need cutouts for the condensate drain and filter access, and I don't think you'd need the top covering as it's mainly pipework anyway (which should themselves be insulated). -
Unused legs in a central heating system?
MJNewton replied to MJNewton's topic in Central Heating (Radiators)
That's good to hear, thanks. I'll be doing the plumbing work shortly and with the rest of the construction work likely to take some time (sigh!) there'll be plenty of opportunity to spot any leaks and the system should be well exercised given the heating season imminent. It's a sealed system so I've got the benefit of an always-connected pressure gauge to alert me to any small leaks that might otherwise be difficult to detect, although it wouldn't be going much above ~1.5 bar. -
Apologies for the rather cryptic title... I am in the middle of creating an open-plan kitchen/lounge/dining area and cannot with certainty decide where best to put the radiators. Indeed, I can envisage that the 'best' position might well change over time if/when the more mobile elements of the room move around. I was wondering, therefore, if there would be any issue with me piping up a couple of areas to cater for the potential alternative siting of radiators at a later date? In keeping with the rest of the system I'll be using 10mm plastic piping run down from the ceiling behind the plasterboard so it'll be a straightforward job to do at this stage of the construction (the ceiling is currently down). The exit points are are at socket height (behind where the radiator would be) so I would just cap off the pipes in a back box and cover them with a blanking plate. Once my project is complete there will be limited access to the ceiling space so I was planning on connecting all the radiator feeds up to the manifolds now hence the unused ones will likely be sitting there for a long time with either air or water in them. Does anyone anticipate any potential issue(s) with this?
-
Wall fasteners for 75mm stud wall?
MJNewton replied to MJNewton's topic in General Construction Issues
I did this job today and, as Simplysimon said, the Dewalt drill bit was a dream to use - it was like the proverbial hot knife through butter. -
Wall fasteners for 75mm stud wall?
MJNewton replied to MJNewton's topic in General Construction Issues
I'm sure they're great but at £69.99 I hasten to add that I only want one bit! (Hopefully) Edit: I see they sell them individually so will take a further look! -
Wall fasteners for 75mm stud wall?
MJNewton replied to MJNewton's topic in General Construction Issues
I'm warming to that idea - certainly sounds the easiest and most straightforward method and having thought about it further can't see how it could cause issue. Assuming of course drilling through the metal is achievable which given all my HSS drill bits are the ones made from cheese that you get in a multi-pack when you first buy a drill will unlikely be the case! Any bit recommendations? (Ideally from Toolstation/Screwfix for ease of reference) -
Wall fasteners for 75mm stud wall?
MJNewton replied to MJNewton's topic in General Construction Issues
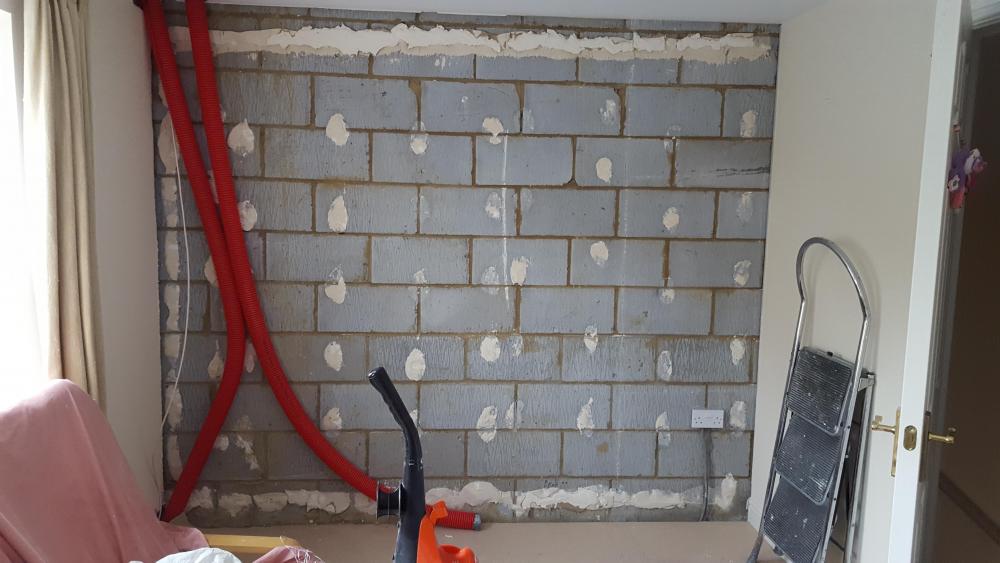
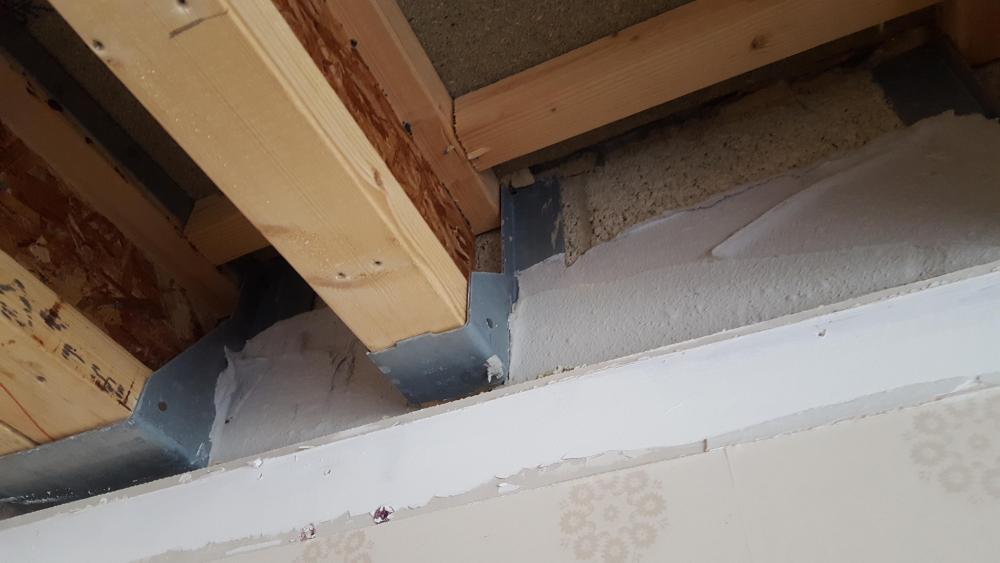
I think all of these suggestions are probably valid; and I should add that by asking the question I have perhaps given the impression that I think it is a difficult problem to solve - I don't think it is but am never the less keen to hear of new (to me) ideas/products or whether a 'just use what Ive got' approach might suffice. On to the pics, here's the wall in question: (Ignore the duct routing - they're just hanging there! Oh, and don't highlight the less-than-ideal noncontinuous dot-and-dab method that'll almost certainly exist throughout the house!) And here are the joist hangers; photo taken from another room where I've taken the ceiling (plasterboard and resilient bars) down but the wall boards are still up: The 'cradle' of the hangers protrude ~80mm into the room so just about the size of my stud depth. If the hangers already hand a hole drilled in the bottom I think I'd be laughing - I'd locate them and drive a decent depth screw up through but for some reason I am nervous about drilling my own hole in them just in case that causes any weakness!