Jump to content
  • entries
    24
  • comments
    246
  • views
    11897

Window and Door Detailing on a Stone Clad MBC Timber-framed House


TerryE

6138 views

As I've previously discussed we have an MBC Passive Slab and Timber-frame, but unlike most builds, our house also has a very traditional stone cottage-style exterior because the new build sits between our current farmhouse, which dates back over 400 years and a cottage which dates back approaching 200 years, so our planners required that we use the same local quarried stone.  So a topic that often comes up is "how do we do the window / door treatment on a timber-framed house with an exterior stone / brick / blockwork skin?"  In this blog entry I want to describe how we approached and addressed these issues on our build. Whilst I make no claims about our approach being the only or the best one, Jan and I do believe that this has worked well for us; we are pleased with how it has all turned out and we don't think that we would do it differently if we were doing this all again.  So if you are in a similar situation to us, please consider this as one possible approach.


There are a number of issues that we considered in designing our detailing:

  • Decoupling the inner and outer skins.  In order to achieve thermal isolation of the inner passive slab, MBC also lays a separate outer ring beam for blockwork, brick and stone skinned houses.  The inner slab carries the Larson trusses of the MB twinwall frame, and the outer ring beam carries the stone skin. The inner frame is CLS; the outer stone and mortar, and these two have different expansion characteristics so you should anticipate up to 5mm, say, differential movement between the inner and outer skins.  So we decided that we should not use the window and door furniture to couple these. 
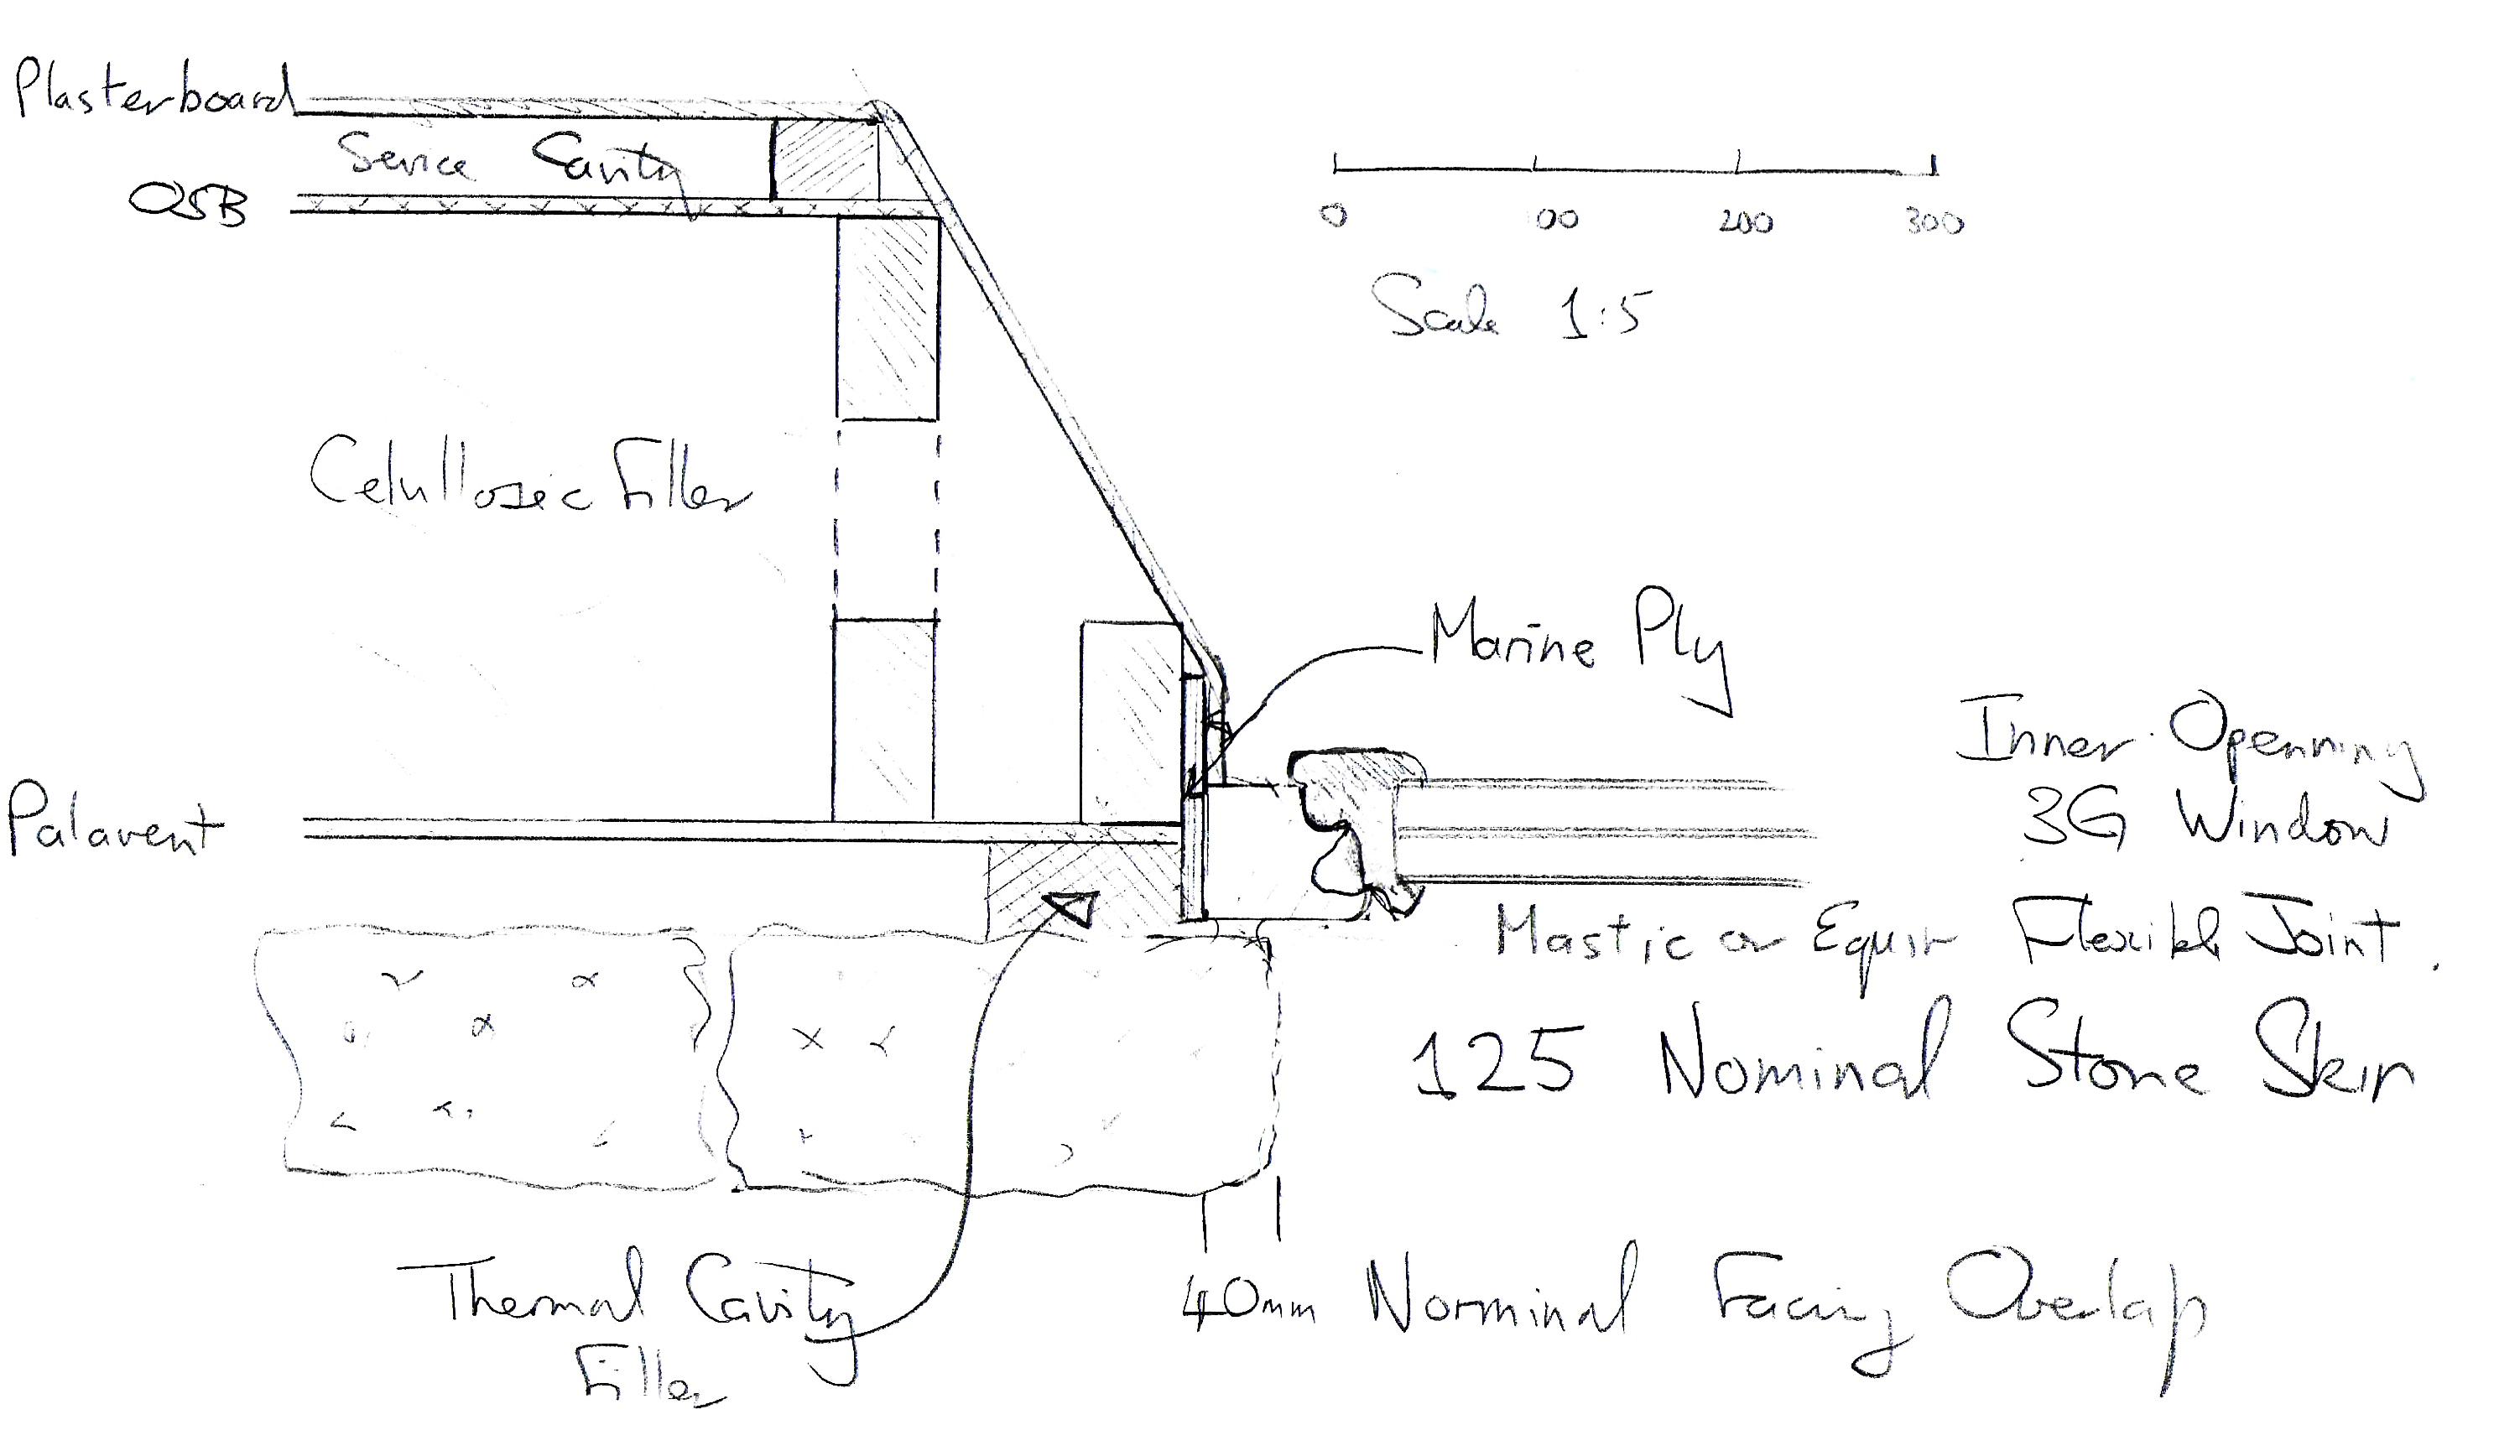
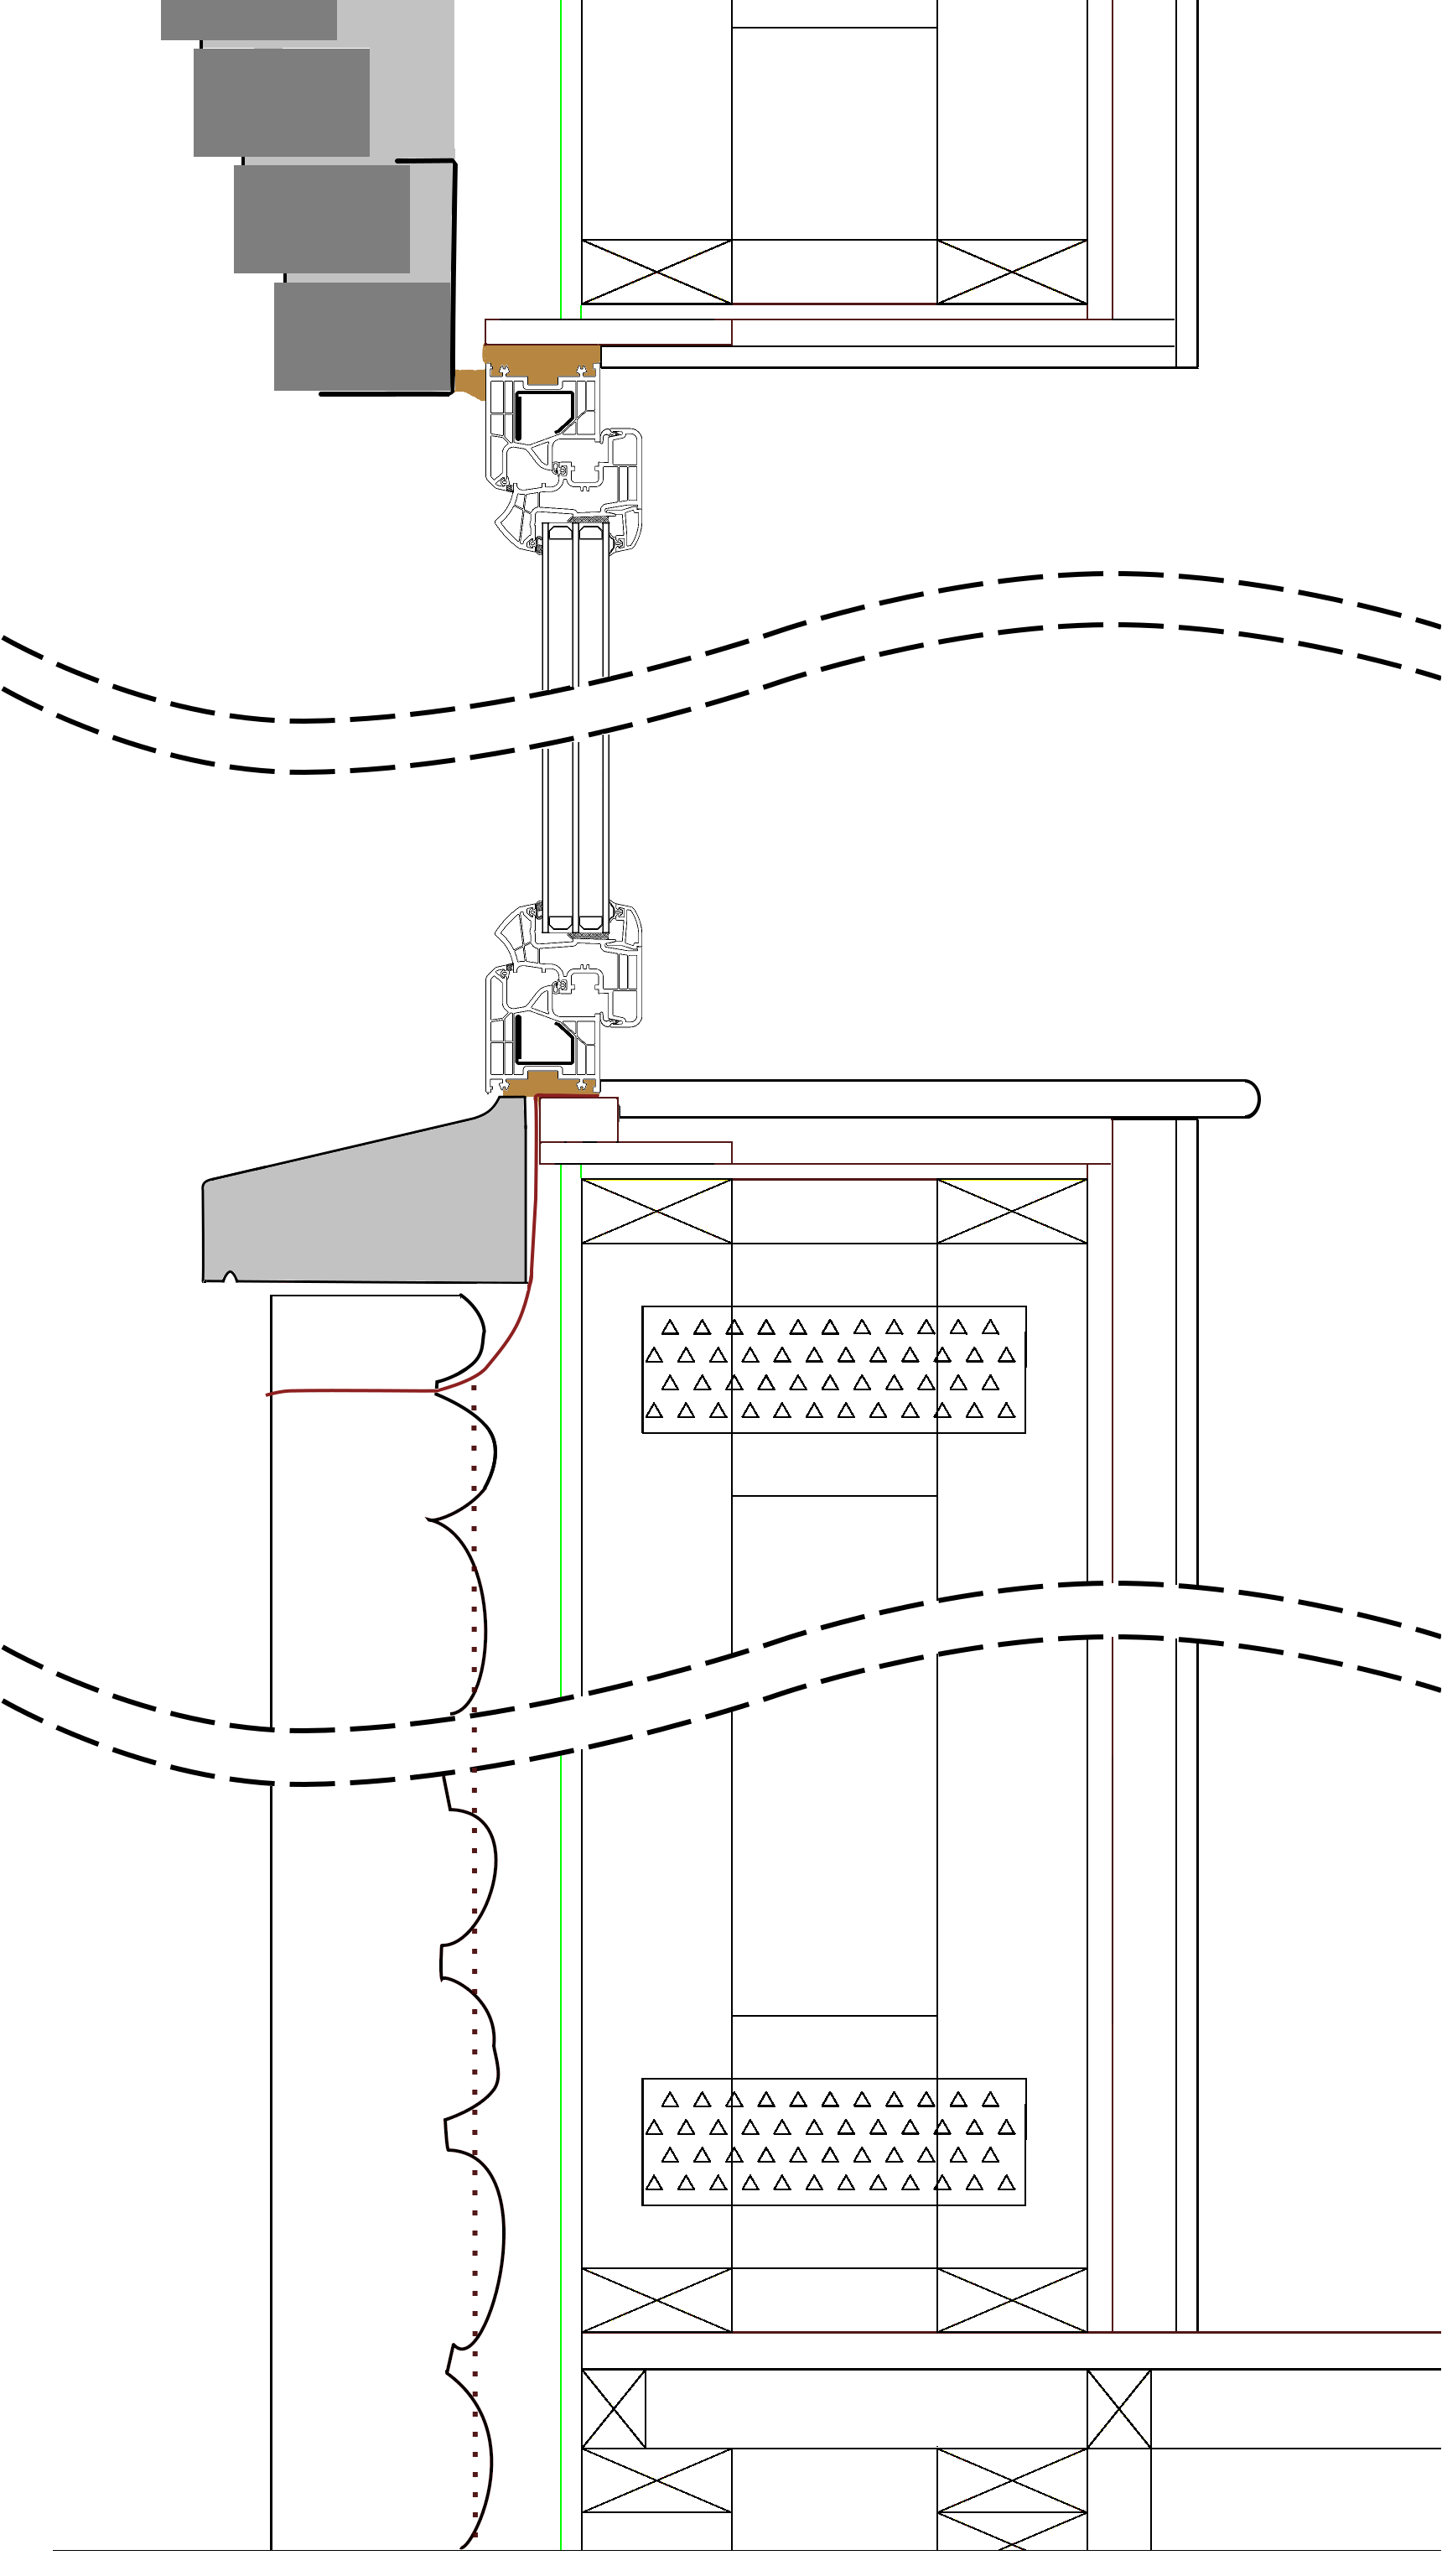
  • Closing the gap. Even so, we still have the issue of the 50mm nominal air gap between the inner and outer skins and how we close this for weather protection and cosmetics.  Our solution to thee two points is to move the front of the windows some 45mm forward of the outer surface of the frame. The stonework then sits immediately in front of this,overlapping the window frame by some 30-40mm.
  • Fixing the windows and doors. We have Internorm KF200 Aluclad PVC windows and I agreed a fitting profile with both MBC and ecoHaus SW who supplied the windows.  This comprised a box section (something like marine ply would do here) that framed each window opening at the top and sides as follows.
    • there was a 10mm filling gap for fixing the windows
    • there was a 15mm filling gap at the top ditto
    • the windows had to sit hard at the bottom, but I inserted a 44 × 38 tanalised carrier to lift the base above the internal frame base.  This was to give adequate clearance to fit the internal cills.
  • Protecting the windows during the build.  EcoHaus SW fitted the windows on day 8 of the the frame erection, so by day 9 we had a completely weather-tight and lockable house. The windows had to be in place before erecting the stone skin, and so needed protection from the stone erection process.  The solution that we agreed with the ecoHaus technical manager was very simple and extremely effective and one that I would suggest to anyone else doing this.  We simply covered the windows in heavy grade clear building polythene, and this served a dual purpose:
    • It provided total protection against the muck and dust of stone erection.
    • You need a slip surface between the aluminium cladding and the stone skin.  (Cf. the first point)  The PVC does this.  Once the stone skin was complete we simply cut around the PVC on the mortar line.  All that is then needed to achieve a total weather seal is to run a thin bead of sealer at the join. 
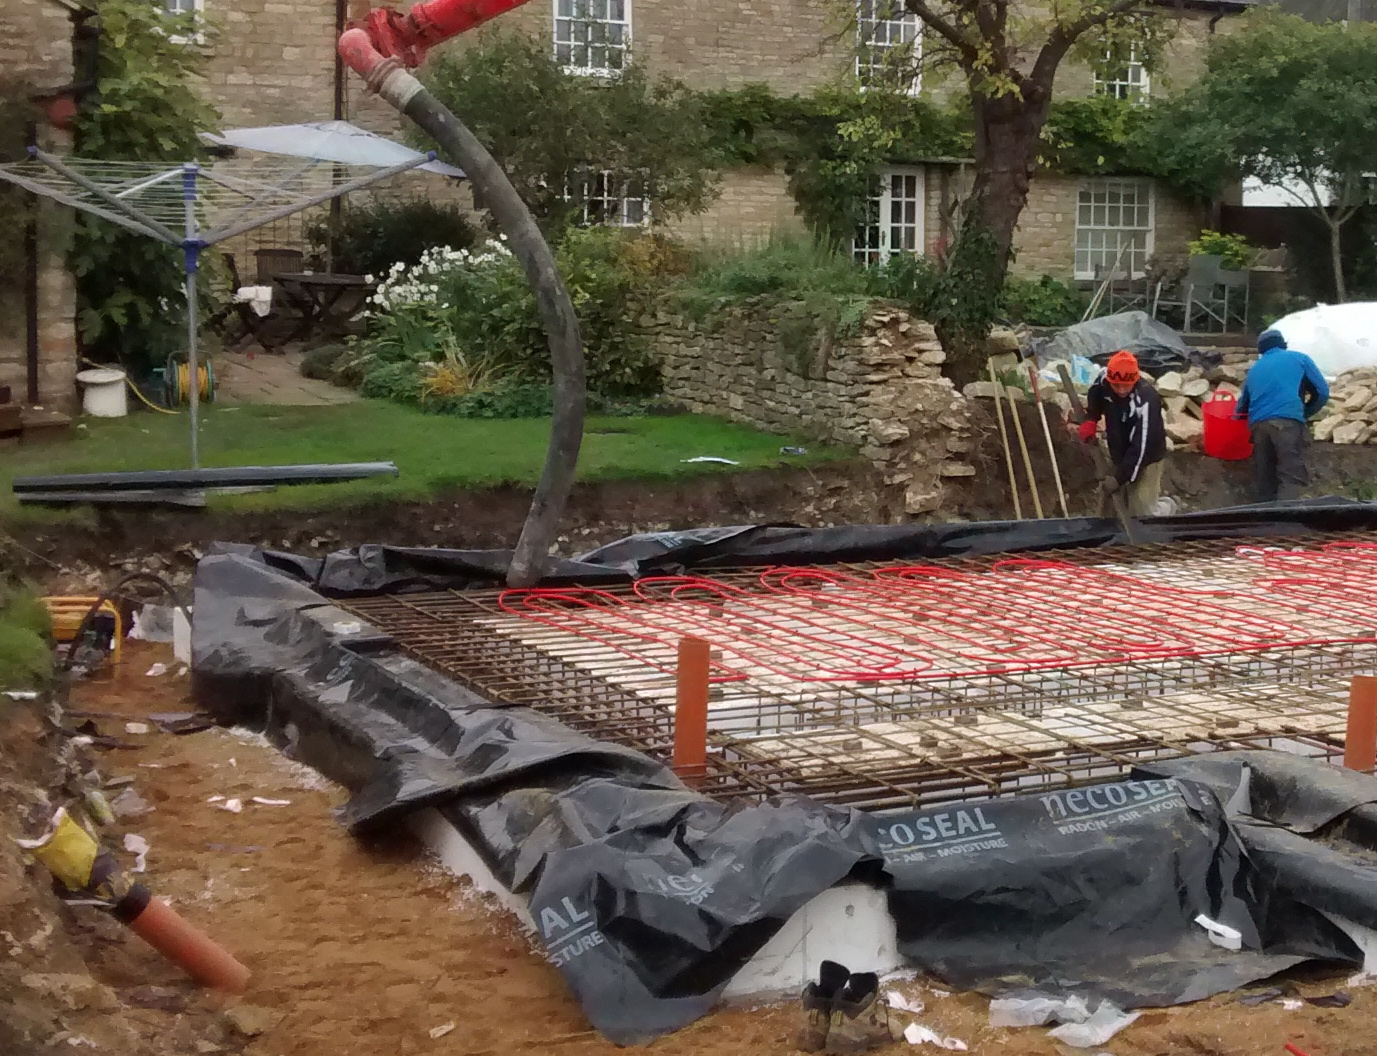
  • Minimising any bridging impact.  The windows have fire-break socks around them which acts both as insulation and a gap closer.  The doors require special treatment.  Here prior to slab pour, we had the MBC team cut out 50mm deep slots at the door openings and we placed extra shuttering in to extend these out by some 40mm in front of the outer frame line.  These were rebarred and when the slab was poured, these became a 50mm deep concrete tongue that extends out to the front face of the door opening.  The doors then sit on a 30mm upstand on these tongues. The upstand acts as a thermal break, but to minimise any bridging through the tongue itself, we used FoamGlass structural bricks to isolate the tongue from the outer cill and the stone skin. If you do the 2D thermal calcs (or at least I did), the thermal capacity of the stone face overlapping the face of the windows materially mitigates the extremes of the temperature variation, and whilst there is a little uplift in the Psi-factors for the window, in absolute terms this equates to adding an extra ½m2 of glass to the house overall, and not enough to cause condensation risks  
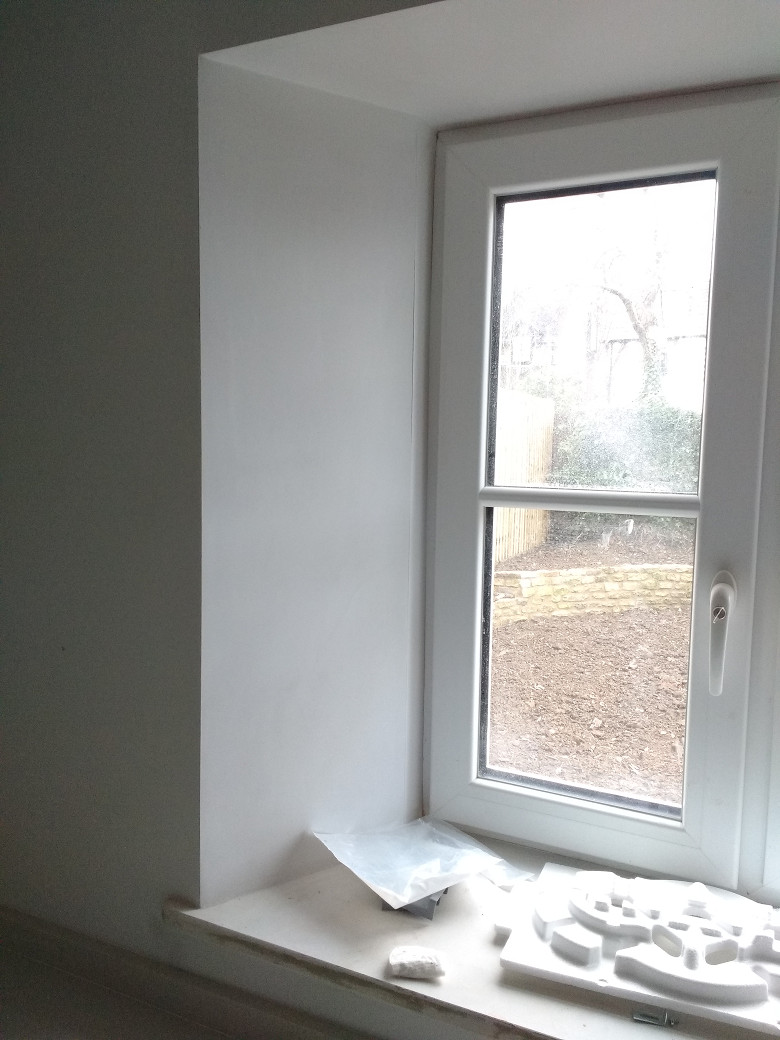
  • Maximising internal light. Our old farmhouse has thick stone walls with window reveals and these work well.  So we decided to ask MBC to do a similar treatment in our new build.  In short not only do they work, they work brilliantly. They let in perhaps 10-15% more light than deep squared frames and they help open out the rooms.  They are an extremely attractive feature and both Jan and I would recommend them to anyone considering using a twinwall frame.


Here is a picture of the slab during the pour. Note the trays for the kitchen French windows and the back door.

5890c260e267a_Slabdetailshowingdoors.thumb.jpg.f4e8b3949cf9171232ec038d01592bd0.jpg


Here are a couple diagram extracts showing the window treatment and detailing:


TE-KitchenWindow-detail.thumb.png.58c457b96ede23daee5cbd660e8019da.png

58a0b69d534d7_Wndowdetail.thumb.png.d06e0341b250692e680cc55868a04399.png5890ba1c01328_WindowDetailV2.thumb.png.b15bd254d24c40c717e16dc2db3c6440.png


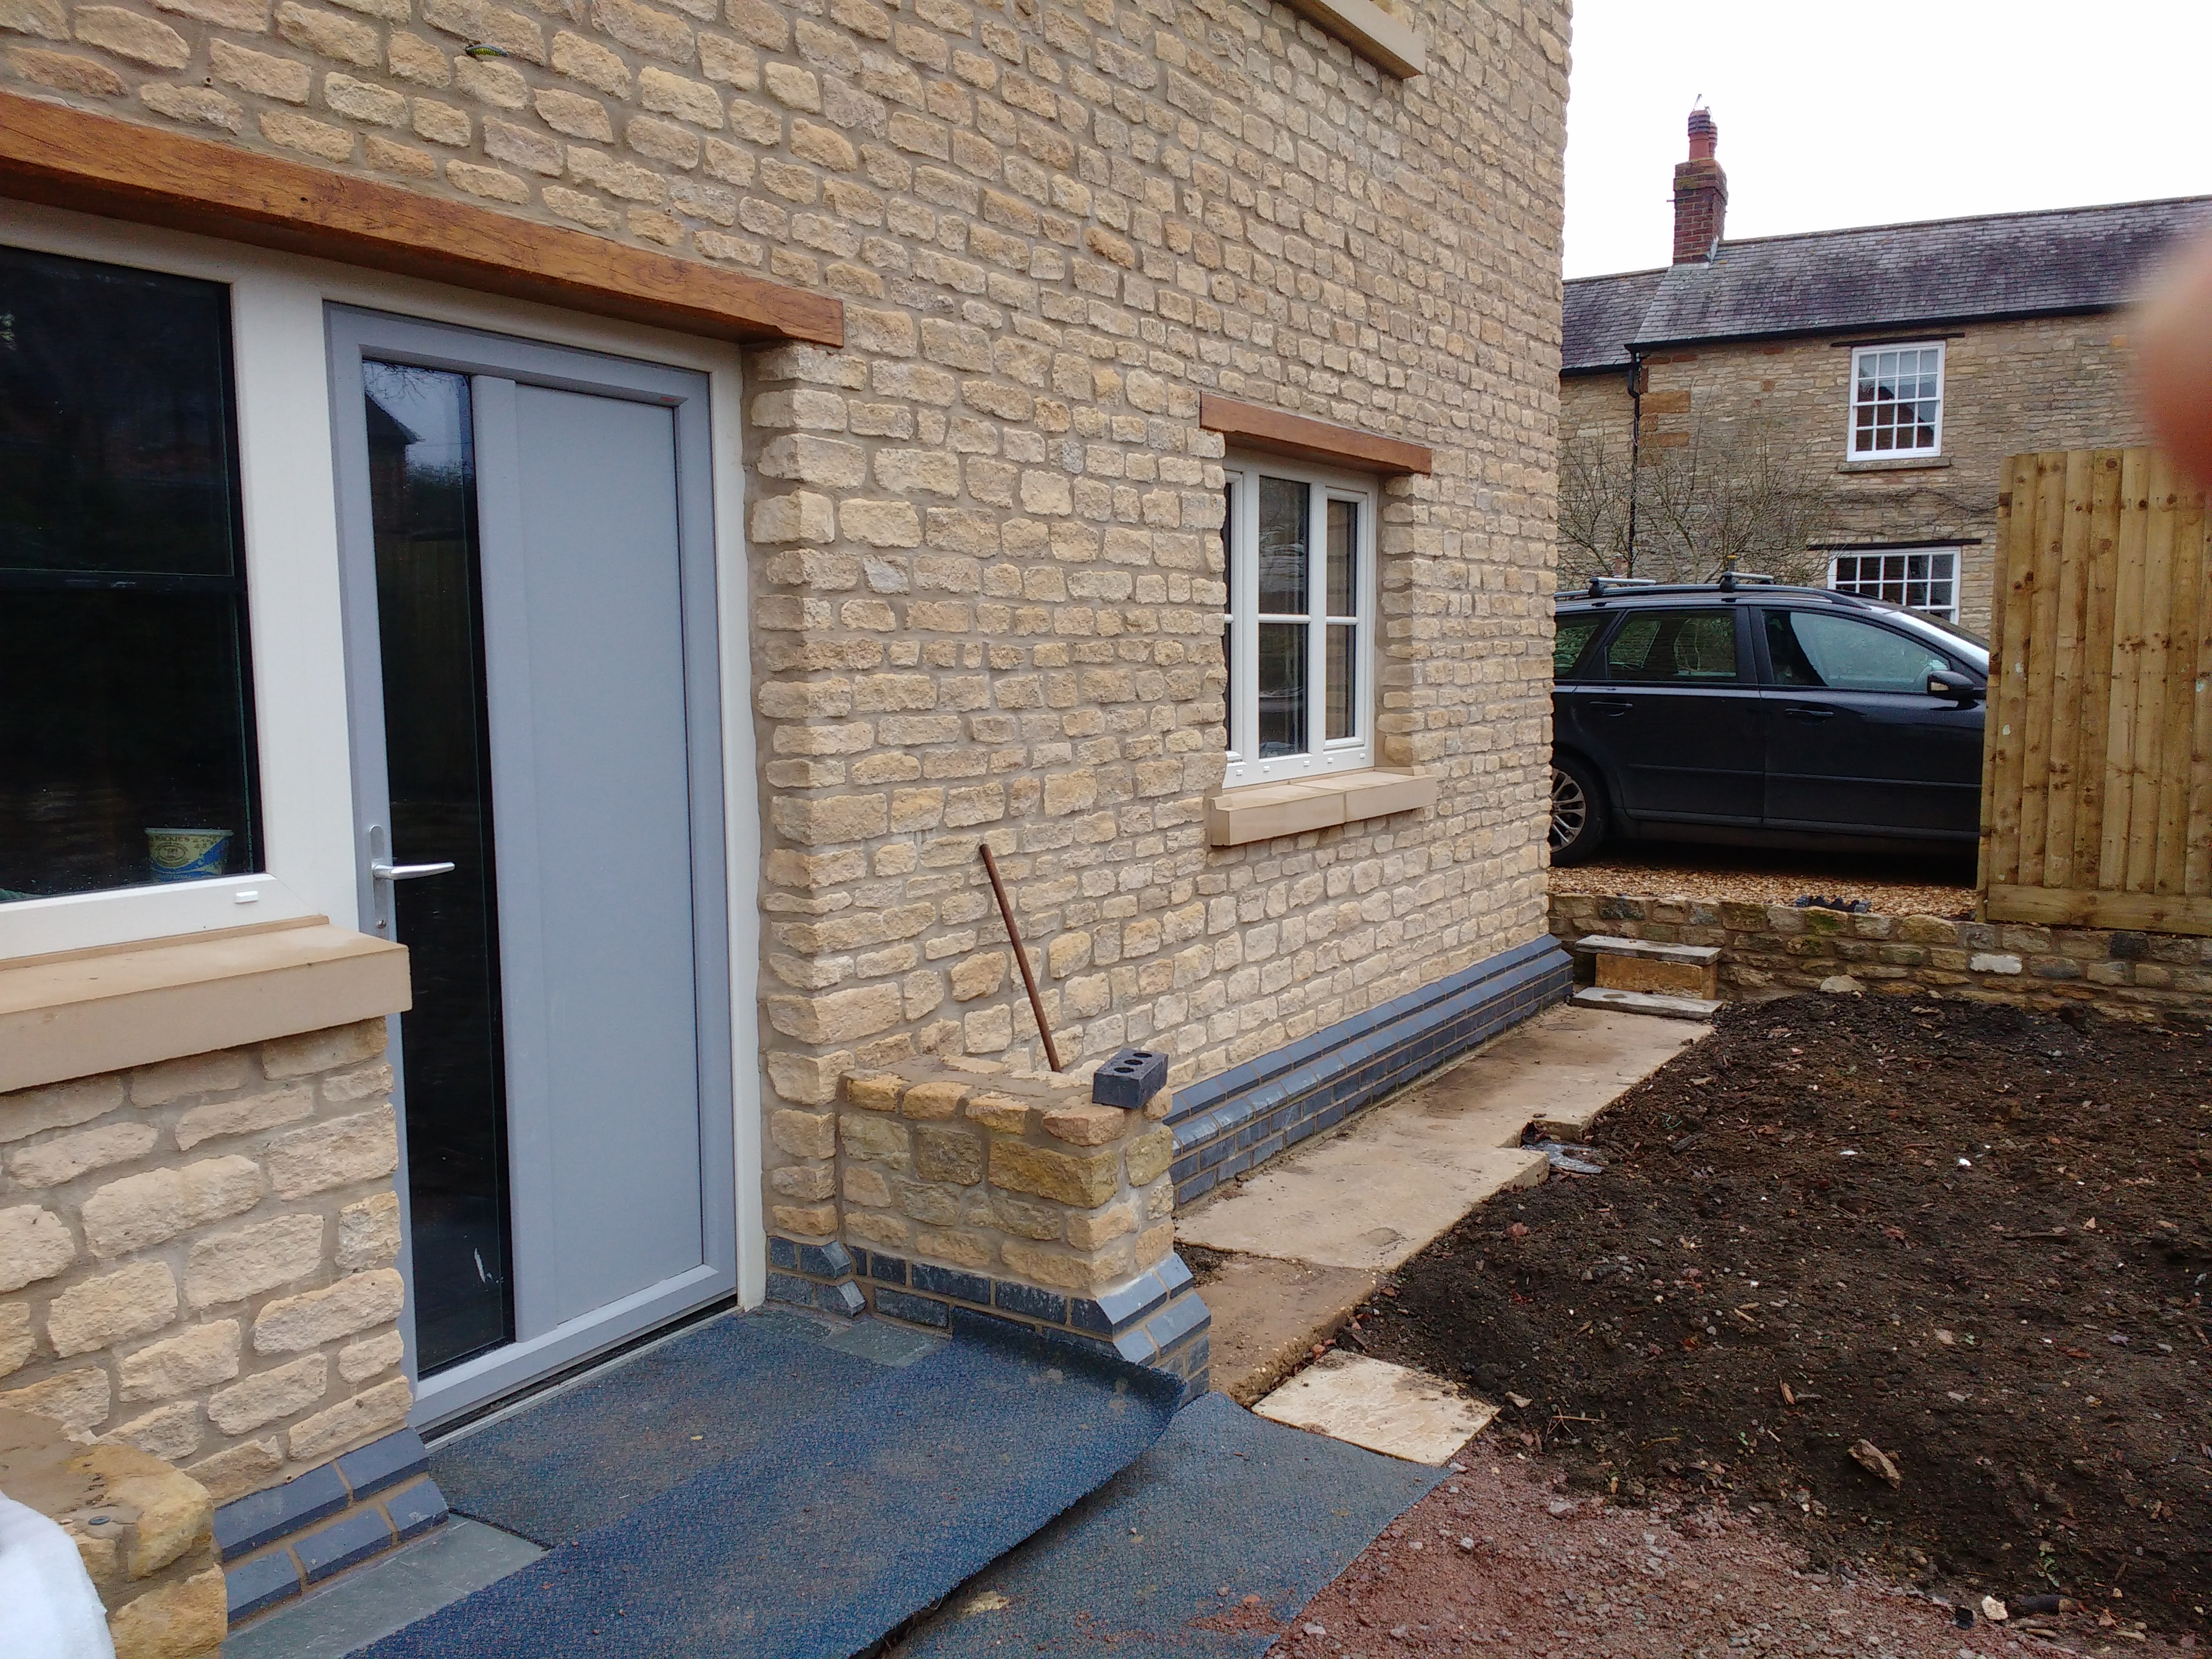
and some photos of the wall in construction showing the set forward windows and the finished effect (less the porch that still has to go in.).


HouseWnDtreatment.thumb.jpg.335fbab0b834dde238004ab2a9b077b7.jpgHouseWnDfinished.thumb.jpg.bb44b897c108a9be067b8ef49a7834cb.jpg


and an internal shot of the kitchen window detail showing the angled reveals:

58932864d66ee_Windowrevealdetail.thumb.jpg.b1fa81a14bb22277886f393937817980.jpg


  • Like 2

12 Comments


Recommended Comments

17 hours ago, ProDave said:

That is a really nice looking blend of high tech house with traditional exterior.


Both we and the planners wanted this.  A contemporary or even an estate-style brick skinned house wouldn't have fitted within the street-scene, and we decided that if we were going to have a traditional look then we wanted to do it well.  This wasn't just for our future benefit, we want to sell the farmhouse quickly and for a good price, it looks directly onto the gable of the new house so we wanted it have very consistent styling.  For example we went out of our way to keep the old plum tree in the first photo alive and well as this sits smack in the middle of the gable and softens its visual impact.


But once you step across the threshold the house is totally modern inside. 


The one slight discord is the front door, but we were stuck with for reasons that I've discussed in earlier posts.

Link to comment

Hi Terry, great write up.

I was interested in your decision to sit the window on a timber carrier. When I've fitted windows in the past I've always just added the internal chill to the internal leaf. The result is perfectly acceptable. Was the decision linked to the fact that the Internorn window opens inwards so more clearance is needed? 

Link to comment

Third question: Was the use of fire break socks to provide some fire protection (I'm not understanding the need for it as the frame is more exposed to fire than just the gap fill you created) or was it simply that they were a cost effective and convenient way of providing gap insulation? 

Link to comment

It's a building regs requirement here (don't know about the rest of the UK) that you provide a fire atop around doors and windows, AND at ground floor / first floor joist level in the cavity of a masonry clad timber frame house.
 

Link to comment
On 02/02/2017 at 07:49, Barney12 said:

Hi Terry, great write up.

I was interested in your decision to sit the window on a timber carrier. When I've fitted windows in the past I've always just added the internal chill to the internal leaf. The result is perfectly acceptable. Was the decision linked to the fact that the Internorn window opens inwards so more clearance is needed? 


If you read other posts on fitting internal cills then you will see why.  The height of the KF200 base profile is 78mm IIRC.  If you sit them directly on the MBC window opening, then you just don't have enough room to fit an internal cill.  Remember also that the inner surfaces of the window openings are lined with air tightness membrane which you can't compromise.  So I glued and screwed 20mm deep battens (3 or 4 depending on the window width) running front-to-back on each window base).  I made cut the inner cills to fit each window out of water-resistant MDF (I got all of the cills out of 2 × 2400×1200×25 sheets.  Fitting the cills was trivial: a bead of CT1 along each batten and along the edge of the cill facing the window and place in position.  Leave the cills 6 hrs for the CT1 to cure; then fill the under-void with gun foam and cut flush to the service cavity framing line. So no screws or fixings breaking the surface of the cills.


The risk here is that the plasters puncture the air tightness by random fixing screws.  So we similarly battened out the reveals but with 10mm battens glued and screwed them down. The rule for the plasterers when fixing any plasterboard was: you can screw through any wooden battens or use sticky foam, but no screws through the bare membrane.


I've updated the photo of the internal window detail.  Click on it and expand to see the finish of the reveals and cills.


On 02/02/2017 at 07:52, Barney12 said:

Second question: Do you have a sectional drawing of your "tongue" design for doors? 


I did have somewhere, but not to hand.  In essence, the tongue bridges the outer EPS300 rim under the door opening and extends out 45mm in front of the line of the EPS.  I made up some 45 × 50 L-shaped trays which we fixed to the outer side of the EPS at the door openings and dropped some extra rebar into these.  They were filled with concrete as part of the pour.  See my last post, Coping with a Thermal Flaw in the Design, for pictures of the profile of the wall base.  We used the same FoamGlass blocks in front of the tongue to provide the thermal break.  Yes, there is a tiny thermal path catty-corner, but nowhere near enough to have condensation problems.

Link to comment
3 hours ago, ProDave said:

It's a building regs requirement here (don't know about the rest of the UK) that you provide a fire atop around doors and windows, AND at ground floor / first floor joist level in the cavity of a masonry clad timber frame house.


Yes, this is a mandatory requirement in Scottish regulations, but optional (and extremely rarely done) in the UK.  I did have a long discussion with my builder about the pros and cons of doing this, and his point was that doing this would act as a trap to catch any snots from the upper stonework and therefore breach the cavity and require another DPC at 1st floor level.  On reflection I agreed and we decided not to have a horizontal fire brake at first floor joist level.  It wasn't an issue for our building inspector.


2 hours ago, dogman said:

Am i right in thinking this could be a timber batten rather than a purpose made fire stop?


I think that a timber batten could meet the English / Welsh BReg requirements. @ProDave can comment of the Scottish ones.   But MBC used the 50×50 mineral wool in-bag for their fire breaks, so we just bought another couple of bags of this.  It was just ever so convenient because you can hammer-staple it into position. And in fact we had to remove it and move it out about 20mm to give the stonemason room to put his wall ties in down the side of each window frame.  Note that we've almost gone overboard tying the outer kin to the wooden frame. we have the special-to-purpose frame-to-stone ties at 400mm centres horizontally and 450mm vertically.  

Link to comment

Hey @TerryE, stumbled across your build via search, looks like you managed to strike a great balance between thermal efficiency and traditional aesthetics. 


Do you have any sketch or photos to explain how you handled the external door thresholds?

Link to comment

@embra, sorry for the delayed response.  If you look at the top pic, you can see how we handled the door thresholds.  We cut a 50 mm slot at the top of the EPC insulation / formwork and then added an extender to the planned depth of the span.  The guys added rebar in this and tied it to the ring-beam rebar so that the slab pour also flowed into these cut-outs, leaving a cast 50mm deep reinforced "ledge" to carry the door.  Well, "carry" is really the wrong word as the Internorm frames were also supported on the sides and top in the same way as the windows, so the door base carries minimal load.  


You will also see that these door cills were also slated externally to finish off; under the slate, we had a 50mm upright EPC at the edge of the cill to act as a thermal break between the warm slab and the external skin.  OK, there is a small thermal path between the cill and the slate, but even in the depths of winter we don't notice any significant temperature drop inside the doors.  I did do a spot-thermostat survey the winter after we moved in, and the floor immediately by the doors got down to around 15°C -- enough to notice on bare feet, but well above any condensation threshold.

Edited by TerryE
Link to comment

Create an account or sign in to comment

You need to be a member in order to leave a comment

Create an account

Sign up for a new account in our community. It's easy!

Register a new account

Sign in

Already have an account? Sign in here.

Sign In Now
×
×
  • Create New...