-
Posts
77 -
Joined
-
Last visited
Omi's Achievements

Member (3/5)
10
Reputation
-

Connecting heat enable to Mitsubishi Ecodan
Omi replied to Scotland's topic in Air Source Heat Pumps (ASHP)
Just adding to this as I've had the exact same question (UH8 + ecodan FTC6) and managed to figure out the answer. My installer had left the ASHP configured with SW 2-1 set to ON but nothing connected to IN1 (TBI.1 7-8) with the plan being that I'd connect the demand from the UH8 once I had all of that wired up. Obviously, the heating worked just fine even without a thermostat being connected to IN1 so I wondered why anything would change once the UH8 demand was actually connected up to the FTC6 IN1. A closer look at the FTC6 manual provides the answer. Without any external thermostat input, the system operates according to "Option C": In my case, the remote controller was set to "Auto Adaptation" mode where it uses the thermistor built into the remote contoller itself to provide the "thermostat" function for the FTC - ignoring anything connected to IN1. To actually make use of the demand signal from the UH8, the controller mode must be set to either "Flow temp." or "Compensation Curve" according to the manual (Option D): In my case, I've opted to go for the "compensation curve" option and can see the ASHP turning ON/OFF in accordance with the demand signal from the UH8. I think it's essential that the operating mode of the FTC remote controller is changed from "auto adaptation" as soon as the UH8 and actuators are installed since I can envision a scenario where the ASHP eats up energy without actually providing any heating. This might happen if the remote controller is set to a higher temperature than the stats? The stats will shut off the UFH circuits once they reach target temperature but the remote controller (in auto adaptation mode) will keep running the ASHP trying to reach the higher temperature set in the remote controller. But of course this will never be achieved since the stats have already shut off the circuits .... NOTE: The FTC6 manual states that the ON/OFF cycle time of the thermostat must be 10 minutes or more to prevent damage to the compressor; however, by default the neoStat v2/Polypipe UFHSMARTW "delay start" function is set to 0 minutes (immediate). To remove any possibility of short cycling, I've increased this to 12 minute on my stats. -

Moving from self-build insurance to standard house insurance
Omi replied to jamieled's topic in Self Build Insurance
For what it's worth, we've managed to get regular home insurance from Nationwide. They weren't bothered about the completion certificate, so long as the build was safe and habitable. We've also got it in writing just to be sure! -

Dealing with hold down straps fixed to studs
Omi replied to Omi's topic in General Construction Issues
Thanks for the ideas everyone. Maybe I'm not understanding this correctly - why do I need a short PB screw? I can see how horizontal battens would help generally but what to do for the window reveals? Normally a batten would go right where the strap is such that the PB for the reveal can be screwed into that from the side? Maybe I just need to put a batten down each side of the strap, then shave 3 mm from another before putting it over the strap and screwing it into the sister batten from the side? -
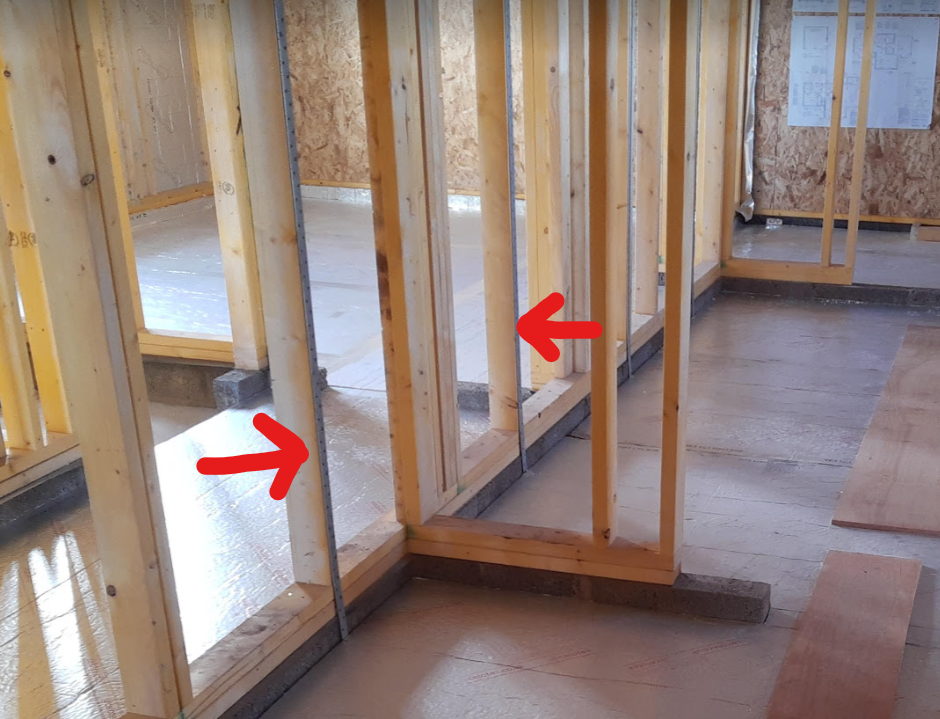
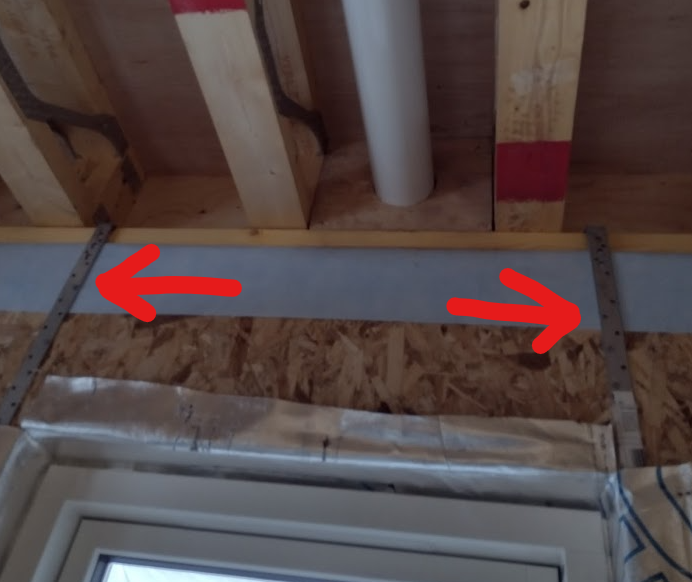
We have several straps fitted to the studs in our timber frame build: The straps are about 3 mm thick and do not cover the full height if the stud. Obviously, service battens and plasterboard won't sit flush if fixed directly over the strap - if it is even possible to do so as the screws would somehow have to find their way into the stud through the straps. What's the best way to solve this problem?
-
Good to know, many thanks!
-
@joe90 the 15mm end seems to be for copper? Can it also be used with PEX/PB? Apologies if it's a silly question - I'm still new to plumbing.
-
Hello, How would I go about connecting a 32 mm mdpe main to the 10 mm pipework on a caravan? I can see reducers to go from 32 mm to 25 mm mdpe and pipe fittings for 15 mm to 10 mm but can't figure out how to go from 25 mm to 15 mm?
-
I've run it past our SE and the designer and the recommendation is indeed 3 layers of 45x45 battens: Vertical battens fitted to timberframe studs (or 600 centers) Intermediate counter-battens fitted horizontally at 600 centers Outermost battens fitted vertically again at 600 centers Render manufacturer's guideline states that the render should not be continuous across differing background materials so I think we'll leave a gap between the blocks/renderboard and treat it the same way as an expansion joint.
-
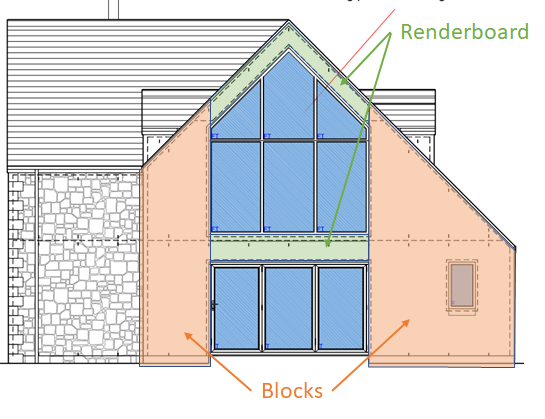
How do you mix blocks and renderboard on a single wall for a seamless rendered finish? We have the following situation in our build where the big picture window/bifold will have renderboard cladding (green) while it'll be blocks (orange) to either side: The external face of blockwork is 150 mm (50 mm cavity) from the timberframe so that would mean 137.5 mm of battens if we want the 12.5 mm renderboard to sit flush with the surrounding blocks? 137.5 mm could be formed using a triple layer of 45 x 45 battens but that doesn't sound right structurally? Is there another way to do this?
-
Yes - the build is still quite some way from getting completed and we're looking to have the pipes installed and screeded before winter.
-
The UFH will be filled and screeded before winter. The build is still in the early stages and won't be occupied for a while yet so freezing over winter is certainly a possibility. A burst water pipe is probably a lot easier to fix than a busted up floor due to frozen UFH! We also don't have the water connected just yet so that's not a risk anyway. Clever - but doesn't that risk getting air bubbles trapped in the system? Nothing - we still need to lay down the system. Just trying to plan ahead. Thanks.
-
Filling with water seems simple enough (just connect to a tap) but how does one go about filling the UFH pipes with antifreeze instead? Would a simple 12V transfer pump do the job?
-
Thanks, that's really helpful.
-
Hello, Scottish Power have asked for: "Please provide and attach a suitable sized backboard (single phase 500mm x 700mm x 12mm) made of fireproof material (compressed wood not MDF) to the wall at the proposed meter location for the termination of our equipment." But I cannot seem to find a backboard meeting those size requirements at any of the usual builder's merchants? Perhaps I'm not looking for the right thing. What do people normally use for a meter backboard?
-
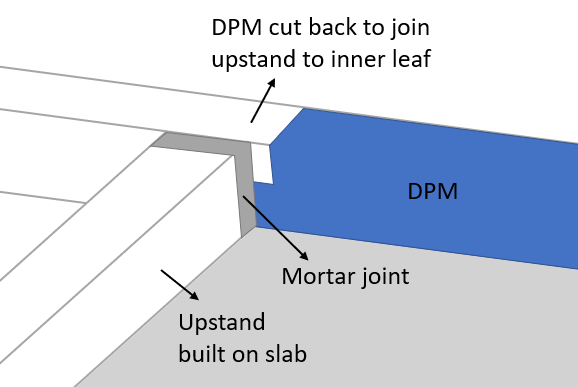
I've also got some Black Jack D.P.M. that I intend to use to seal the inside and outside edges of the repair. Hopefully that'll be enough. Now the next challenge - I noticed that the builders have cut away the DPM from a few sections where the wall upstands join the perimeter (inner leaf) wall. In these sections, the DPM extends about half way up the joint and the remaining bit is mortar: What's the best way to address this? I'm worried about lateral damp transfer through the joint but not sure much can be done about that at this stage aside from just adding the DPC as normal? Thanks!

