MortarThePoint
-
Posts
2198 -
Joined
-
Last visited
Everything posted by MortarThePoint
-
Tolerances to expect
MortarThePoint replied to MortarThePoint's topic in General Construction Issues
I'd prefer to readjust. It's always been a pet peeve of mine when people have not thought about tolerances and default set very tight. I saved a previous company I worked for >£30k on a 10,000 fps high speed video camera that was proposed to confirm that an event happened within less than 100ms. I was able to show it using my phone at 120fps and we went with a rig using a 1200 fps point and shoot camera with an LED attached to a calibrated signal generator setting a reference timing. The event was always faster than 50ms. Would have been cool to play with the 10,000 fps camera though. -
Tolerances to expect
MortarThePoint replied to MortarThePoint's topic in General Construction Issues
The groundworks crew used something like that to spray out the foundations. I measured it with a tape measure over the following weekend and was really impressed. It was about +/- 30mm typically and I was using a tape measure over rough ground so some of that will be on my measurement. The sprayed line has a width anyway. I did notice that they had misread a dimension though and lined up two walls that weren't supposed to be. -
Tolerances to expect
MortarThePoint replied to MortarThePoint's topic in General Construction Issues
I've found some NHBC guidance for some of these: http://www.nhbc.co.uk/NHBCpublications/LiteratureLibrary/Technical/filedownload,15912,en.pdf but it's to do with finishes really. Brick or block level: +/-8mm over 5m, +/-12mm over further Brick or block plumbness: 8mm over 5m, 12m for higher but 8mm per storey -
Tolerances to expect
MortarThePoint replied to MortarThePoint's topic in General Construction Issues
I want to be sure I have realistic expectations as it saves grief and means that I can tweak to accommodate the appropriate tolerance in advance. -
Tolerances to expect
MortarThePoint replied to MortarThePoint's topic in General Construction Issues
That's some serious bedtime reading! -
Hard work in a different way, but what about using a Tamper:

-
I've worked in the world of precision engineering for many years and as a self builder know that I need to adjust my expectations from dealing in fractions of a mm when it comes to tolerances. I'd be interested in people's views as to tolerances on the following (my current naive expectation in brackets): Foundation lateral placement (ignoring due to local side collapse) (+/-50mm over 5m) Foundation level (+/-5mm over 10m) Brick or block lateral placement (+/-10mm over 5m) Brick or block level (+/-5mm over 10m) Brick or block plumbness (+/-5mm over a floor) Lateral pipe of socket placement (+/-25mm) Window of door opening dimensions (+/-5mm for normal sizes) Feel free to add to the list as there are doubtless many areas I haven't thought about. My expectations have come from what I feel is practical, but I can't defend them much beyond that.
-
Cover over foul water pipes
MortarThePoint replied to MortarThePoint's topic in General Construction Issues
Well I didn't expect so much ramp discussion although it is interesting. Sounds like there isn't any minimum cover required by building regs. I have a run that needs to go a total of about 35m so it may start pretty shallow and end 2 or 3 feet down. A gradient of 1 in 80 is OK for a family of four sharing a house isn't it? That would be a drop of about 450mm. -
Sorry if the question has been asked before (I did do a quick search) but I'm really tired after a couple of hard days and Part H is confusing me. Can someone be kind enough to advise me as to what the minimum depth is for foul water pipes running along side the house and then across the garden to a sewage treatment plant is. I see information for fields and roads but not garden etc... I guess it may be different near the house from in open garden. If the regs don't set a minimum depth, then experience appreciated. There are some things you don't want to step in when walking in the garden and, without a dog, this could be the greatest risk.
-
Tuning cavity width for Flemish Bond
MortarThePoint replied to MortarThePoint's topic in Brick & Block
Interesting thought. I just took a look here and the lambda value looks the same as the more performant mineral wools like Dritherm Ultimate at 0.032. I guess it could be an option if supply is a major issue as can be put in after wall construction. A nice thing about these Knauf insulations is that it uses ECOSE which doesn't use a Formaldehyde binder agent in manufacture. -
Tuning cavity width for Flemish Bond
MortarThePoint replied to MortarThePoint's topic in Brick & Block
I follow you, like this: With Flemish you put a stretcher next to the queen closer. Face 1 Corner Face 2 [Stretcher-][Head][Stretcher-][Q][Head] | [Stretcher-][Head][Stretcher-][Head] [Head][Stretcher-][Head][Stretcher-] | [Head][Q][Stretcher-][Head][Stretcher-] [Stretcher-][Head][Stretcher-][Q][Head] | [Stretcher-][Head][Stretcher-][Head] Where's my daughter's Lego when I need it?
-
Tuning cavity width for Flemish Bond
MortarThePoint replied to MortarThePoint's topic in Brick & Block
Using Knauf Dritherm Ultimate 32 Slab insulation and considered various cavity widths: 100mm : U-value 0.27, DER 9.80 kg/m2 125mm : U-value 0.22, DER 9.76 kg/m2 150mm : U-value 0.19, DER 9.41 kg/m2 Overall the benefits of going thicker did not stack up for us, but it's a personal thing really as everyone has their own set of priorities on a build. We live at about 17-18 C during the winter and there are two stoves in the house that we can use. If it was to be oil heated, I'd fit a larger tank given prices, but it's going to be ASHP. -
Tuning cavity width for Flemish Bond
MortarThePoint replied to MortarThePoint's topic in Brick & Block
I don't understand this, are you able to share a picture? -
Tuning cavity width for Flemish Bond
MortarThePoint replied to MortarThePoint's topic in Brick & Block
Is that a typo (weeps or perps) as I'm not familiar with peeps? Completely agree! Not something to be rushed as it is a demanding bond, important not to undermine the visual appeal by not making good layout choices. -
Tuning cavity width for Flemish Bond
MortarThePoint replied to MortarThePoint's topic in Brick & Block
I'll be fine with the rough internal look of the outer leaf, it's not the finished face and I can't imagine it any other way. This straw pole seems to support opening the cavity slightly, I'm not keen to go as far as 125mm, but adding a few mm does feel sensible. Once I started noticing brick bonds I started really appreciating them. I wondered about Monk bond (stretcher-stretcher-header). It's going to be Flemish all round as it is in keeping with the broader style of the house. -
Tuning cavity width for Flemish Bond
MortarThePoint replied to MortarThePoint's topic in Brick & Block
My day job is as an engineer and I'm used to dealing in um so it's sometimes hard to adjust to the tolerances. I was hoping to do lots of the brick laying myself, but Covid-19 may make that non-viable unfortunately. -
The outer leaf for most of the house's cavity walls are going to be flemish bond. We'll cut bricks in half to make 'header' part of the bond as you'd expect. What I was wondering is whether we should widen the cavity slightly to make the laying easier. Half a standard brick is 215 / 2 = 107.5mm whereas the standard brick width is 102.5mm. The blade of the grinder will take a bit off, but it's enough work to cut bricks in half let alone cut a slither off. The cavity is to be 100mm mineral wall. Should we tweak the cavity width to say 105mm to make life easier or could that create it's own issues? I discussed it with a pair of brickies, one said no as he likes a 'tight cavity' whereas the other said yes and the compromise was to go with 102.5mm, but I wanted to see what others thought.
-
Can't build house so making shepherd's hut / site hut
MortarThePoint replied to MortarThePoint's topic in Garages & Workshops
I've realised the figures for the deflection were wrong as I should have used: d_max = W*L^3 / 3*Y*I []NB: I used Y for Young's modulus but table uses E] as set out on the second line of the BEAM BENDING table. I didn't read the table properly as I assumed M=W*L applied to the deflection as well, but it doesn't ( M = W*(L - x) ). That changes the deflections figures to: 4x2 : d_max = W*L^3 / 3*Y*I = (150*9.81) * 600^3 / (3 * 7200 * 4E+6) = 3.7mm 5x2 : d_max = W*L^3 / 3*Y*I = (150*9.81) * 600^3 / (3 * 7200 * 7.6E+6) = 2.0mm -
Can't build house so making shepherd's hut / site hut
MortarThePoint replied to MortarThePoint's topic in Garages & Workshops
I think I understand what you are suggesting, effectively making a timber I-beam. From the calculations I am content that it will be stiff enough without that. There will be a fair amount of cold bridging, but the plan is to fill the gaps between the 4x2 noggins with 100mm Celotex then with 18mm CDX ply on top and 9mm CDX ply beneath. If I make it too warm then a log burner would turn it in to an oven. Probably already the case actually as not many shepherd huts will have a 100mm PIR insulated envelope. That's better insulated than we are planning for the house. -
Can't build house so making shepherd's hut / site hut
MortarThePoint replied to MortarThePoint's topic in Garages & Workshops
ProDave, you're right I'm sure it would make a big difference and lower the maximum stress considerably. I did mention "their weight wouldn't be carried solely by one beam", but that perhaps understates it. I'm happy that C24 4x2 would be sufficiently strong, but wanted to crunch some worst case numbers to get some confidence. I may double up a couple of the beams at the doorway though. -
Can't build house so making shepherd's hut / site hut
MortarThePoint replied to MortarThePoint's topic in Garages & Workshops
HEALTH WARNING: AMATEUR AT WORK!! Right so I am going to have a go at playing Structural Engineer. I've found a copy of BS5268 - Structural use of timber. Table 8 of this has "Grade stresses and moduli of elasticity for various strength classes" and lists: C16 - bending parallel to grain 5.3N/mm2 and minimum Y=5800 N/mm2 C24 - bending parallel to grain 7.5N/mm2 and minimum Y=7200 N/mm2 My cantilever length is L ~ 600mm My maximum moment with 150kg at ~600mm is M = 150kg*9.81N/kg*600mm = 9E+5 Nmm A beam's second moment of inertia is I = b*h^3 / 12 (where b with its cross section width and h its cross section height) The resulting maximum deflection is d_max = M*L^2 / 2*Y*I The bending stress is sigma = M*y / I where y is the distance to the neutral axis so h/2, so sigma = M*h / 2*I For C24, Y = 7200 N/mm2 4x2 h = 100mm, b = 47mm Second moment of inertia: I = b*h^3 / 12 = 47*100^3 / 12 = 4E+6 mm4 The maximum deflection: d_max = M*L^2 / 2*Y*I = 9E+5 * 600^2 / (2 * 7200 * 4E+6) = 5.6mm. Bending stress: sigma= 9E+5 * 100 / 2 * 4E+6 = 11.25N/mm2 > 7.5N/mm2 SNAP! 5x2 h = 125mm, b = 47mm Second moment of inertia: I = 7.6E+6 mm4 The maximum deflection: d_max = 3.0mm Bending stress: sigma = 7.4N/mm2 < 7.5N/mm2 OK However, that is based on permanent loading, for short term loading you can multiply the permissible stress by a loading duration factor, K_3 = 1.5 (from Table 17 of BS5268). That raises the limit to 7.5 * 1.5 = 11.25 N/mm2 which makes the 4x2 OK (just). There are other factors (like the depth factor) which I could make fractionally greater than 1. My scenario is very pessimistic and in reality the 100kg person wouldn't be out at 600mm and their weight wouldn't be carried solely by one beam. I need to think carefully about how I secure the beams to the chassis so as not to weaken them. I'm thinking like this, but possibly only 2 screws holding the blocks on so that the screws are closer to the neutral axis. Do these calculations look correct? HEALTH WARNING: AMATEUR AT WORK!! http://www.learneasy.info/MDME/MEMmods/MEM09155A-CAE/020-Compare/Compare_to_formulas.html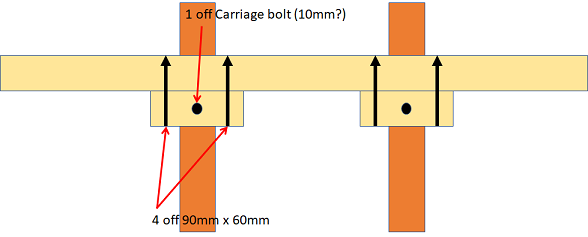
-
Can't build house so making shepherd's hut / site hut
MortarThePoint replied to MortarThePoint's topic in Garages & Workshops
Good thought, it will be pretty top heavy -
Can't build house so making shepherd's hut / site hut
MortarThePoint replied to MortarThePoint's topic in Garages & Workshops
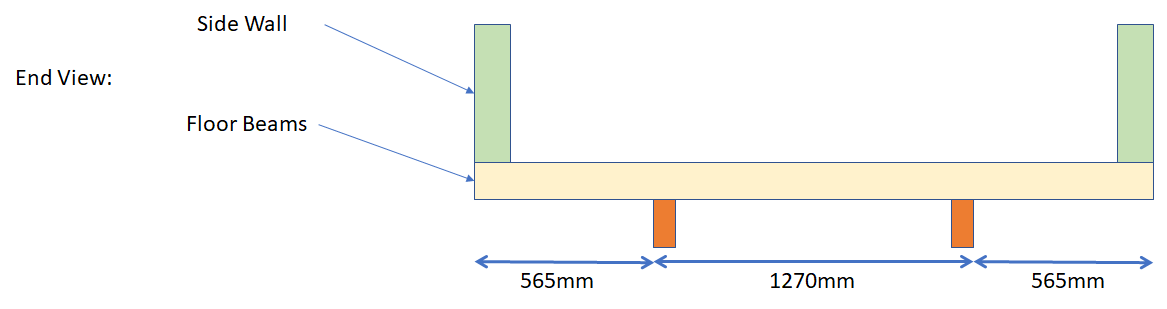
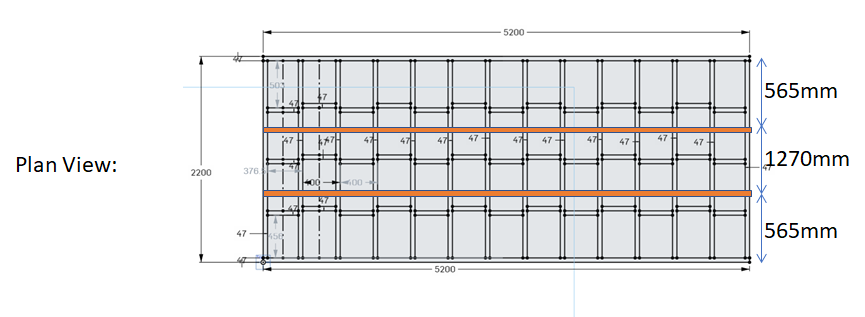
Last chance for me to change my mind on the timbers I'm looking to use for the base. The trailer has two rails that go the full length of the trailer and are 1270mm apart. The width of the hut is 2200mm or 2400mm, not decided yet. If I presume 2400mm, that means the hut overhangs the sides of the rails by 565mm on each side. Do you think 4x2 timber will be strong enough for that cantilever? They are on ~400mm centres and the panels and weight of the hut itself is likely to be equivalent to less than 50kg bearing down on the end of the 4x2. Adding that someone could stand against the wall and that could add as much as another 100kg. Does 150kg on the end of a 4x2 cantilever 600mm long sound OK? There is lots of safety margin in that as the person's weight wouldn't be solely supported by the one beam and the walls etc will be much less than 50kg (the panels way <20kg per 400mm).
-
Can't build house so making shepherd's hut / site hut
MortarThePoint replied to MortarThePoint's topic in Garages & Workshops
It is nice and I wondered about that. Also considering the US style of vertical battens on sheet: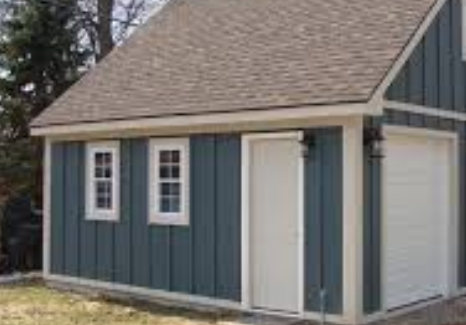
-
Can't build house so making shepherd's hut / site hut
MortarThePoint replied to MortarThePoint's topic in Garages & Workshops
In the short term I'll lave the insulated panels exposed as they have an external skin of painted metal. In the long run I'll probably go with feather edged board.